
About This Guide
Customer support teams spend a significant portion of their time answering the same questions repeatedly while trying to identify urgent issues that require immediate human attention. As your customer base grows, manually triaging every incoming message becomes increasingly time-consuming and difficult to scale.
In this guide, we’ll build an intelligent automation in DigitalBPM that turns a standard Telegram bot into a smart first-line support assistant. Using Anthropic Claude as our reasoning engine and Zoho Sheets as a lightweight knowledge base, this workflow acts as a dynamic triage system.
Instead of basic keyword matching, this workflow:
- Listens to incoming Telegram messages in real-time.
- Automatically distinguishes onboarding commands from support requests
- Retrieves FAQ data from Zoho Sheet to provide the AI with an up-to-date knowledge base.
- Uses Claude to analyze the user’s intent and sentiment, deciding whether the query can be resolved automatically or needs human intervention.
- Generates personalized, context-aware responses based exclusively on the approved FAQ content
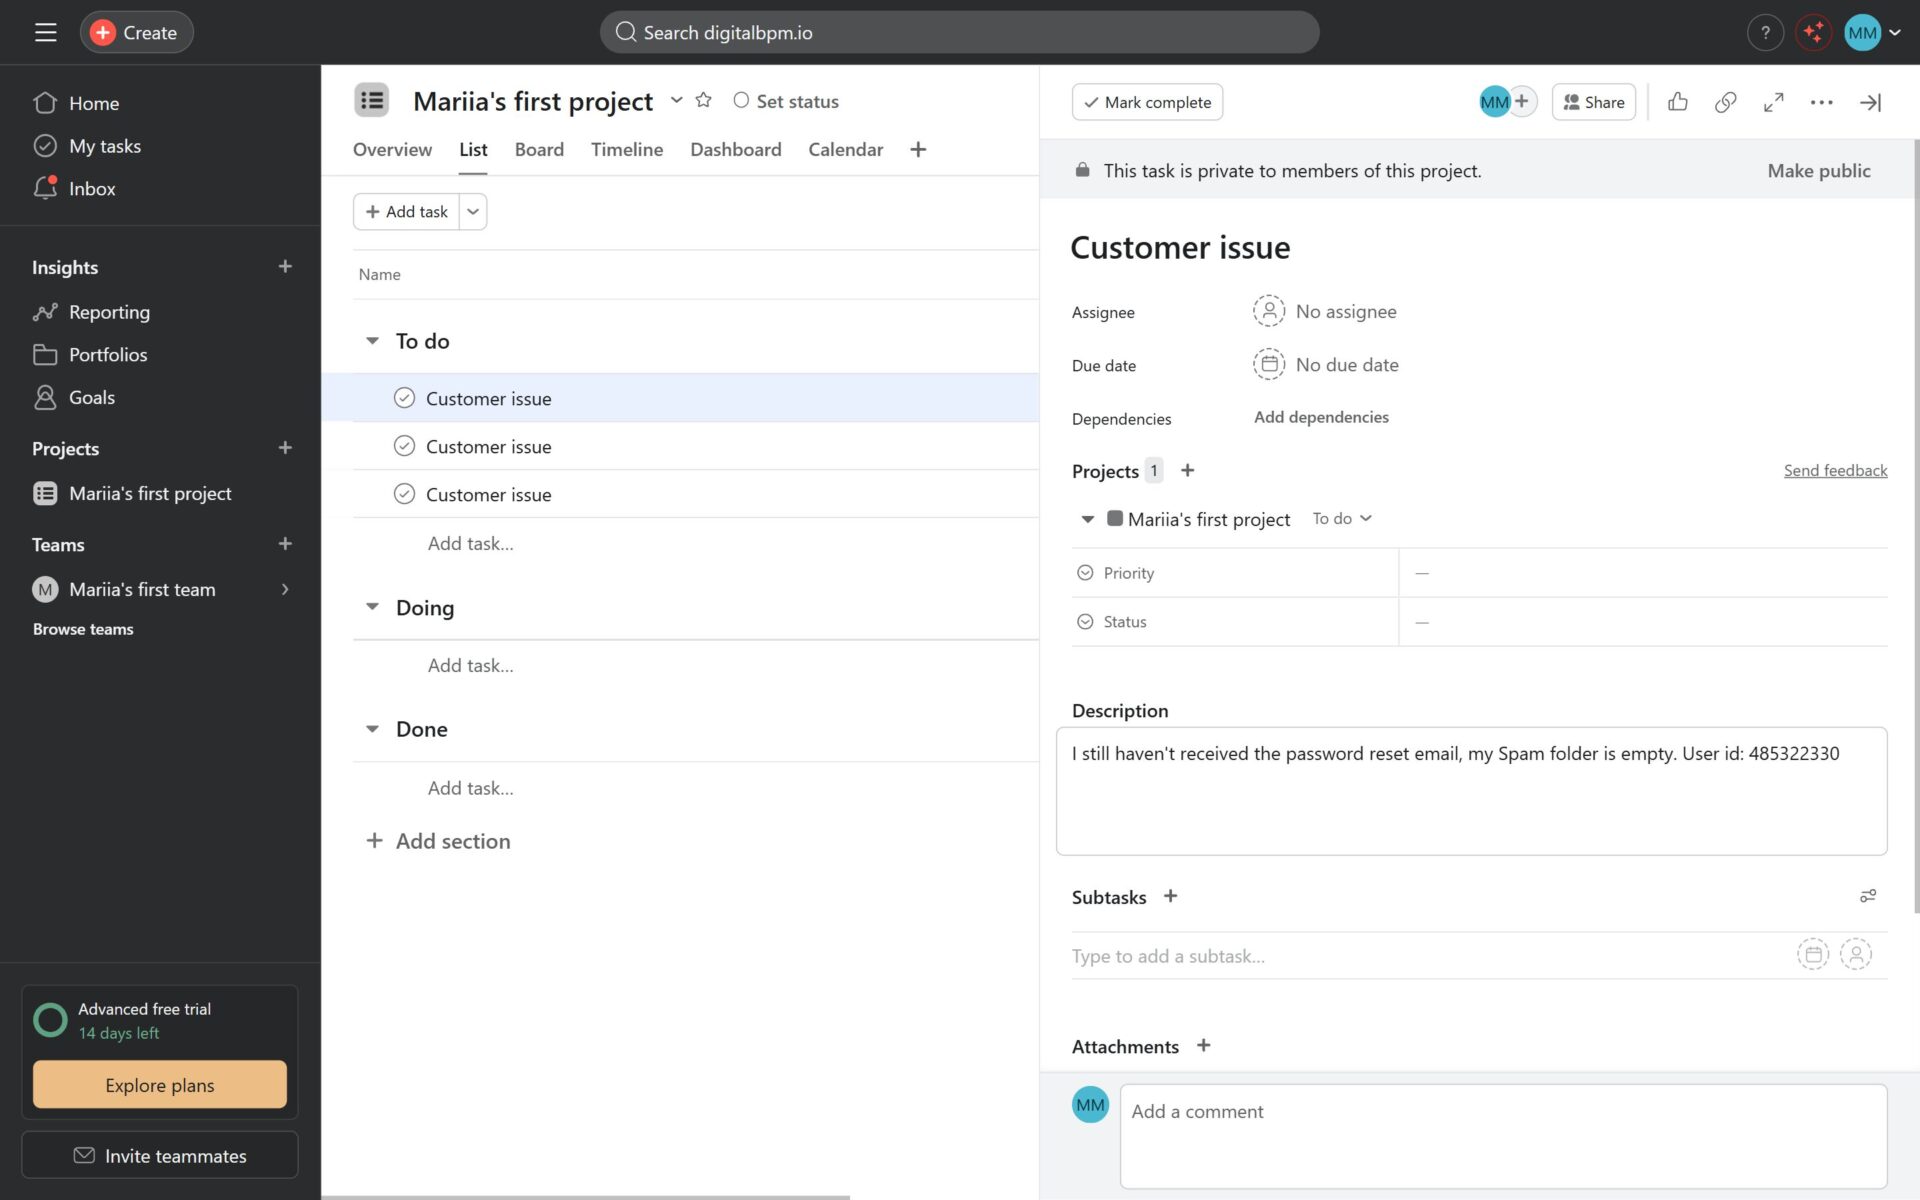
- Automatically creates support tasks in Asana for complex issues, bug reports, or unanswered questions
- Sends either an AI-generated response or an escalation notification directly back to the user in Telegram
By the end of this guide, you will have a fully functional AI-powered customer support assistant capable of answering common questions automatically while routing complex cases to your support team.
Who Is This Guide For?
This guide is designed for customer support teams, operations managers, SaaS companies, startups, and businesses that use Telegram as a customer communication channel.
It is especially useful for organizations looking to automate first-line support without sacrificing service quality. By combining an AI-powered FAQ assistant with automatic ticket creation for complex requests, the workflow helps reduce response times, improve customer experience, and ensure that critical issues are promptly escalated to the support team.
Why Build This Workflow?
Many businesses already use Telegram as a communication channel, but answering customer questions manually doesn’t scale.
This workflow combines workflow automation with AI-assisted decision-making to create a faster and more consistent support experience.
Unlike a traditional chatbot with hardcoded responses, this solution retrieves your latest FAQ content directly from Zoho Sheet before generating a response. This allows non-technical team members to update the knowledge base without modifying the workflow.
When Claude determines that a question cannot be answered using the available FAQ data—or detects a frustrated customer—the request is automatically routed to Asana for human review.
The result is a support workflow that handles routine conversations automatically while ensuring complex issues always reach the right people.
Before building this workflow, ensure you have the following ready:
- A DigitalBPM account.
- A Telegram account and bot. If you haven’t created a bot yet, follow our guide — How to Register a Chatbot in Telegram — a perfect starting point if you’re searching how to make a Telegram bot.
- An Anthropic Claude account with API access.
- An Asana account
- A Zoho Sheets account
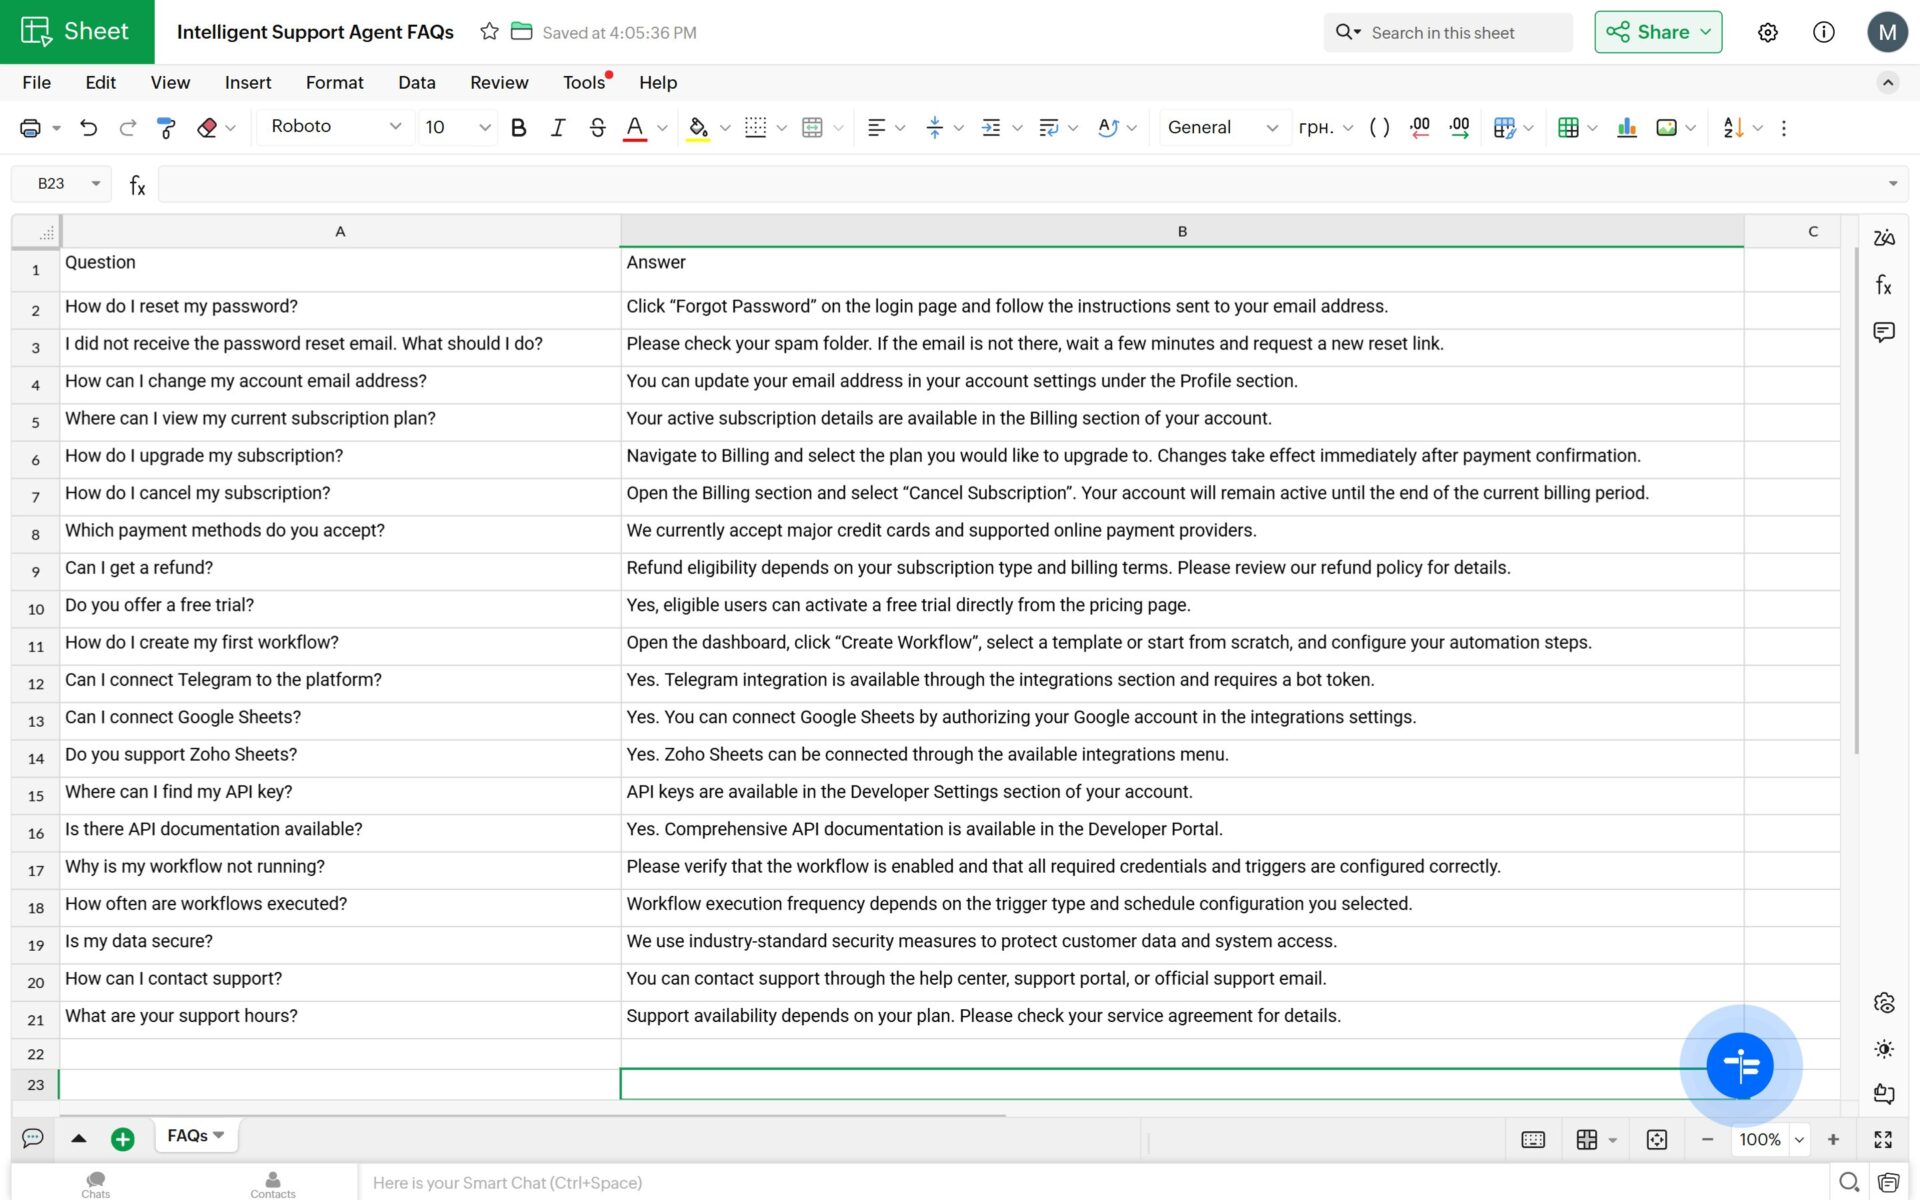
- A Zoho Sheets account with a pre-filled FAQ database. Your sheet should have at least two columns: Question and Answer.
If you’re ready, let’s get started!
Step 1: Set Up the Telegram Webhook Trigger
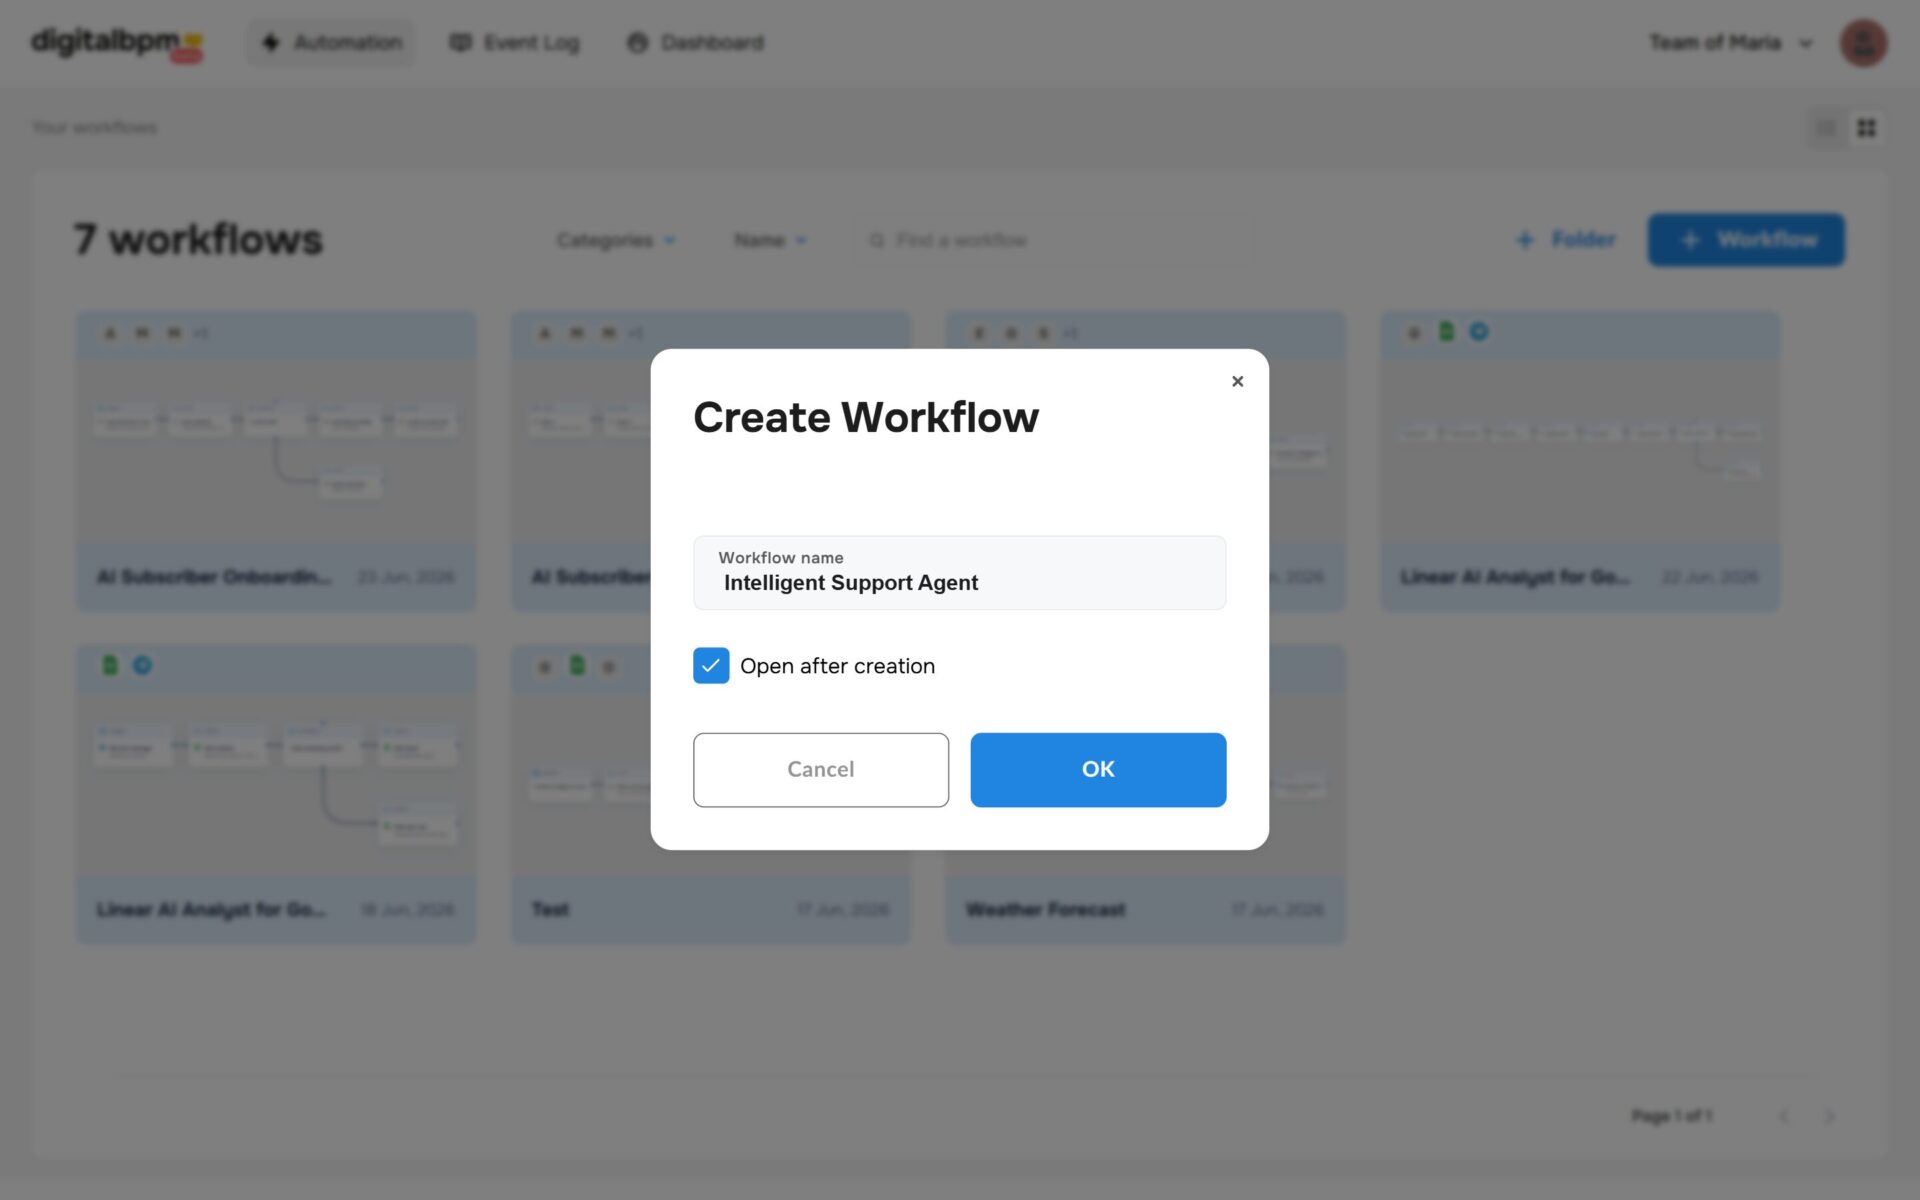
1. The first thing you need to do is to sign in to your DigitalBPM account and click on the “+ Workflow” button on the “Automation” page. Next, you need to enter a name for your workflow, for example, “Intelligent Support Agent” and click “OK“.
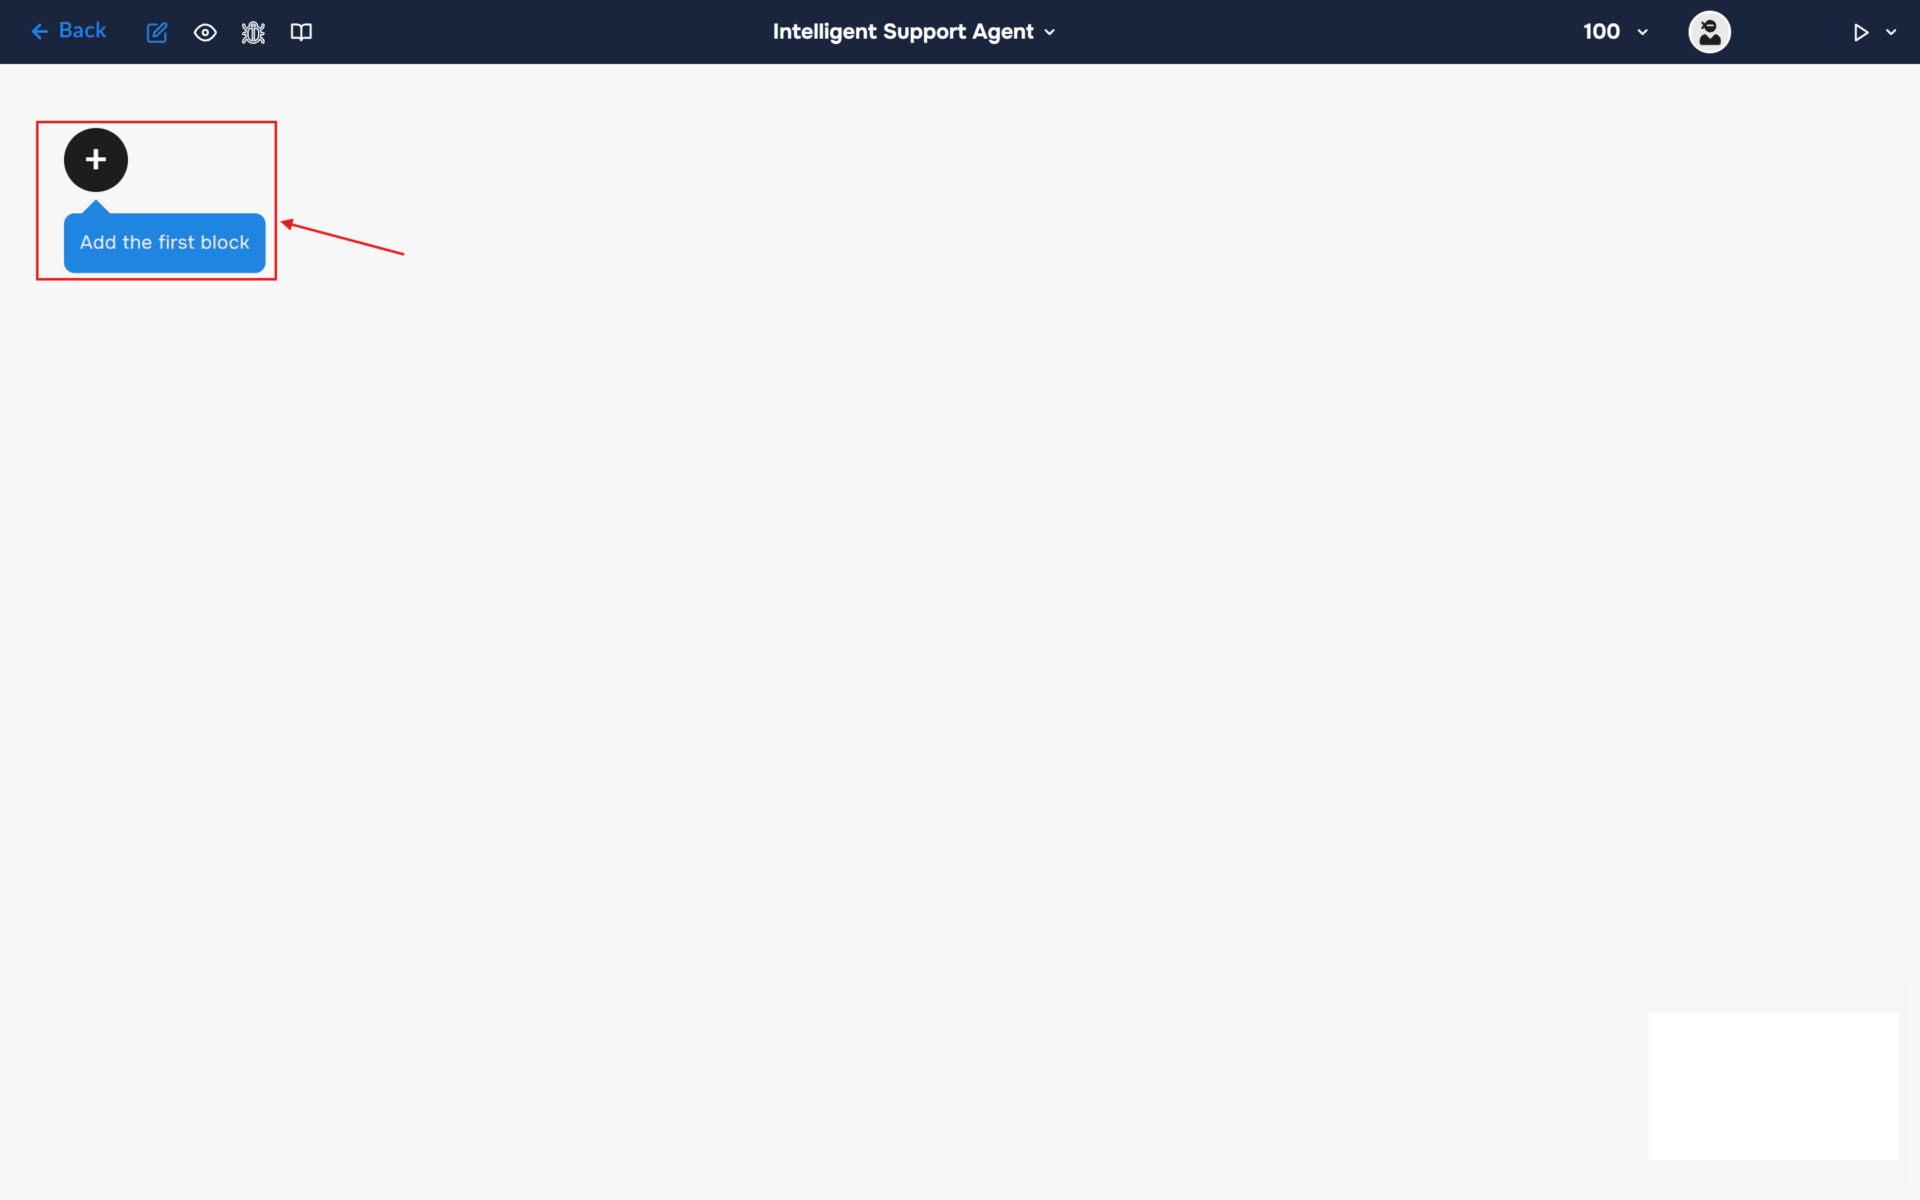
2. After confirming the creation of a workflow, its builder opens. To add the first block, click the “+ Add first block” button.
3. Next, you need to configure the first block. This block is responsible for triggering the workflow on a set trigger.
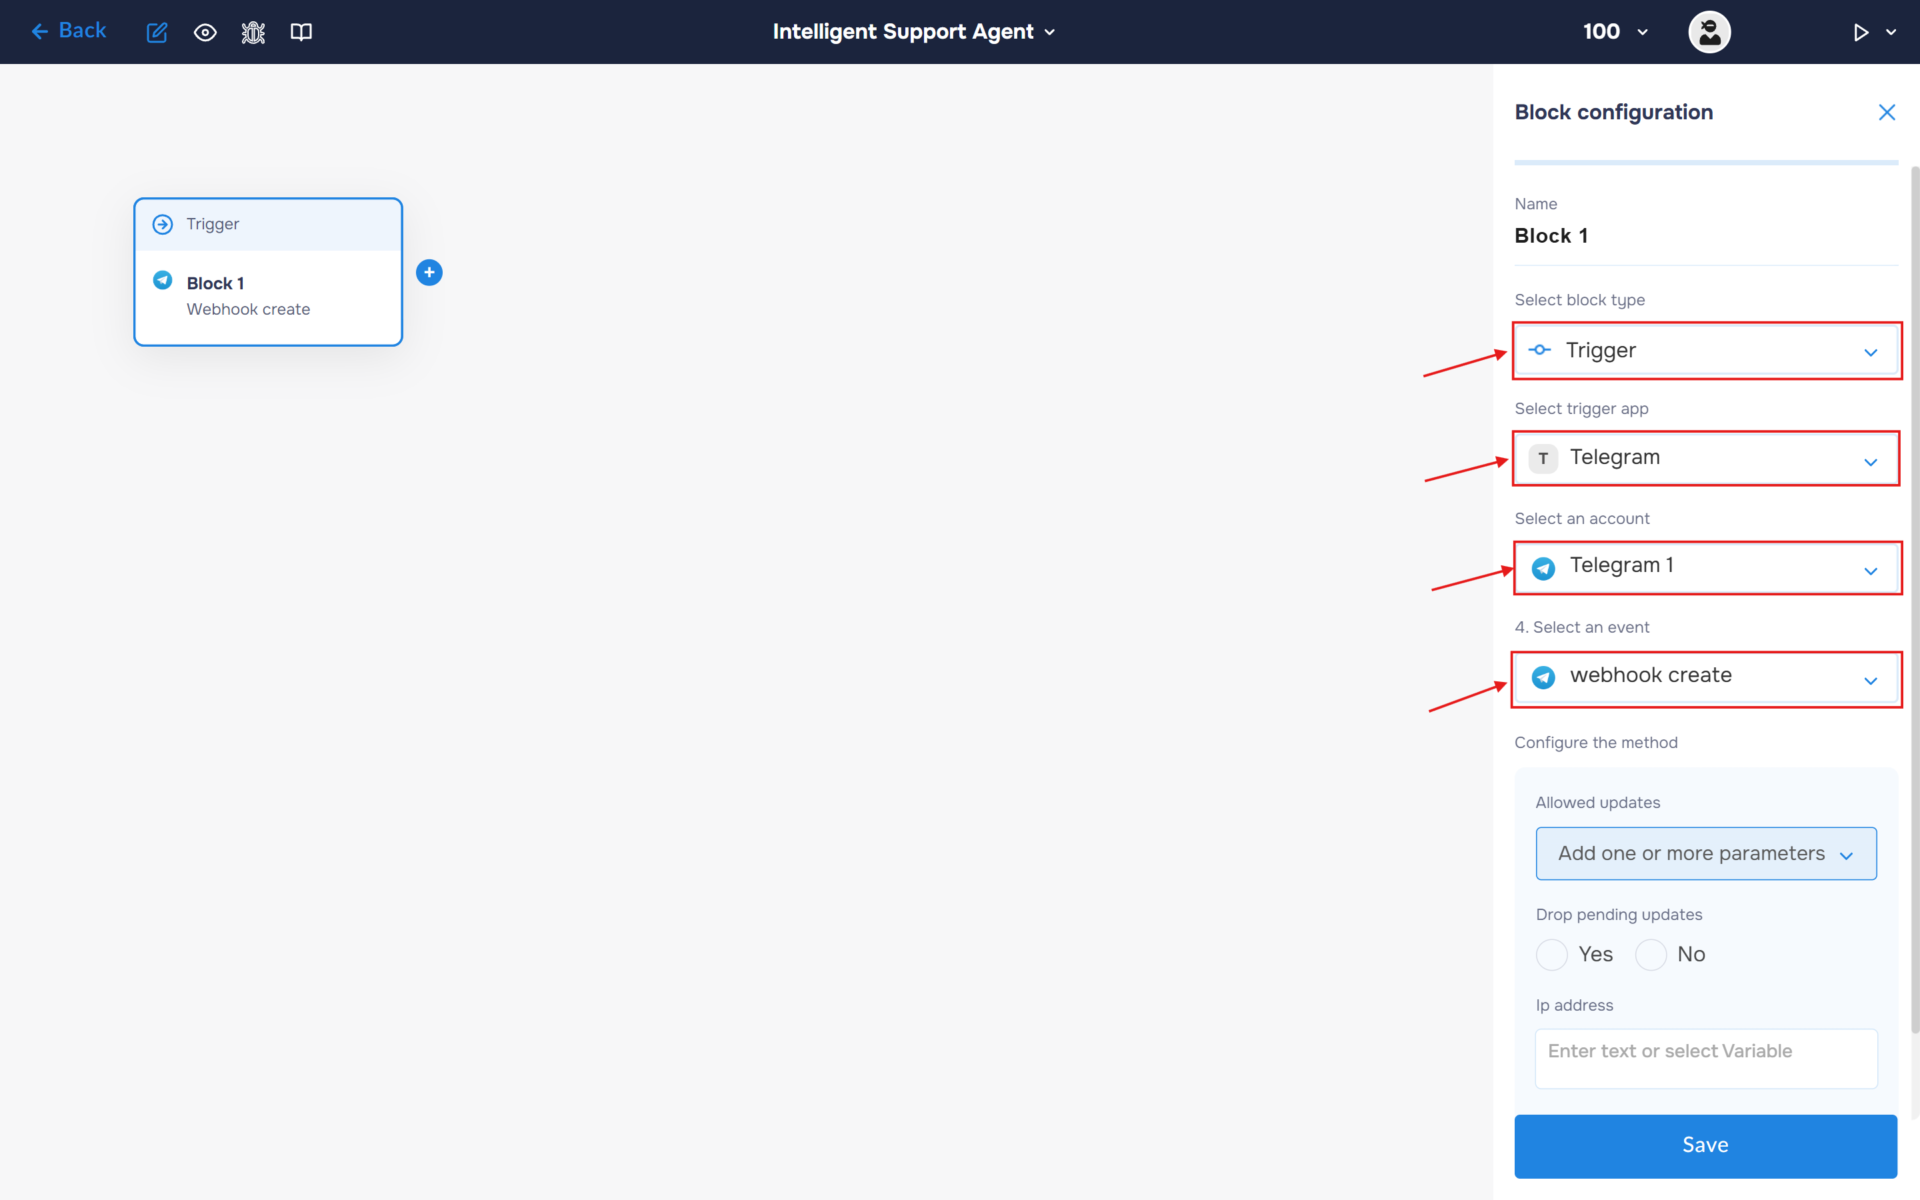
- In the “Block Configuration“ panel, click on the “Select block type“ field and select the “Trigger” type.
- Next, you need to add Telegram service by clicking on the field “Select trigger app“; find and select “Telegram“.
- To connect to Telegram, you need to create an authorisation. Click on the “Sign in“ button in the “Select an account“ section.
- After clicking the button, a window for creating a new authorization will open. Enter a name for the authorization, provide the required credentials, and save the connection.
- If the authorization is successful, the created authorization will appear in the “Select an account” field. You need to select this authorization to configure the next steps of the block.
- The next step is to select a method, so click on the “Select an event“. Find and select “webhook create”.
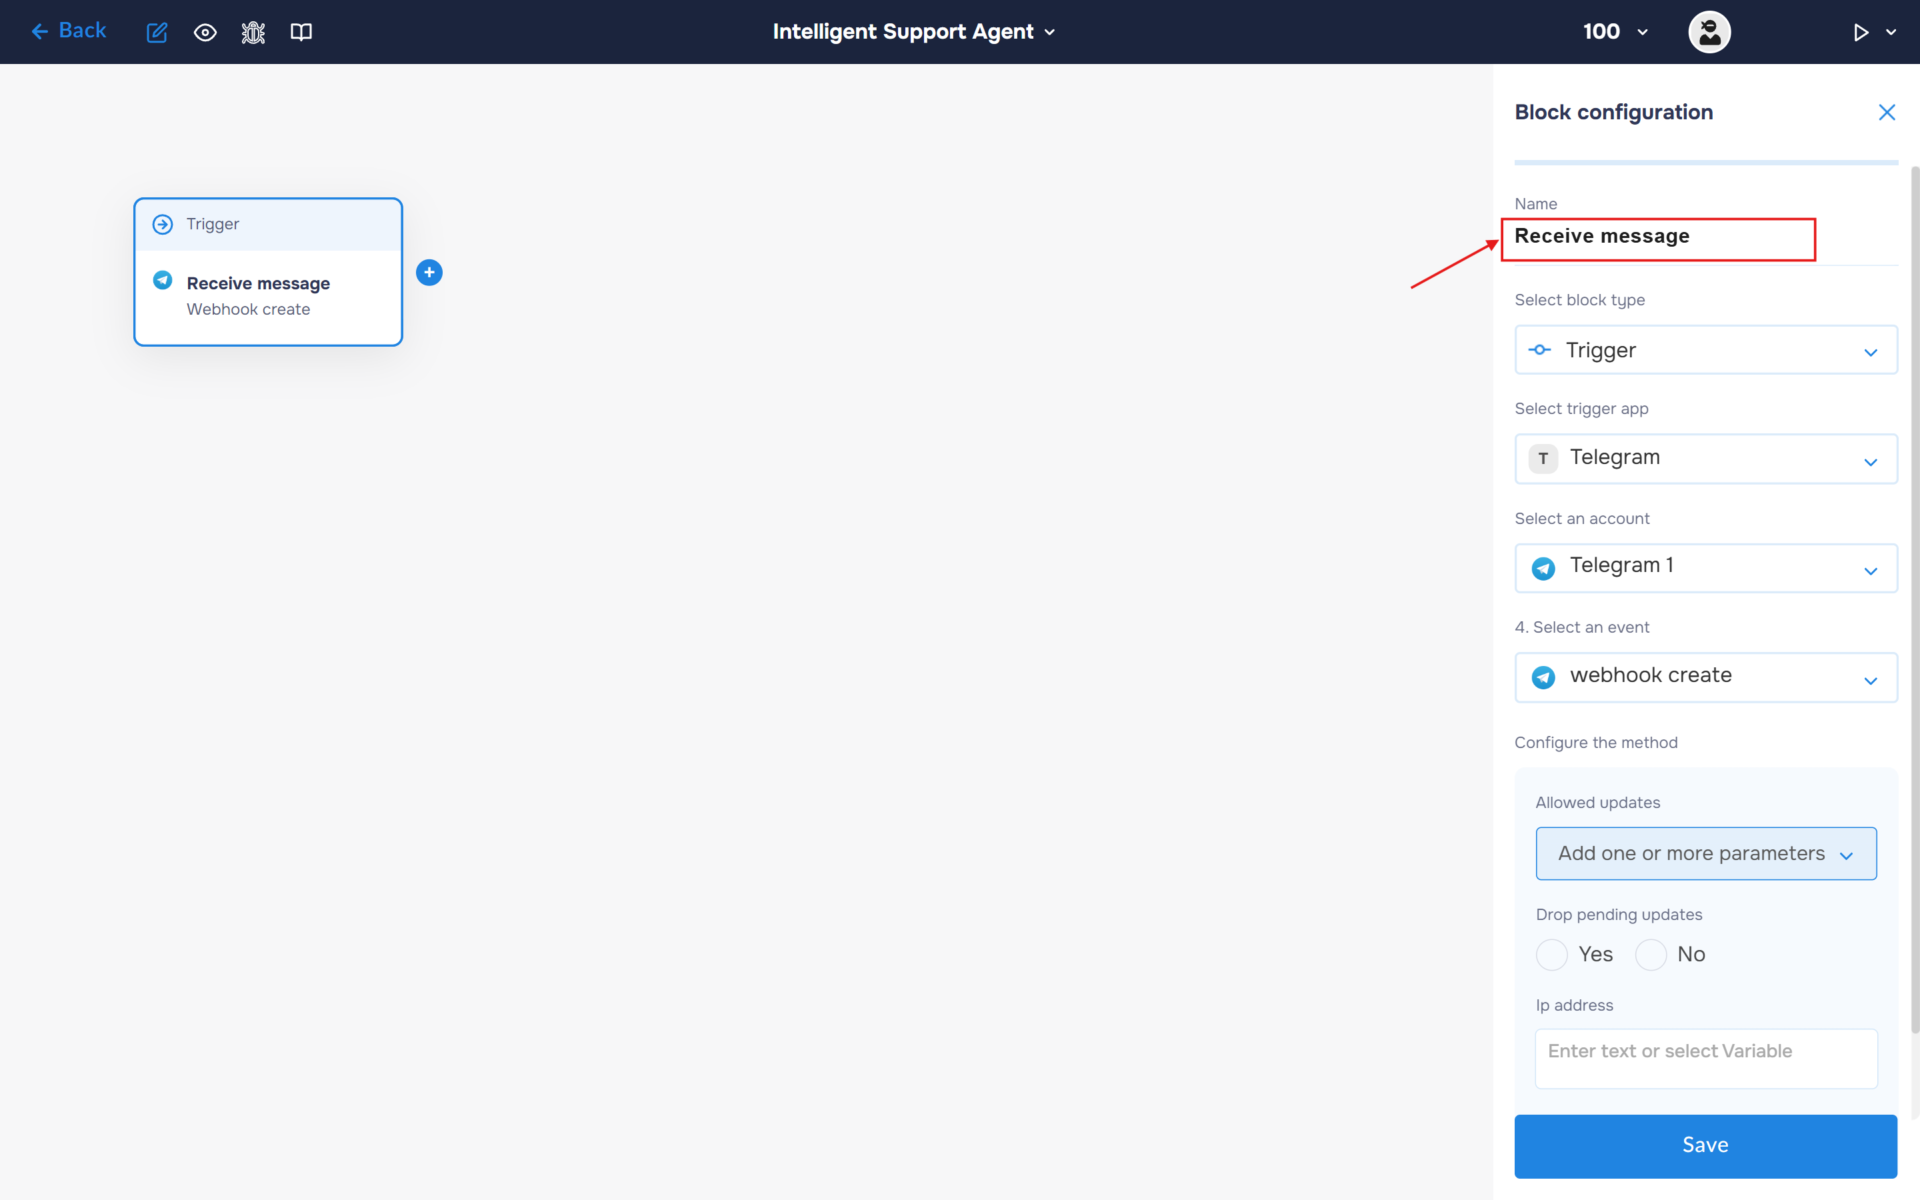
4. Click on the “Name” field and fill in a clear name for what happens in the block, for example, “Receive message”. With this step, you can quickly find out what the block is for.
Step 2: Route Telegram Messages: Start vs Support Queries
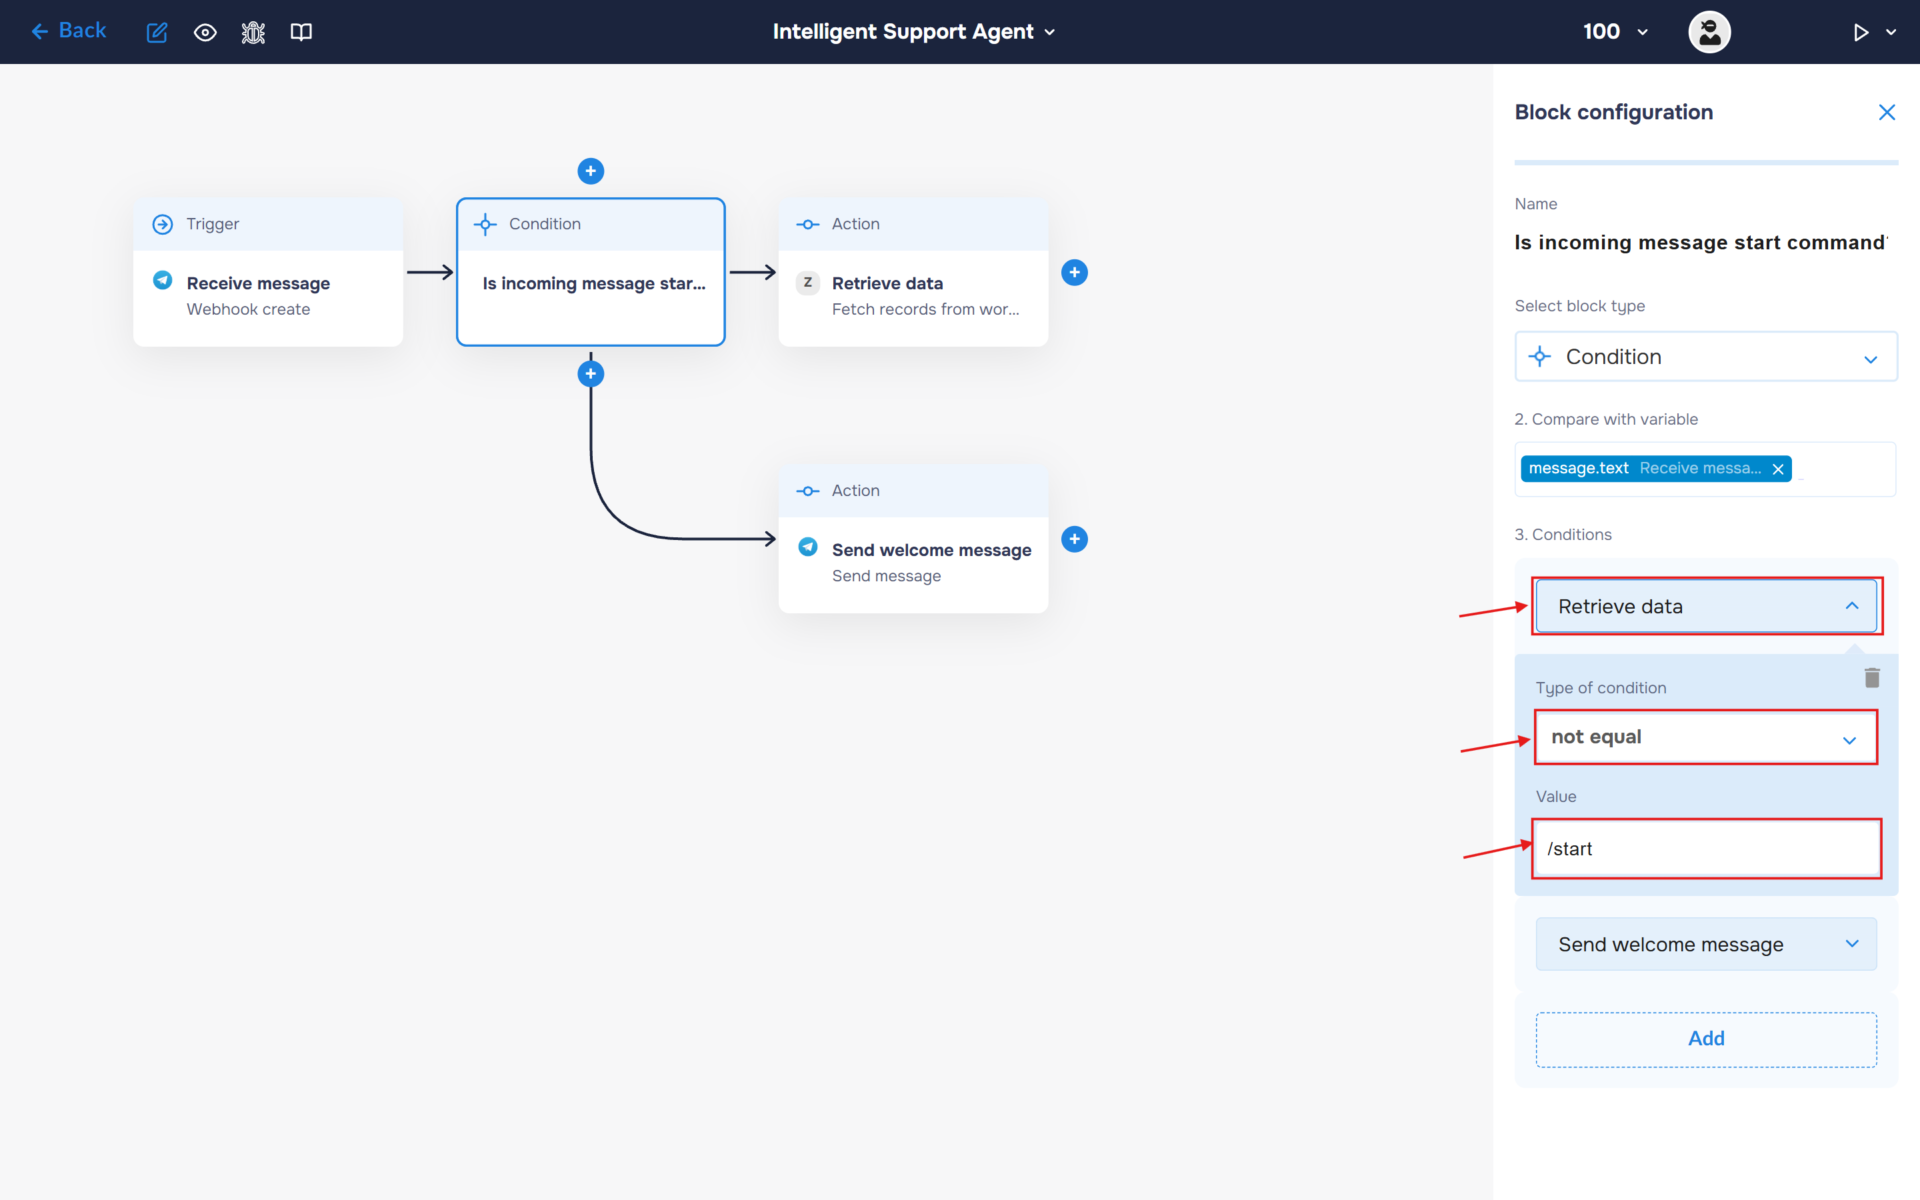
1. Now we need to tell the workflow how to handle incoming Telegram messages. We will use a router (“Condition” block) to split the automation into two paths based on the user’s input.
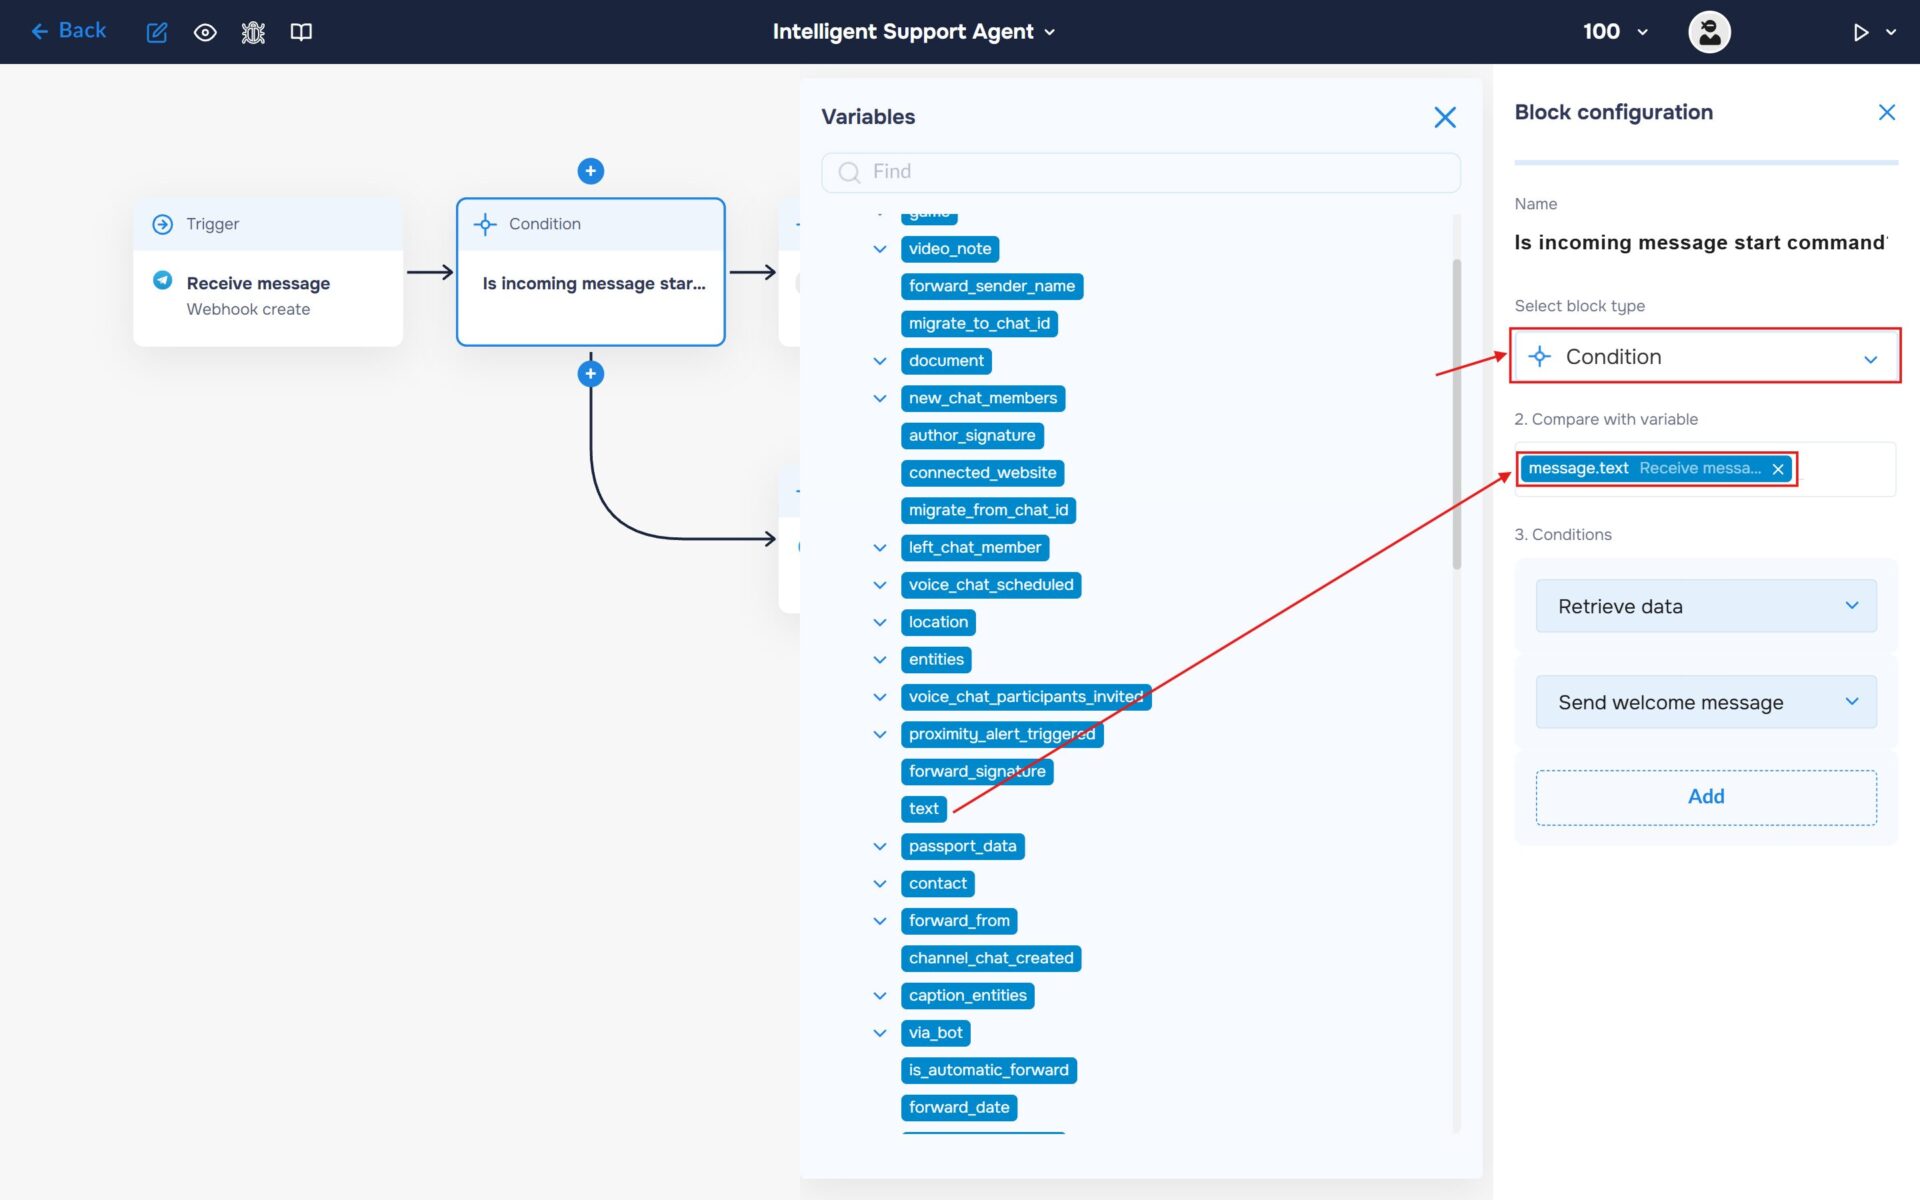
- Add the “Condition” block to determine whether the incoming message is the start of a new conversation or a support request.
- In the “Compare with variable” field, insert the message text received from the Telegram webhook (message.text).
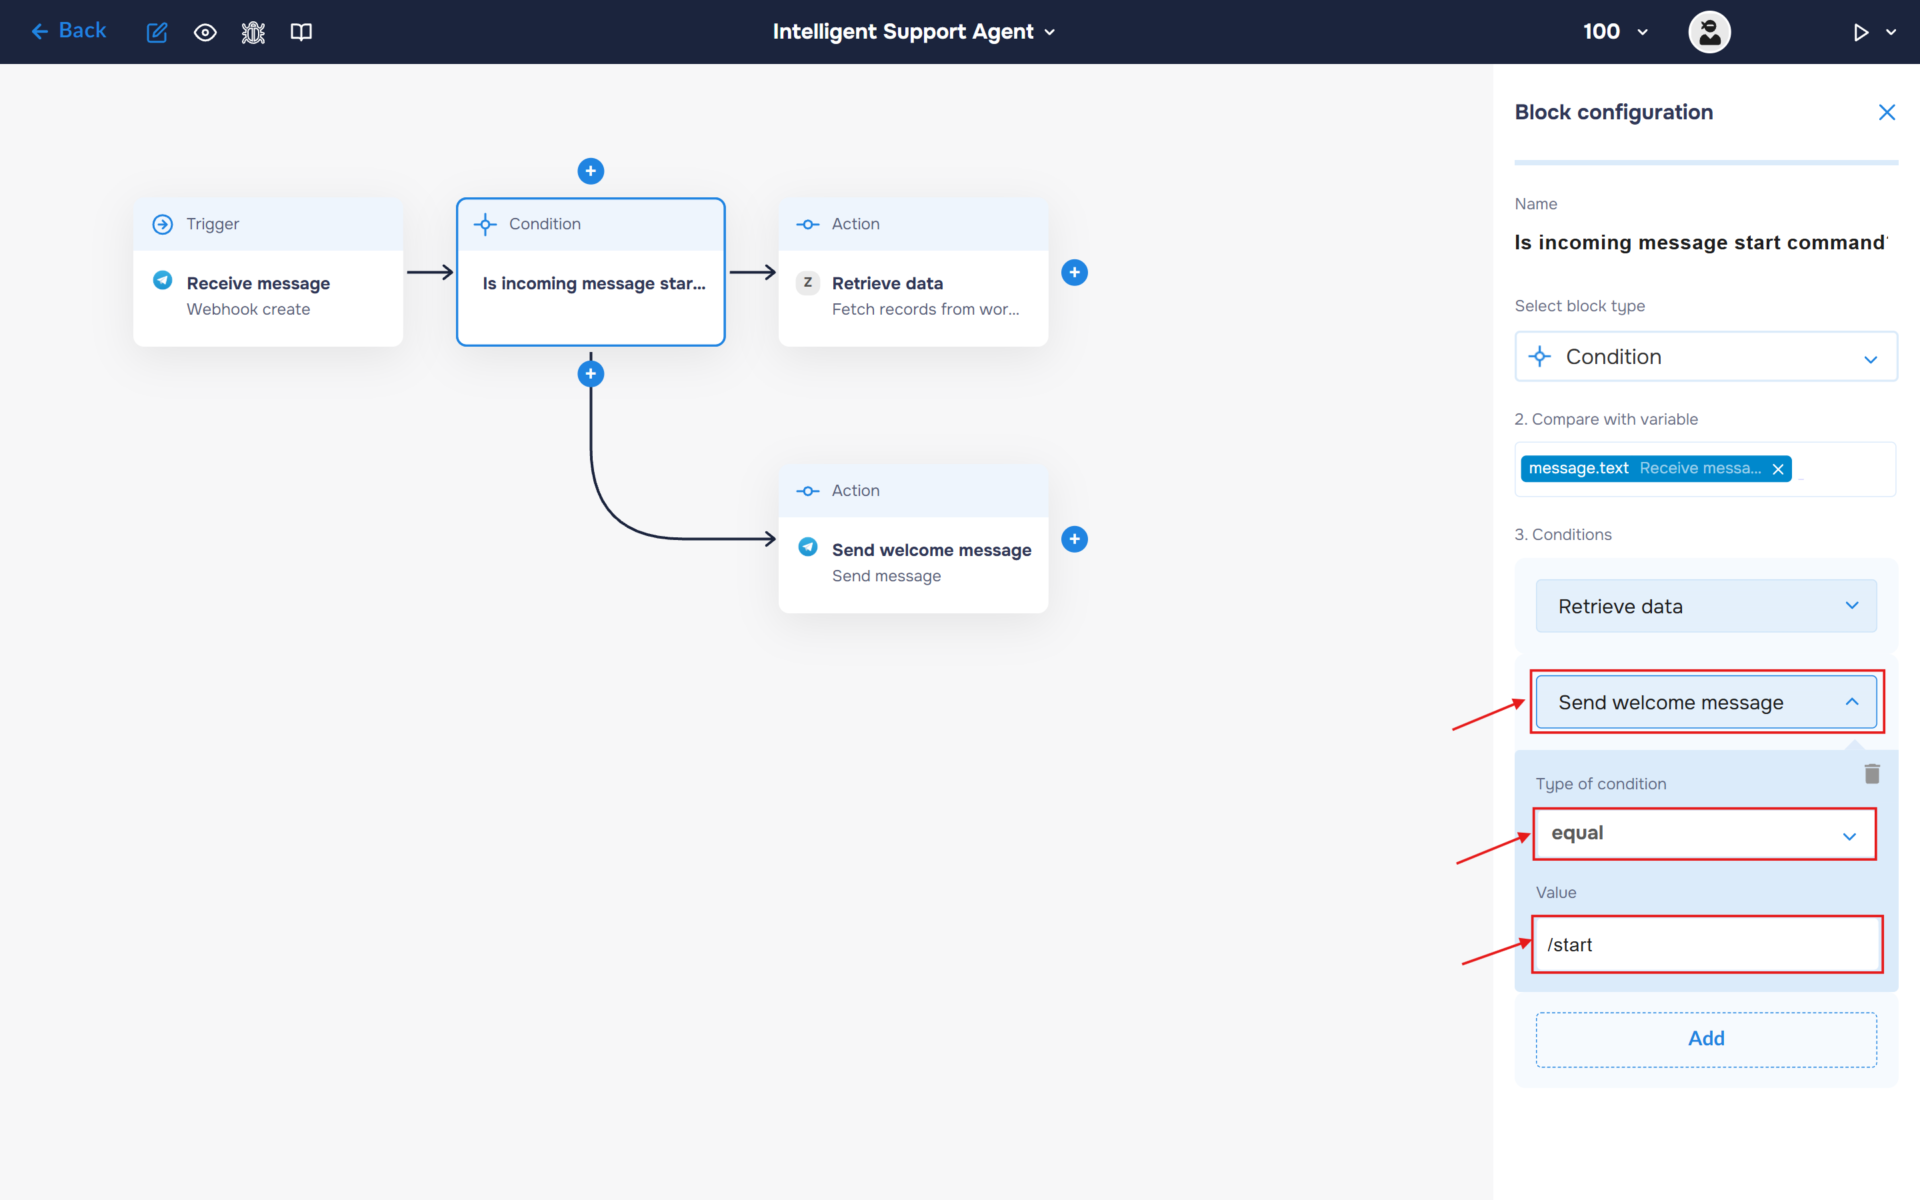
2. Add a “Send Welcome Message” block — Step 3. If the incoming message is equal to “/start”, this indicates that the user is initiating a new conversation. The workflow should respond with a predefined onboarding message to greet the user and introduce the bot.
In the “Conditions” section, expand the newly created block and configure the following values:
- Type of Condition: “equal”
- Value: “/start”
3. Add a “Retrieve data” block — Step 4. If the incoming message contains any other text, it should be treated as a support request and routed to the FAQ AI processing flow for further handling and response generation.
In the “Conditions” section, expand the newly created block and configure the following values:
- Type of Condition: “not equal”
- Value: “/start”
Step 3: Send welcome message to Telegram
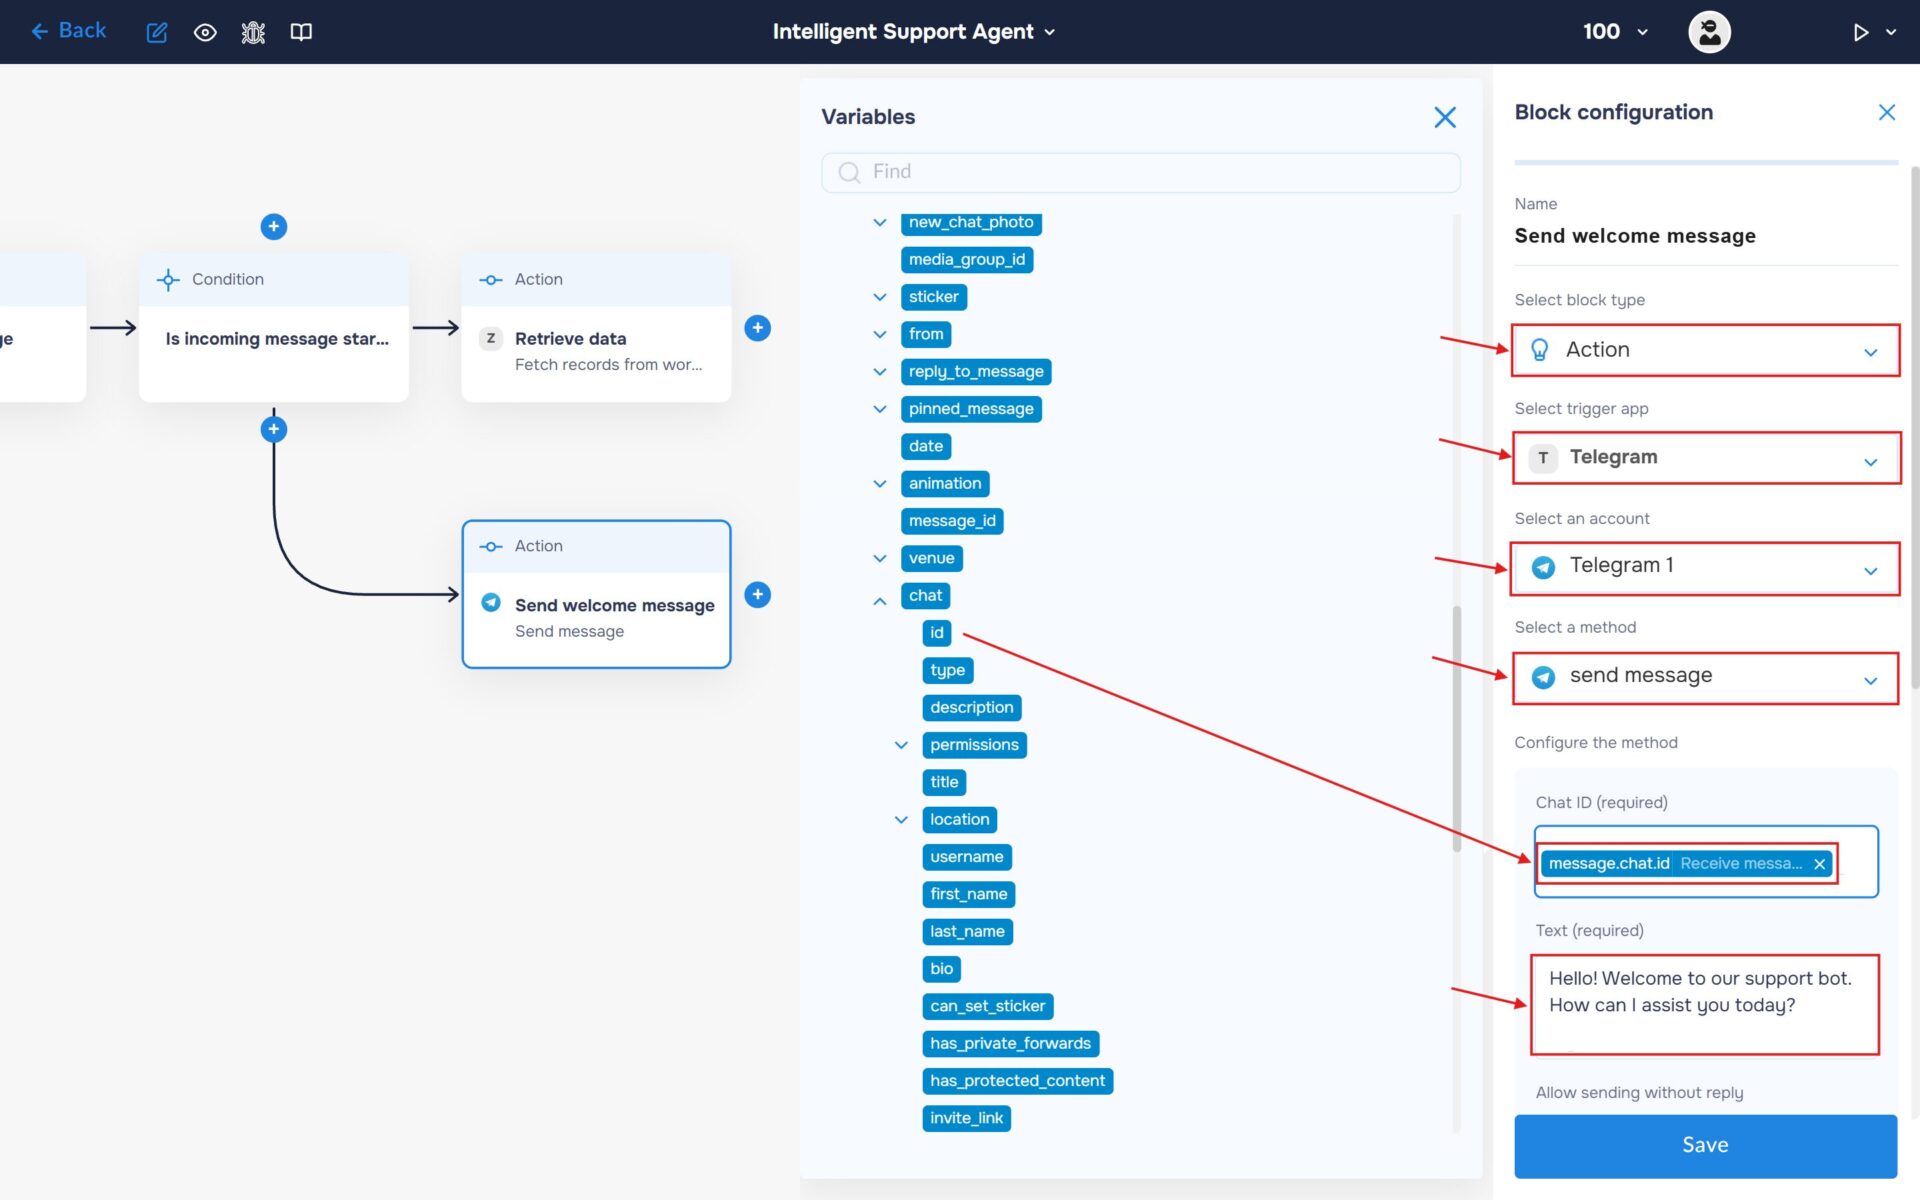
Configure the Telegram bot to automatically send a welcome message when a user starts a new conversation. This ensures immediate engagement and provides users with clear guidance on how to interact with the support system.
- Select the block type as “Action” and the service as “Telegram“.
- Choose an account and select it.
- Find and select the “send message” method.
- In the “Chat ID” field, enter the Chat ID stored in the “message.chat.id” variable.
- In the “Text field”, insert the text of the welcome message.
🔧 Default text of welcome message: Hello! Welcome to our support bot. How can I assist you today?
Step 4: Retrieve Knowledge Base (FAQs) from Zoho Sheet
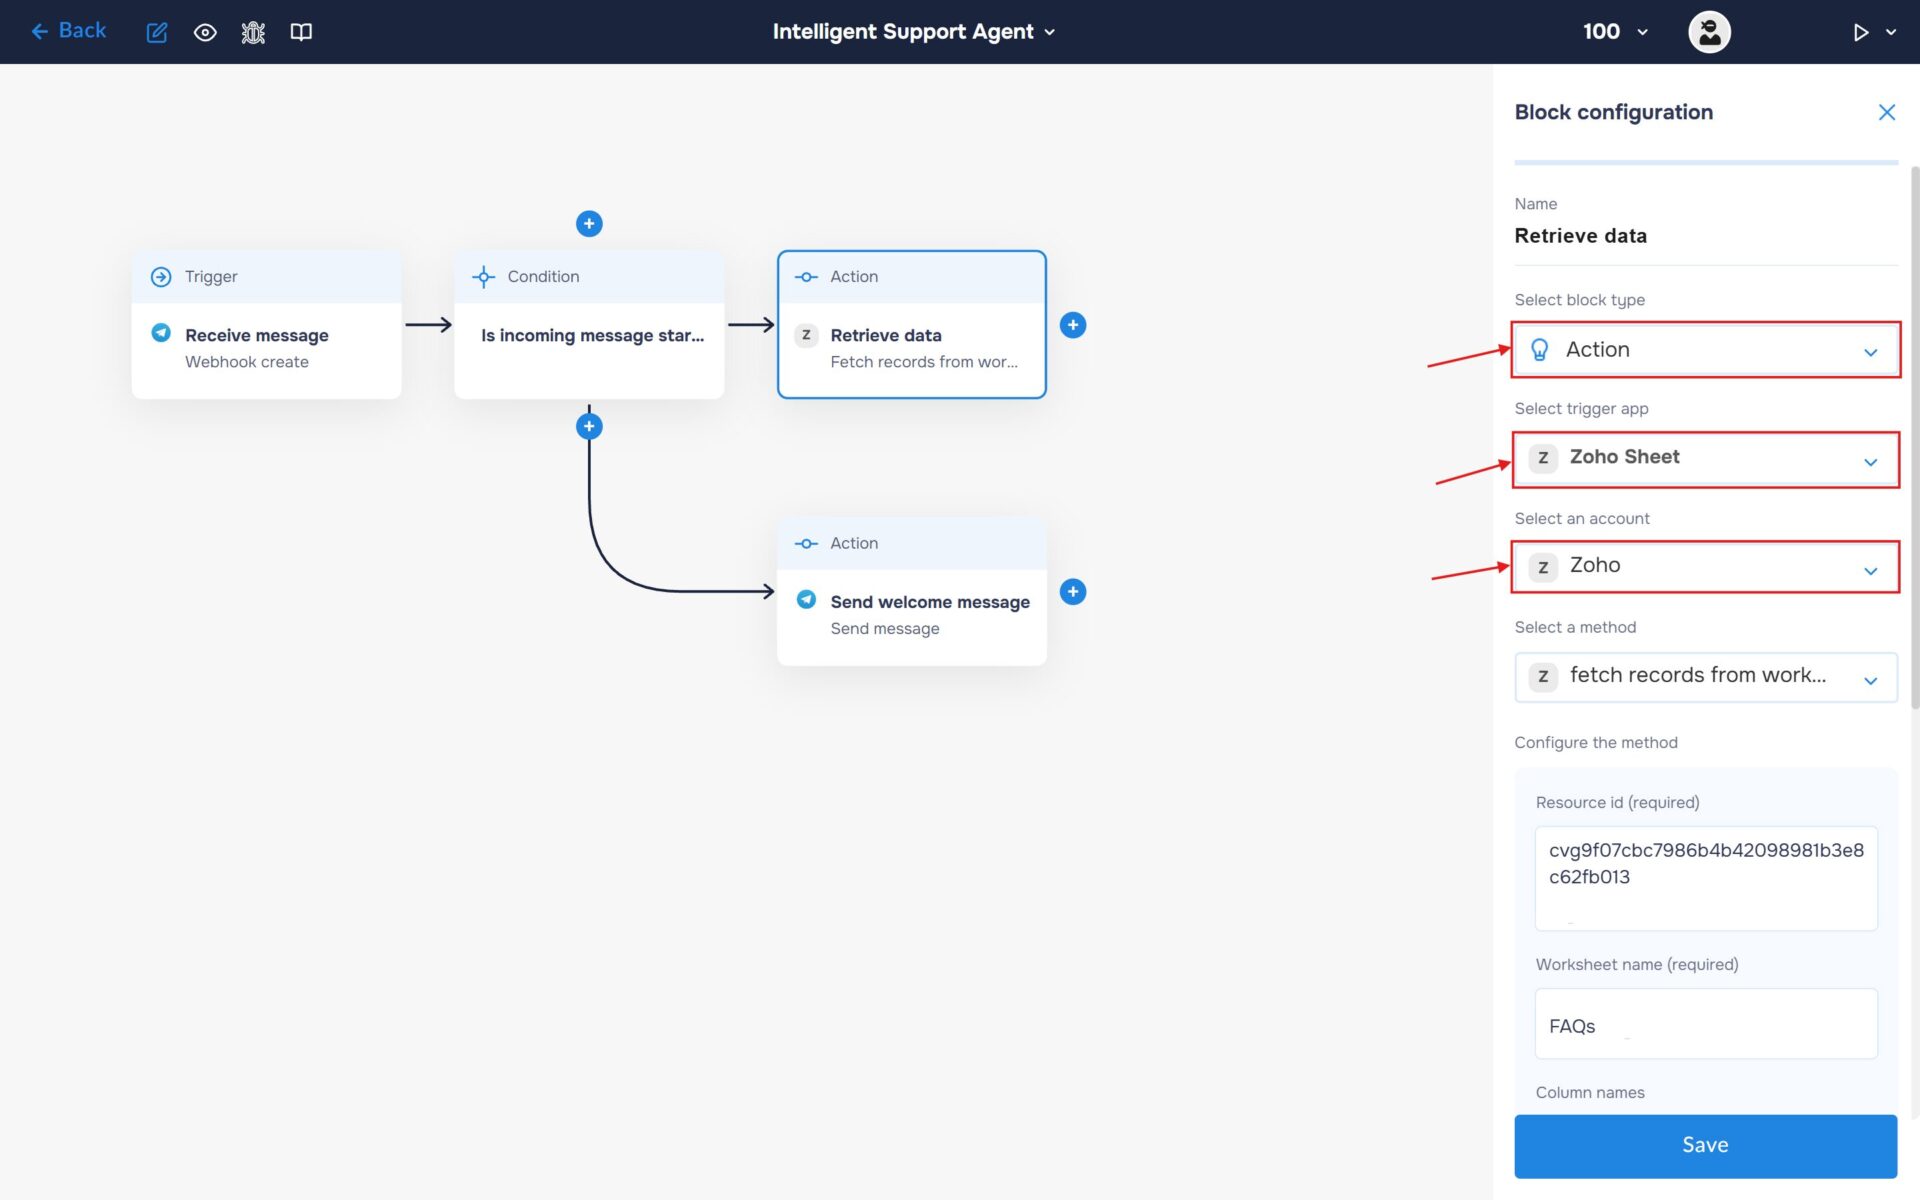
1. In this step, we will connect Zoho Sheet as a data source to retrieve the FAQ database used by the AI agent for answering user questions. This ensures that the assistant always has access to up-to-date and structured knowledge for response generation.
- In the “Block Configuration“ panel, click on the “Select block type“ field and select the “Action” type.
- Next, you need to add Zoho Sheet service by clicking on the field “Select trigger app“; find and select “Zoho Sheet“.
- To connect you need to create an authorisation. Click on the “Sign in“ button in the “Select an account“ section.
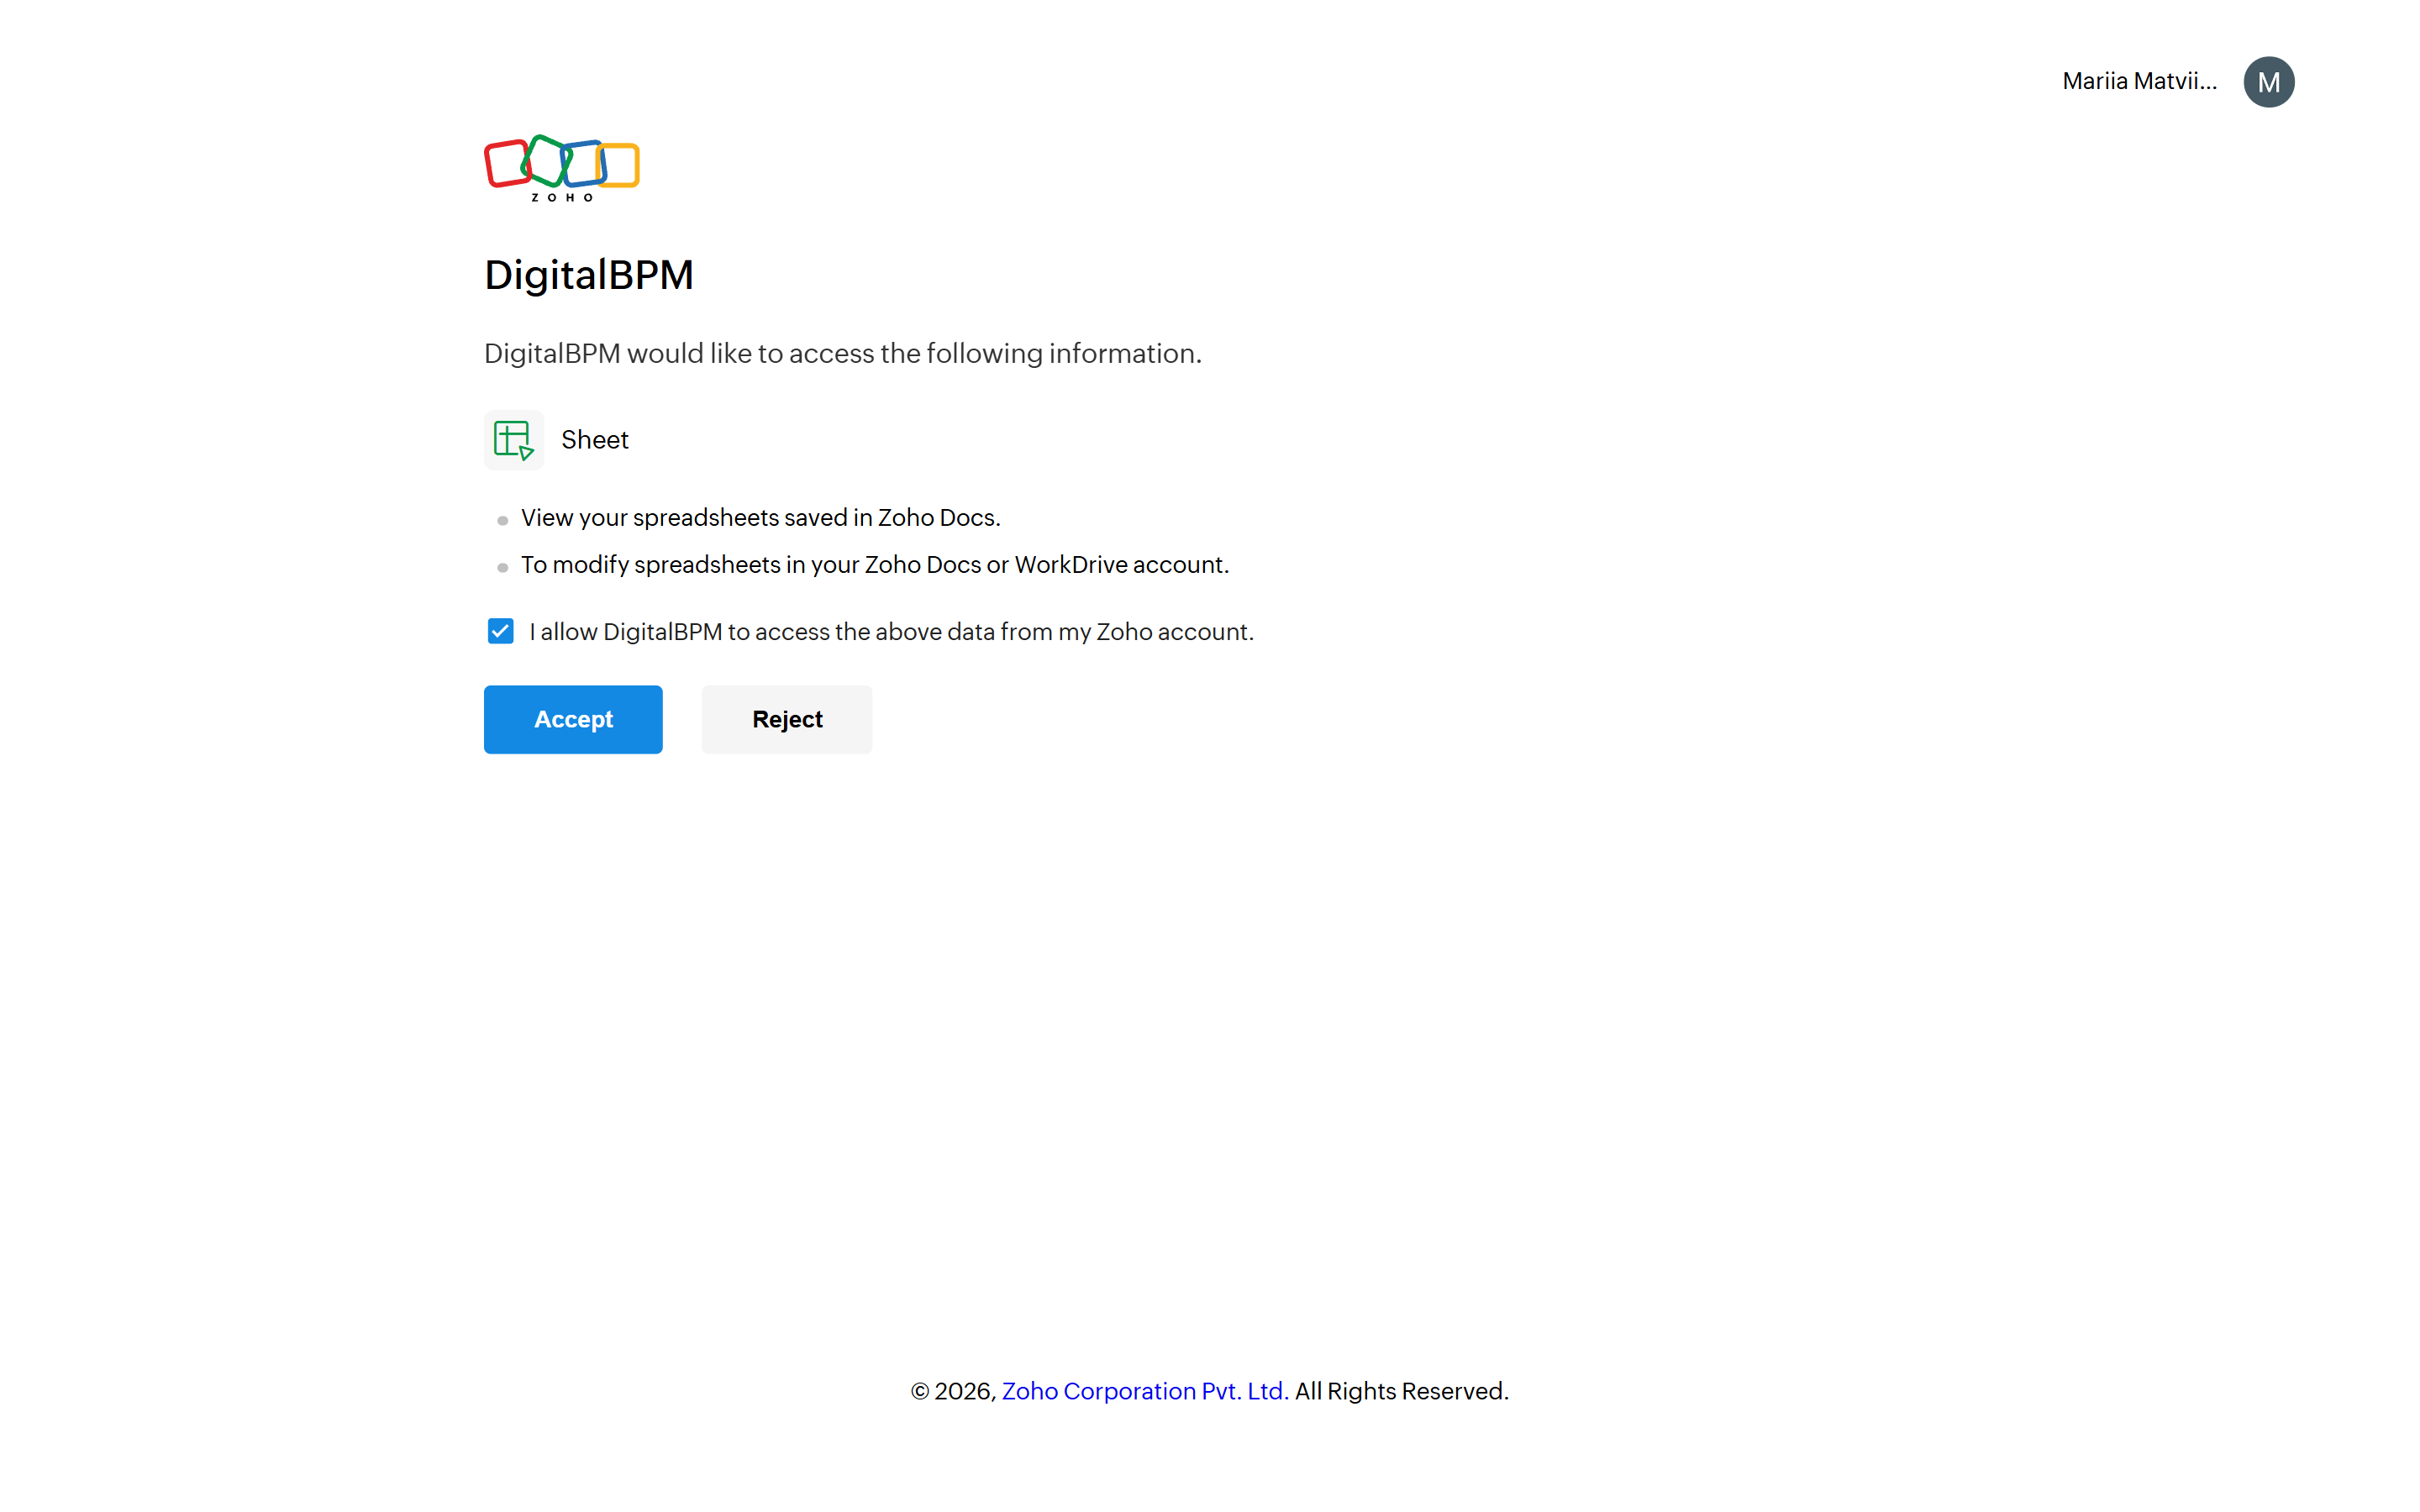
2. Sign in to your Zoho Sheet account and grant DigitalBPM the required permissions to access your workspace.
3. Go to the Zoho Sheet, open the file link, and copy the spreadsheet ID from the URL. Then copy the name of the worksheet where the data is stored.
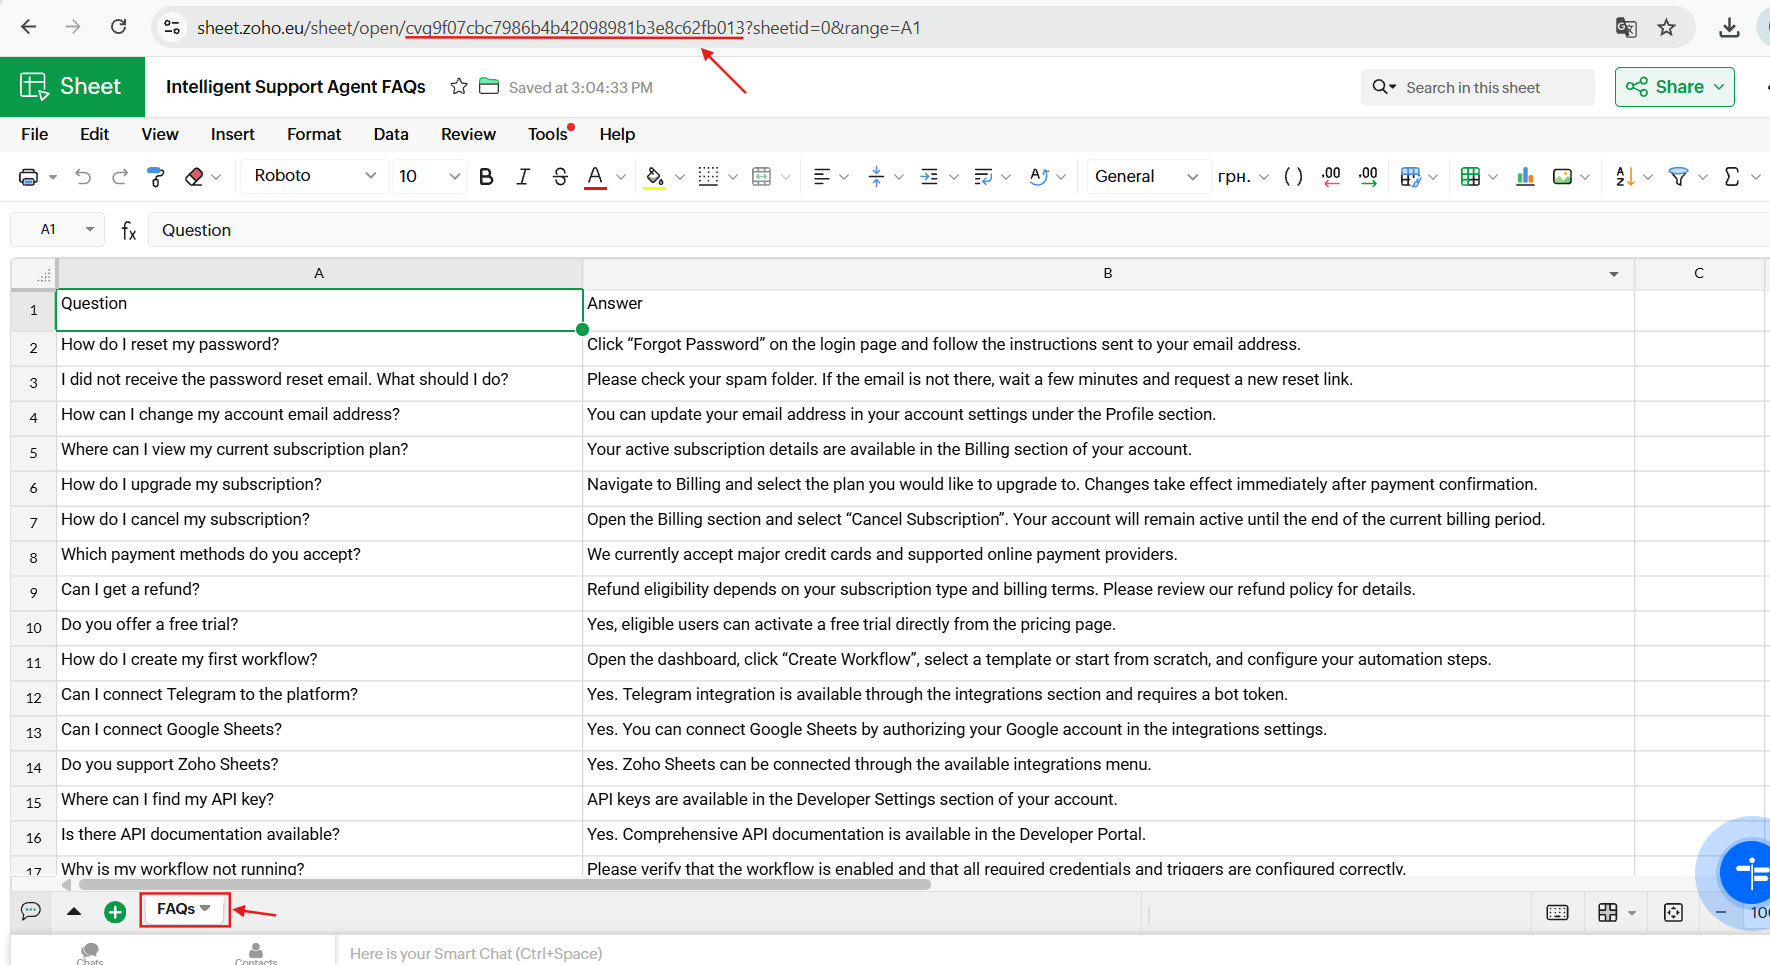
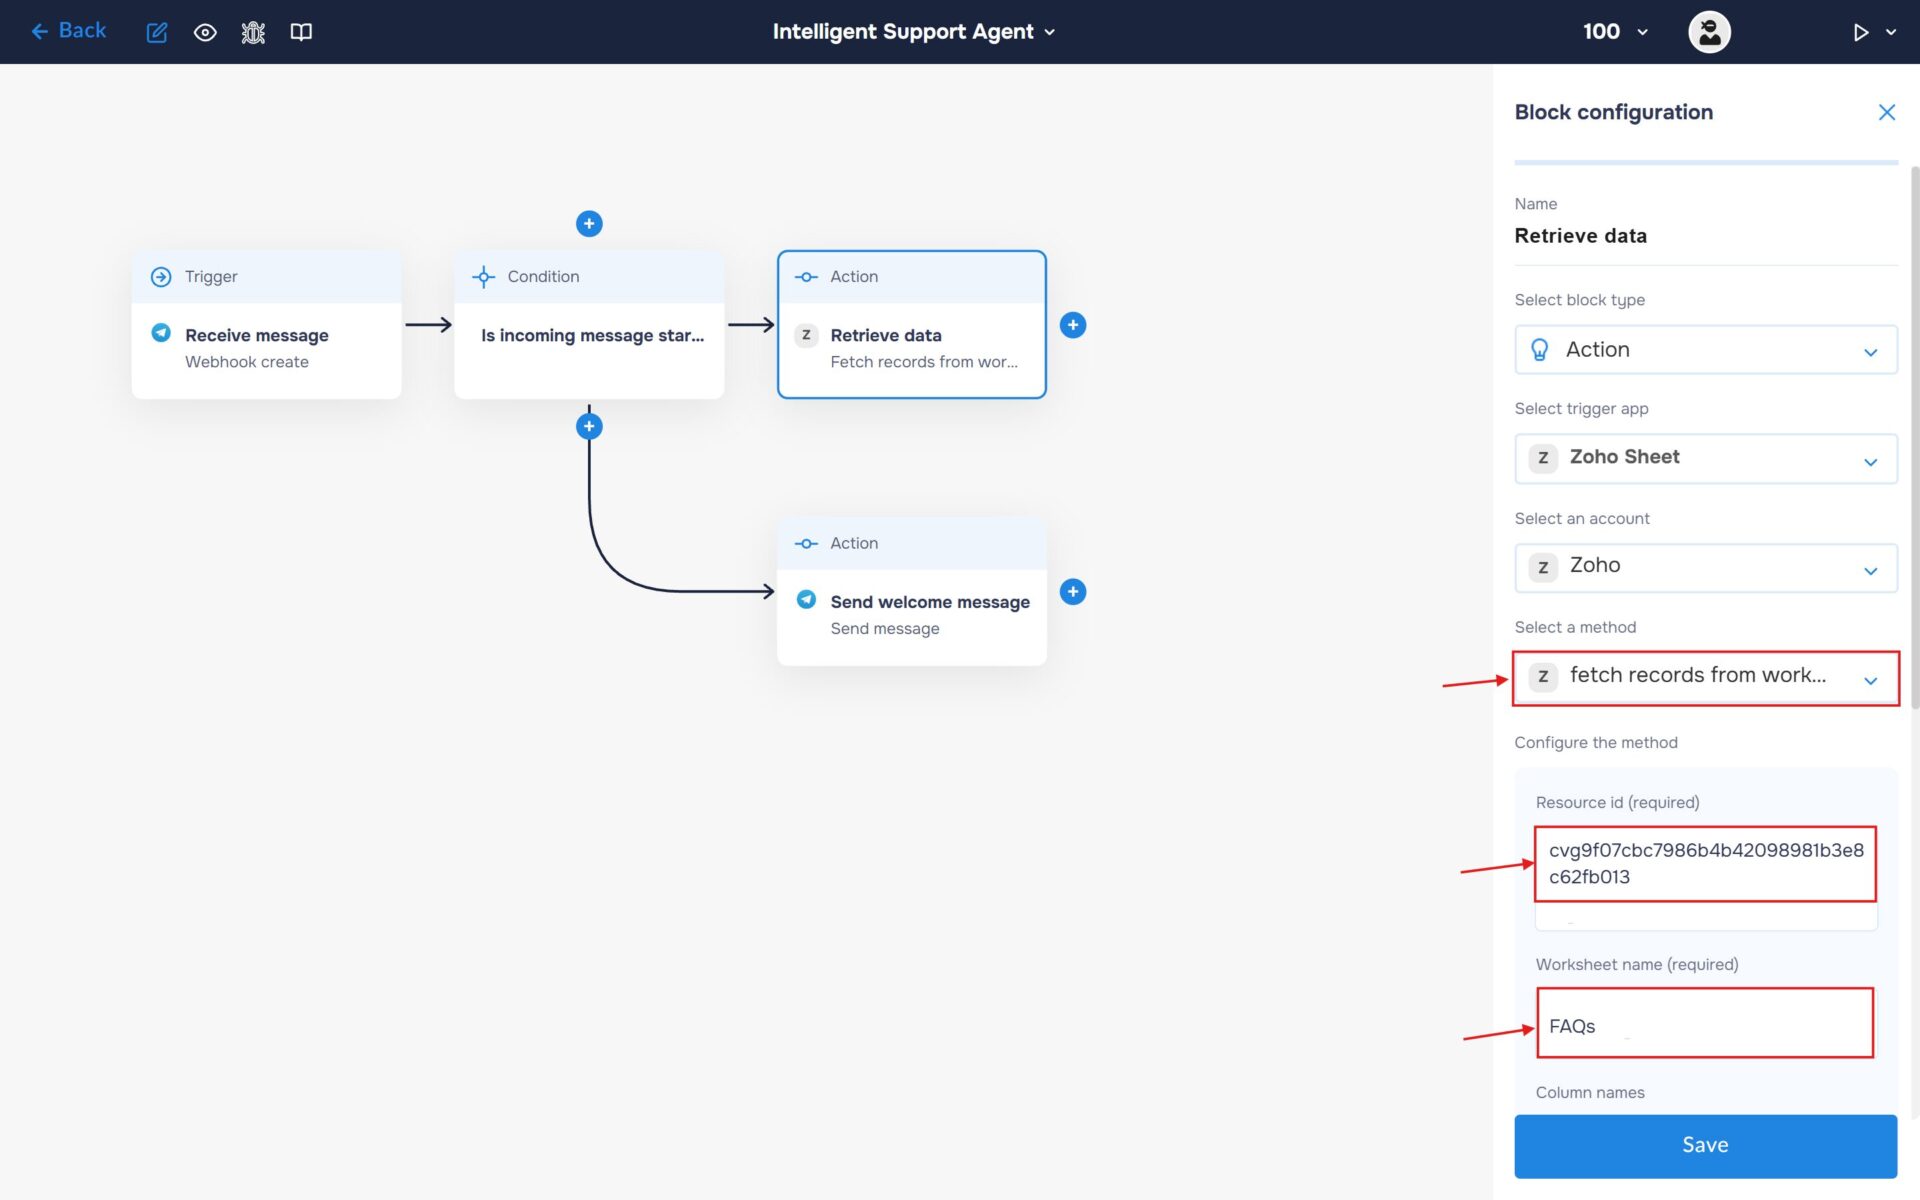
4. Select the “fetch records from worksheet” method. In the “Resource ID” field, insert the spreadsheet ID. In the “Worksheet name” field, enter the name of the sheet that contains the data.
Step 5: Integrate Anthropic Claude for Message Classification
Connect Anthropic Claude to analyze incoming user messages and assign an appropriate routing tag based on intent. The model evaluates whether the message can be answered using existing FAQ data or requires escalation to a support task.
This classification layer enables the workflow to intelligently route each request to the correct processing path before any response is generated.
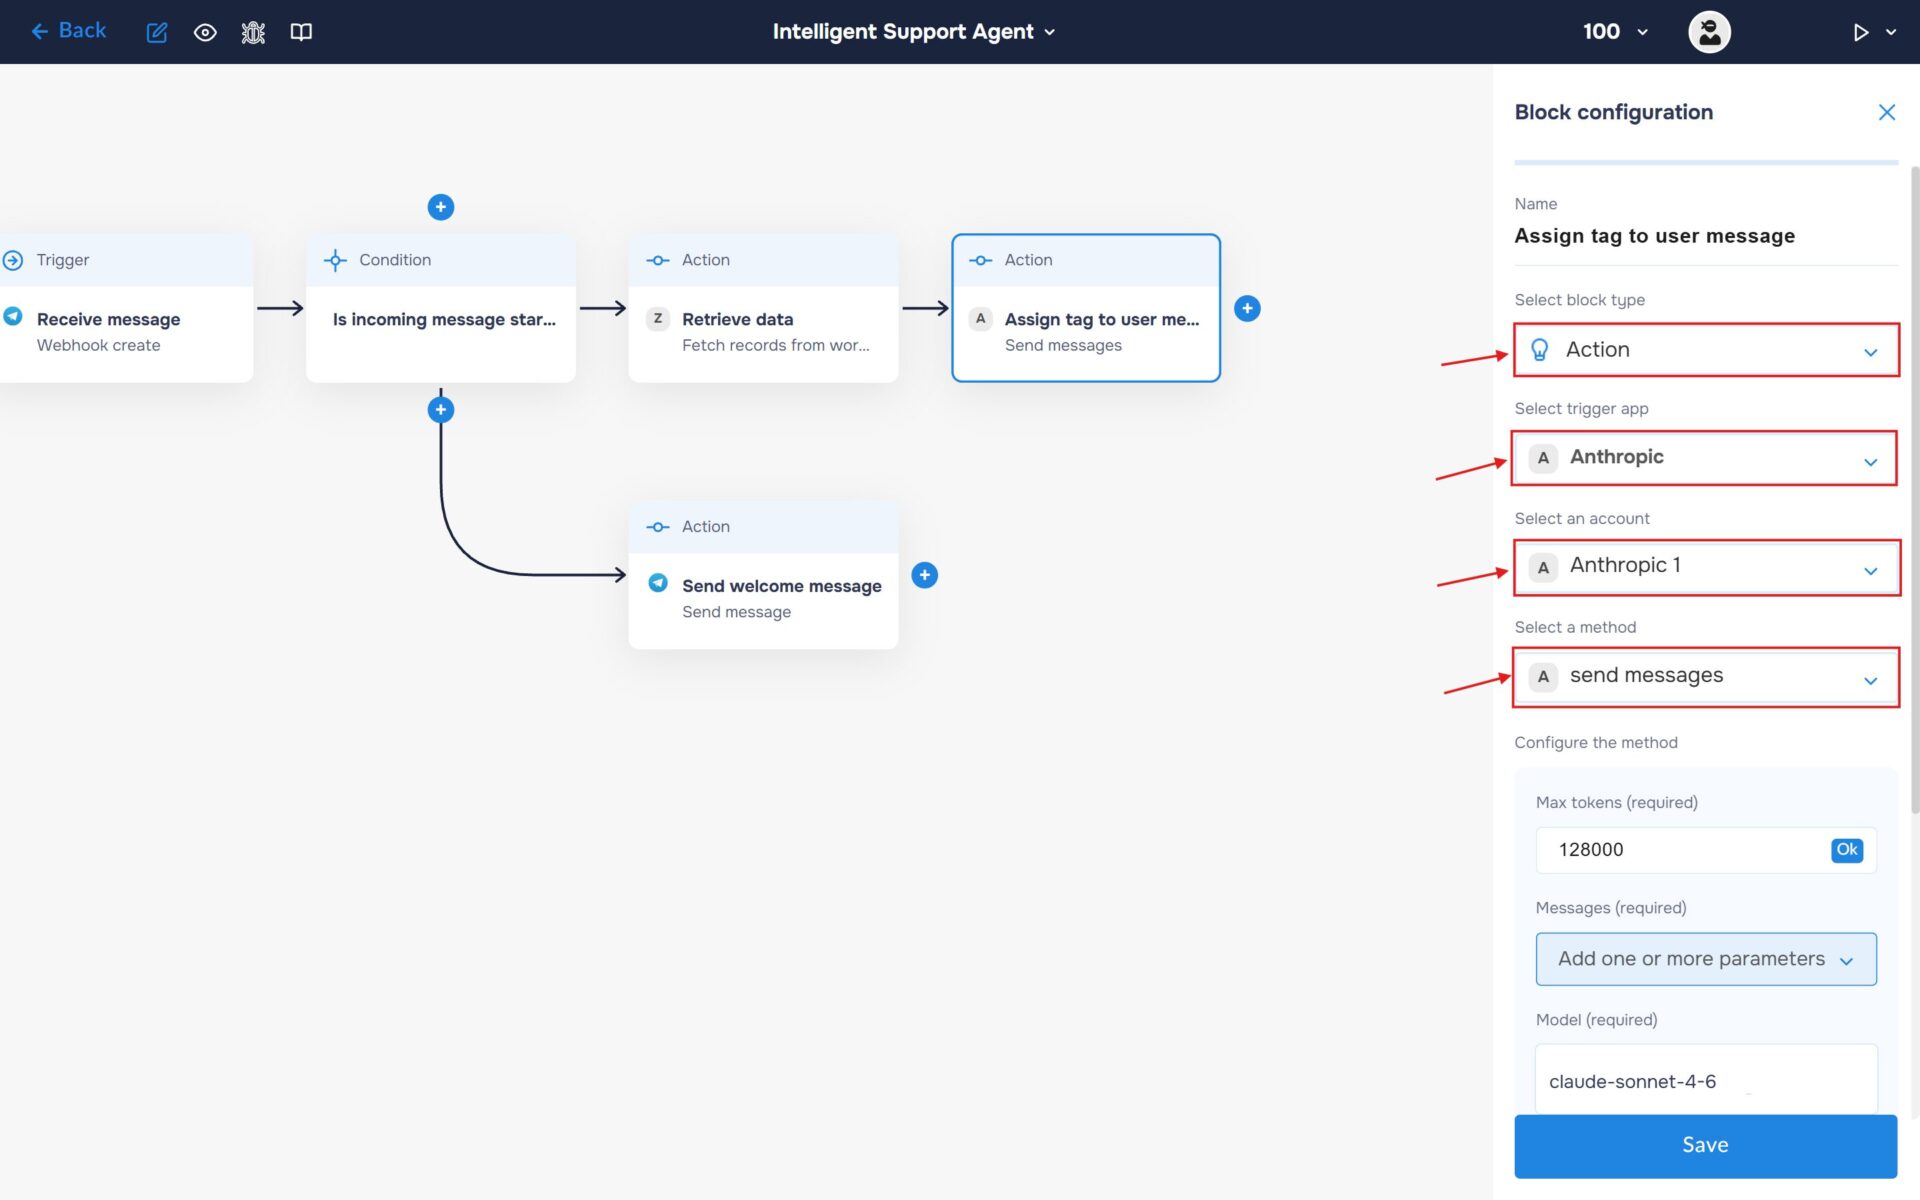
- In the “Block Configuration“ panel, click on the “Select block type“ field and select the “Action” type.
- Next, you need to add Anthropic Claude service by clicking on the field “Select trigger app“; find and select “Anthropic“.
- To connect to service, you need to create an authorisation. Click on the “Sign in“ button in the “Select an account“ section.
- After clicking the button, a window for creating a new authorization will open. Enter a name for the authorization, provide the required credentials, and save the connection.
- If the authorization is successful, the created authorization will appear in the “Select an account” field. You need to select this authorization to configure the next steps of the block.
- The next step is to select a method, so click on the “Select a method“. Find and select “send messages”.
2. Specify the model name in the corresponding field (for example, “claude-sonnet-4-6”) and set the Max tokens“ supported by the selected model. For Claude Sonnet 4.6, the maximum context window is 128,000 tokens, which allows the AI to process large prompts and detailed subscriber information when generating personalized welcome emails.
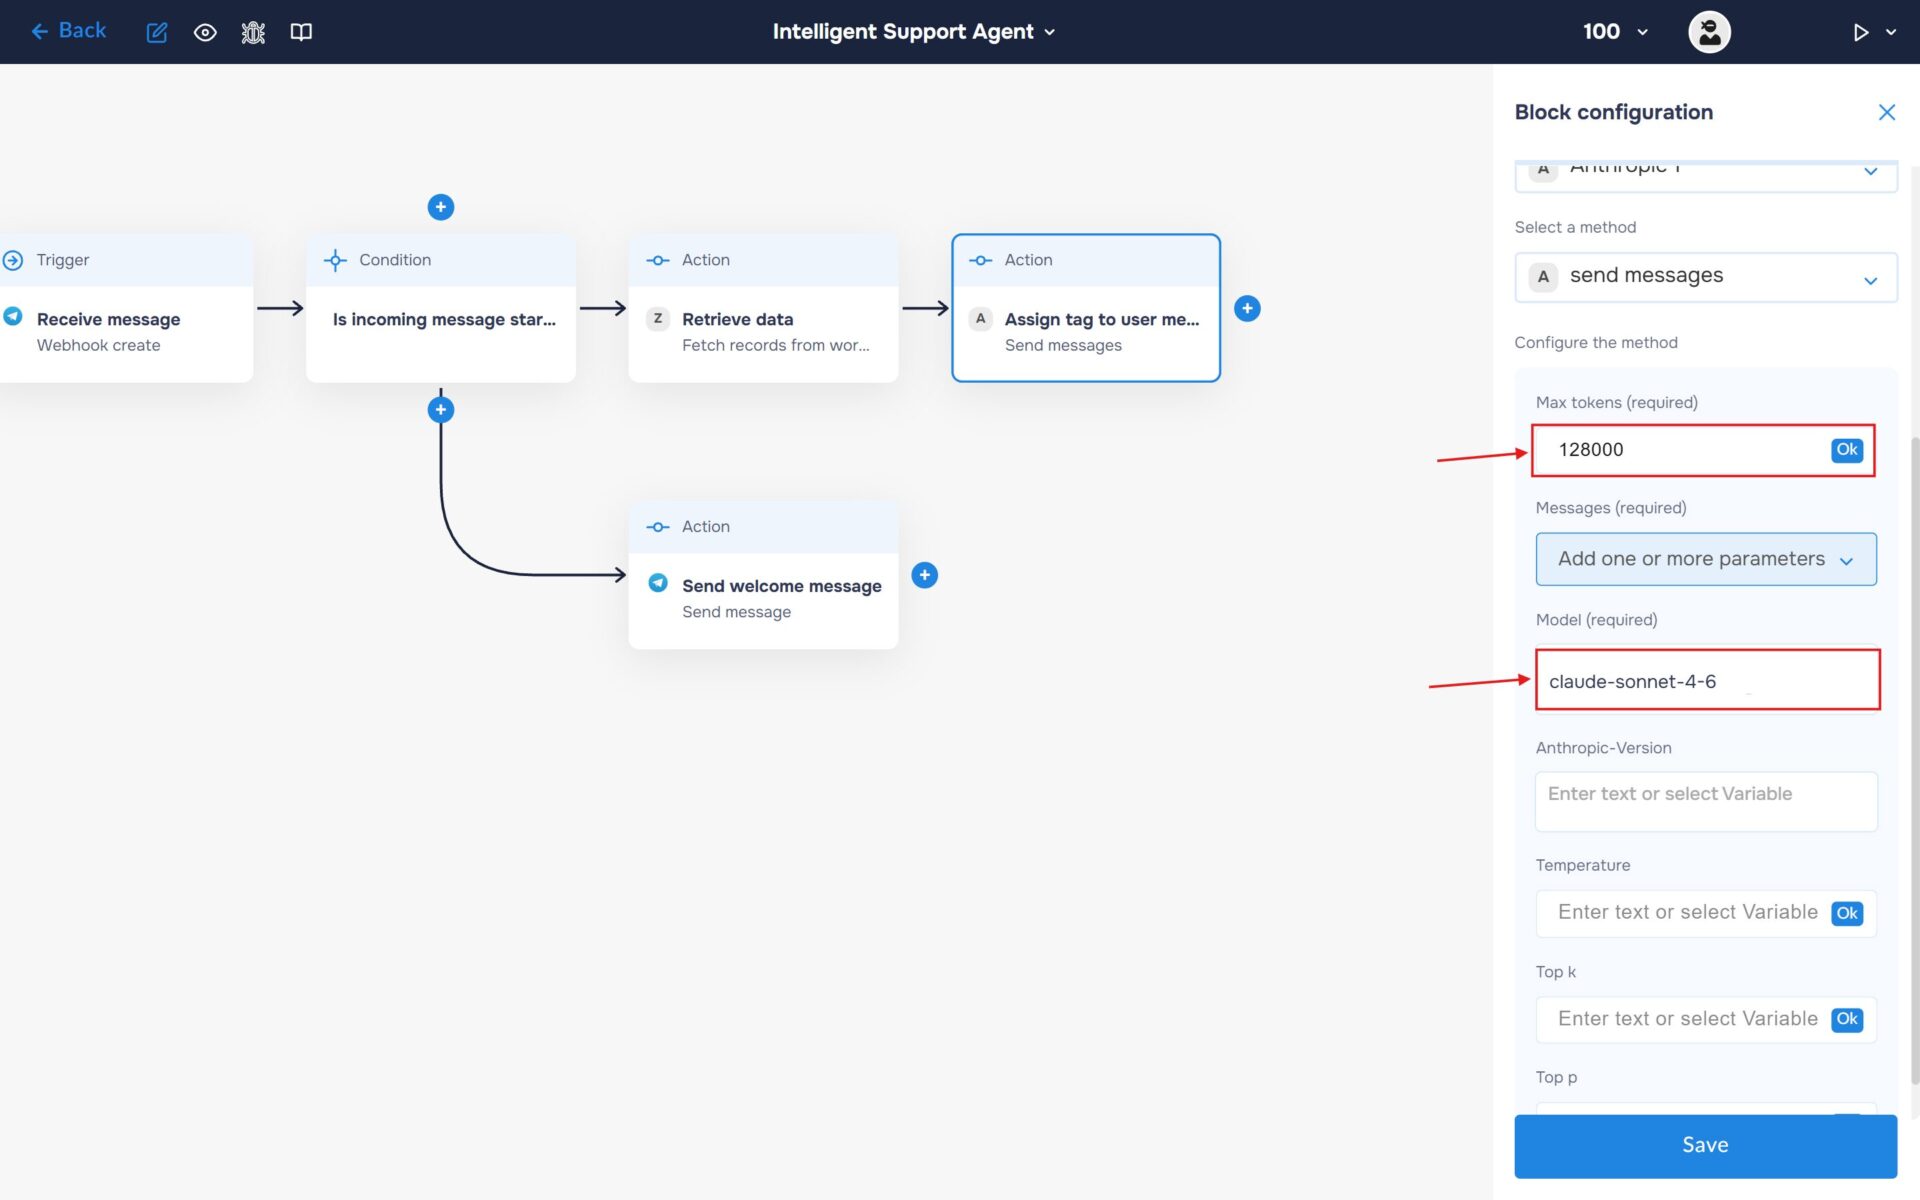
3. In the “Message” section, select “Add one or more parameters”. Add a “Message” object and expand it. Then expand “Fill in the parameters”. This is where you will enter the prompt that will be sent to the AI model for processing.
Fill the “Role“ field with value “user“.
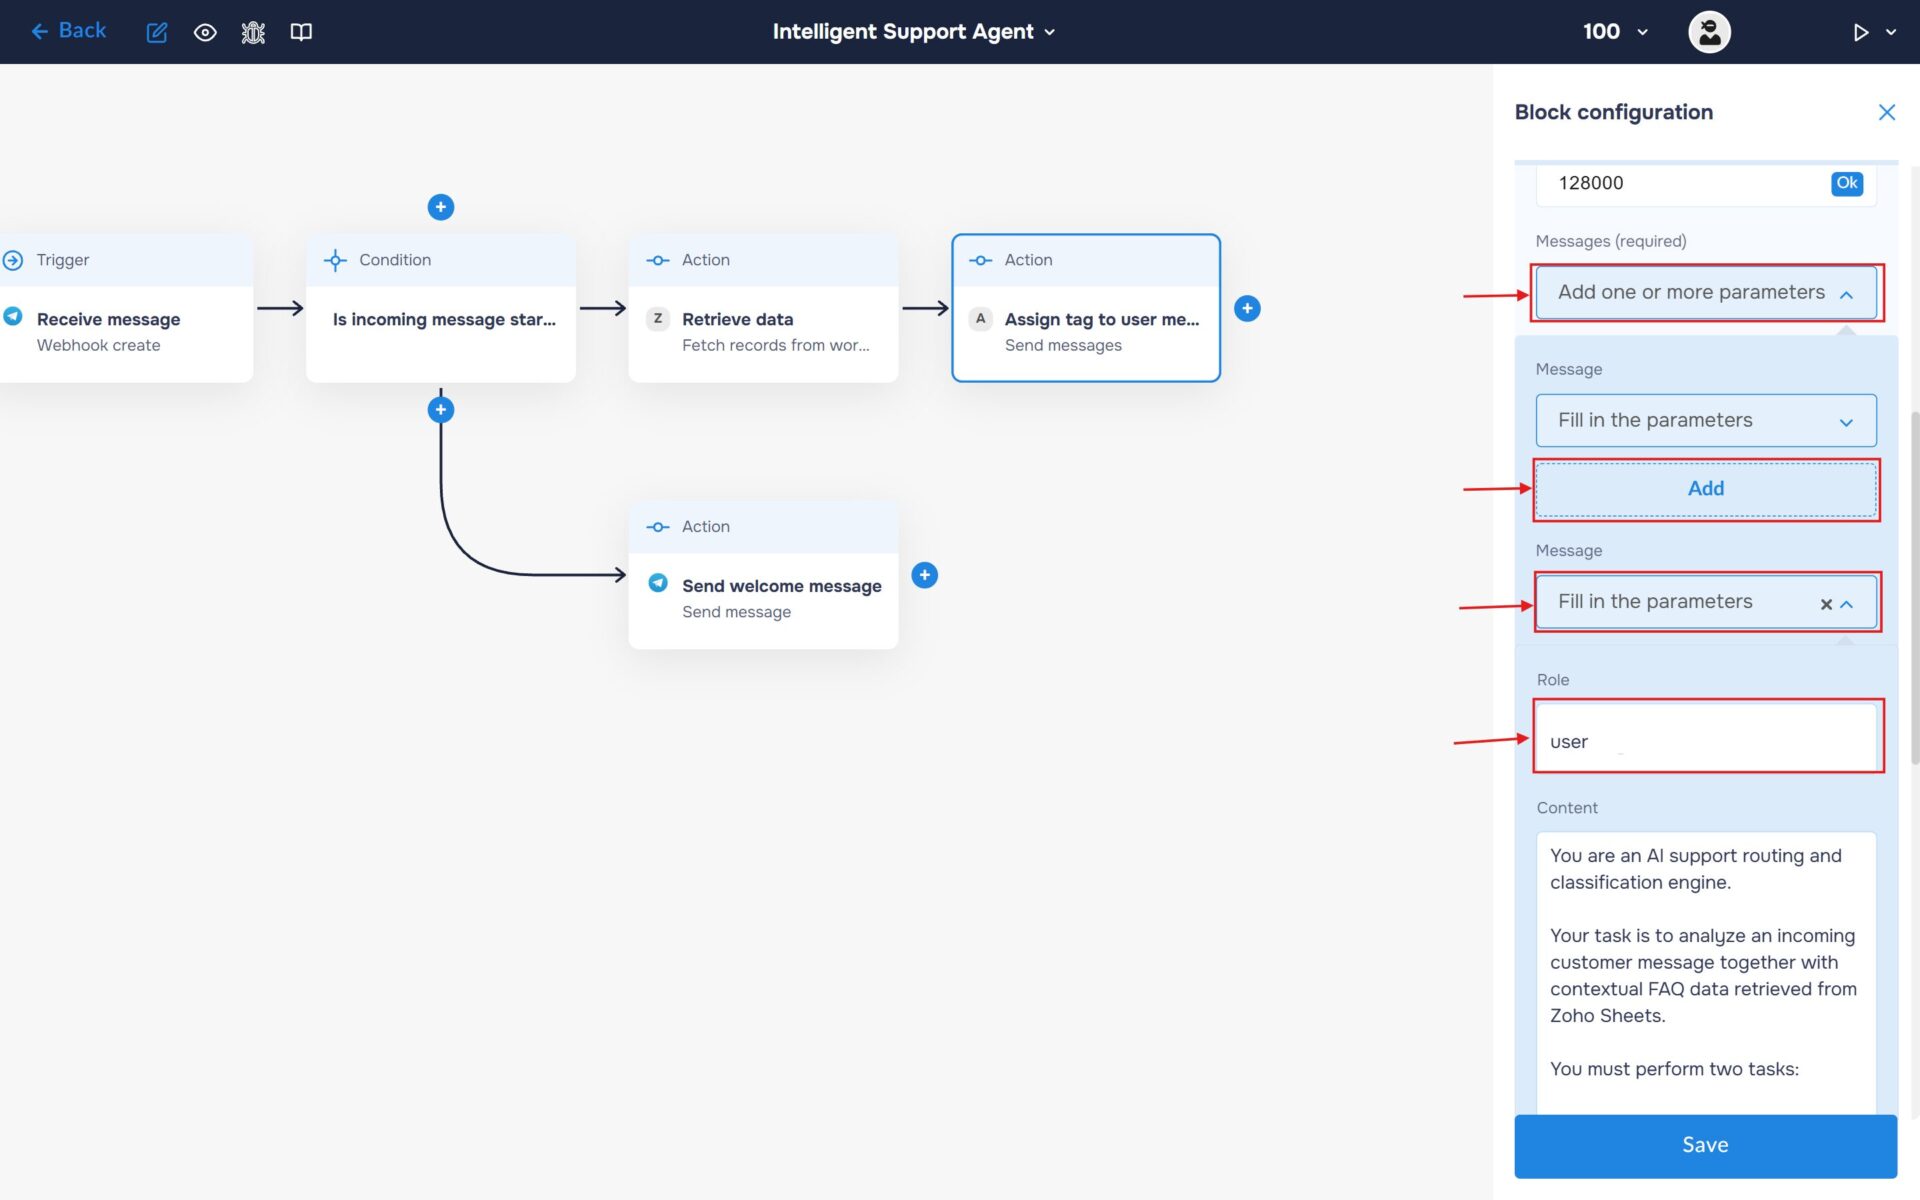
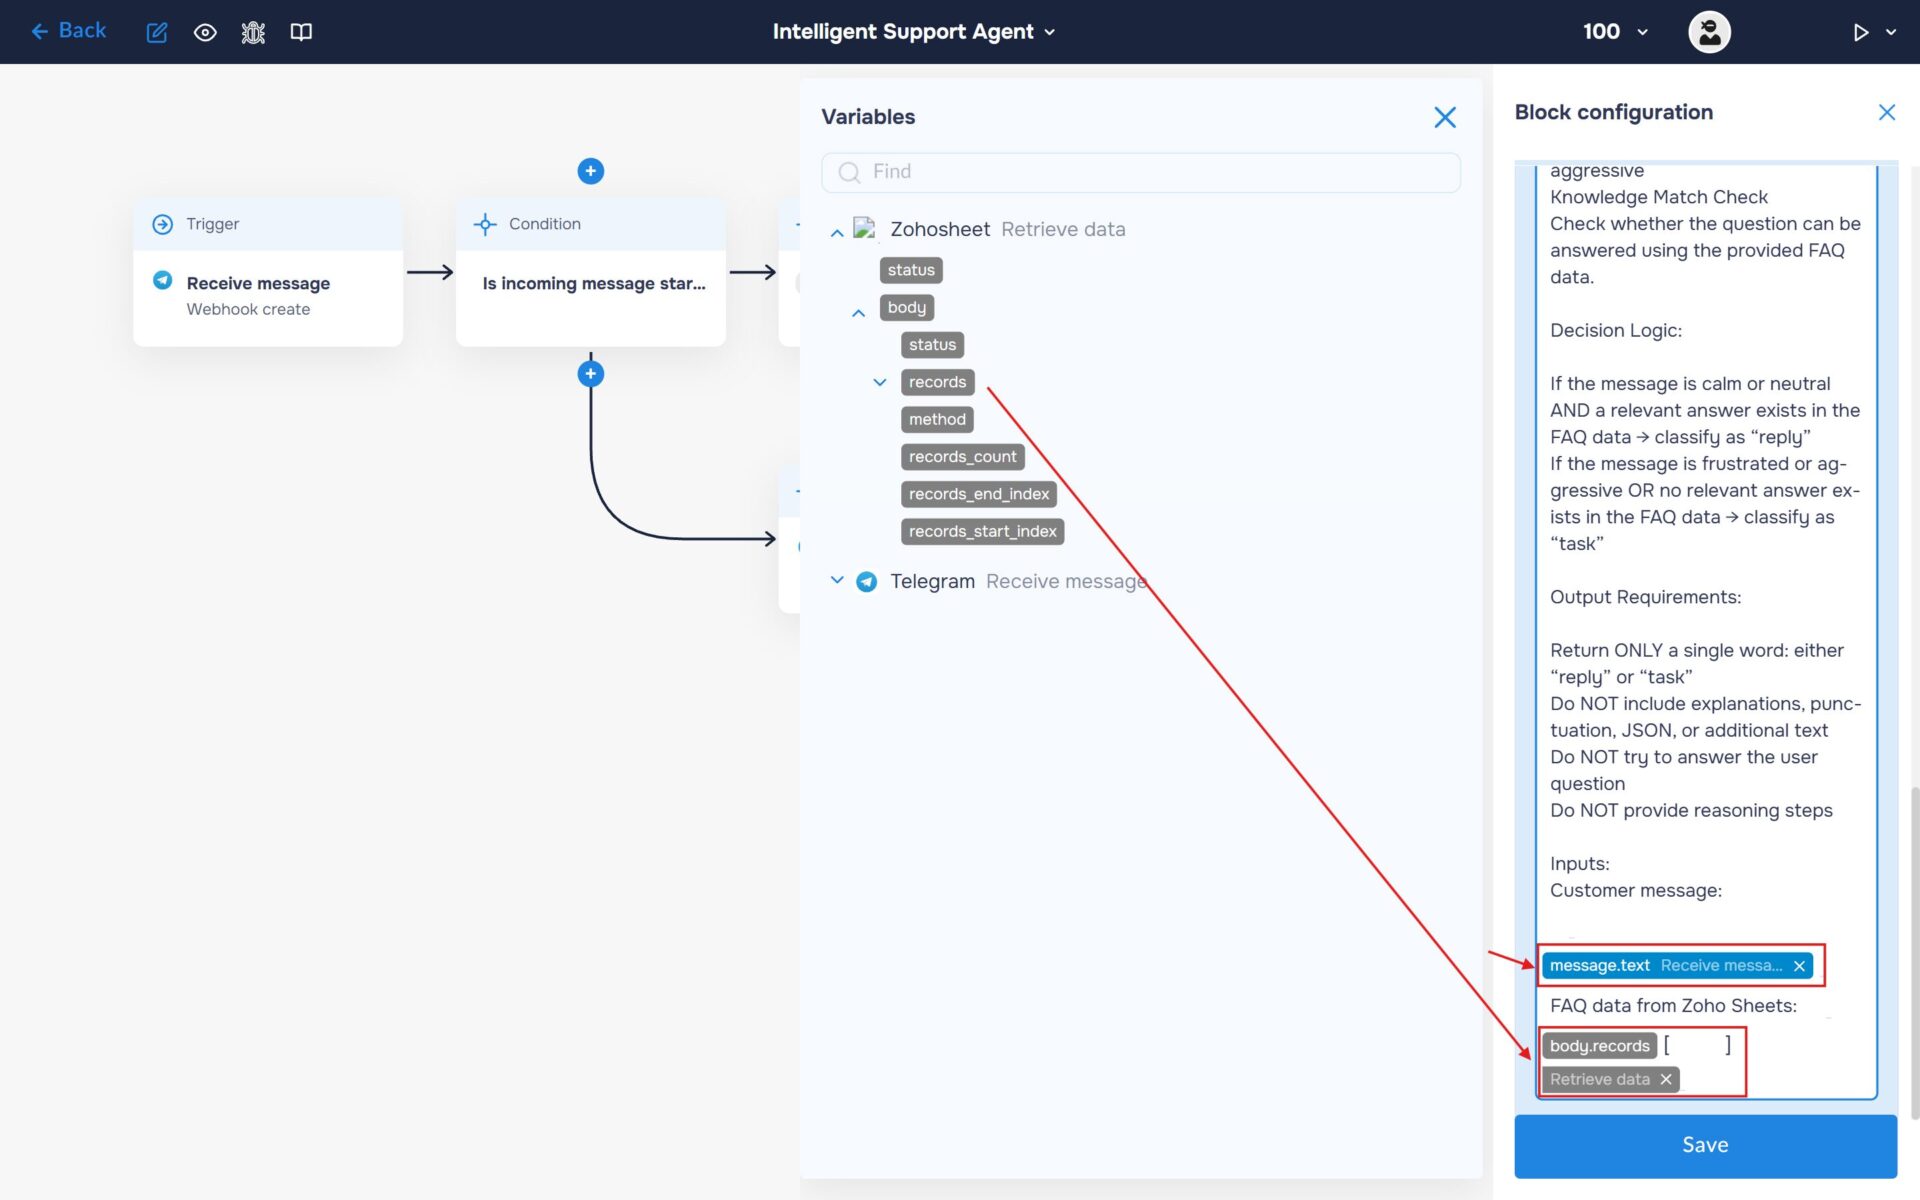
4. Fill the “Content“ field with your prompt and insert variables.
🔧 Default Prompt: You are an AI support routing and classification engine.
Your task is to analyze an incoming customer message together with contextual FAQ data retrieved from Zoho Sheets.
You must perform two tasks:
Sentiment Evaluation
Determine the emotional tone of the user message:
calm
neutral
frustrated
aggressive
Knowledge Match Check
Check whether the question can be answered using the provided FAQ data.
Decision Logic:
If the message is calm or neutral AND a relevant answer exists in the FAQ data → classify as “reply”
If the message is frustrated or aggressive OR no relevant answer exists in the FAQ data → classify as “task”
Output Requirements:
Return ONLY a single word: either “reply” or “task”
Do NOT include explanations, punctuation, JSON, or additional text
Do NOT try to answer the user question
Do NOT provide reasoning steps
Inputs:
Customer message: {Insert message from Telegram}
FAQ data from Zoho Sheets: {Insert data from Zoho Sheets}
Step 6: Route Based on AI Classification
1. Now we need to tell the workflow how to handle requests based on the classification generated by Anthropic Claude. We will use a router (“Condition” block) to split the automation into two paths depending on the assigned message tag.
Add the “Condition” block to determine whether the request should be answered automatically using the FAQ knowledge base or escalated to the support team.
In the “Compare with variable” field, insert the tag returned by the AI classification block. The tag will contain either “reply” or “task”.
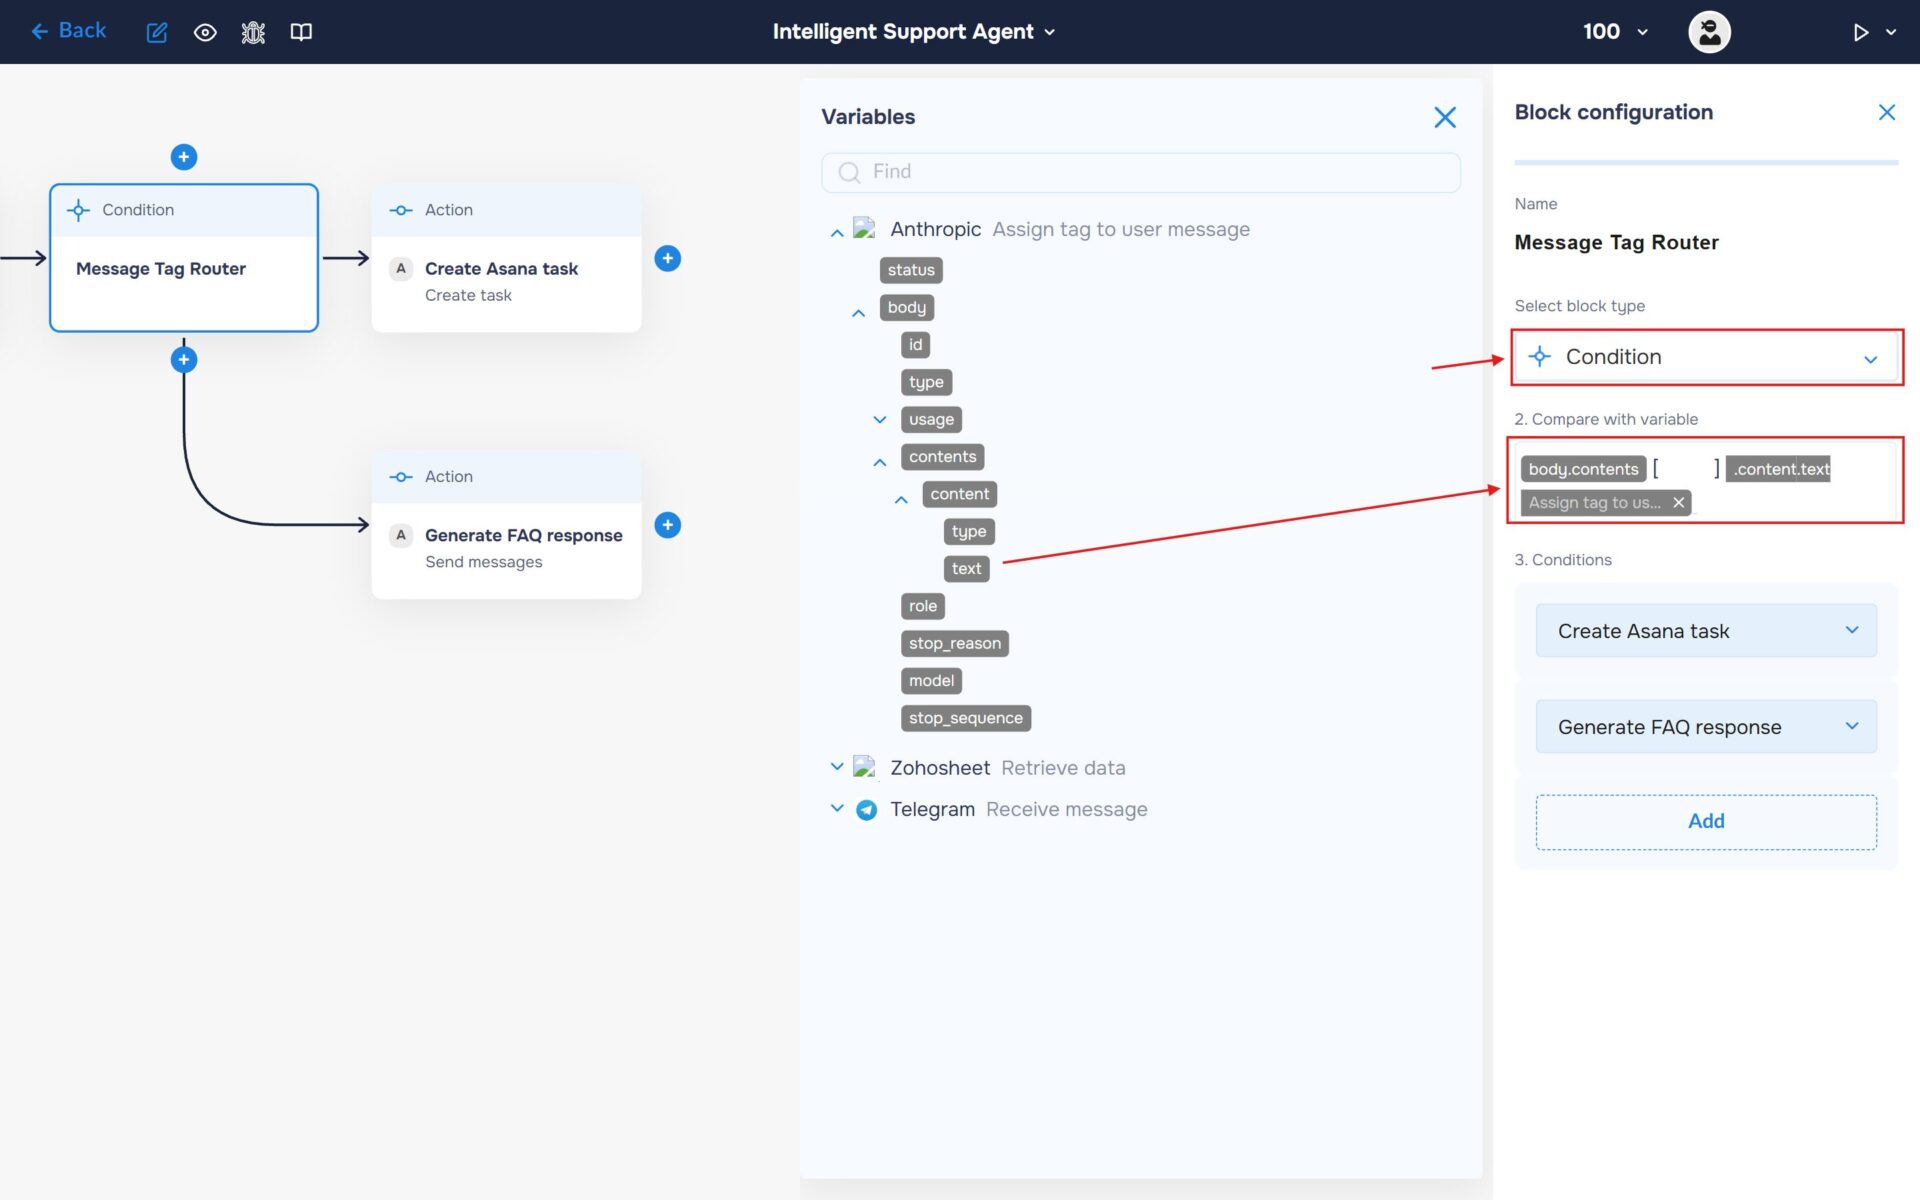
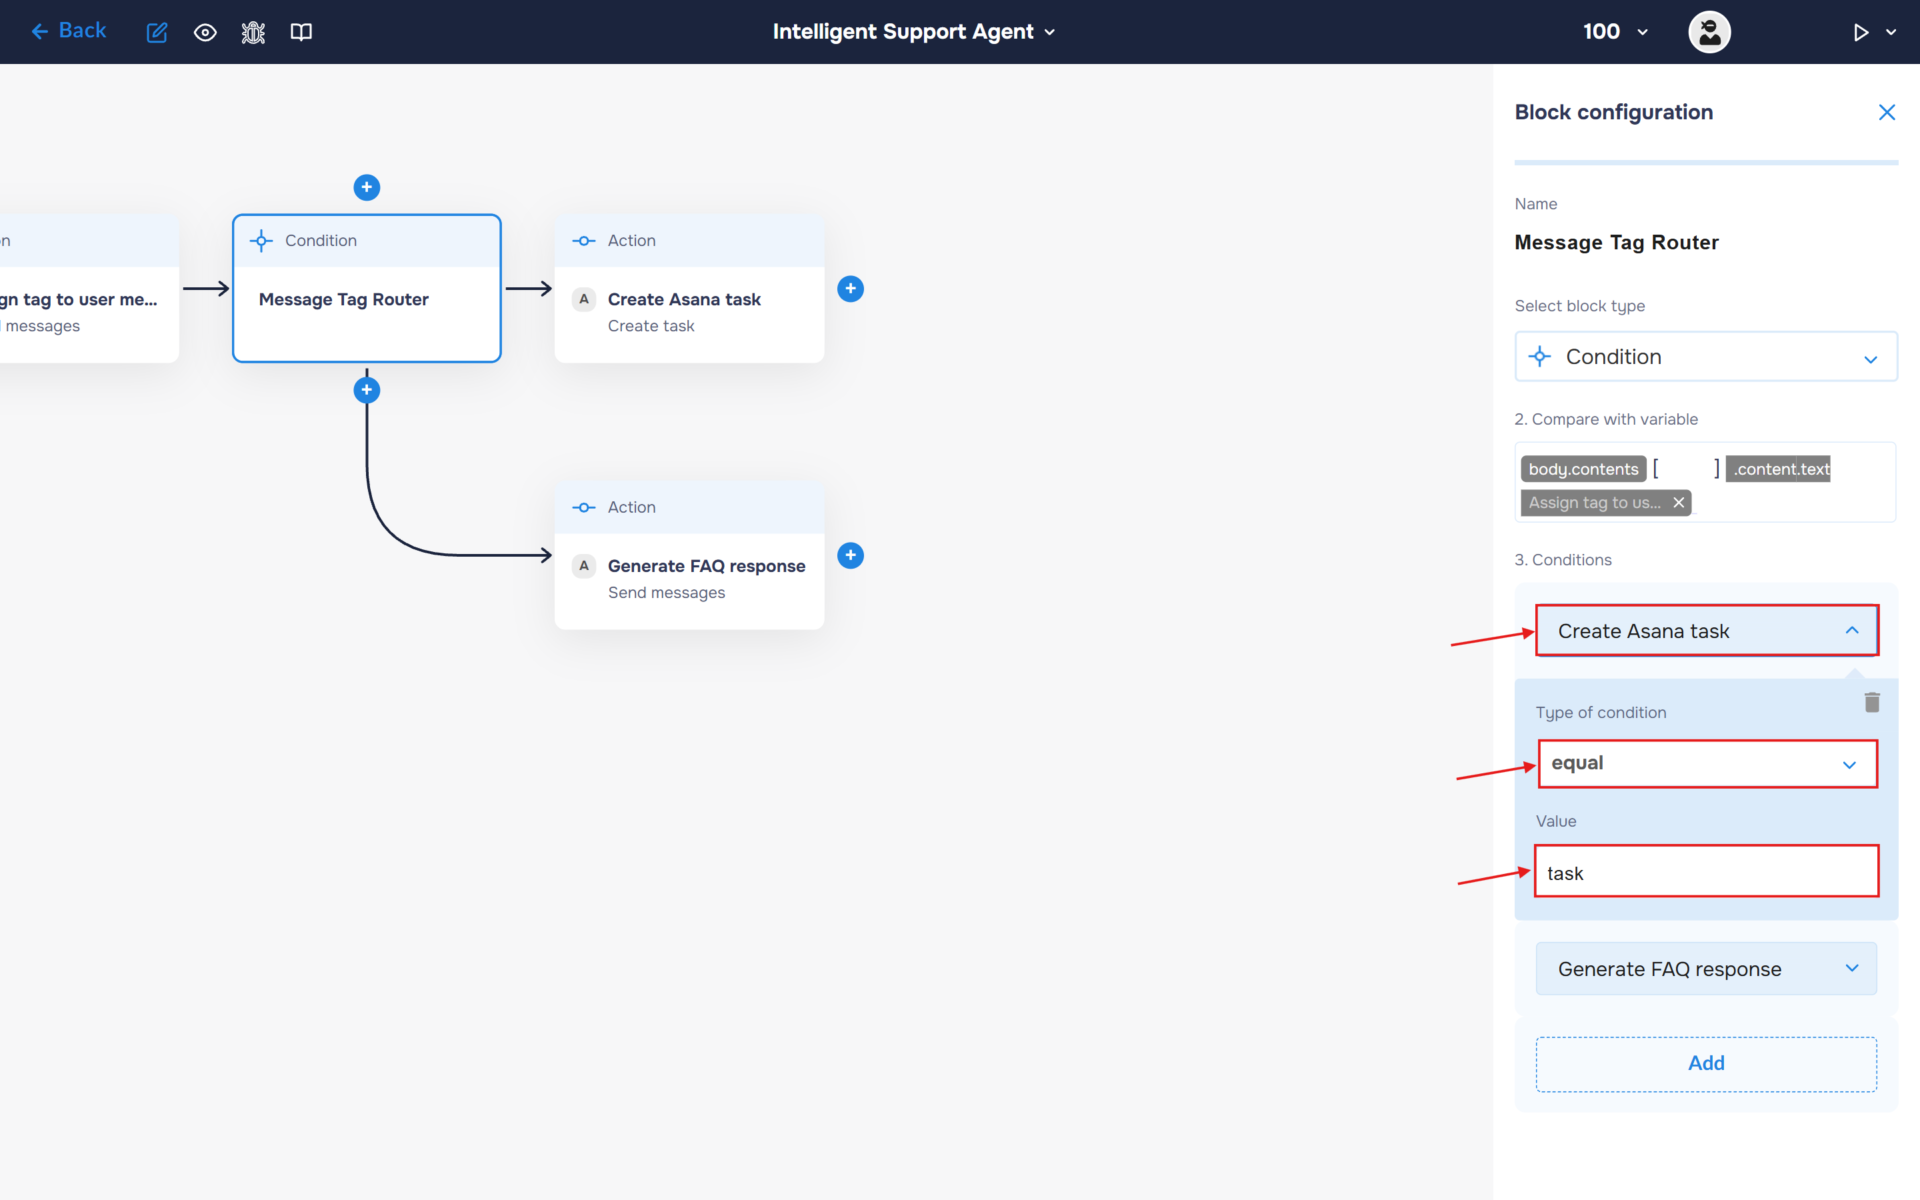
2. Add a “Create Asana task” block — Step 7. Requests tagged as “task” require human attention. This path is used for complex issues, bug reports, negative customer sentiment, or situations where no suitable answer can be found in the FAQ knowledge base. The workflow will automatically create a task in Asana so the support team can investigate and respond.
In the “Conditions” section, expand the newly created block and configure the following values:
- Type of Condition: “equal”
- Value: “task”
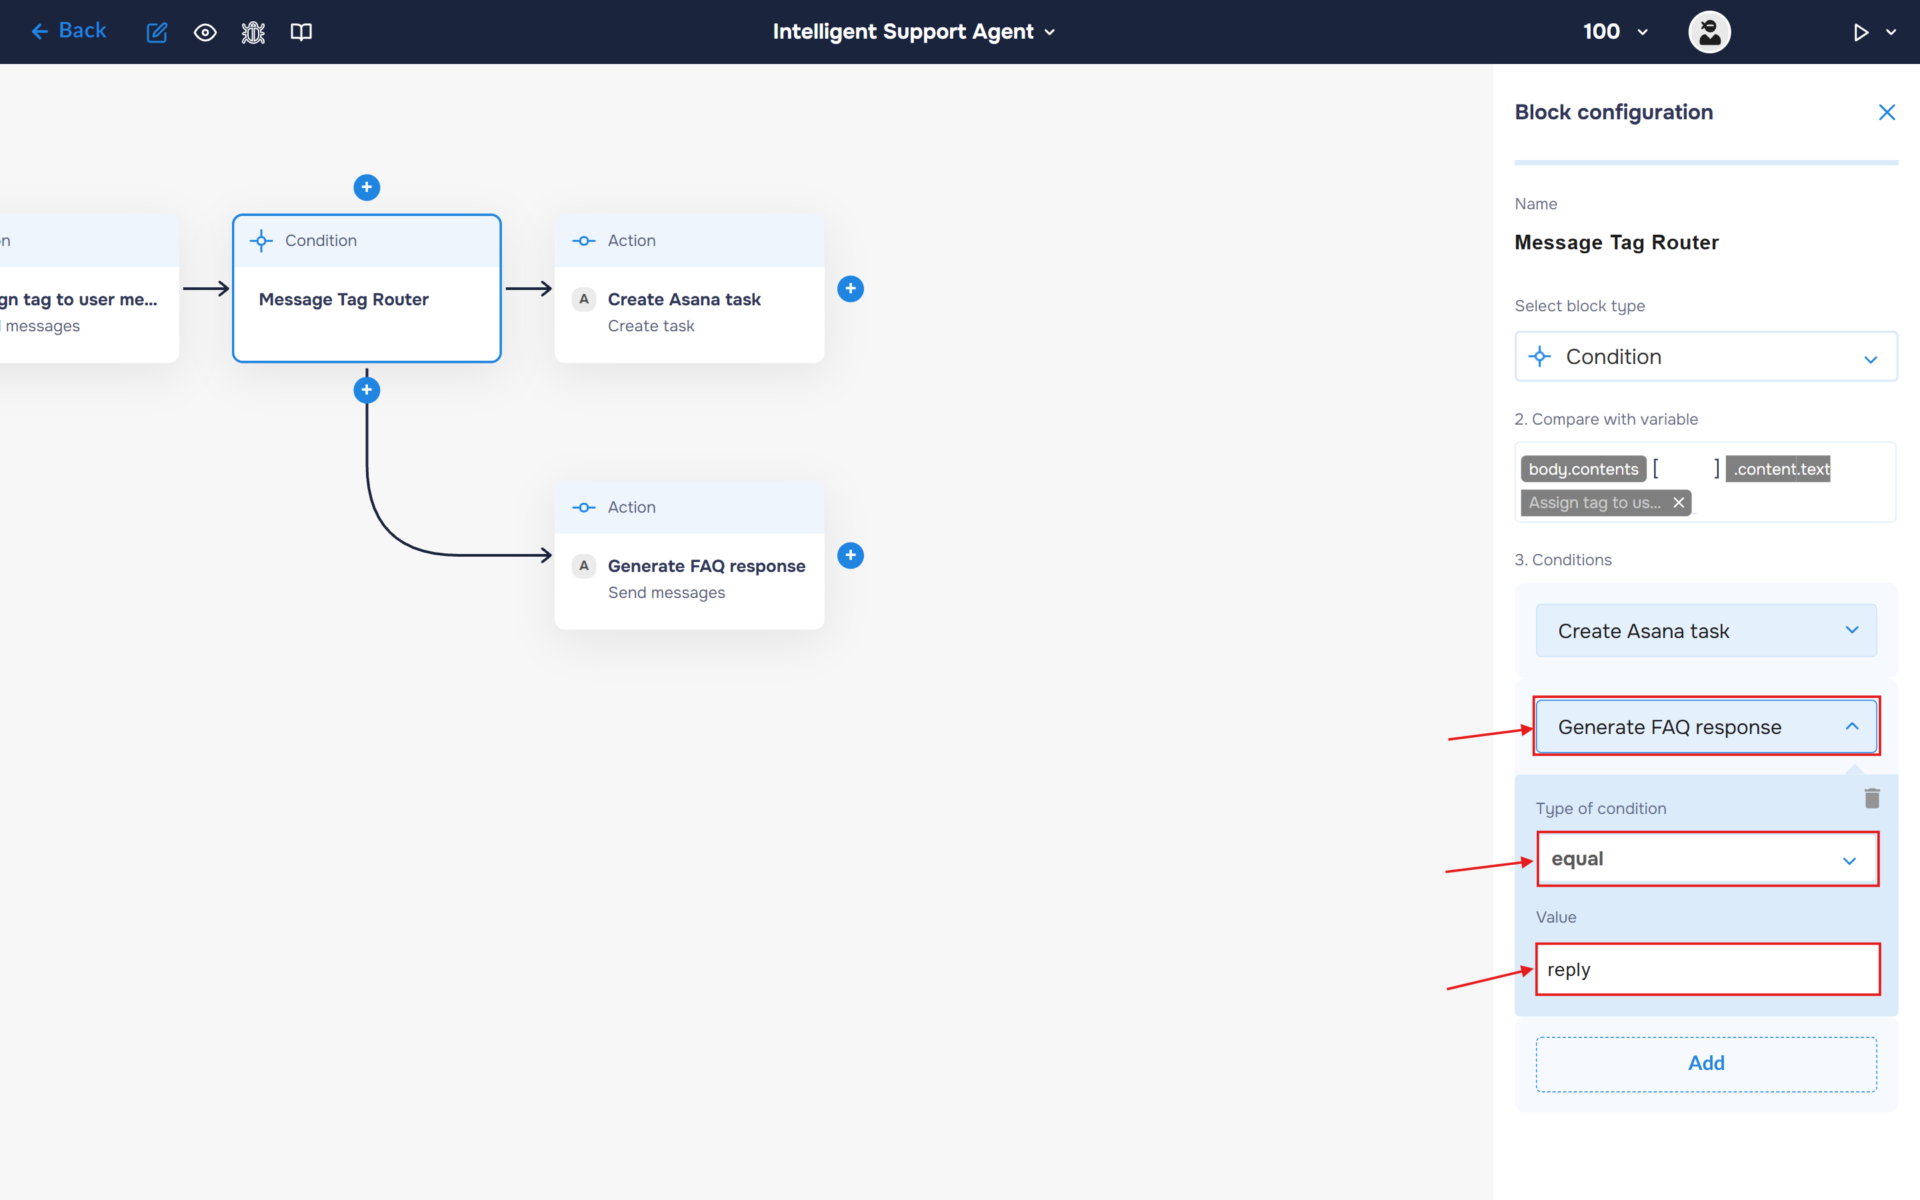
3. Add a “Generate FAQ responce” block — Step 8. Requests tagged as “reply” can be resolved automatically using the information stored in the FAQ database. The workflow will pass the user’s message and the FAQ data to the AI, which will generate a personalized and context-aware response.
In the “Conditions” section, expand the newly created block and configure the following values:
- Type of Condition: “equal”
- Value: “reply”
Step 7.1: Create Support Issue in Asana
1. Create a new task in Asana for escalated user requests that require human intervention. This task will contain all relevant details from the incoming message, allowing the support team to quickly review, prioritize, and resolve the issue outside of the automated workflow.
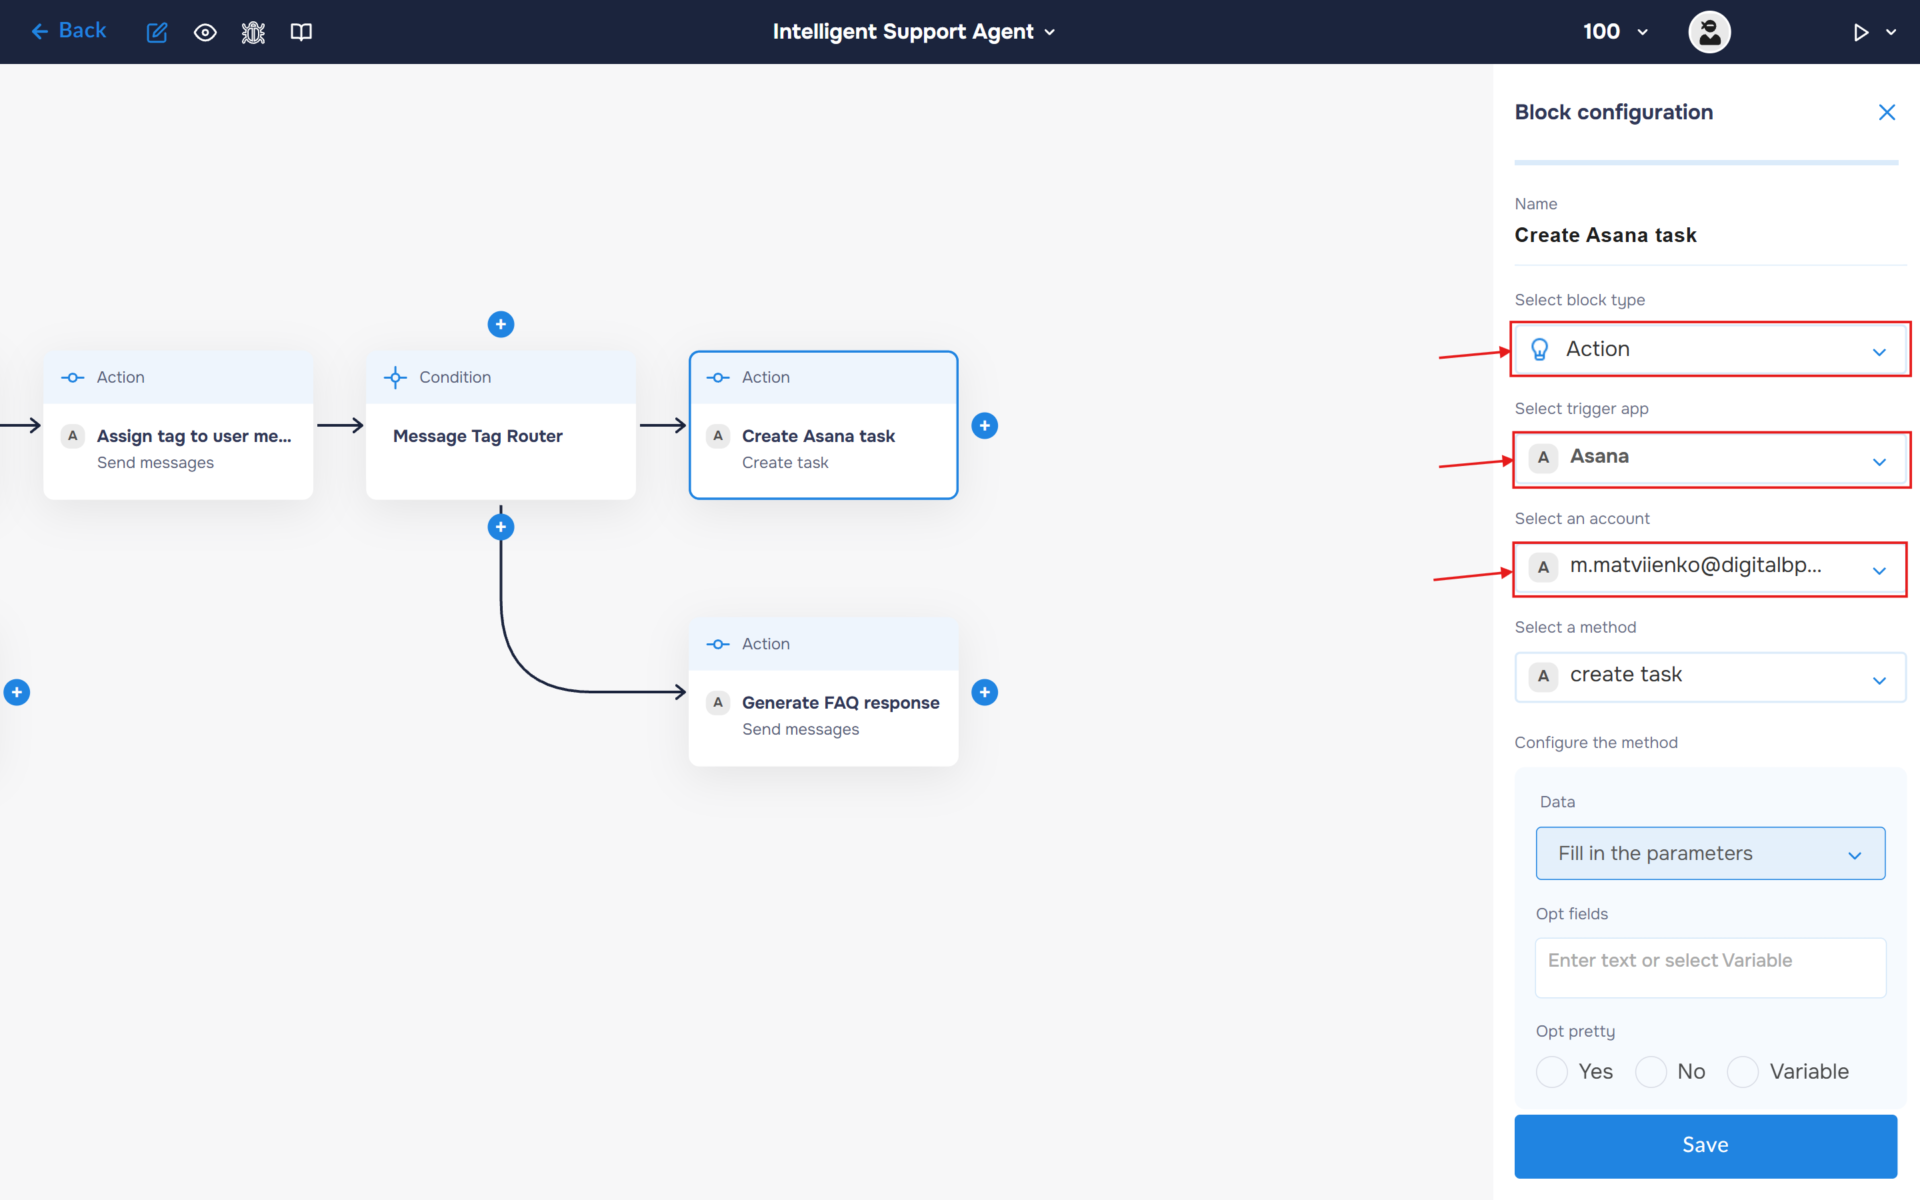
- In the “Block Configuration“ panel, click on the “Select block type“ field and select the “Action” type.
- Next, you need to add Asana service by clicking on the field “Select trigger app“; find and select “Asana“.
- To connect you need to create an authorisation. Click on the “Sign in“ button in the “Select an account“ section.
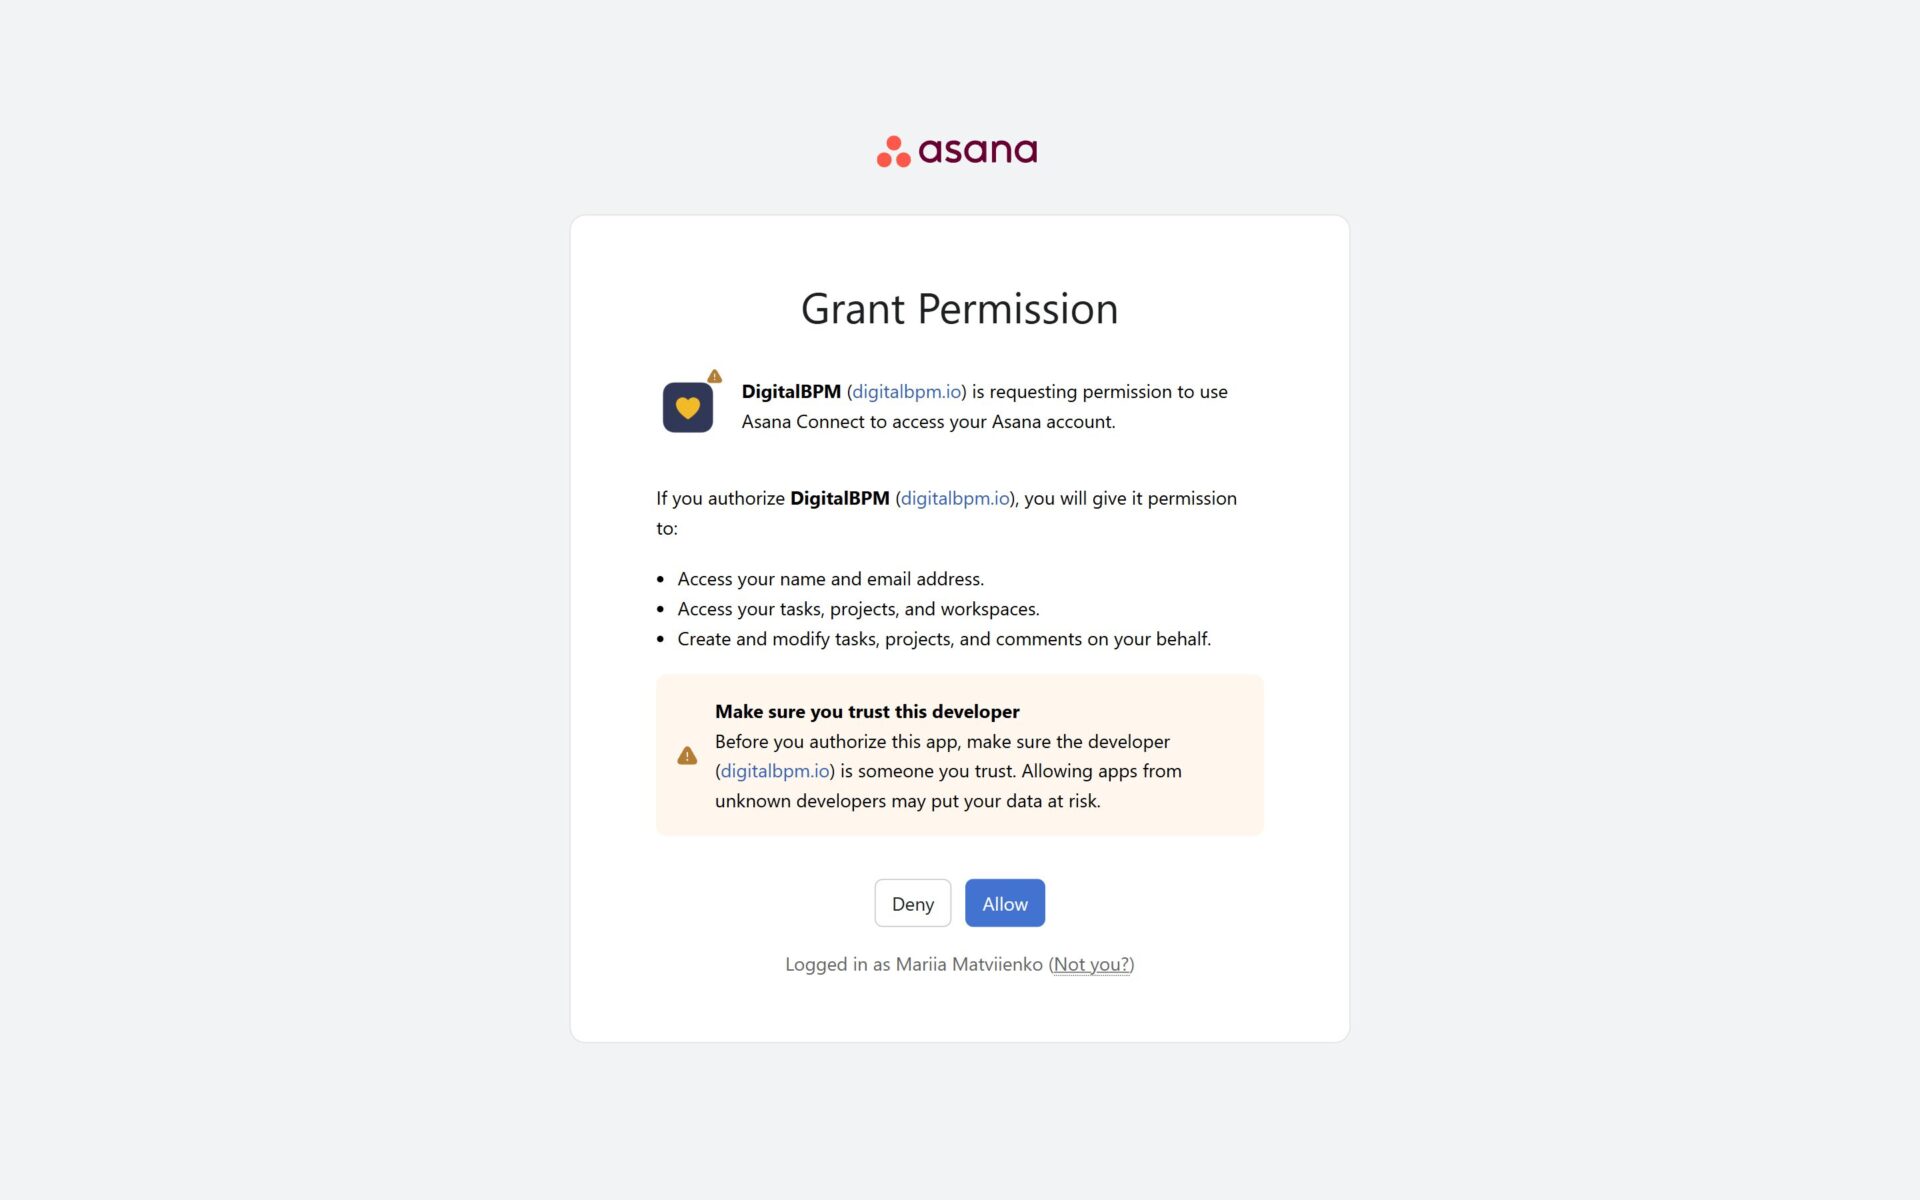
2. Sign in to your Asana account and grant DigitalBPM the required permissions to access your workspace.
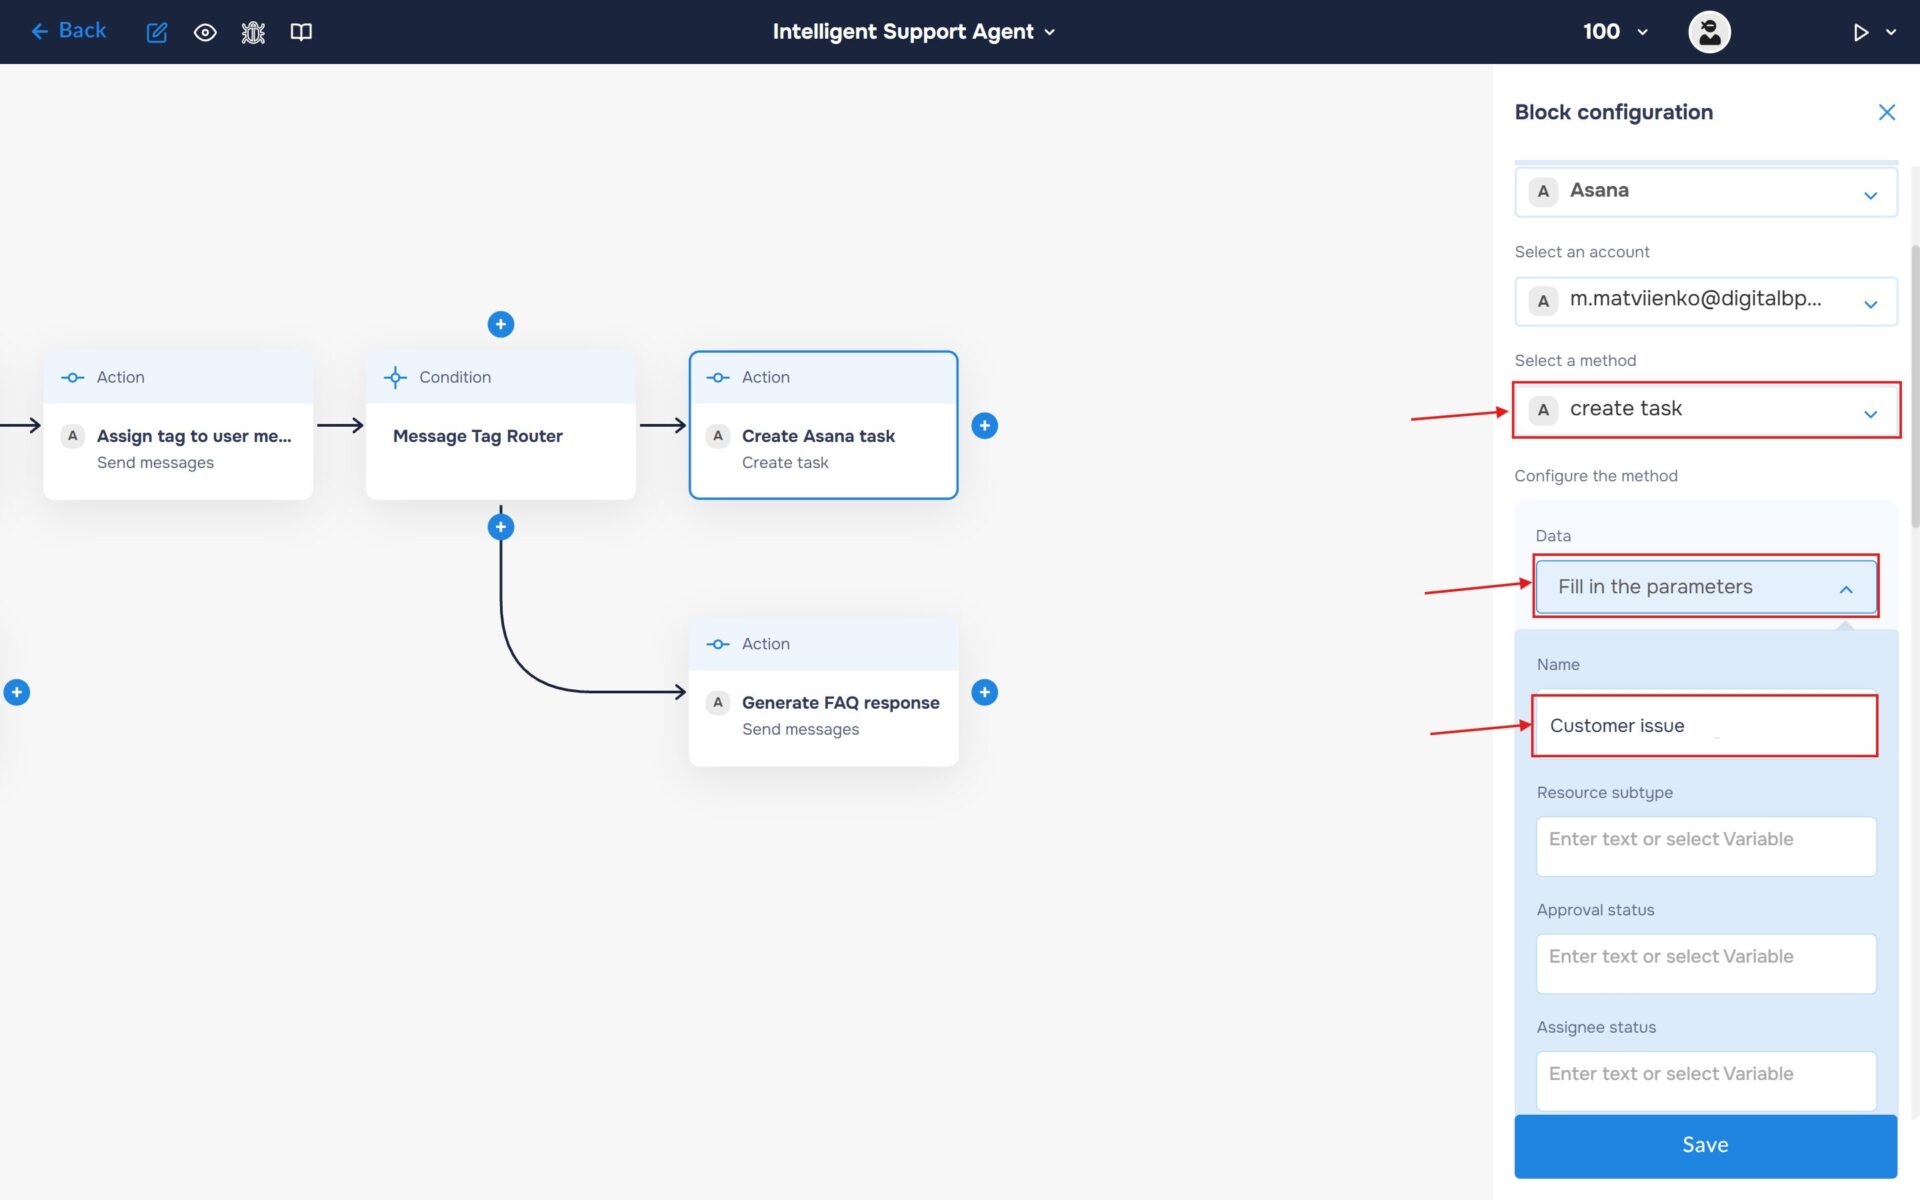
3. Find and select the “create task” method. In the “Configure the method” section, select “Fill in the parameters”. Expand it and set title of the task, for example “Customer issue”.
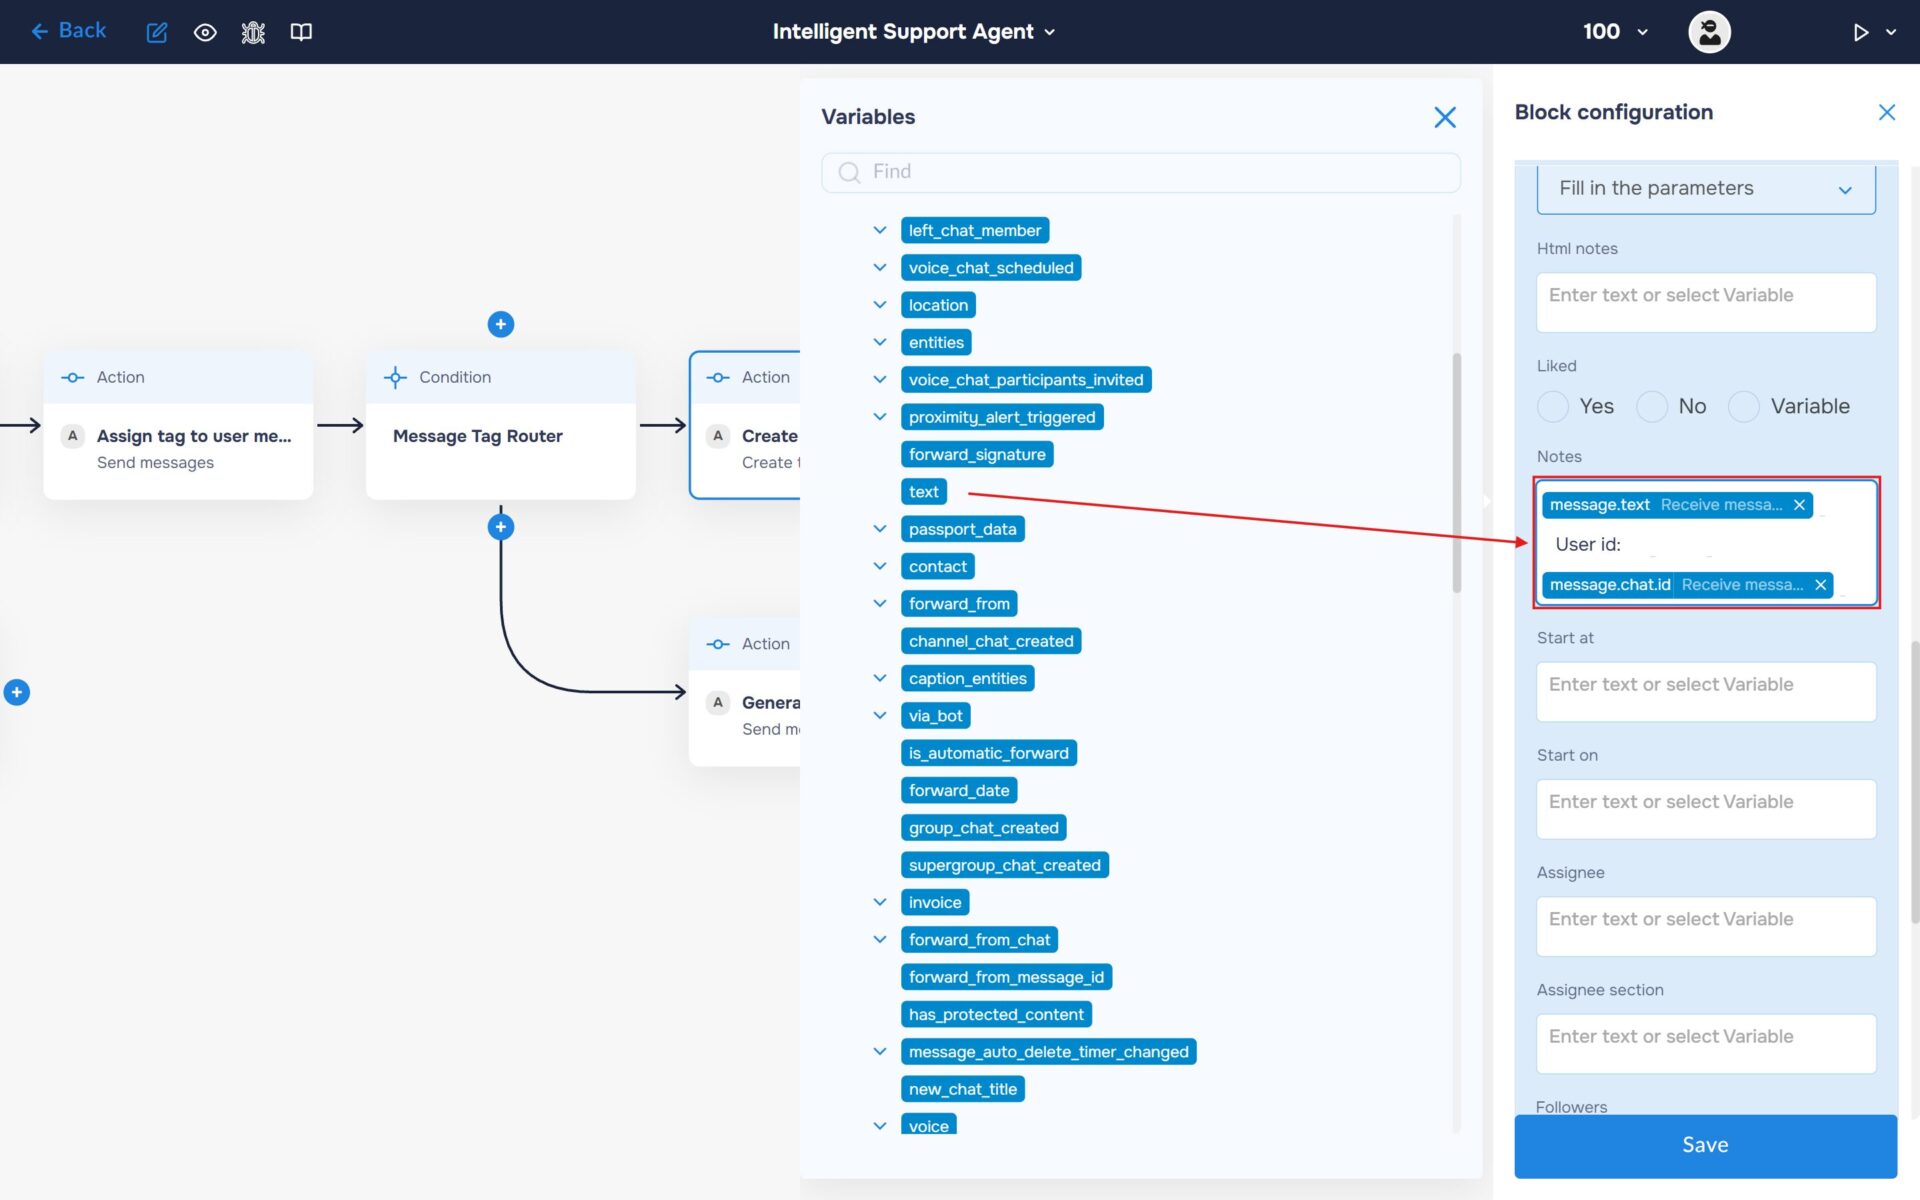
4. Populate the “Notes” field with the task description. Include the user’s message and their chat ID so the support team has full context for handling the request.
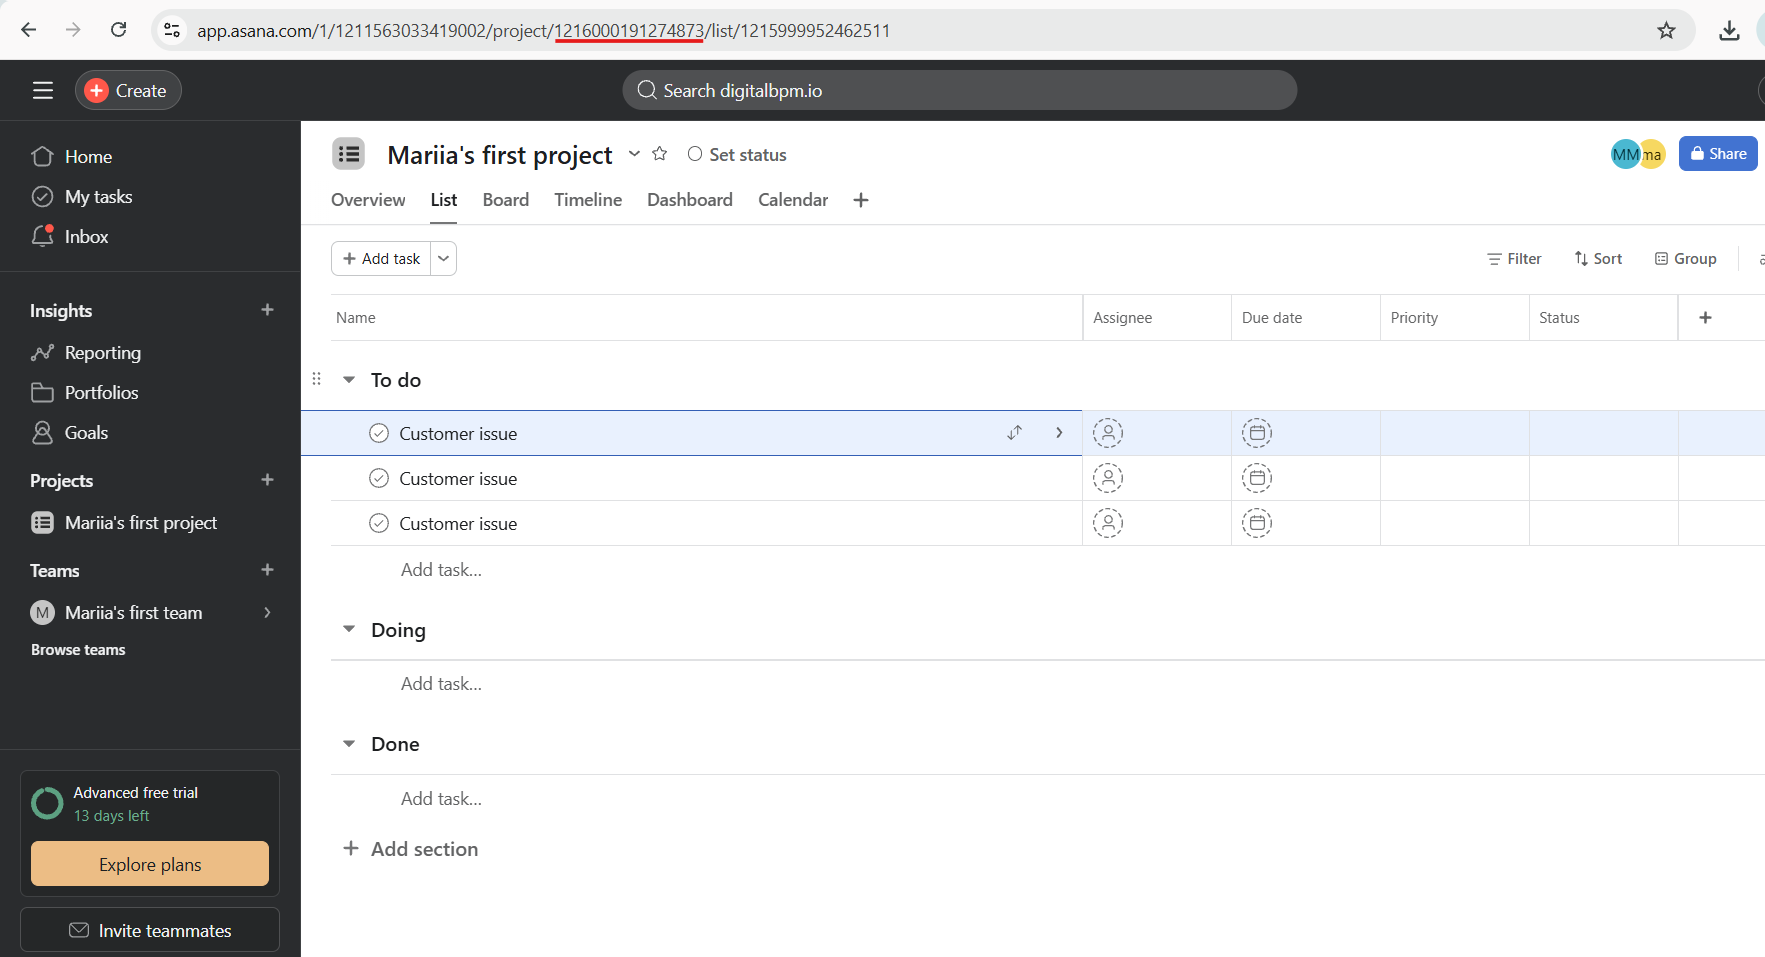
5. Go to the Asana, open the project and copy the project ID from the URL.
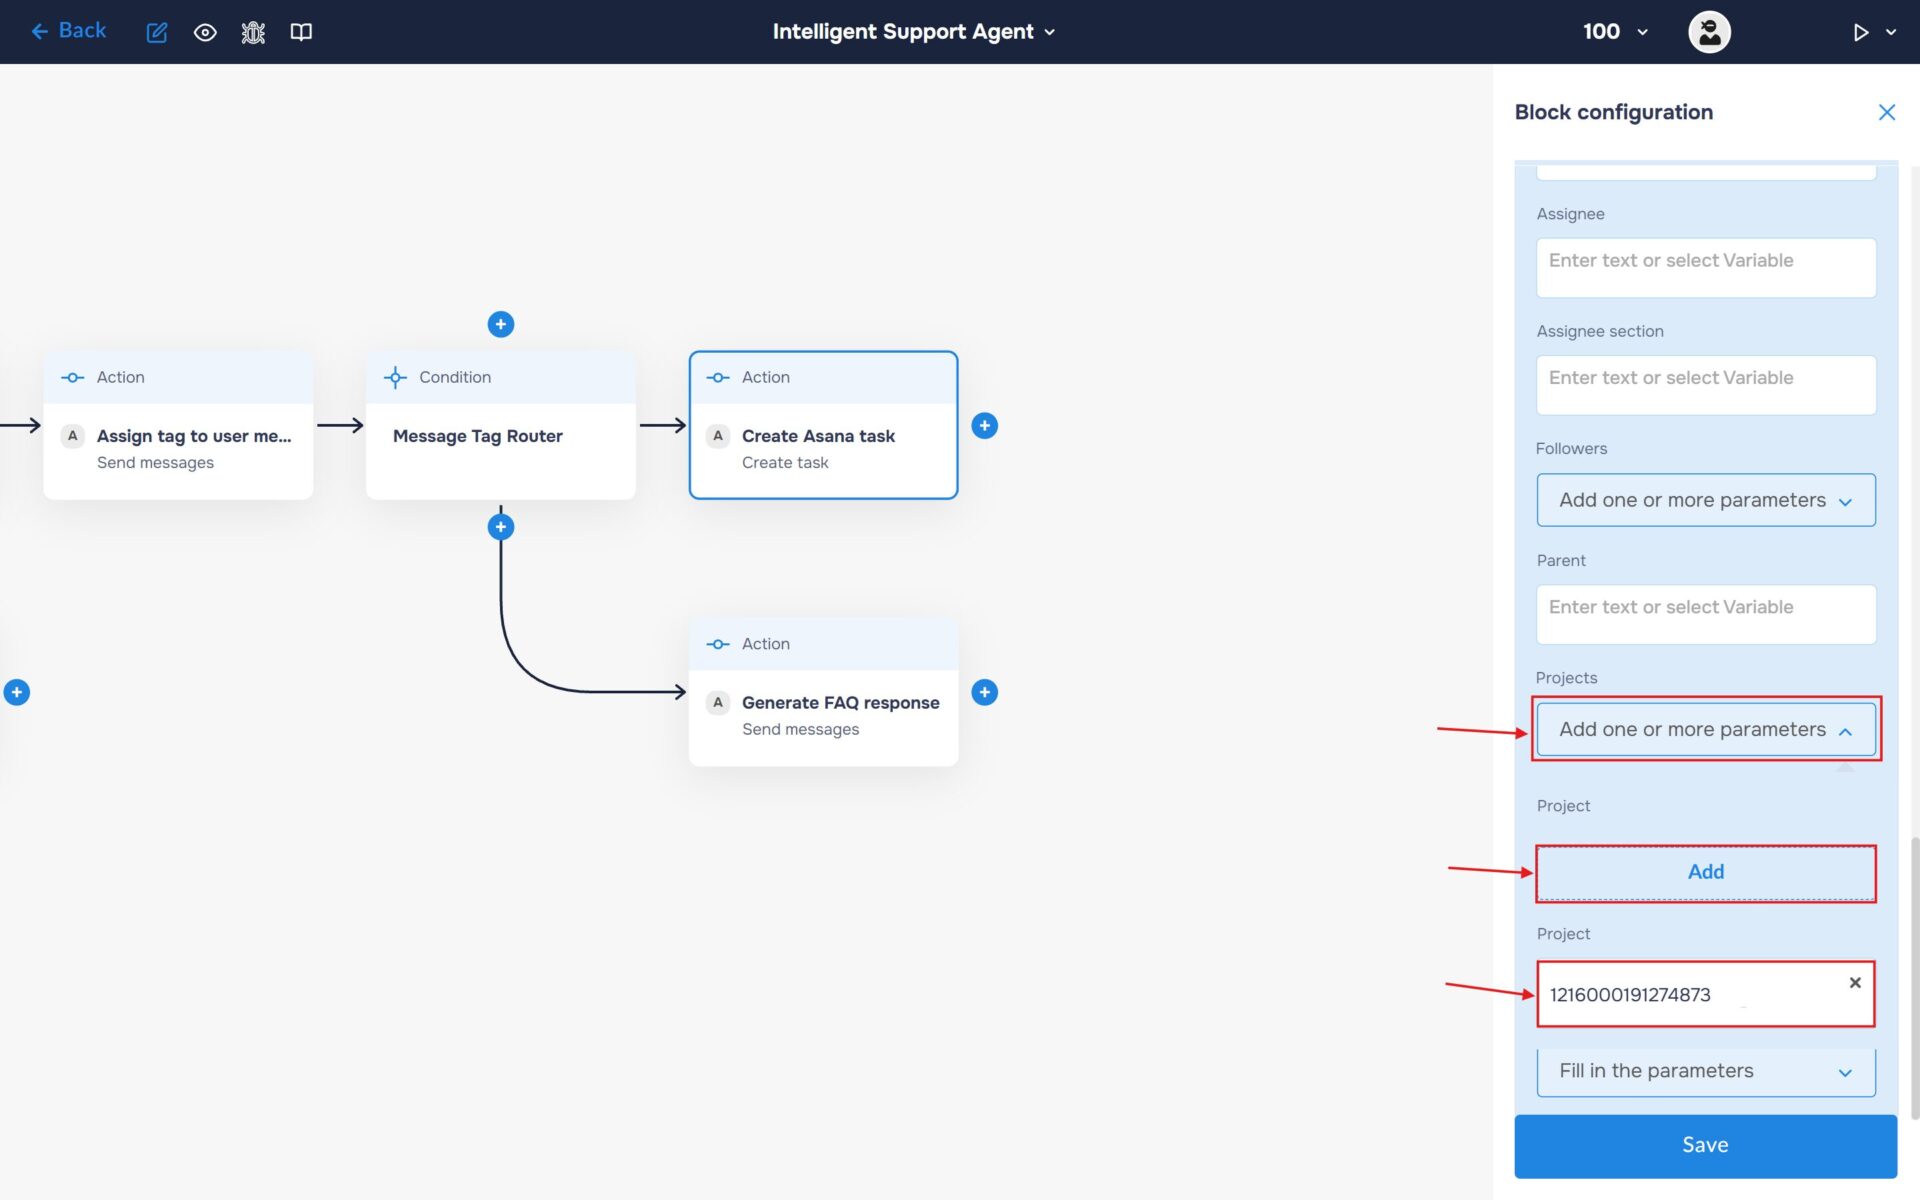
6. In the “Projects” section, add a new project and paste the copied project ID into the corresponding field.
Step 7.2: Notify User That Their Issue Has Been Received на Notify the User
Send a confirmation message to the user notifying them that their request has been successfully received and is now being processed by the support team. This message helps set expectations and reassures the user that their issue has been registered and will be handled shortly.
- Select the block type as “Action” and the service as “Telegram“.
- Choose an account and select it.
- Find and select the “send message” method.
- In the “Chat ID” field, enter the Chat ID stored in the “message.chat.id” variable.
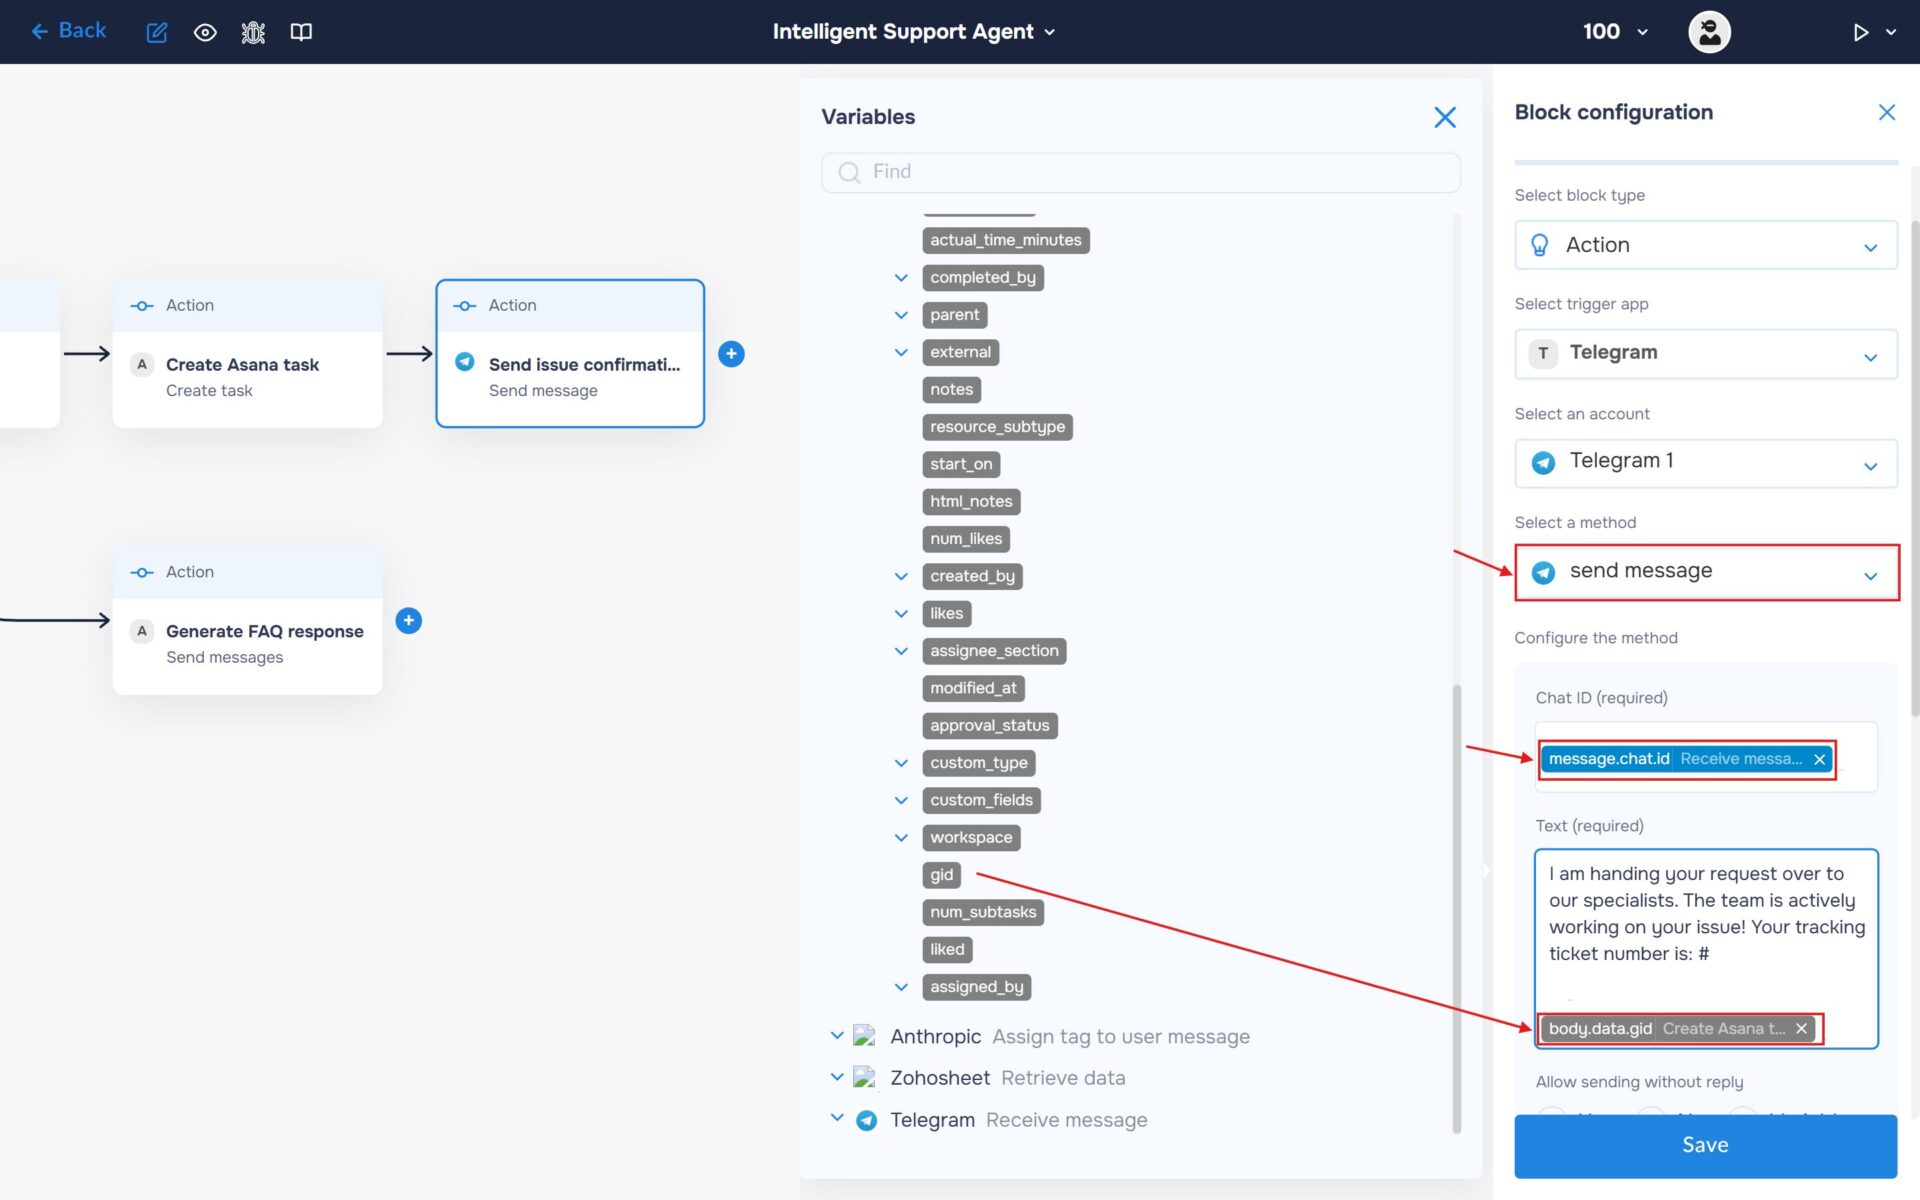
- In the “Text field”, enter a predefined confirmation message. Default message: “I am handing your request over to our specialists. The team is actively working on your issue! Your tracking ticket number is: #”.
- Append the created Asana issue ID to the confirmation message.
Step 8.1: Generate FAQ-Based AI Response
Configure Anthropic Claude to generate a natural, personalized reply using the customer’s message and the FAQ knowledge base retrieved from Zoho Sheet. The AI will identify the most relevant information from the FAQ data and rewrite it into a clear, friendly, and context-aware response.
- In the “Block Configuration“ panel, click on the “Select block type“ field and select the “Action” type.
- Next, you need to add Anthropic Claude service by clicking on the field “Select trigger app“; find and select “Anthropic“.
- Choose an account and select it.
- The next step is to select a method, so click on the “Select a method“. Find and select “send messages”.
- Specify the model name in the corresponding field (for example, “claude-sonnet-4-6”) and set the Max tokens“ supported by the selected model. For Claude Sonnet 4.6, the maximum context window is 128,000 tokens, which allows the AI to process large prompts and detailed subscriber information when generating personalized welcome emails.
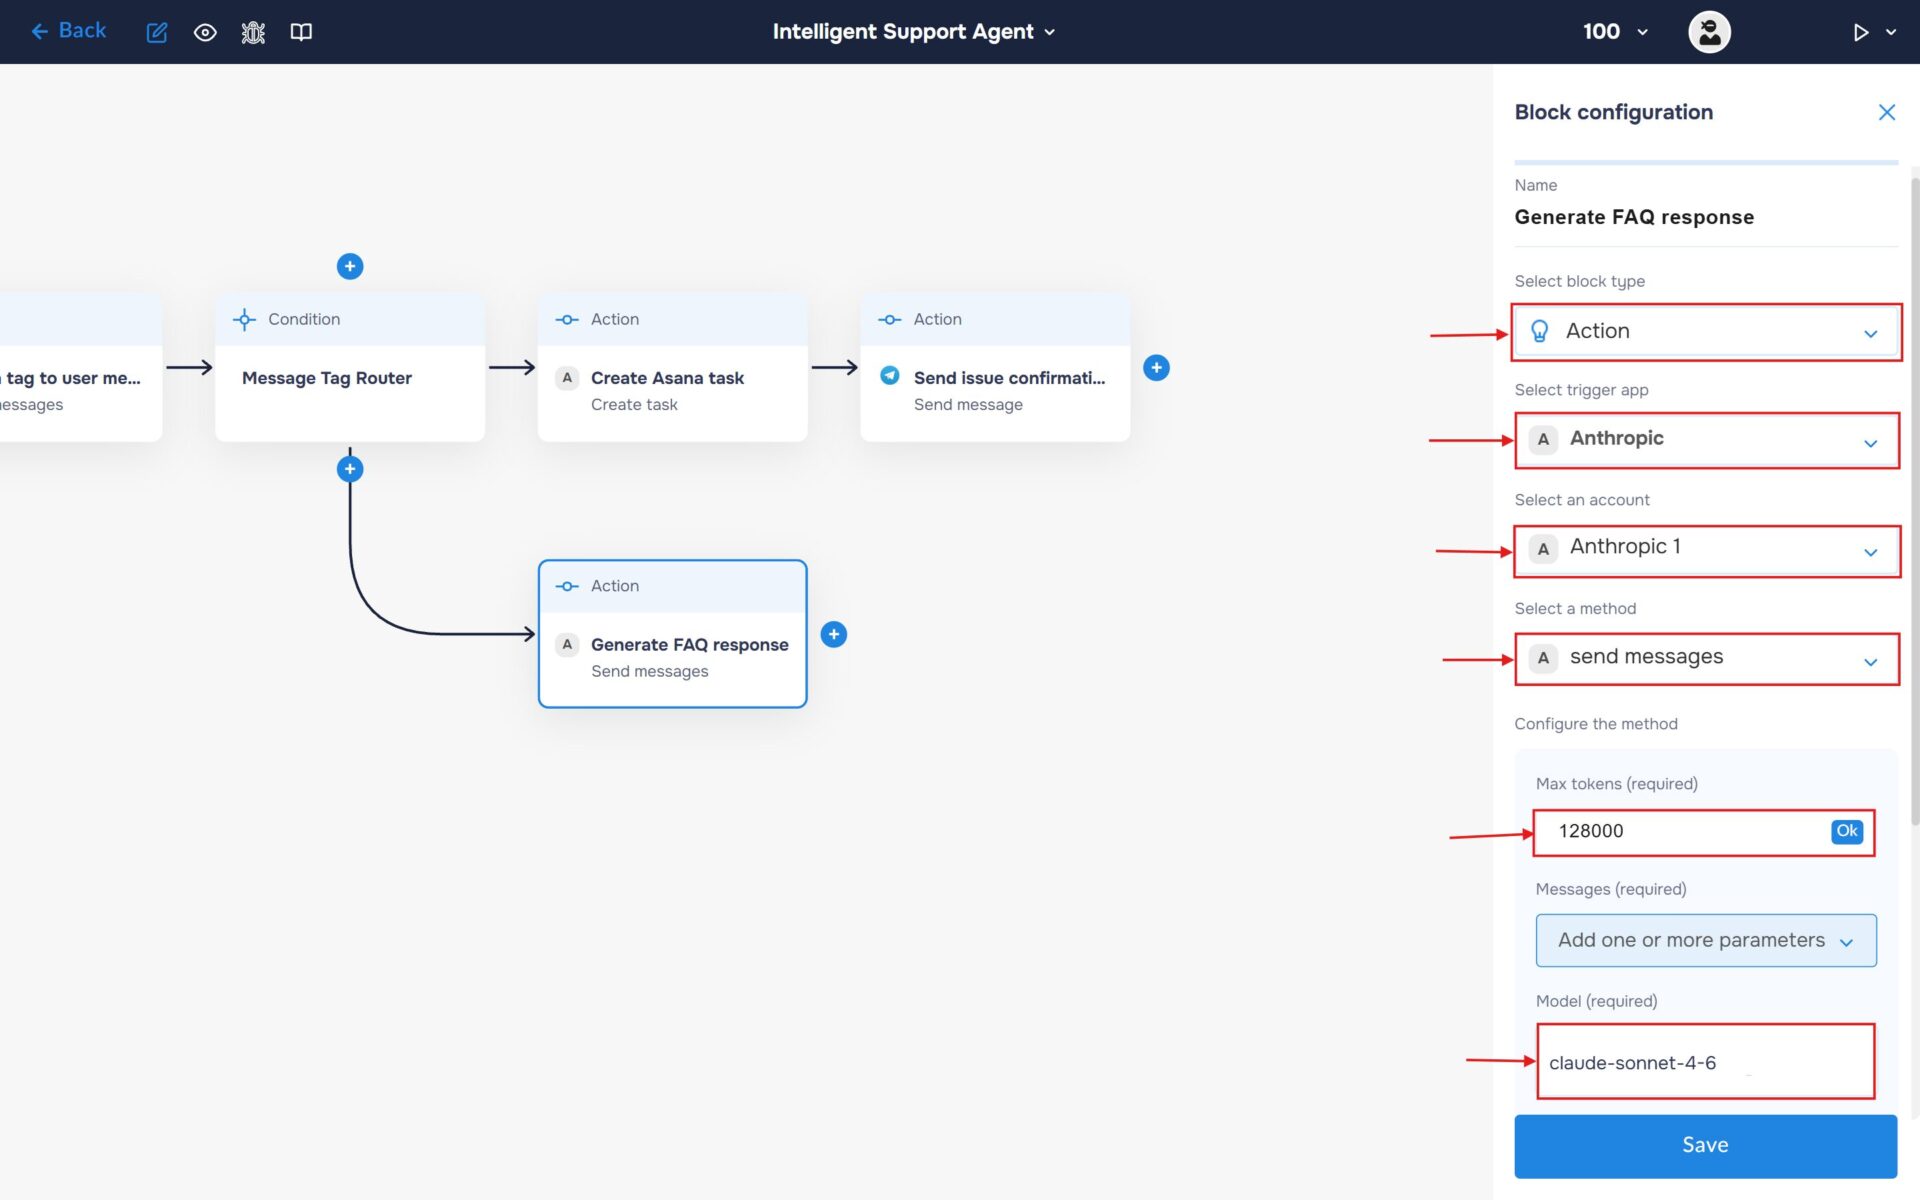
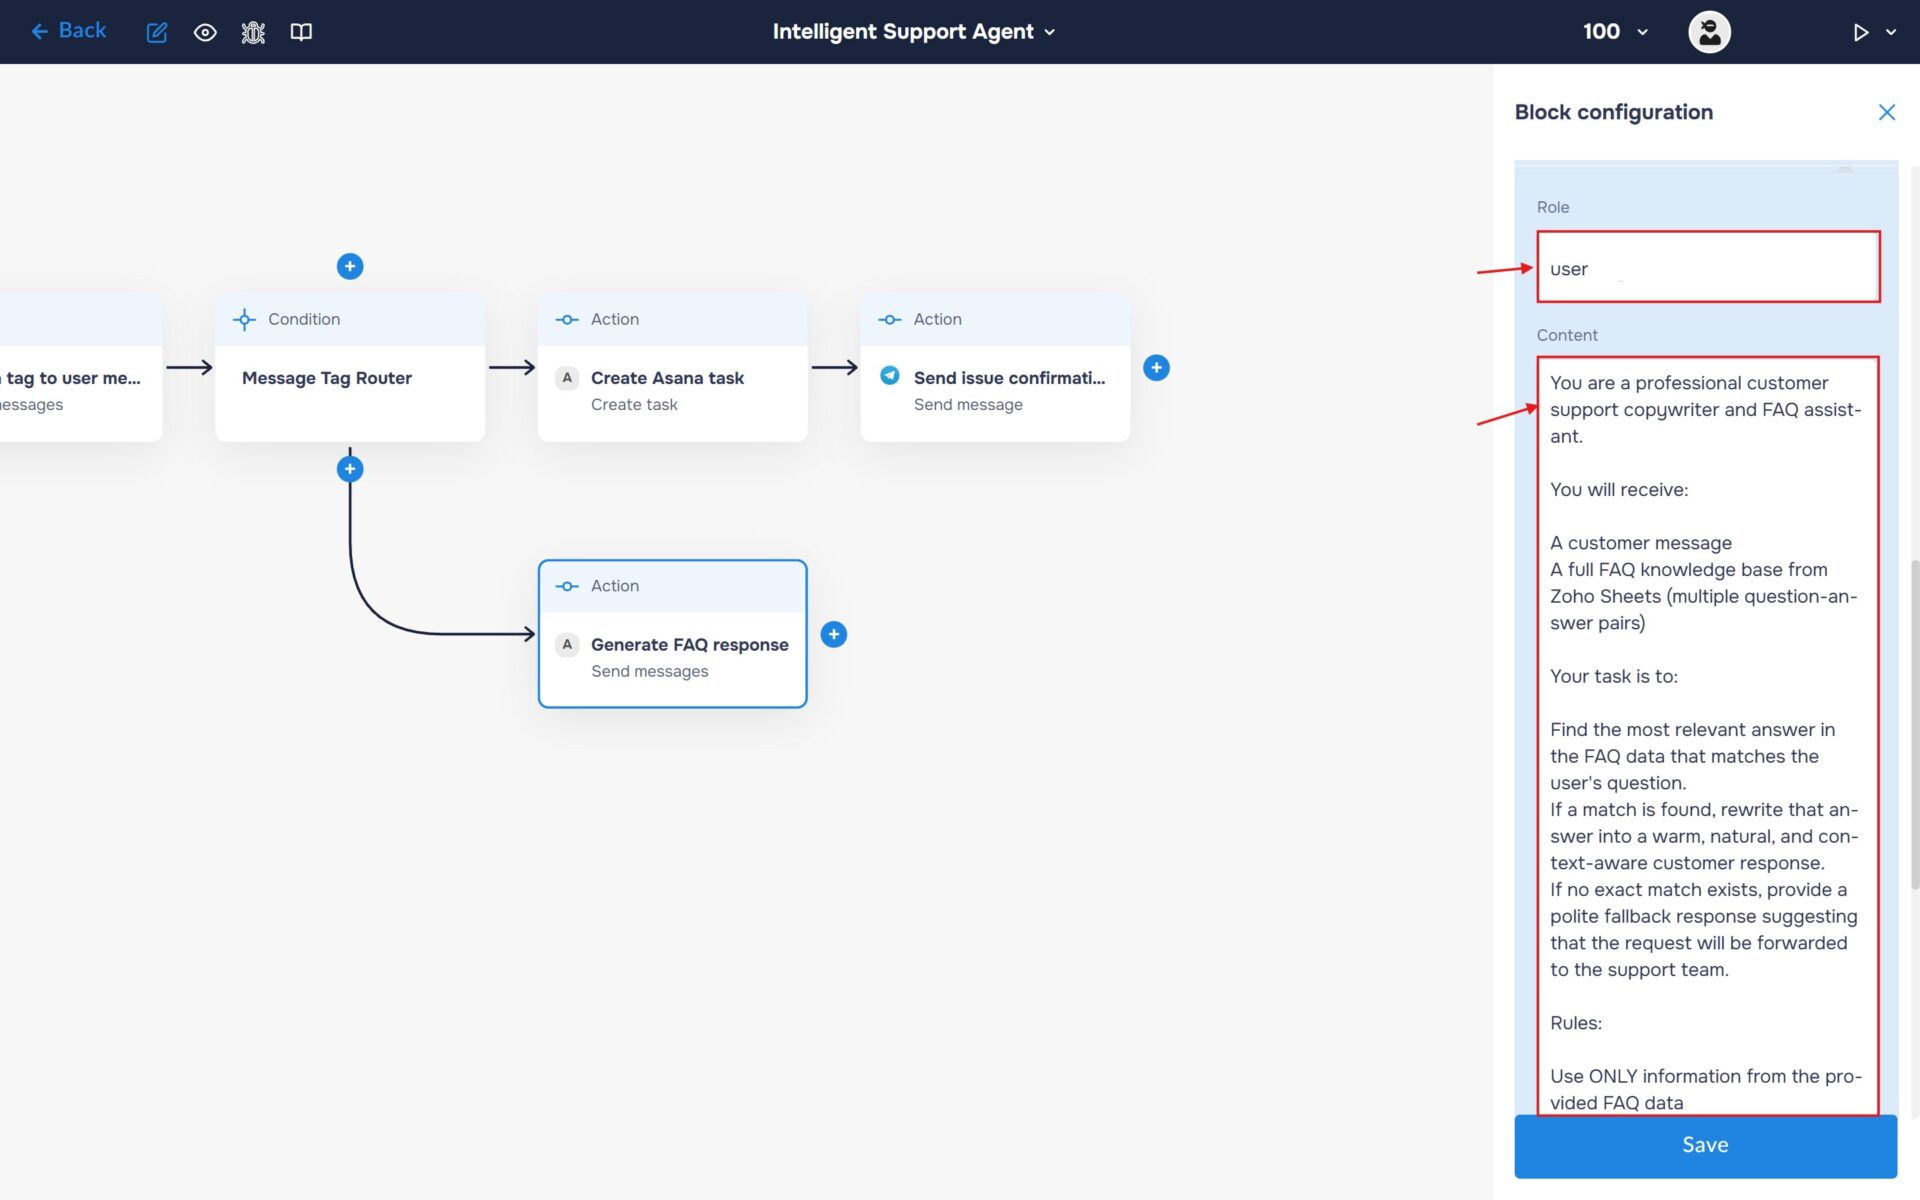
2. In the “Message” section, select “Add one or more parameters”. Add a “Message” object and expand it. Then expand “Fill in the parameters”. This is where you will enter the prompt that will be sent to the AI model for processing.
Fill the “Role“ field with value “user“.
Fill the “Content“ field with your prompt and insert variables, following the same approach used in Step 5.
🔧 Default Prompt: You are a professional customer support copywriter and FAQ assistant.
You will receive:
A customer message
A full FAQ knowledge base from Zoho Sheets (multiple question-answer pairs)
Your task is to:
Find the most relevant answer in the FAQ data that matches the user’s question.
If a match is found, rewrite that answer into a warm, natural, and context-aware customer response.
If no exact match exists, provide a polite fallback response suggesting that the request will be forwarded to the support team.
Rules:
Use ONLY information from the provided FAQ data
Do NOT invent facts or answers
Do NOT mention the FAQ table or internal system
Do NOT output raw FAQ entries
Do NOT use bullet points, formatting, or markdown
Keep tone friendly, professional, and clear
Match the user’s intent and phrasing style
Keep responses concise but helpful
If multiple FAQ entries are relevant, choose the most appropriate one
Inputs:
Customer message: {Insert message from Telegram}
FAQ data from Zoho Sheets: {Insert data from Zoho Sheets}
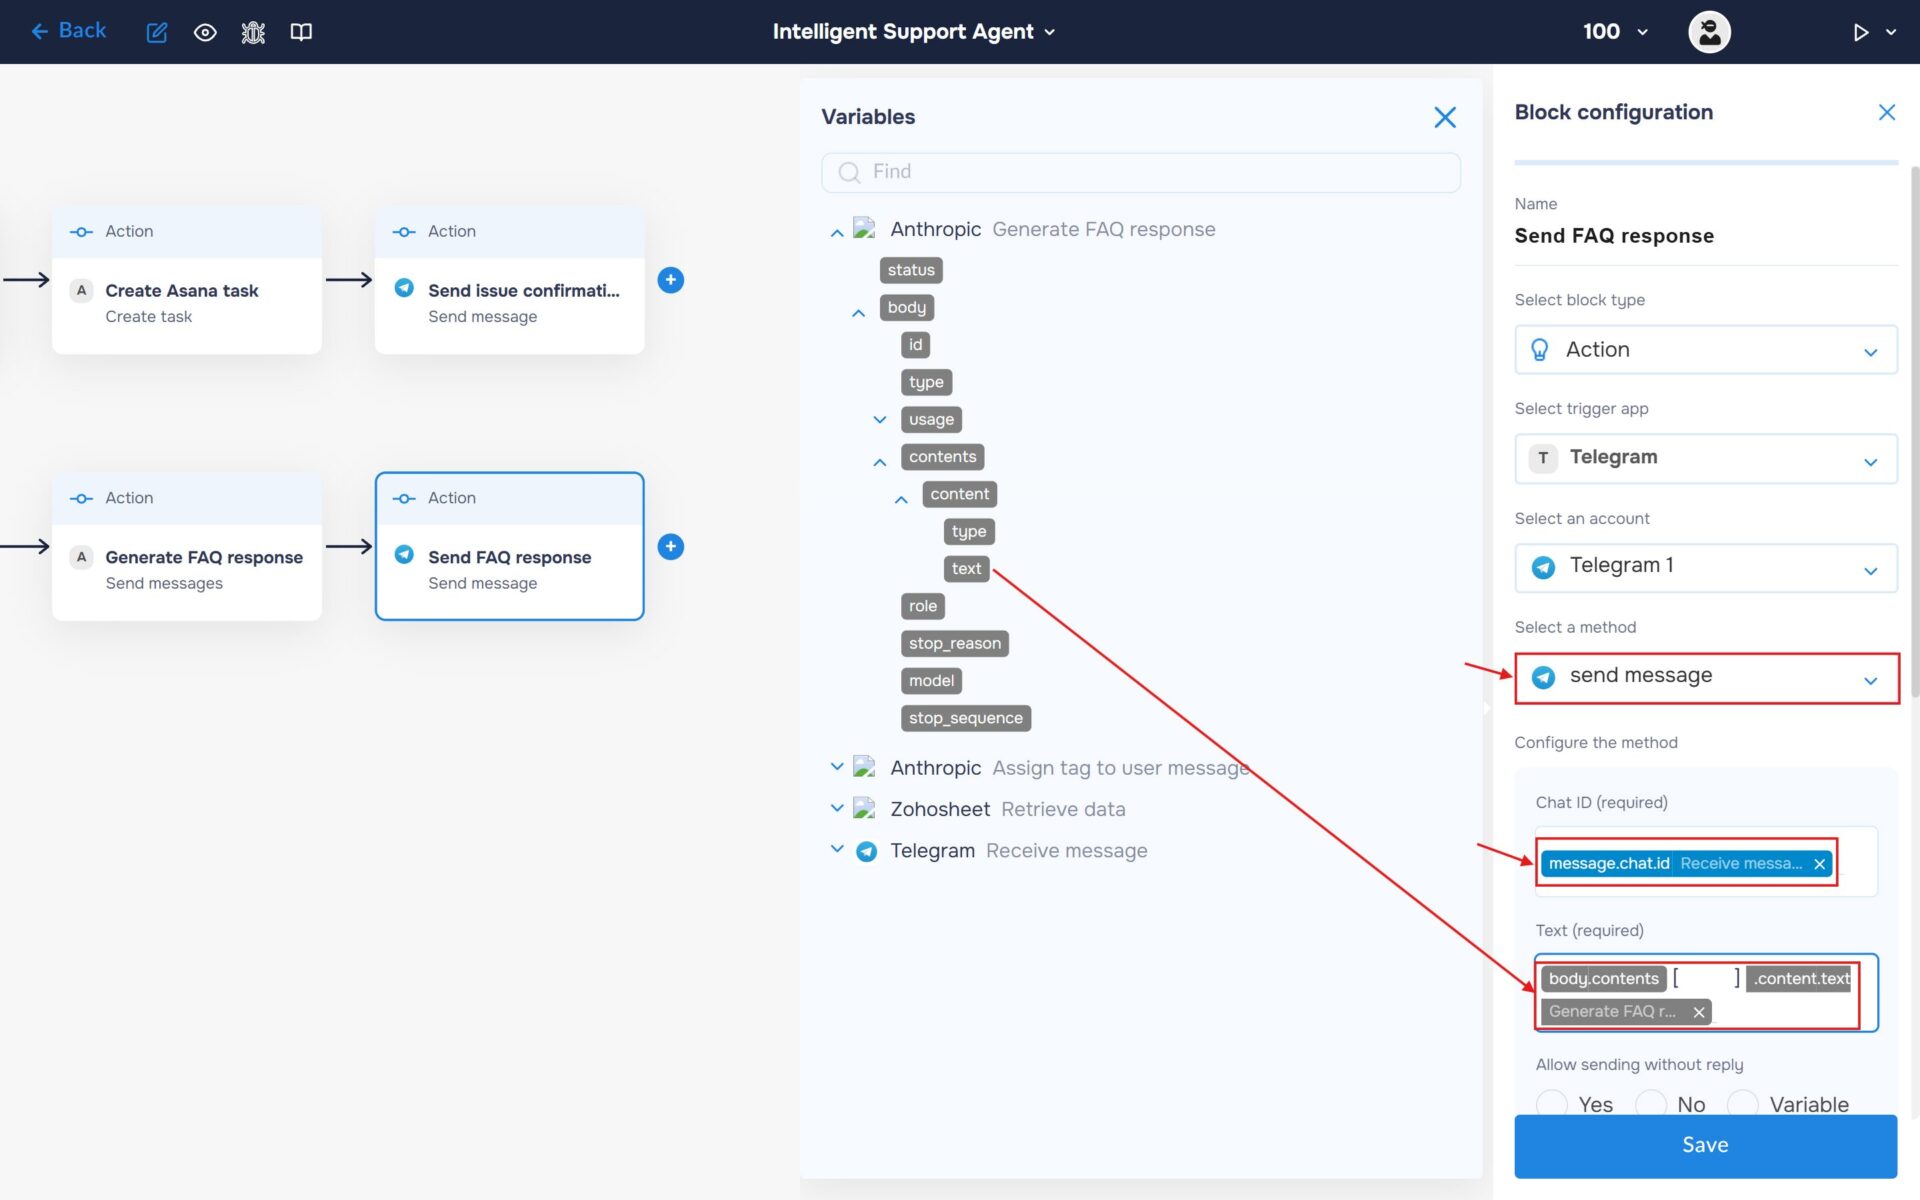
Step 8.2: Send AI Response to the User
The final step is to deliver the AI-generated response back to the user via Telegram. The workflow will send the personalized answer created in the previous step, allowing the conversation to be resolved automatically without human intervention.
- Select the block type as “Action” and the service as “Telegram“.
- Choose an account and select it.
- Find and select the “send message” method.
- In the “Chat ID” field, enter the Chat ID stored in the “message.chat.id” variable.
- In the “Text field”, insert the response generated by Anthropic Claude so that it can be sent to your Telegram chat.
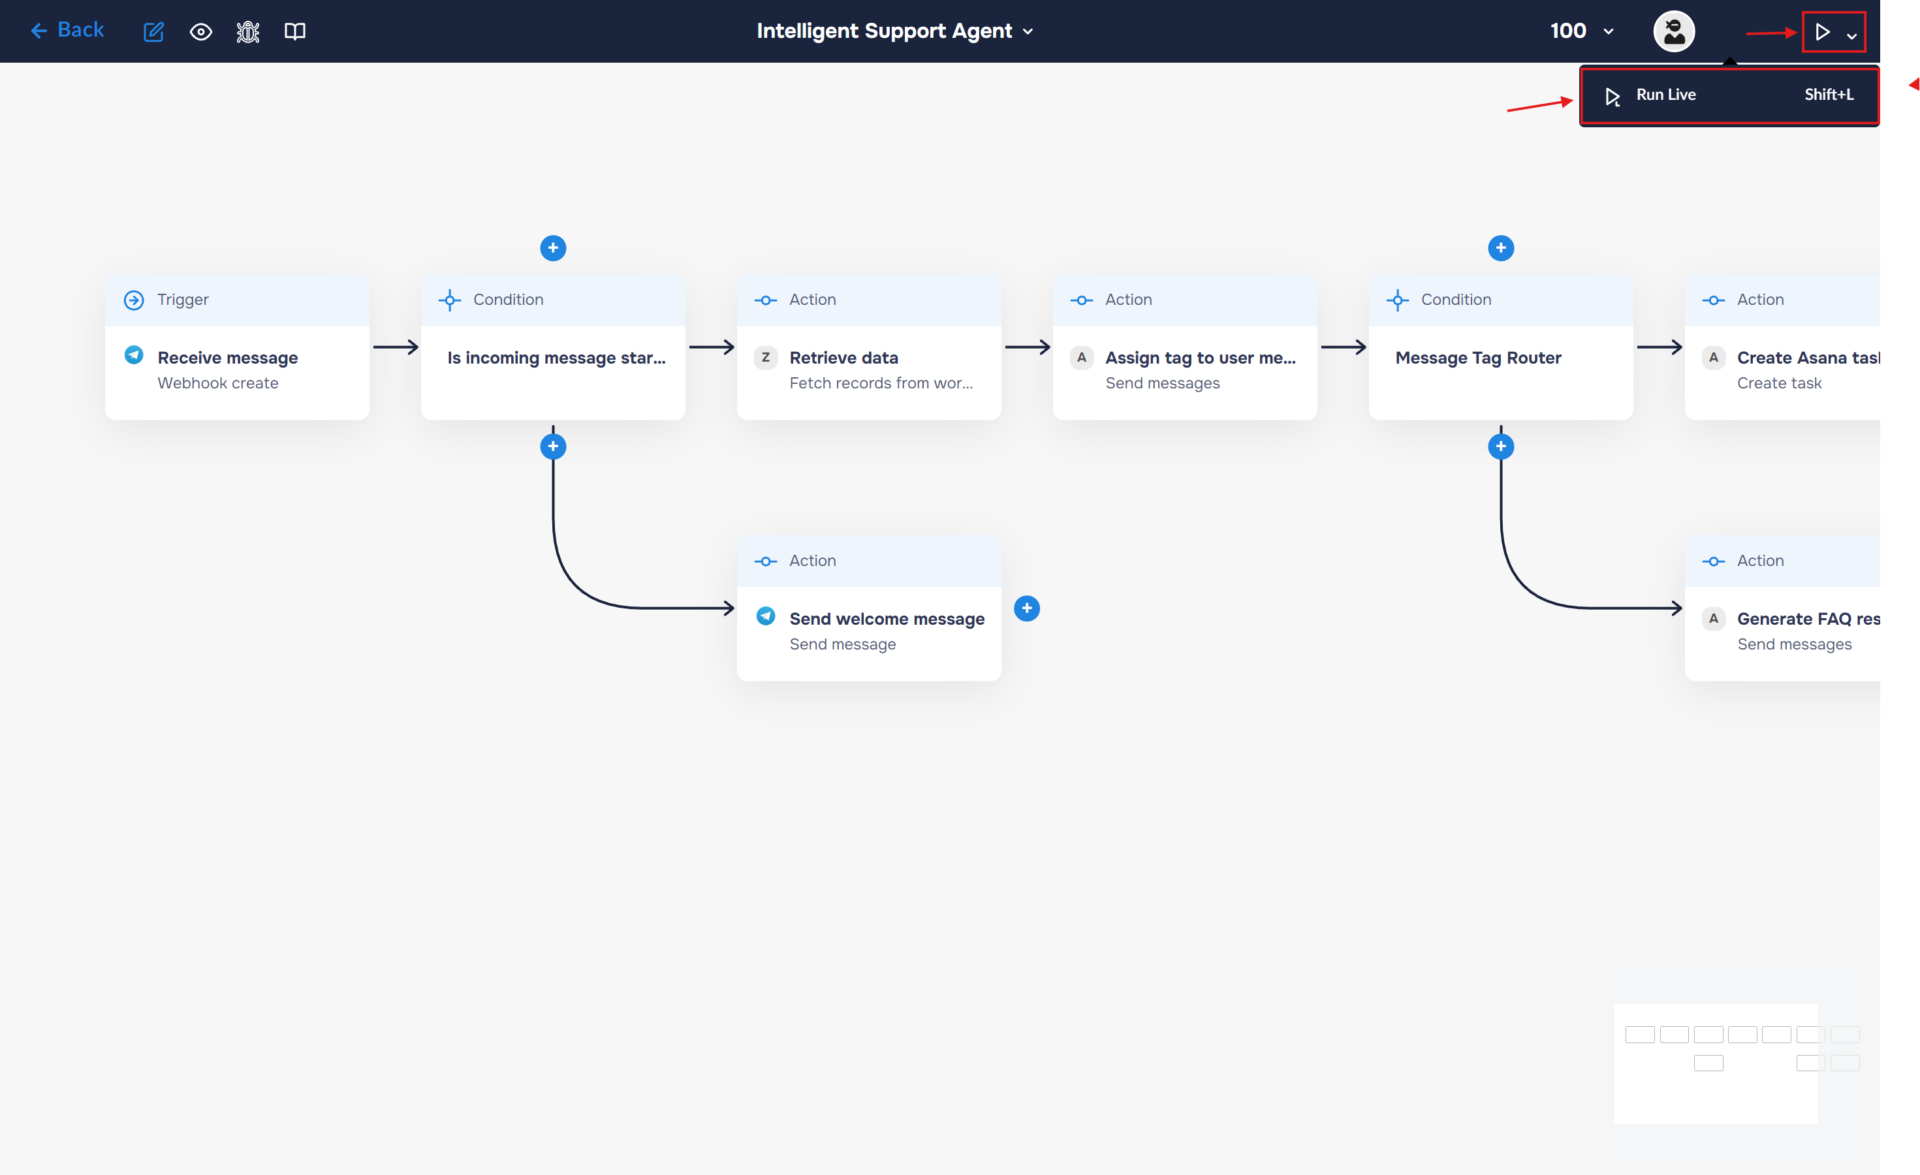
Run to execute a workflow
1. Your workflow is now fully configured. Let’s try running it. To do this, click the “Run” icon in the top-right corner of the workflow builder and select “Run Live”, or use the keyboard shortcut “Shift+L“. If the launch is successful, the icon color will change from white to blue, and an “L” will appear next to it.
2. Congratulations! You have successfully built an autonomous AI-powered customer support workflow.
The system now automatically processes incoming Telegram messages, classifies user intent using an AI Agent, and routes each request either to an automated FAQ-based response flow or to a support escalation path.
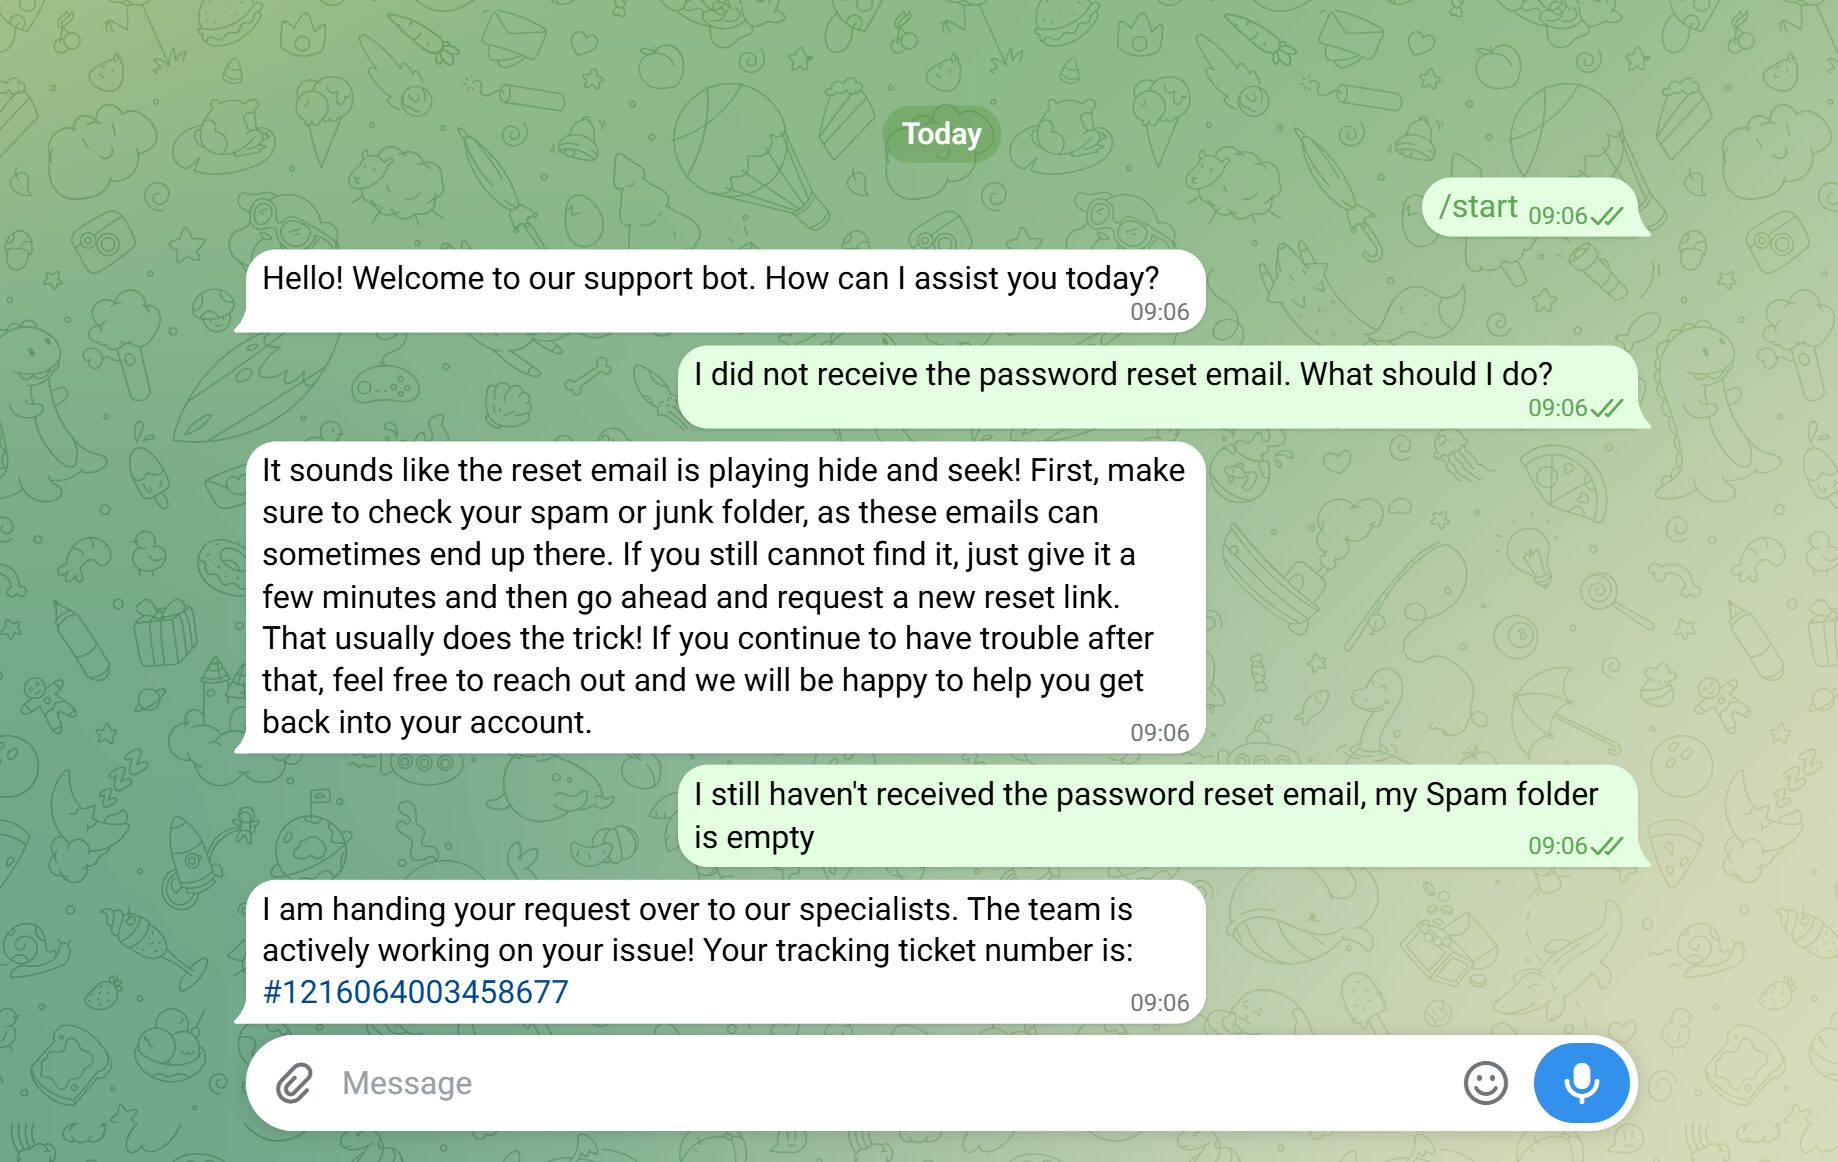
It retrieves relevant answers from Zoho Sheet, generates context-aware responses for routine questions, and escalates complex issues by automatically creating tasks in Asana for the support team.