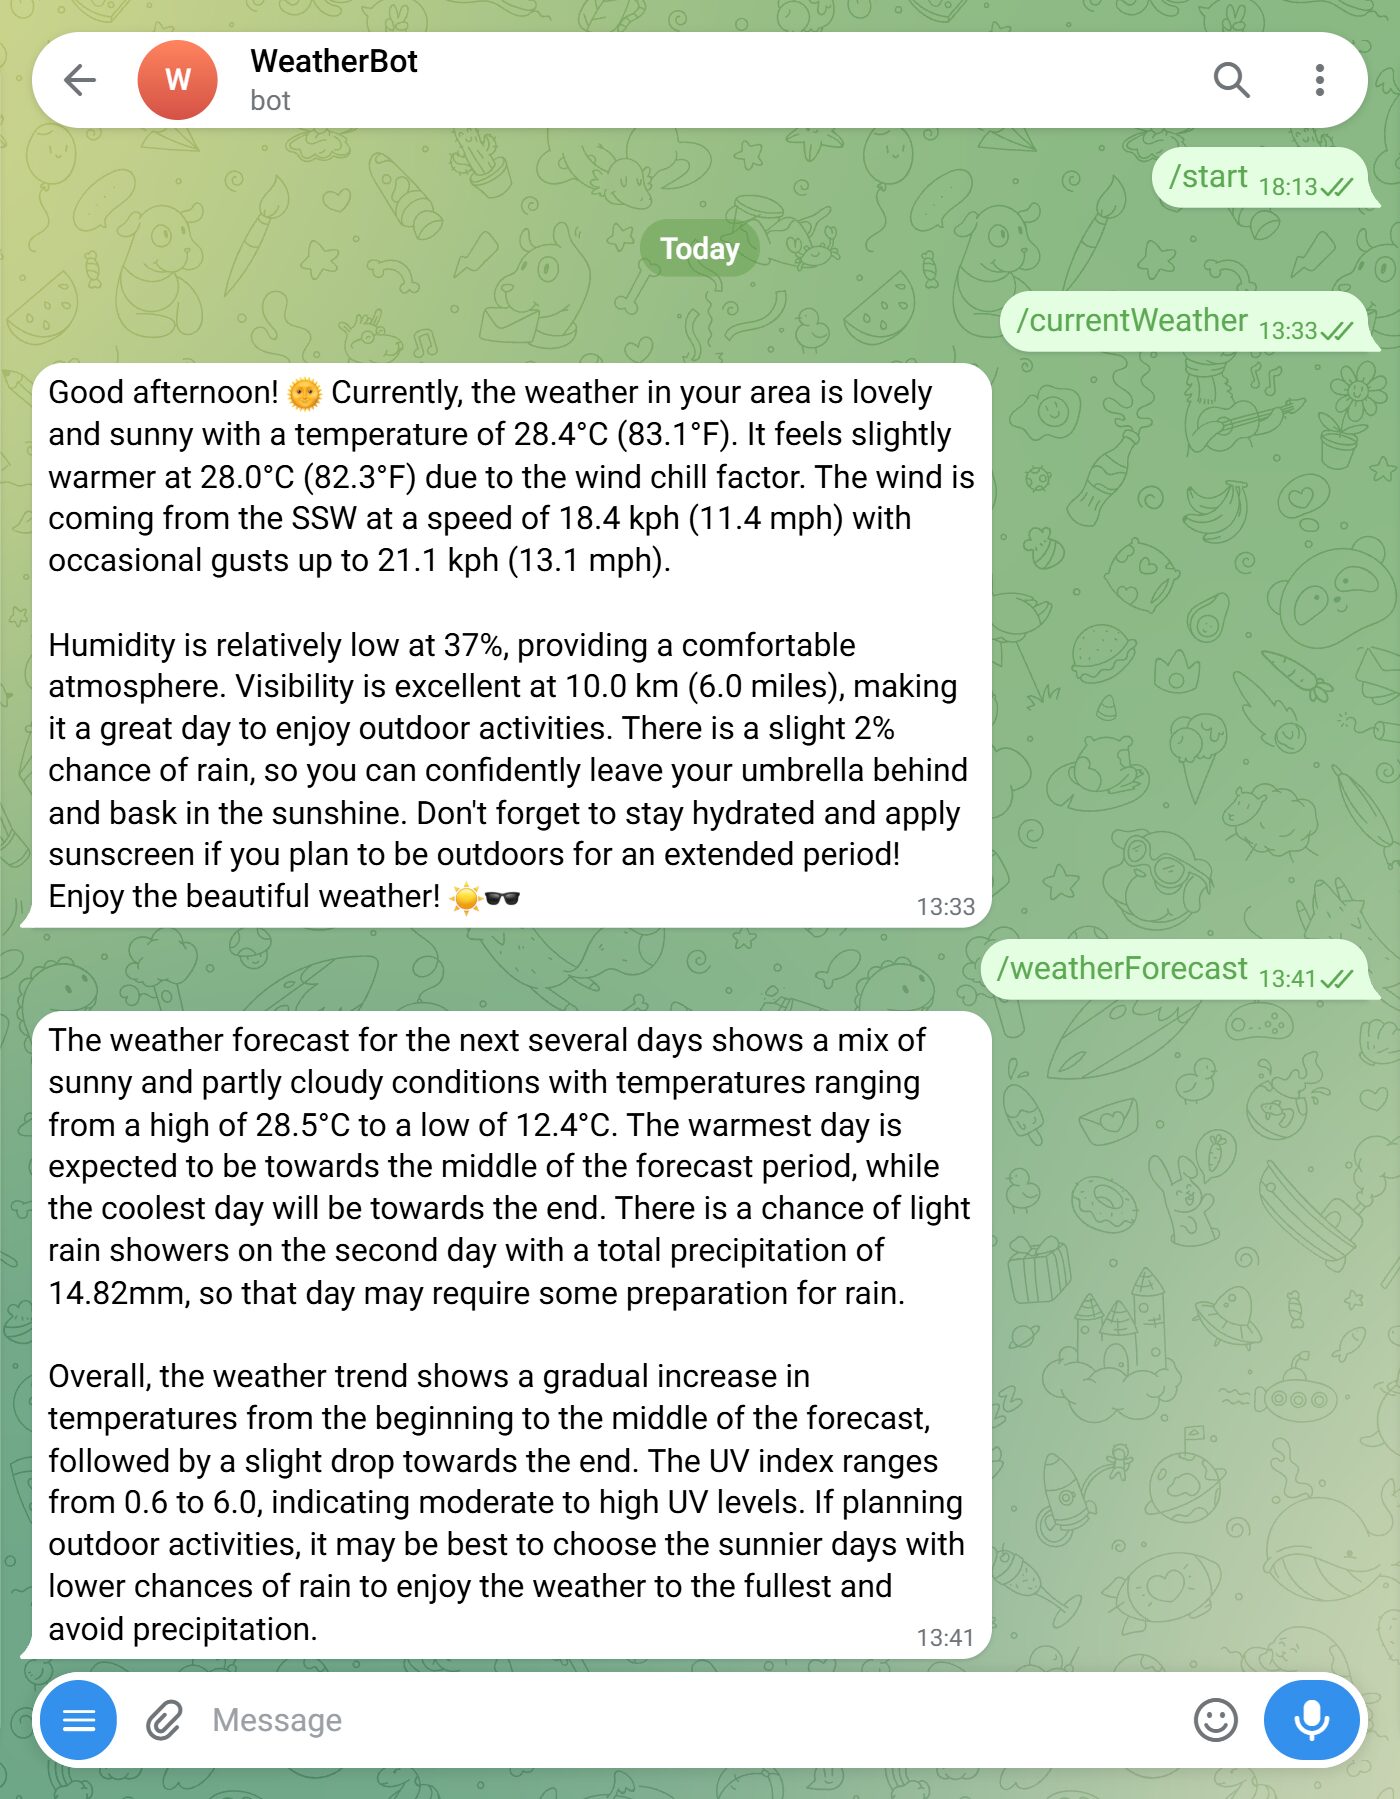


About This Guide
This guide provides step-by-step instructions for building an AI-powered weather assistant using the DigitalBPM platform, Telegram, IPLocate, WeatherAPI, and ChatGPT.
Rather than simply connecting to a weather service, you will build an interactive AI assistant capable of understanding user commands, retrieving live weather data, and transforming raw API responses into clear, personalized recommendations.
Throughout this guide, you will create a workflow that:
- Accepts multiple Telegram commands from users
- Automatically detects the user’s location
- Retrieves current weather conditions or forecast data from WeatherAPI
- Uses different ChatGPT prompts depending on the requested command
- Converts structured API responses into natural-language explanations
- Returns personalized weather insights directly in Telegram
By the end of this guide, you will have a fully functional AI weather assistant that demonstrates how to combine conversational AI, external APIs, routing logic, and personalized responses within a single workflow.
Who Is This Guide For?
This guide is designed for automation specialists, developers, chatbot builders, AI enthusiasts, and anyone interested in creating conversational assistants that integrate external services.
It is especially useful if you want to:
- Build interactive AI assistants that respond to user commands
- Learn how to route different requests using Condition blocks
- Integrate external APIs into AI-powered workflows
- Generate natural-language responses from structured API data
- Create personalized Telegram assistants without writing custom backend code
Before building this workflow, ensure you have the following ready:
- A DigitalBPM account
- A Telegram account and bot. If you haven’t created a bot yet, follow our guide — How to Register a Chatbot in Telegram — a perfect starting point if you’re searching how to make a Telegram bot.
- A IPLocate account with API access
- A WeatherAPI account with API access
- A ChatGPT account with API access
If you’re ready, let’s get started!
Step 1: Create a New Workflow and Trigger Block
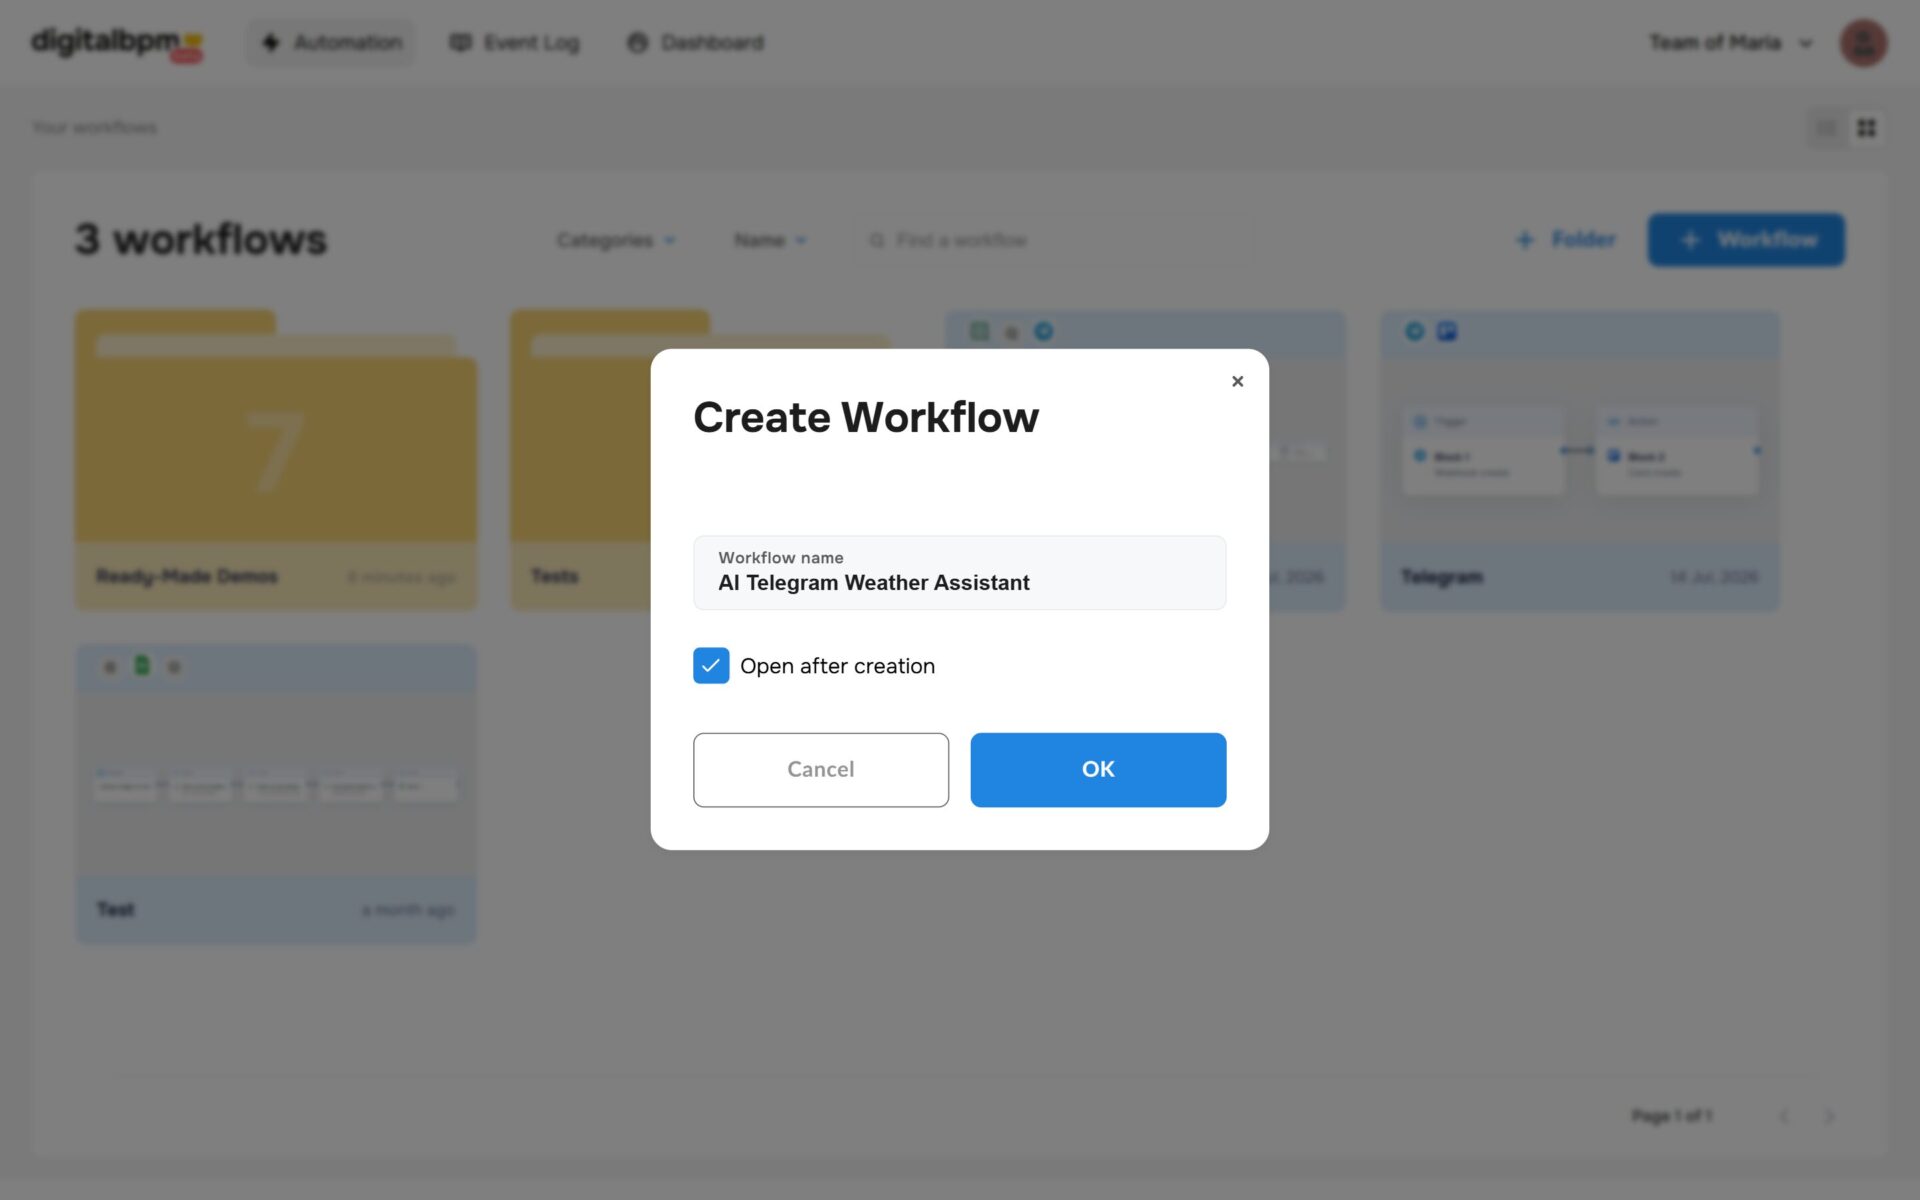
1. The first thing you need to do is to sign in to your DigitalBPM account and click on the “+ Workflow” button on the “Automation” page. Next, you need to enter a name for your workflow, for example, “AI Telegram Weather Assistant” and click “OK“.
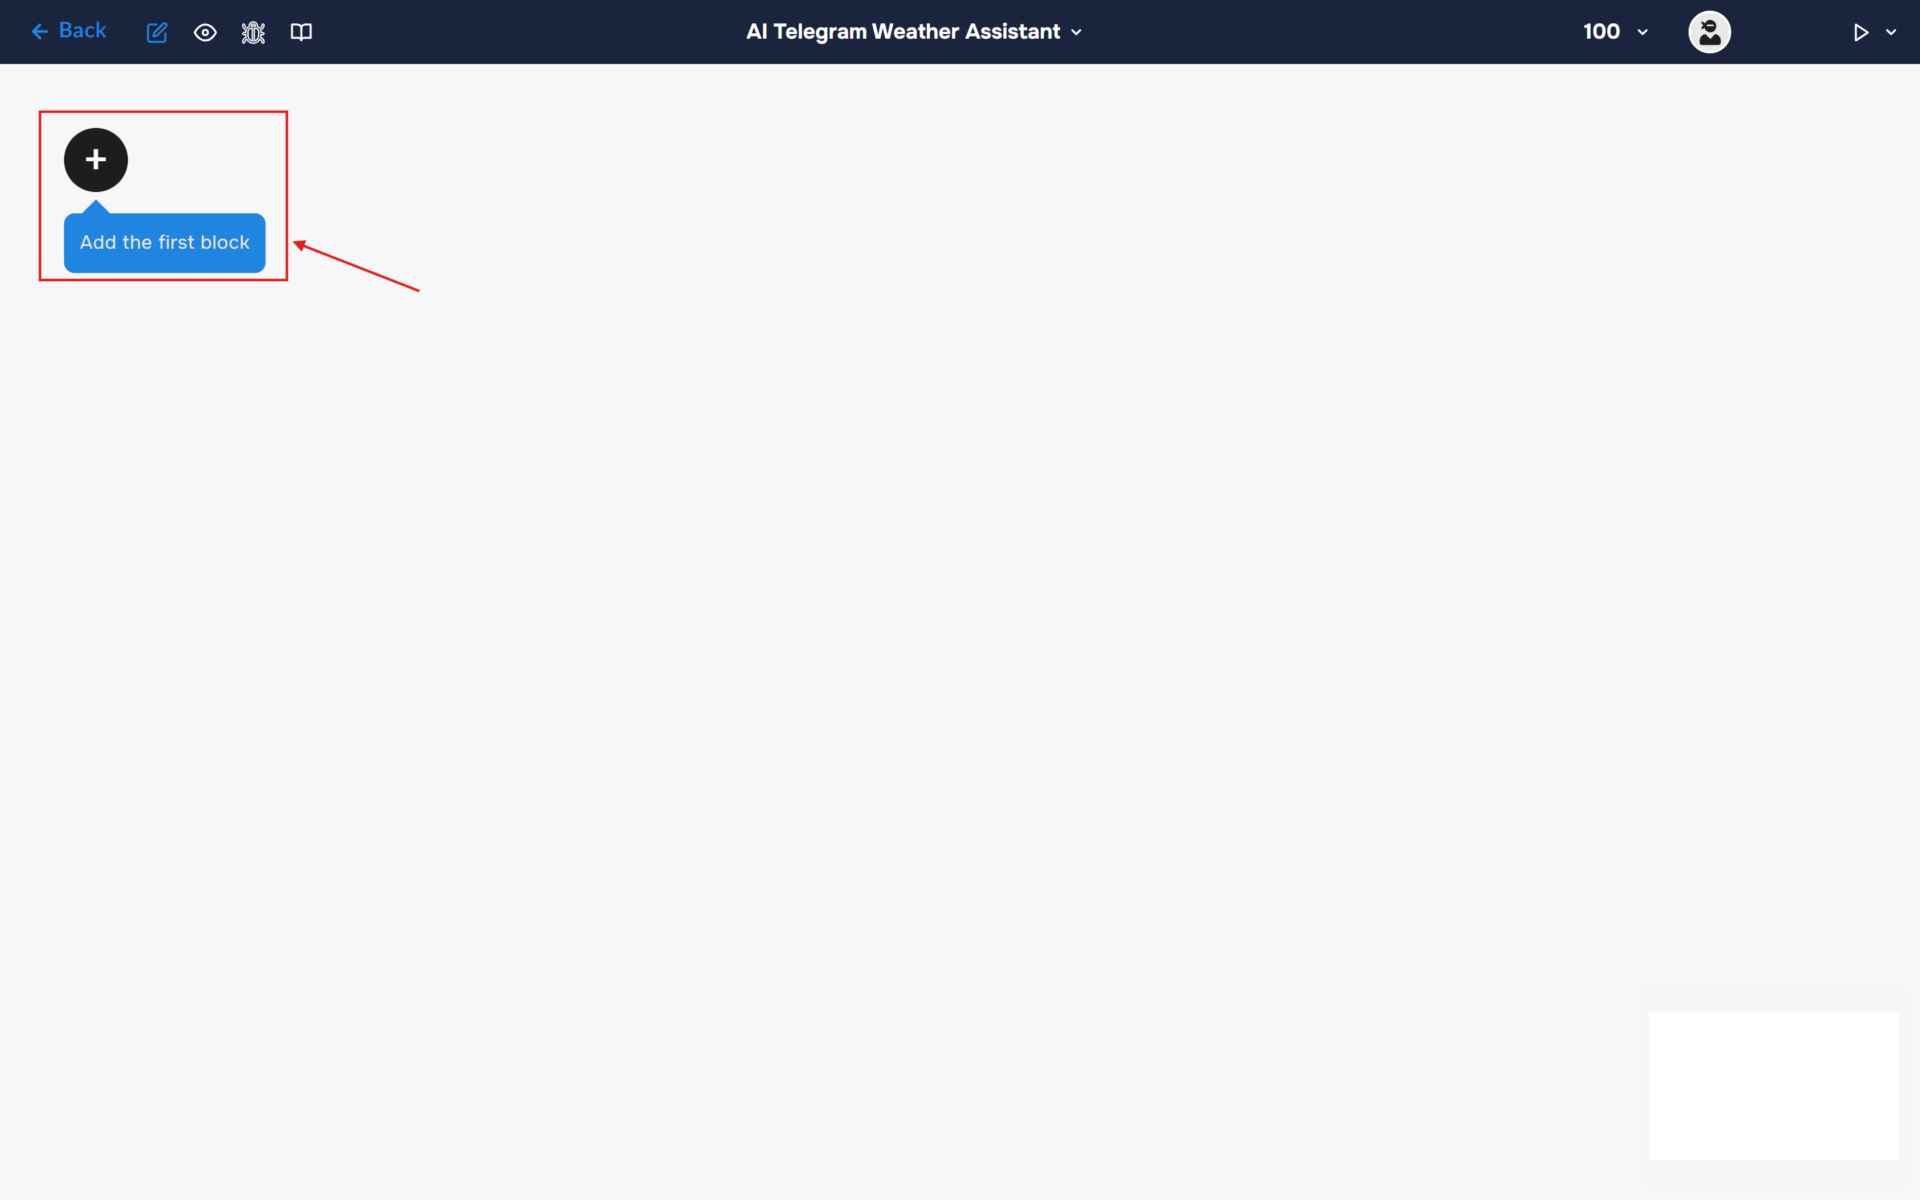
2. After confirming the creation of a workflow, its builder opens. To add the first block, click the “+ Add first block” button.
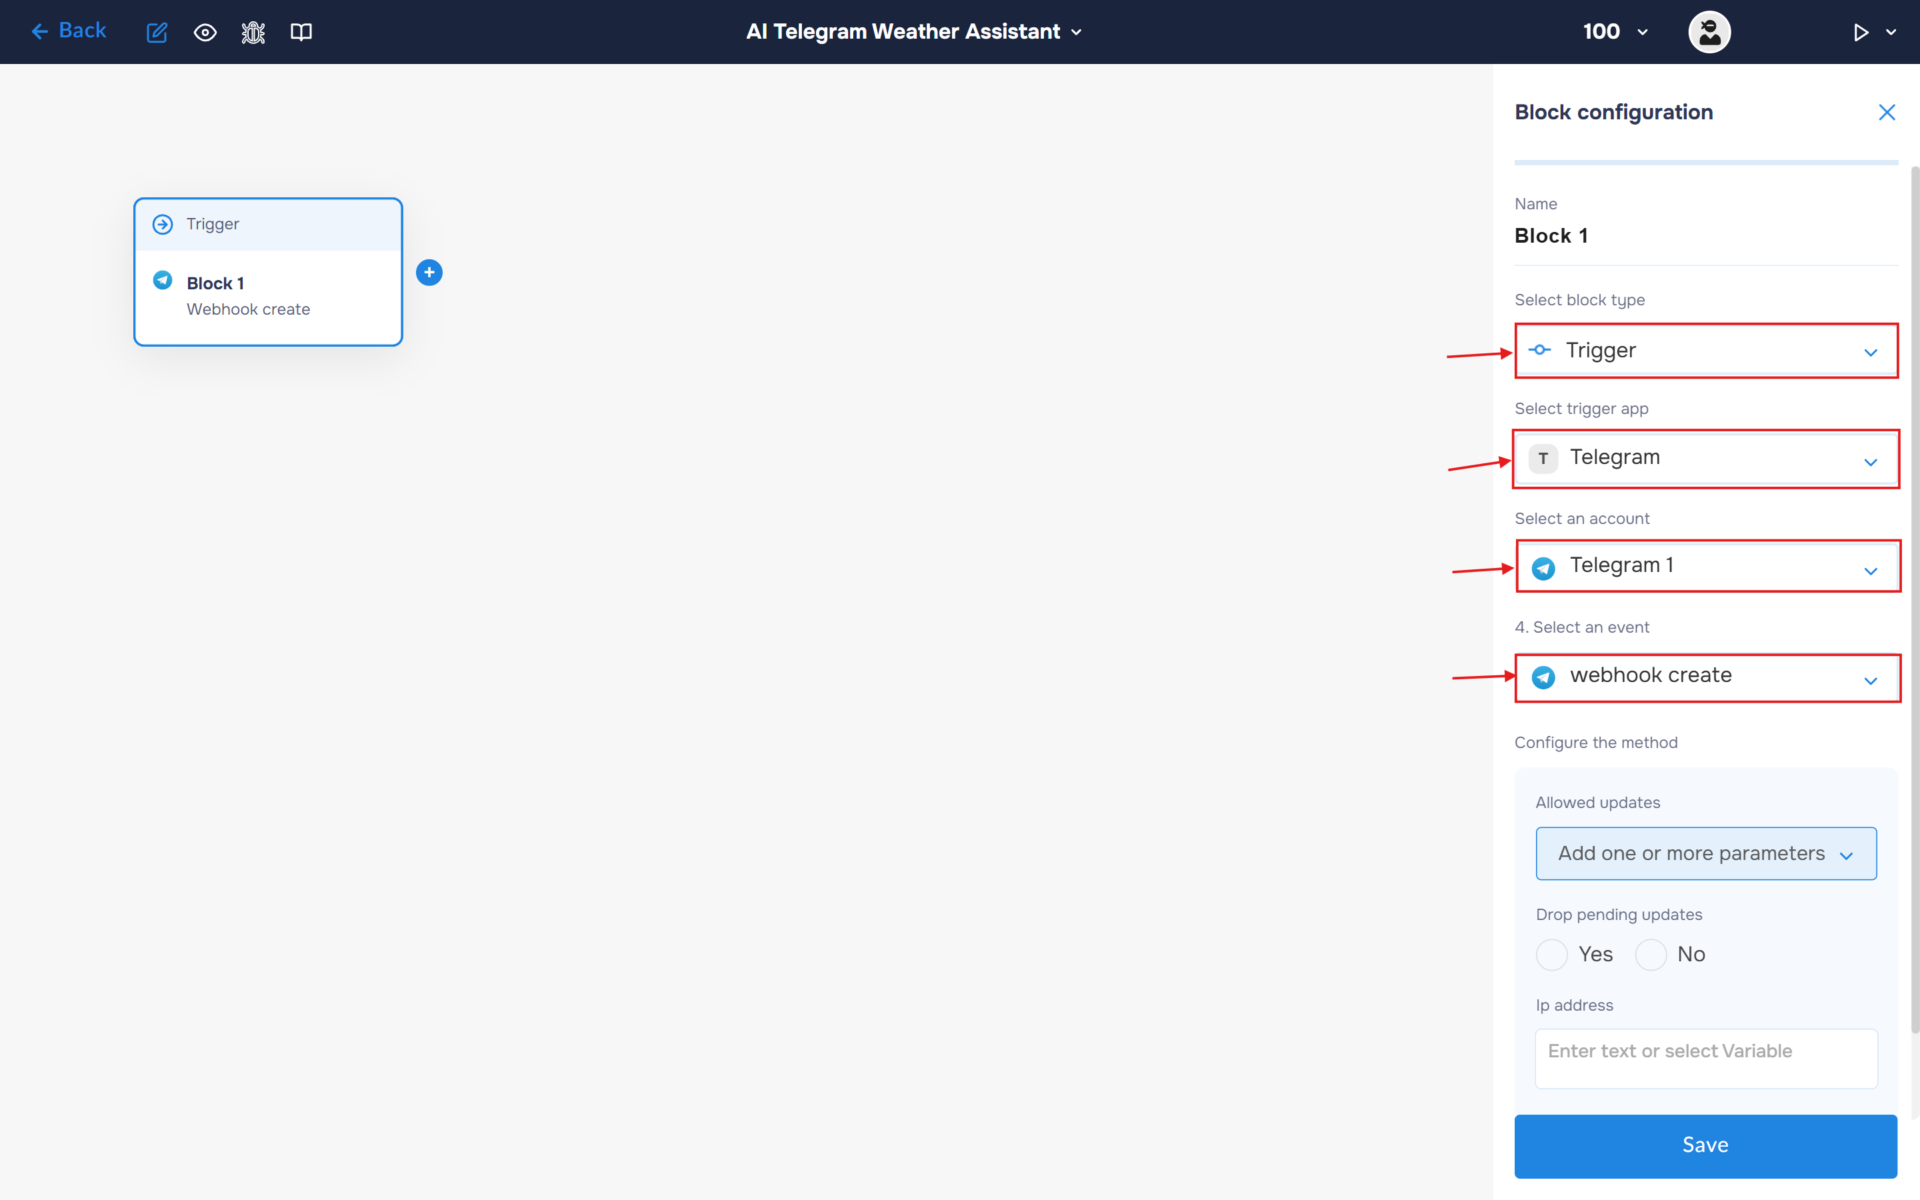
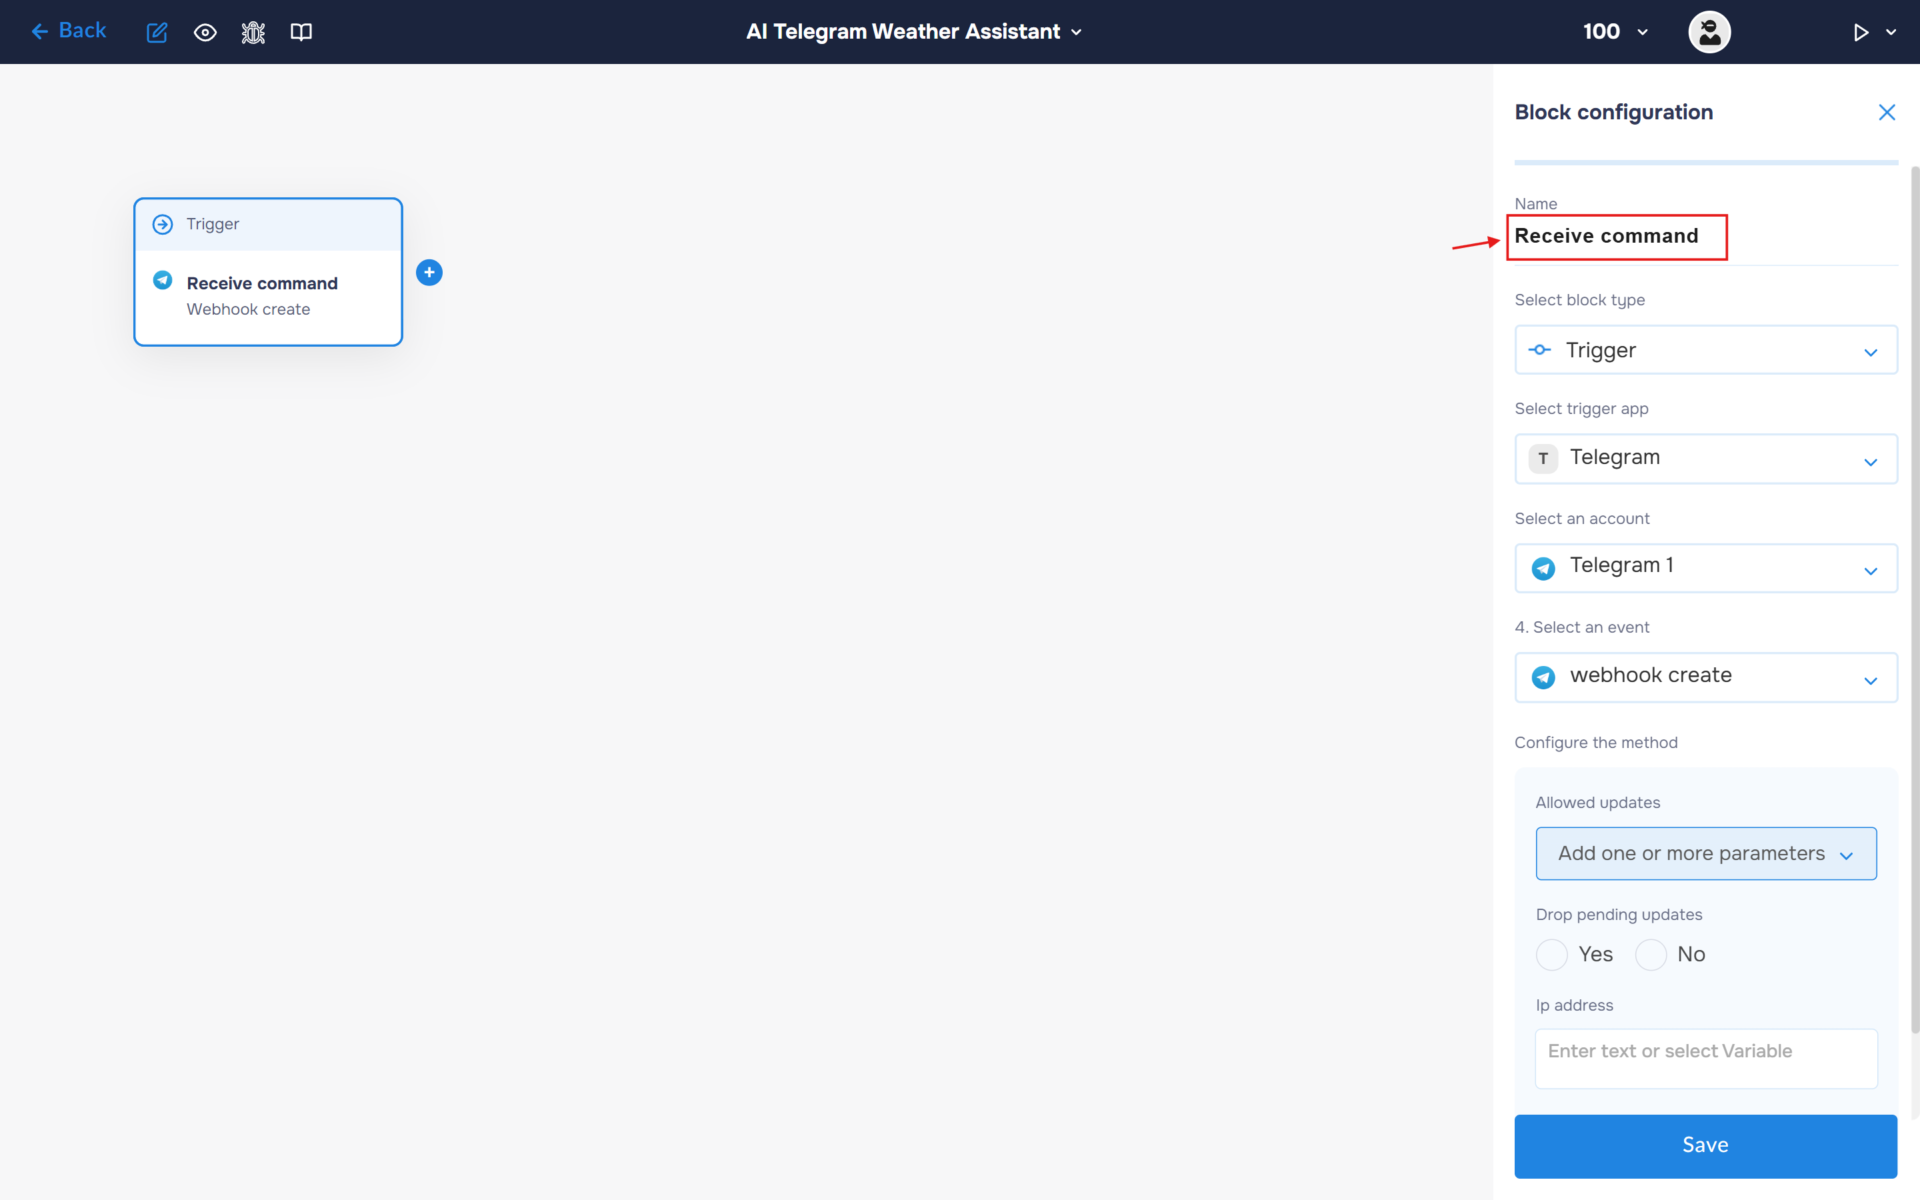
3. Next, you need to configure the first block. This block is responsible for triggering the workflow on a set trigger.
- In the “Block Configuration“ panel, click on the “Select block type“ field and select the “Trigger” type.
- Next, you need to add Telegram service by clicking on the field “Select trigger app“; find and select “Telegram“.
- To connect to Telegram, you need to create an authorisation. Click on the “Sign in“ button in the “Select an account“ section.
- After clicking the button, a window for creating a new authorization will open. Enter a name for the authorization, provide the required credentials, and save the connection.
- If the authorization is successful, the created authorization will appear in the “Select an account” field. You need to select this authorization to configure the next steps of the block.
- The next step is to select a method, so click on the “Select an event“. Find and select “webhook create”.
4. Click on the “Name” field and fill in a clear name for what happens in the block, for example, “Receive command”. With this step, you can quickly find out what the block is for.
Step 2: Detect the User’s Location
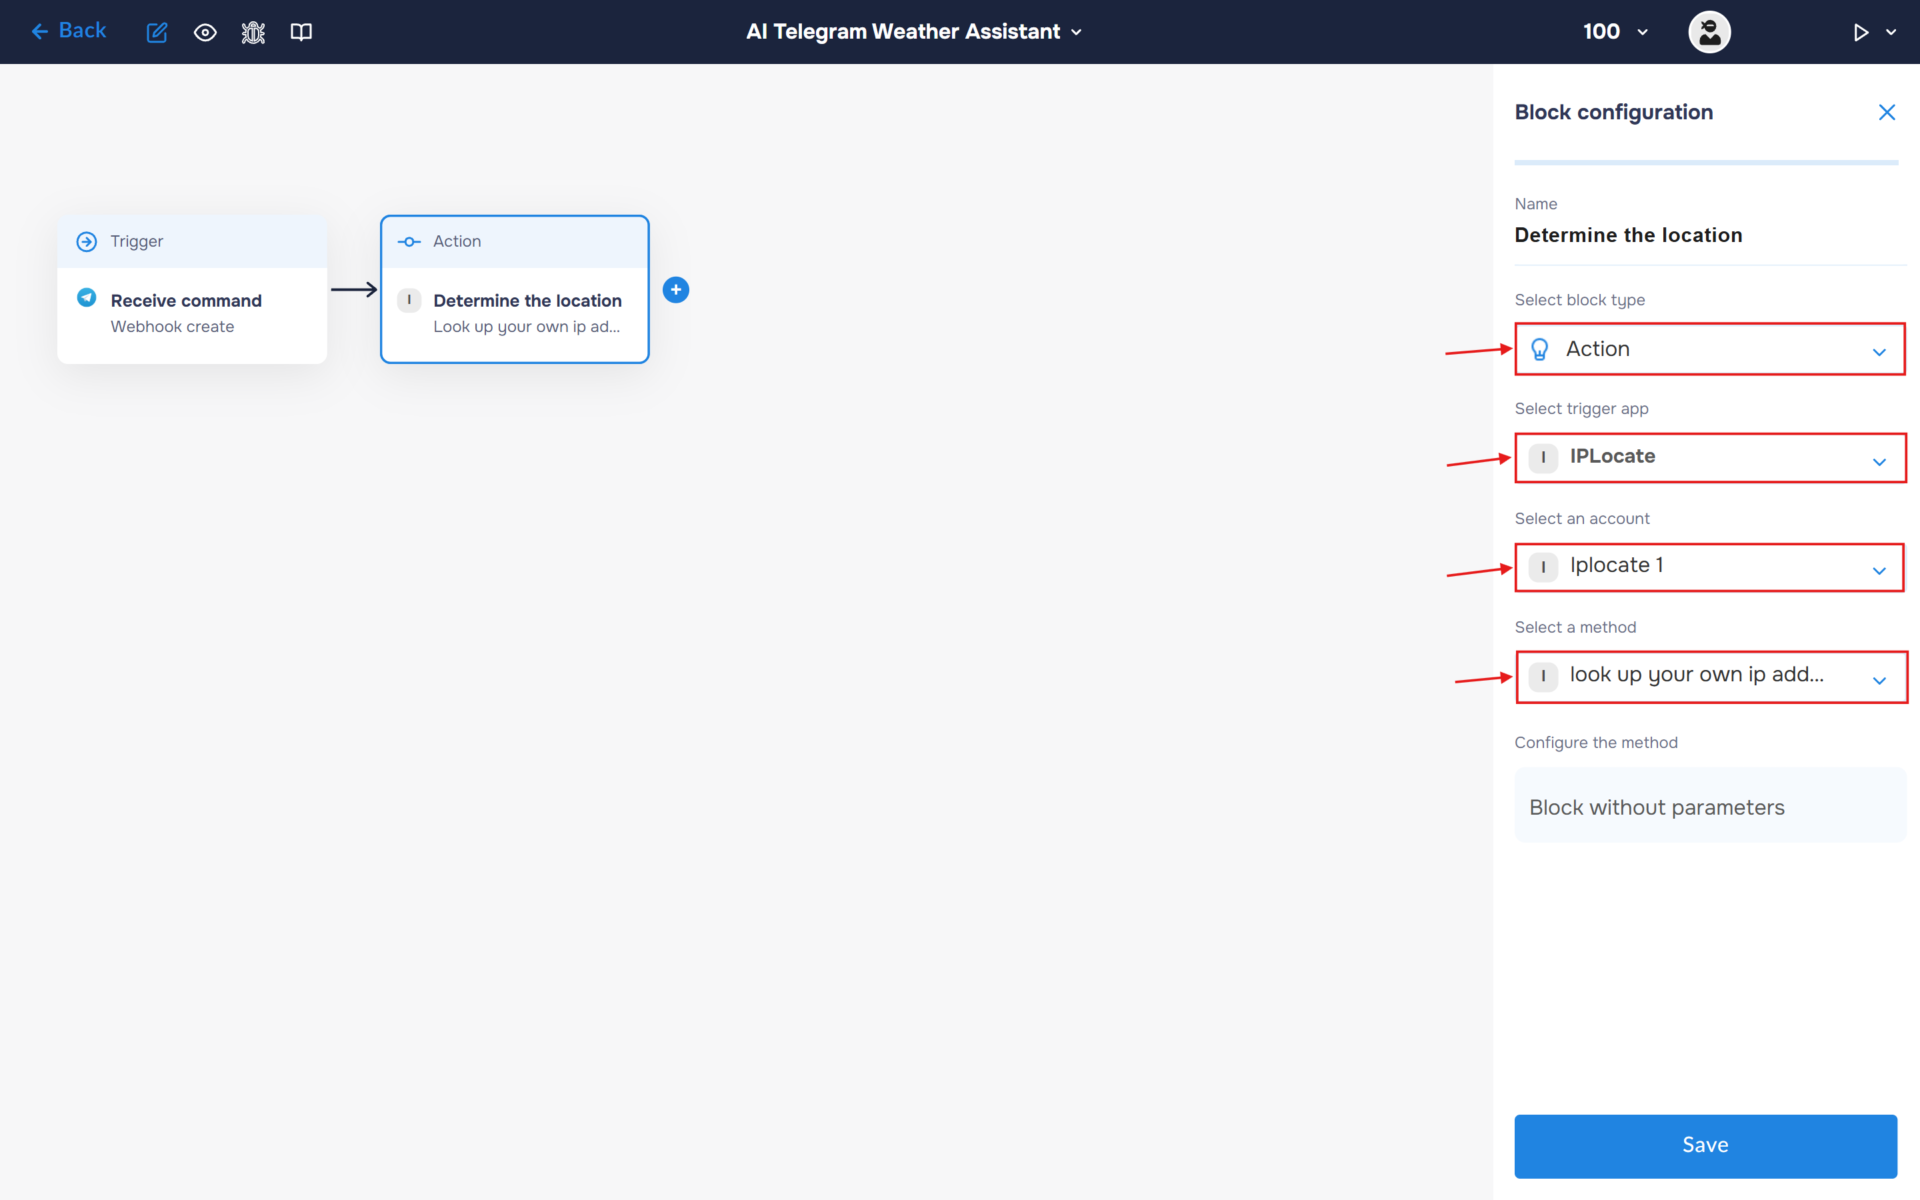
To provide accurate weather information, the workflow first needs to determine the user’s approximate location. Instead of asking the user to manually enter a city, it automatically detects the location based on the incoming request.
In this step, you will connect the IPLocate service, which returns the location information required for the weather request.
- In the “Block Configuration“ panel, click on the “Select block type“ field and select the “Action” type.
- Next, you need to add IPLocate service by clicking on the field “Select trigger app“; find and select “IPLocate“.
- To connect to IPLocate, you need to create an authorisation. Click on the “Sign in“ button in the “Select an account“ section.
- After clicking the button, a window for creating a new IPLocate authorization will open. Enter a name for the authorization, provide the required credentials, and save the connection.
- If the authorization is successful, the created authorization will appear in the “Select an account” field. You need to select this authorization to configure the next steps of the block.
- The next step is to select a method, so click on the “Select a method“. Find and select the “look up your own ip address” method.
Step 3: Route Requests by User Command
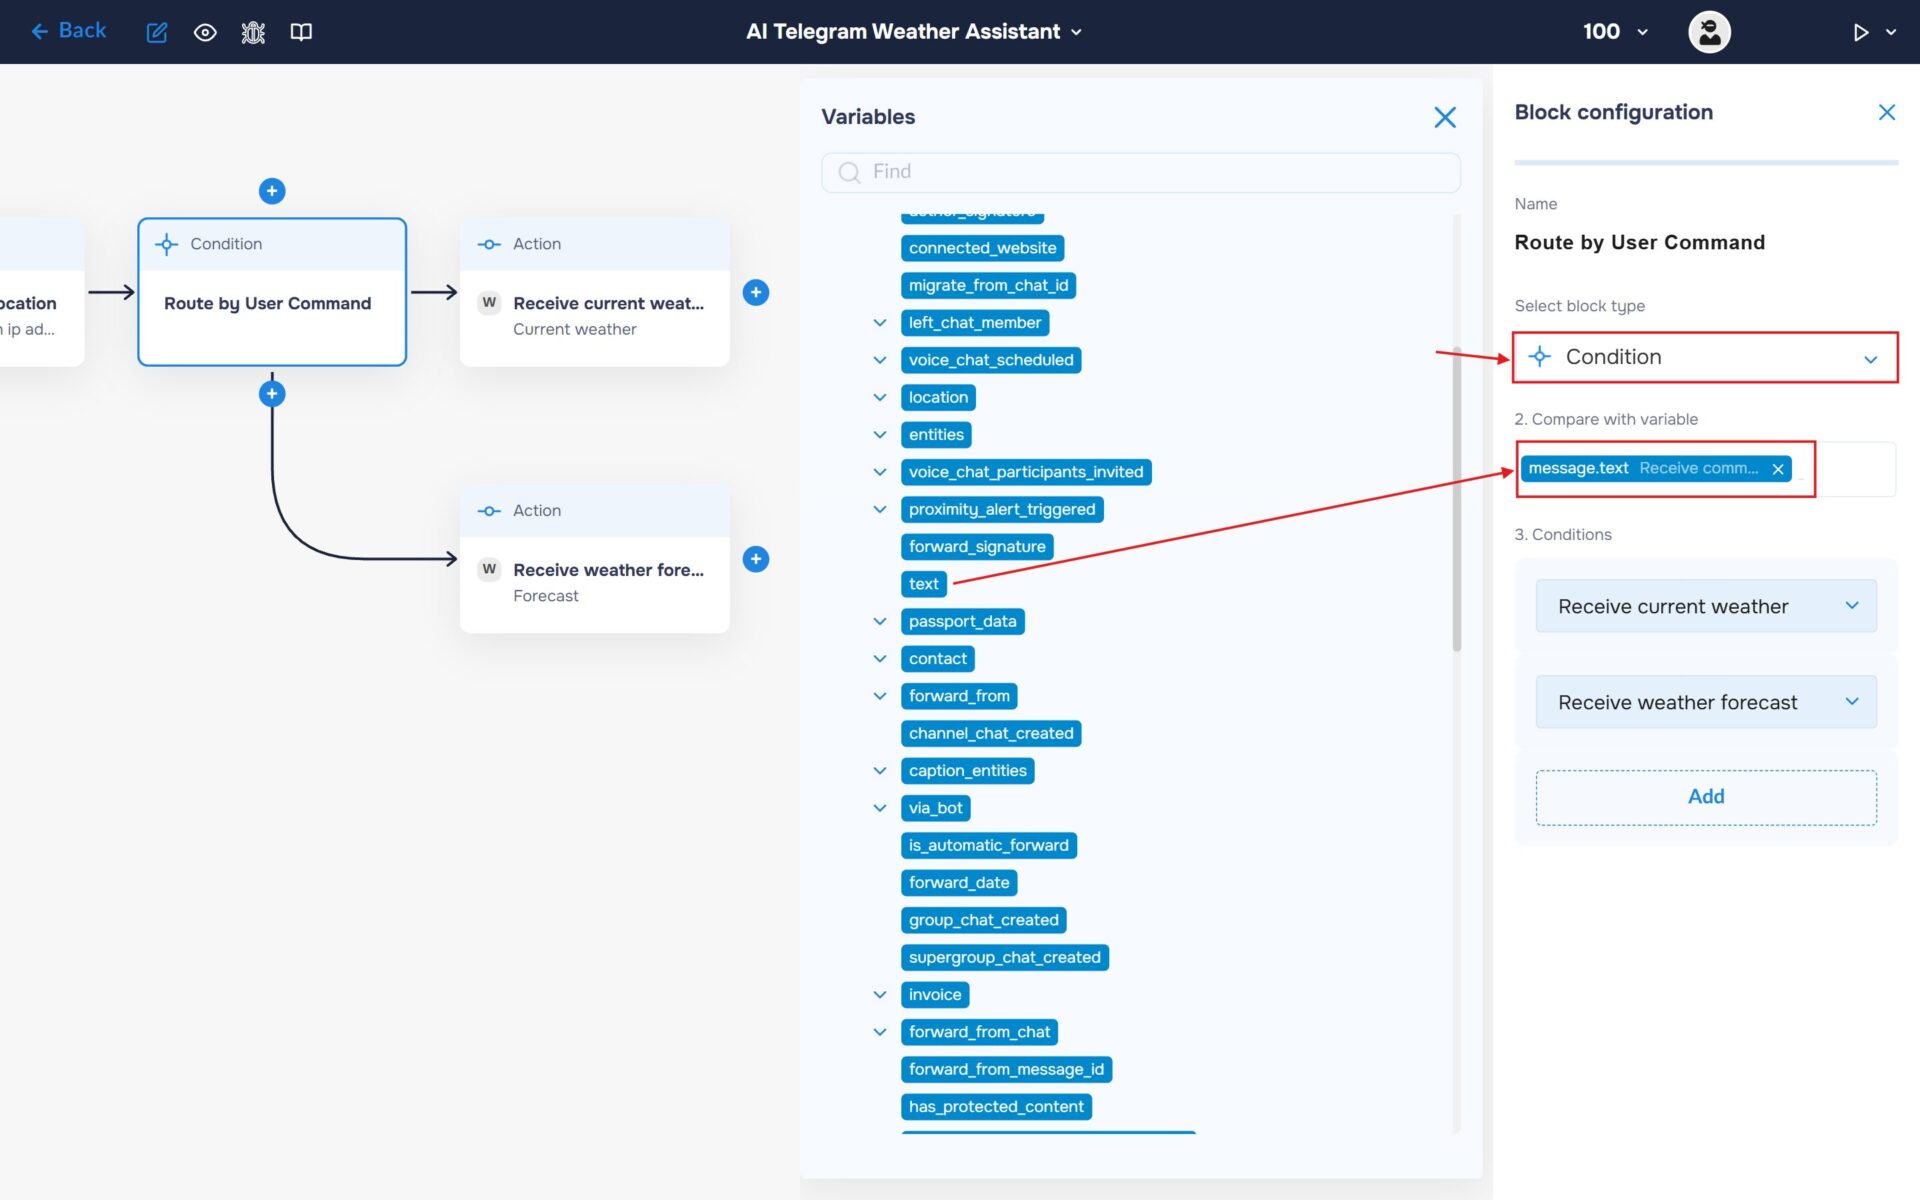
The assistant supports multiple commands, each requiring a different type of weather information. We will use a router (“Condition” block) to determine which command the user sent and direct the workflow to the appropriate processing path.
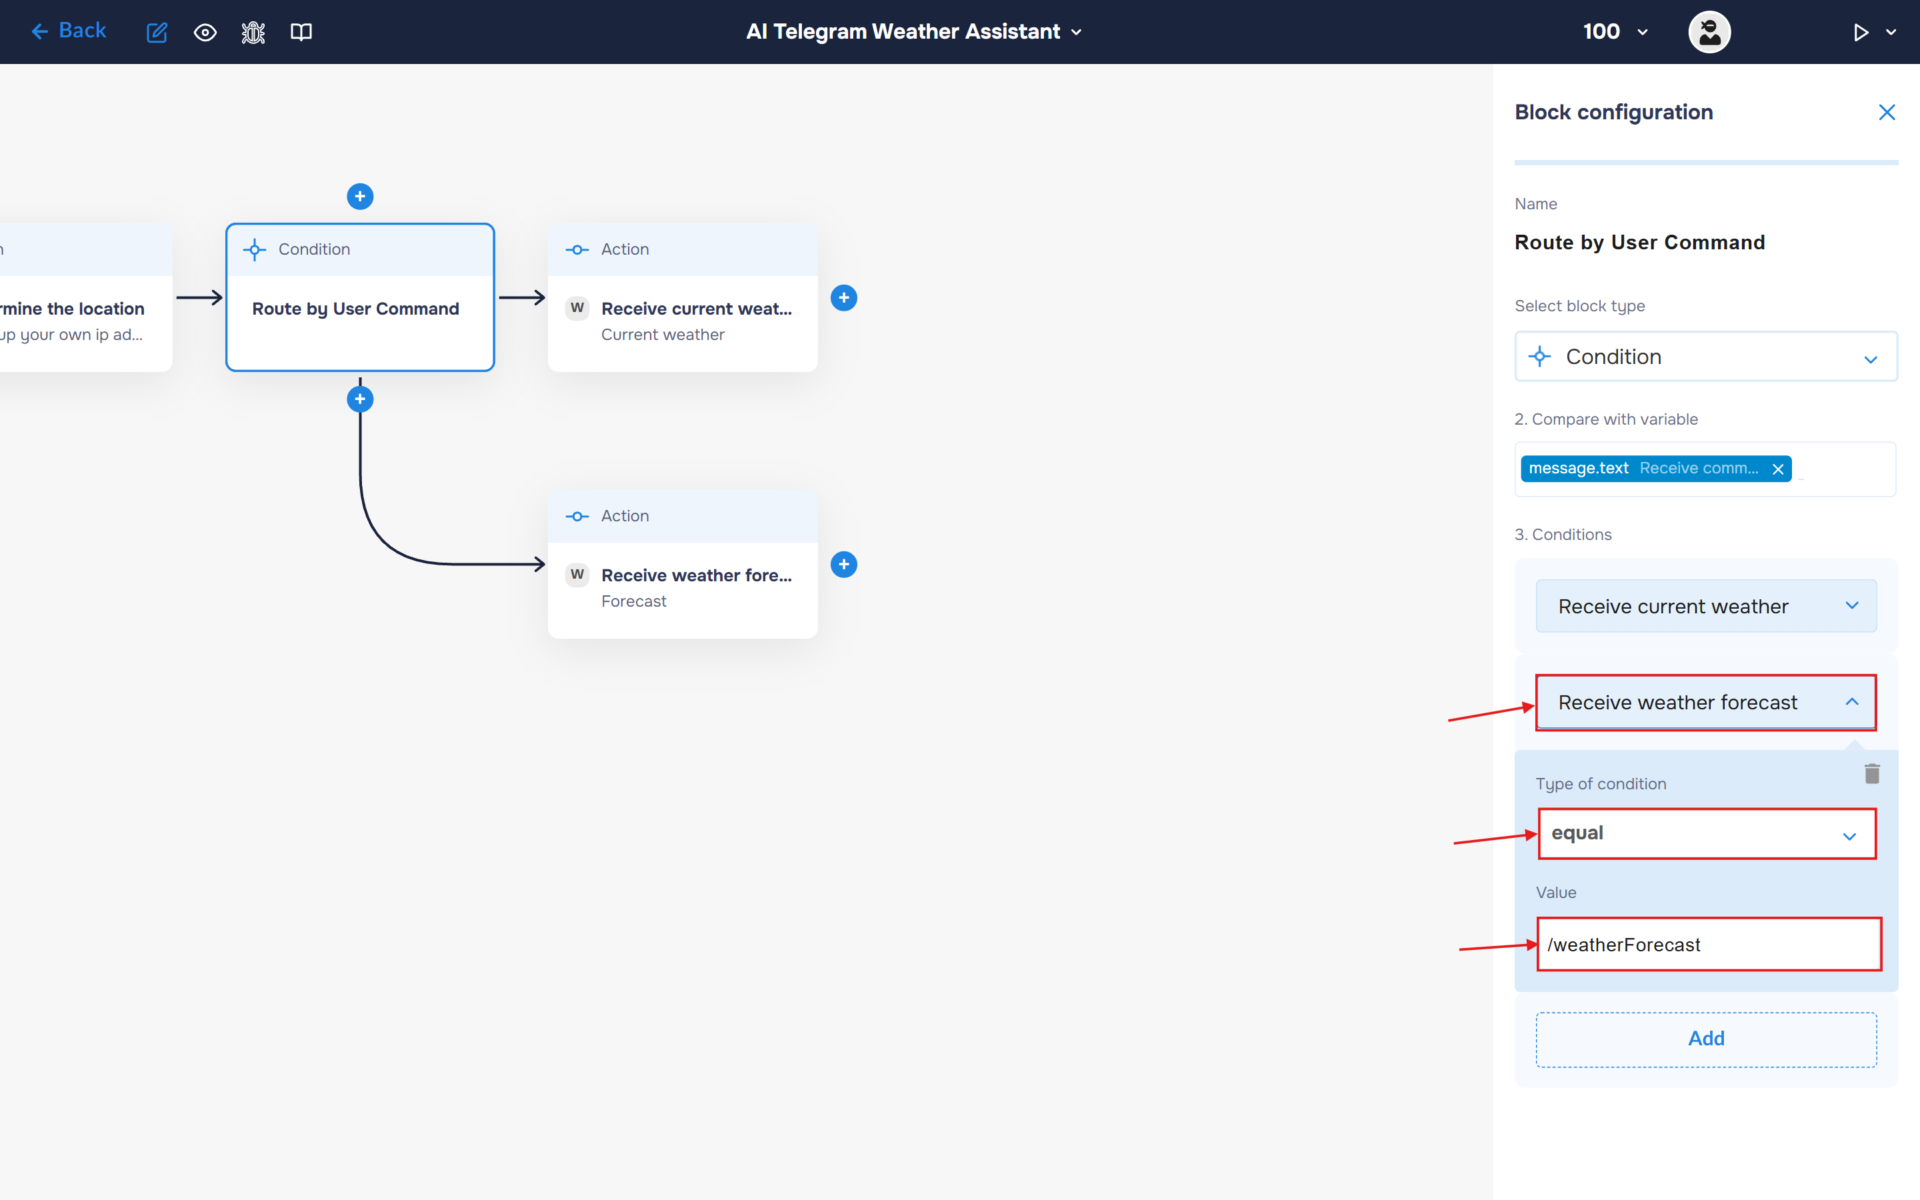
Add the “Condition” block to distinguish between the “/currentWeather” and “/weatherForecast” commands.
In the “Compare with variable” field, insert the message text received from the Telegram trigger.
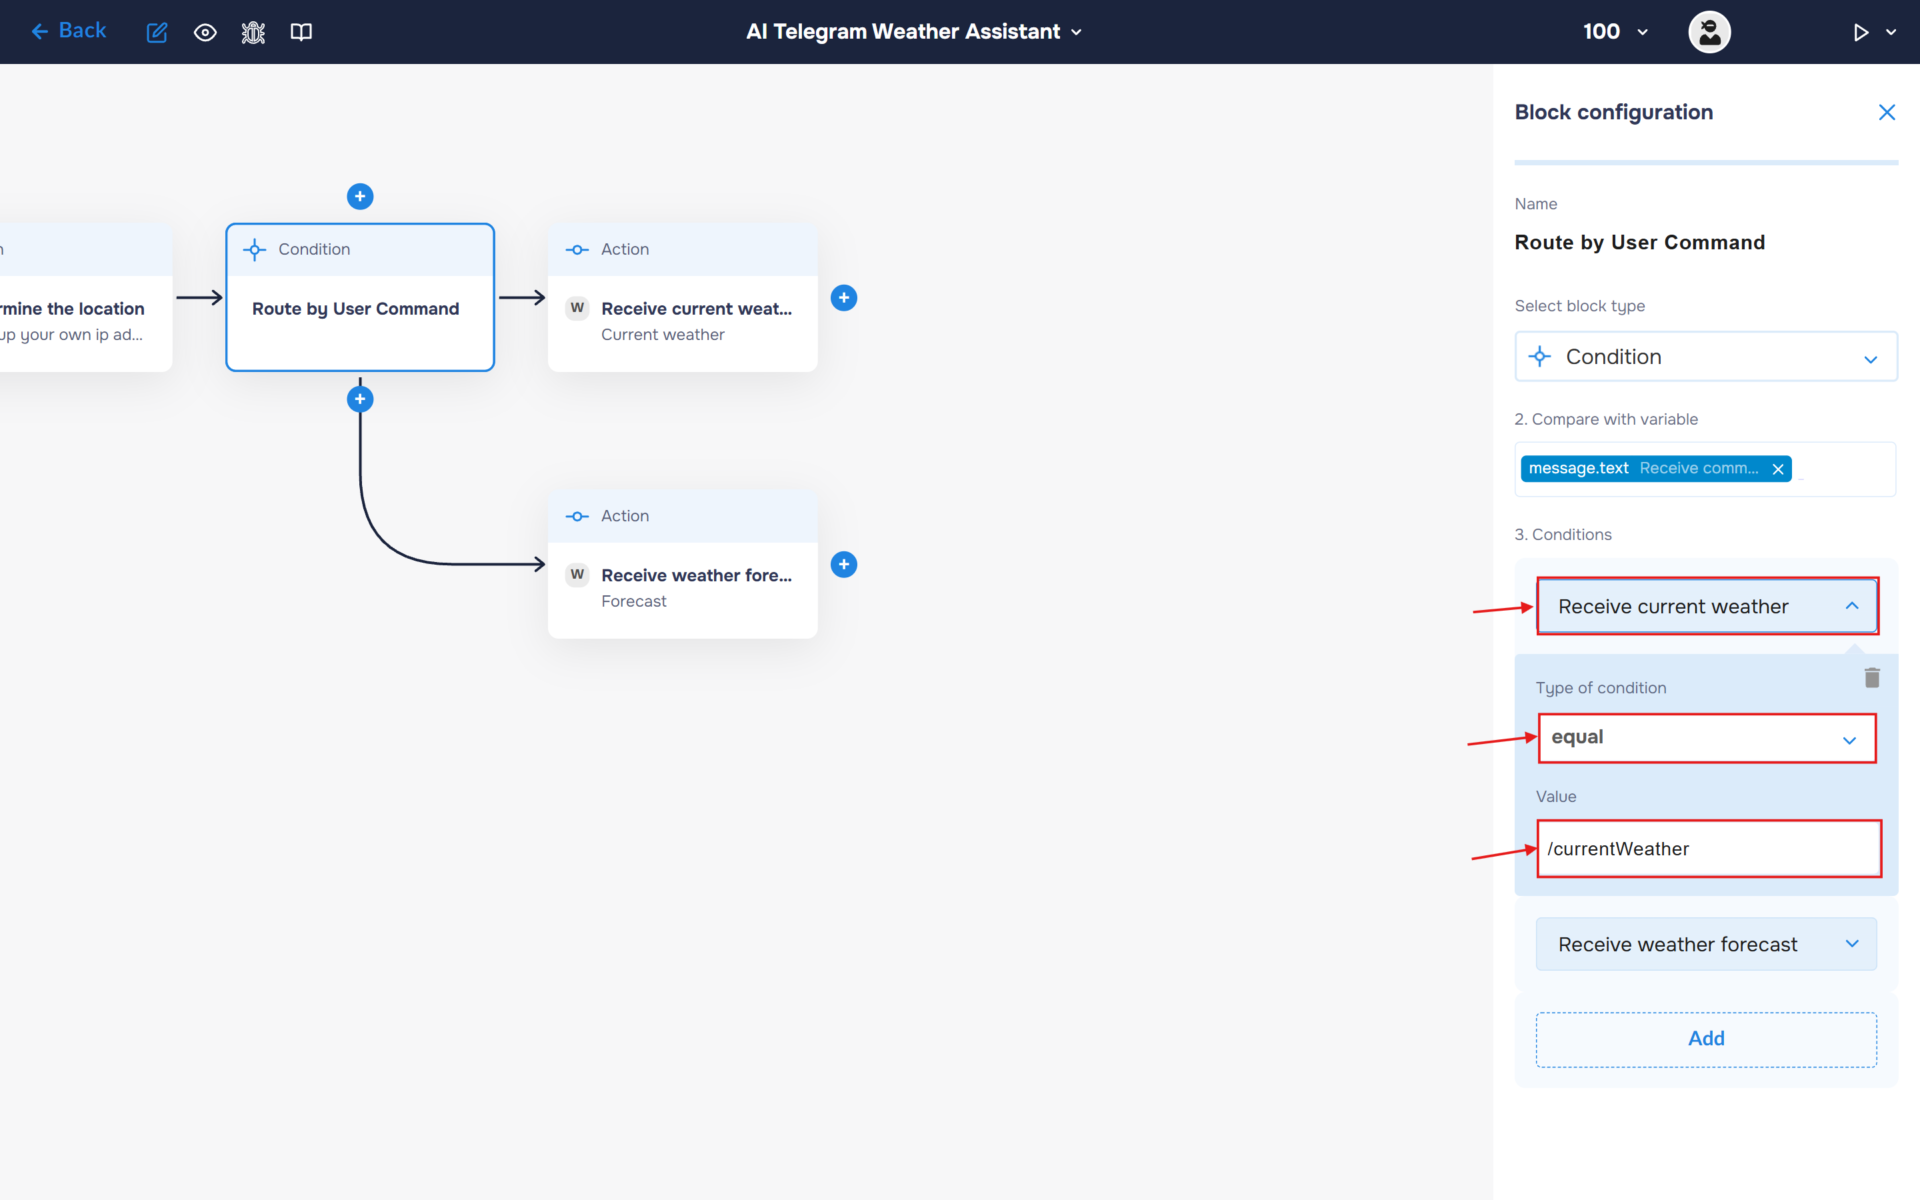
2. Add a “Reсeive Current Weather Data” block — Step 4.1. This branch is executed when the user sends the /currentWeather command. The workflow will request the latest weather conditions for the detected location from WeatherAPI.
In the “Conditions” section, expand the newly created block and configure the following values:
- Type of Condition: “equal”
- Value: “/currentWeather”
3. Add a “Recieve 7-Day Weather Forecast” block — Step 4.2. This branch is executed when the user sends the /weatherForecast command. The workflow will retrieve the upcoming 7-day forecast from WeatherAPI, providing the data required for ChatGPT to generate a personalized forecast summary.
In the “Conditions” section, expand the newly created block and configure the following values:
- Type of Condition: “equal”
- Value: “/weatherForecast”
Step 4.1: Retrieve Current Weather Data
1. When the user requests the current weather, the workflow sends a request to WeatherAPI using the detected location. The returned weather data will later be transformed into a natural-language response by ChatGPT.
- In the “Block Configuration“ panel, click on the “Select block type“ field and select the “Action” type.
- Next, you need to add WeatherAPI service by clicking on the field “Select trigger app“; find and select “Weather API “.
- To connect to WeatherAPI , you need to create an authorisation. Click on the “Sign in“ button in the “Select an account“ section.
- After clicking the button, a window for creating a new WeatherAPI authorization will open. Enter a name for the authorization, provide the required credentials, and save the connection.
- If the authorization is successful, the created authorization will appear in the “Select an account” field. You need to select this authorization to configure the next steps of the block.
- The next step is to select a method, so click on the “Select a method“. Find and select the “current weather” method.
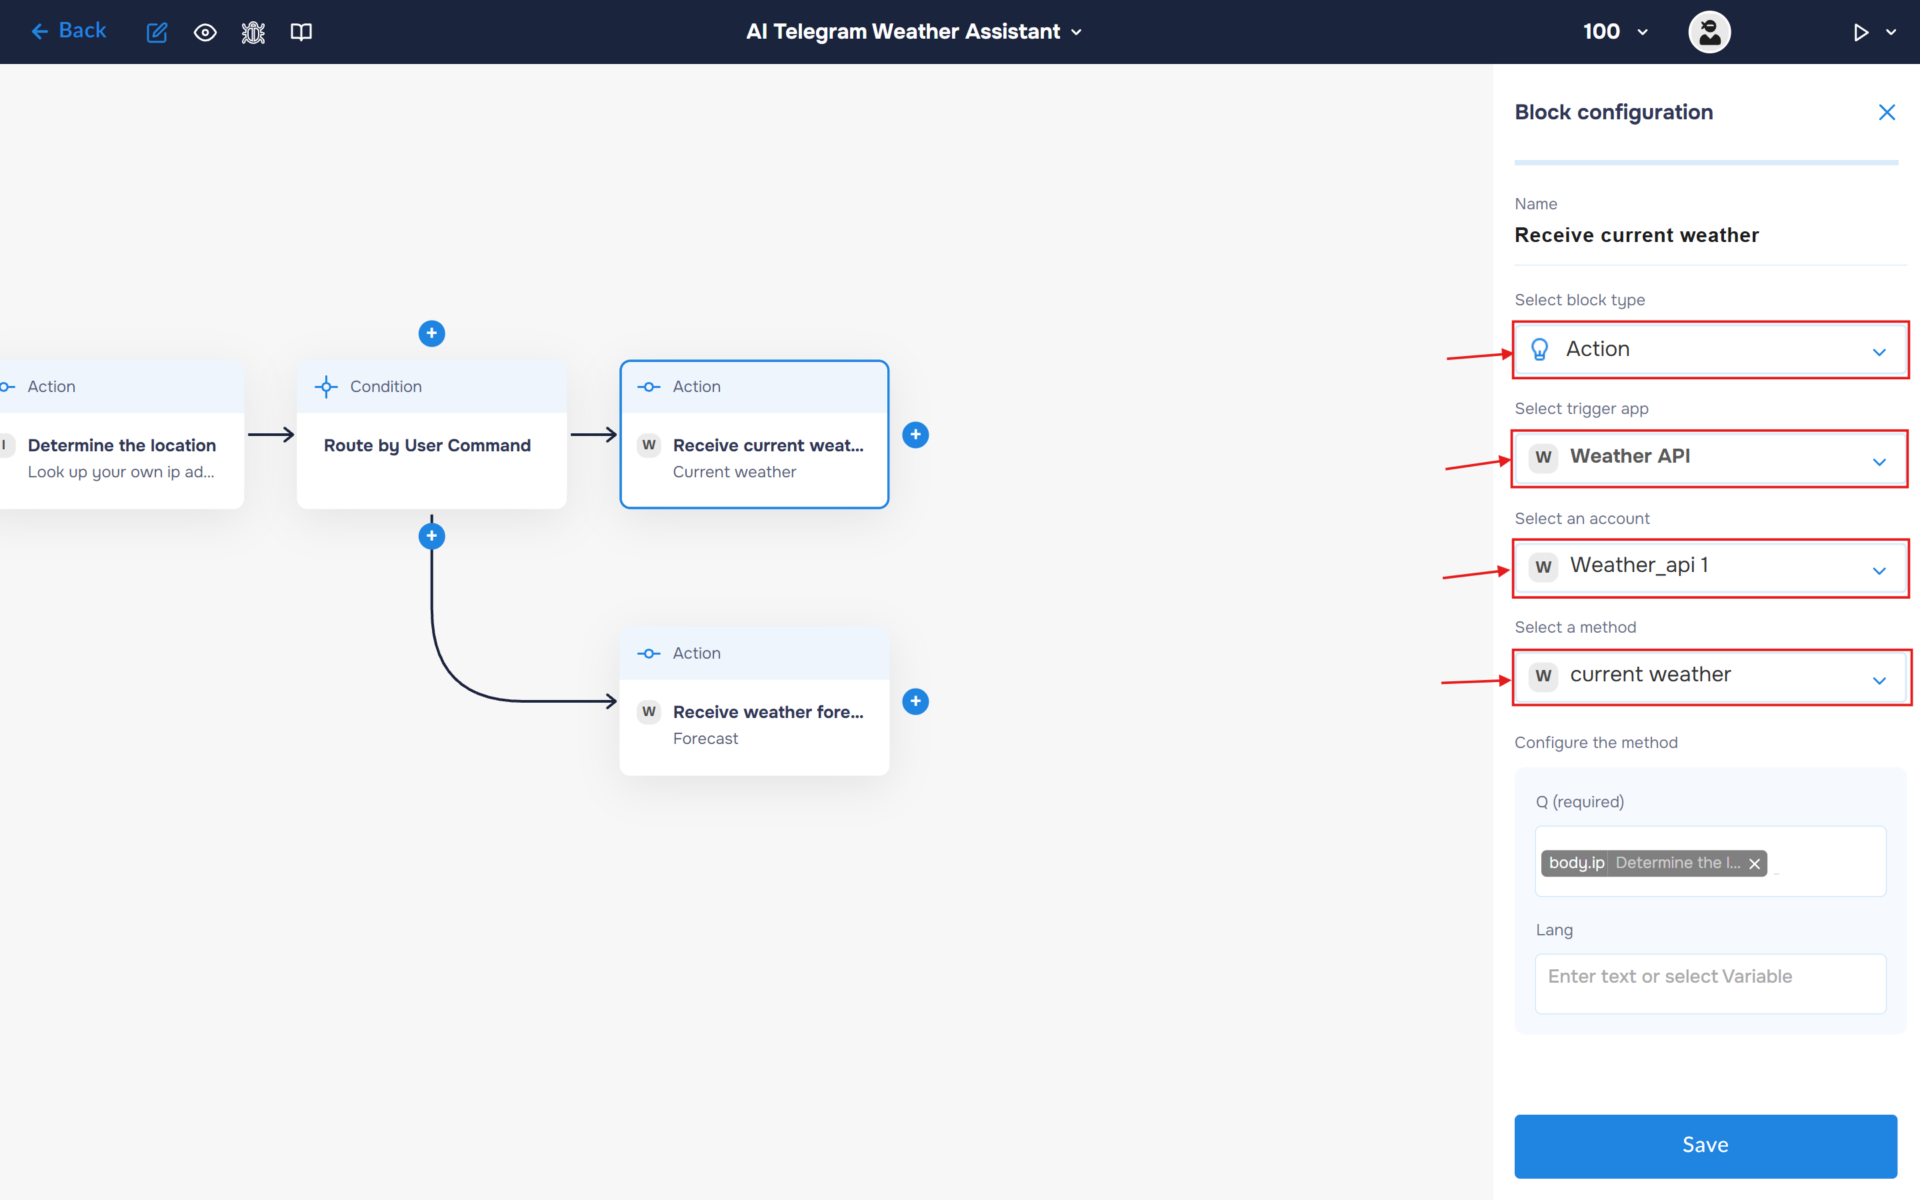
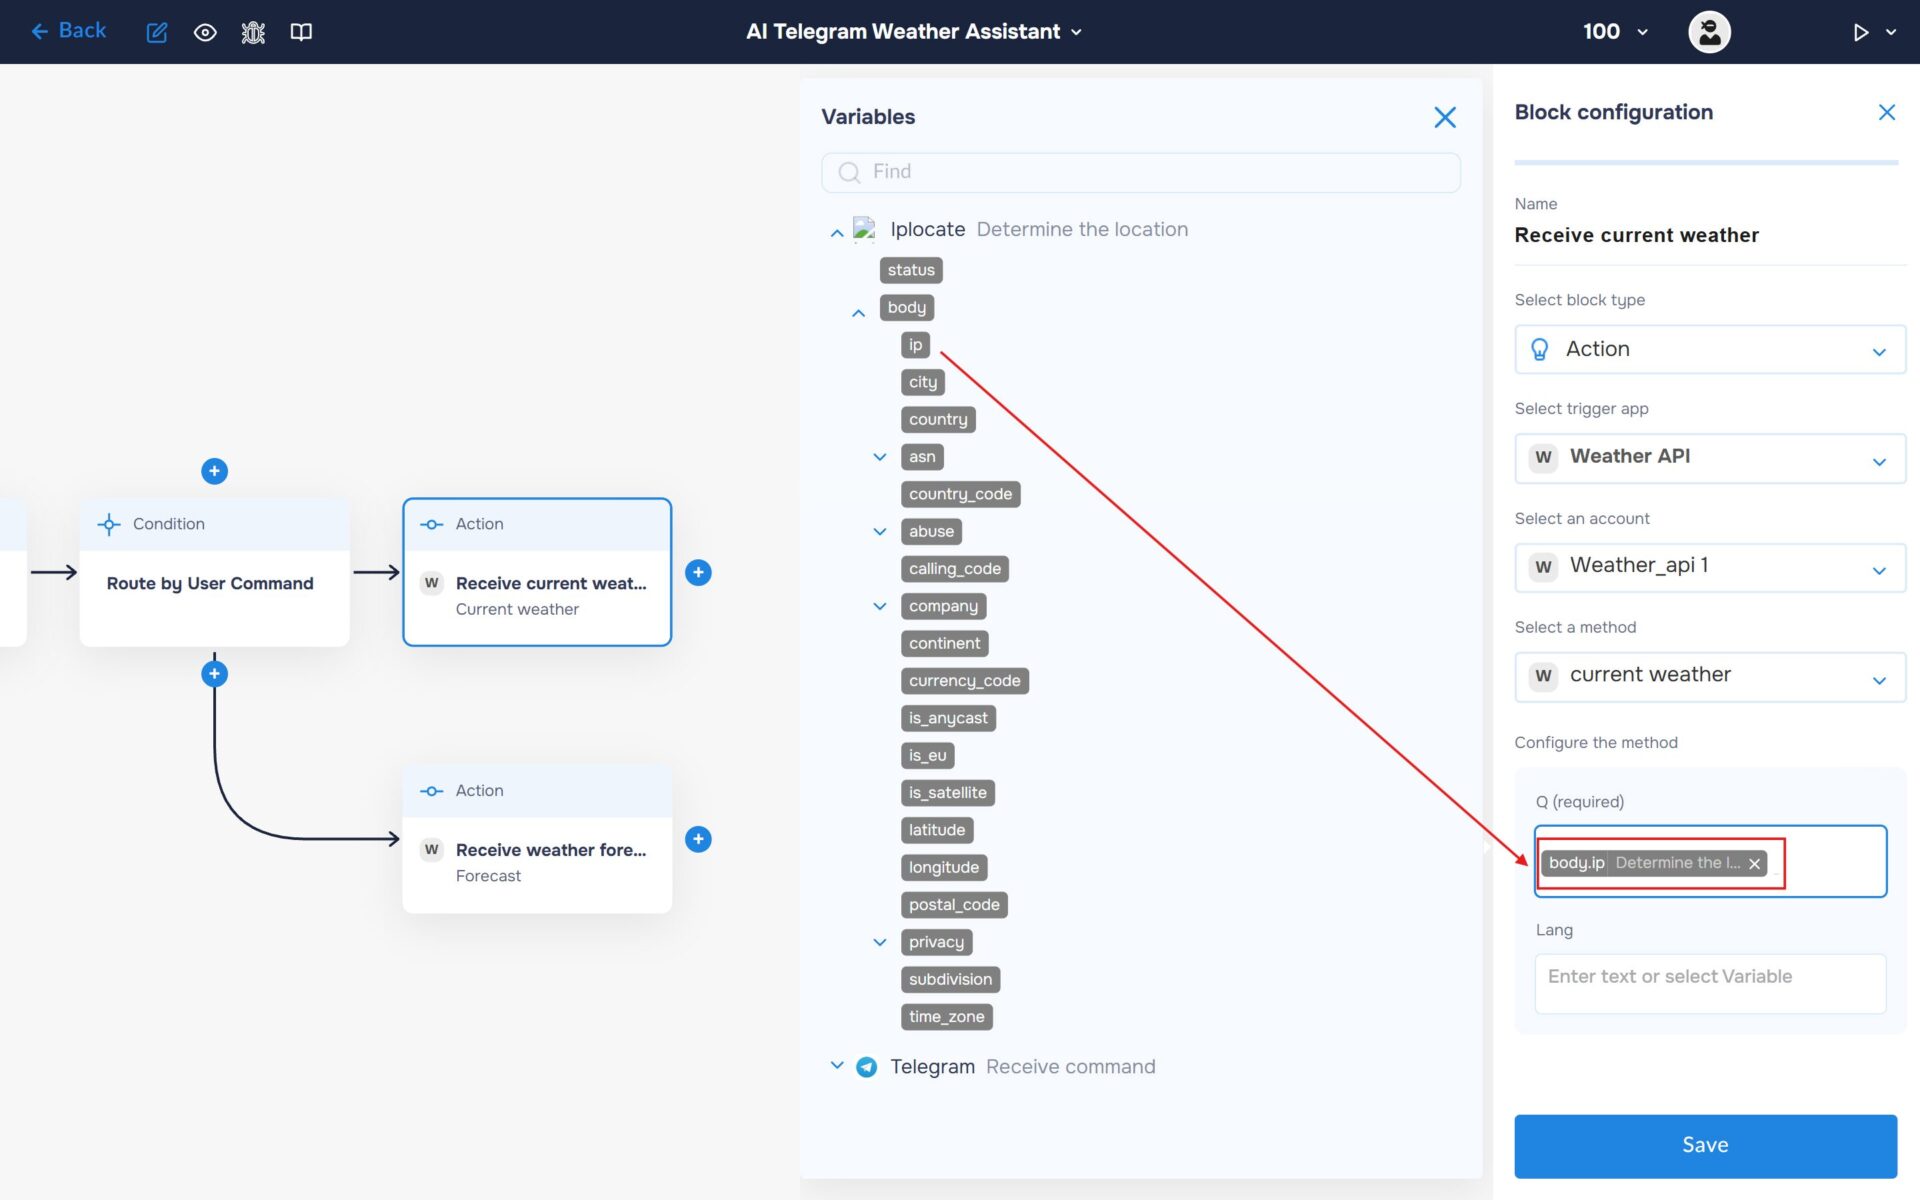
2. Fill the “Q” field with the IP address returned by the IPLocate service.
Step 4.2: Retrieve the 7-Day Weather Forecast
1. When the user requests a weather forecast, the workflow retrieves the upcoming 7-day forecast from WeatherAPI. This data will then be analyzed by ChatGPT to generate a concise and easy-to-understand forecast summary.
- In the “Block Configuration“ panel, click on the “Select block type“ field and select the “Action” type.
- Next, you need to add WeatherAPI service by clicking on the field “Select trigger app“; find and select “Weather API “.
- To connect to WeatherAPI , you need to create an authorisation. Click on the “Sign in“ button in the “Select an account“ section.
- After clicking the button, a window for creating a new WeatherAPI authorization will open. Enter a name for the authorization, provide the required credentials, and save the connection.
- If the authorization is successful, the created authorization will appear in the “Select an account” field. You need to select this authorization to configure the next steps of the block.
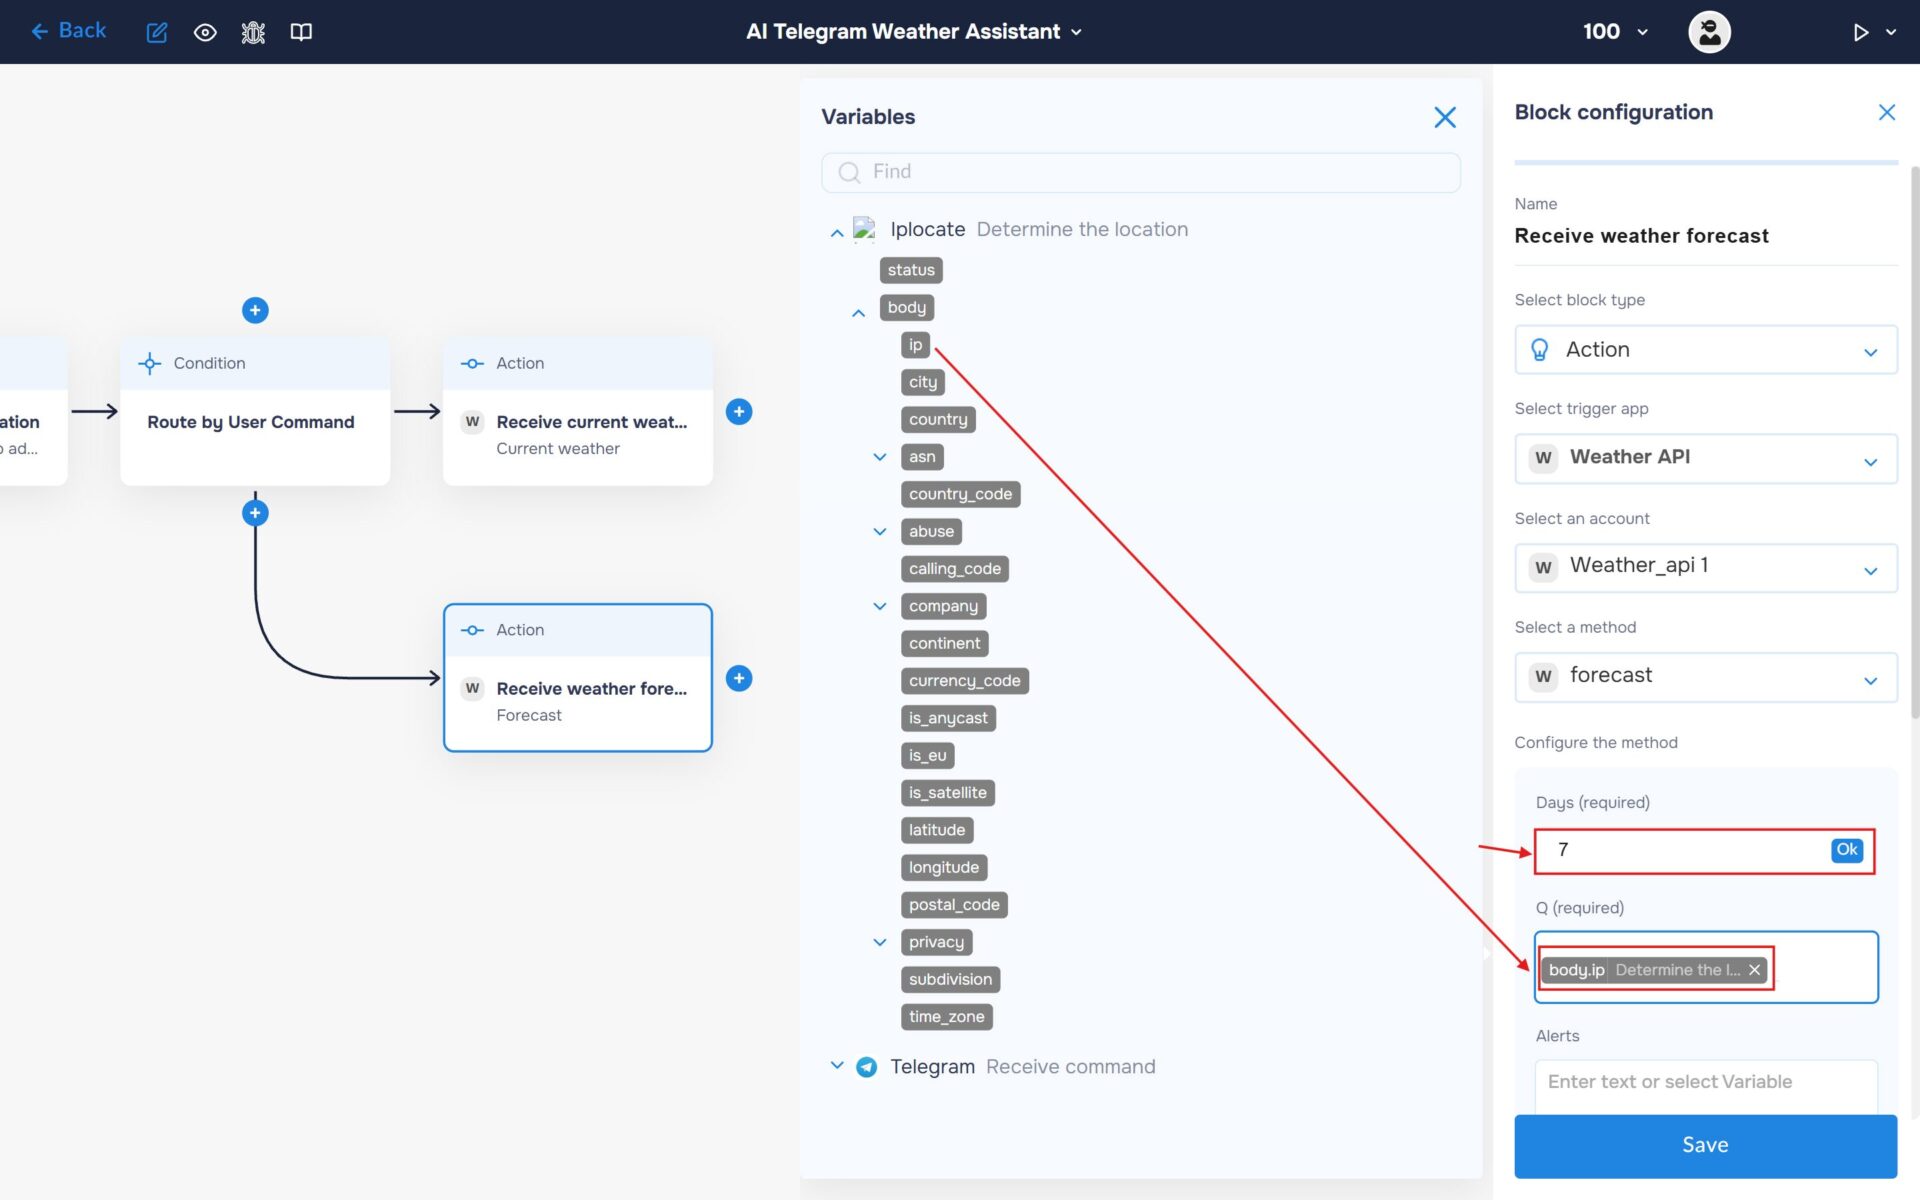
- The next step is to select a method, so click on the “Select a method“. Find and select the “forecast” method.
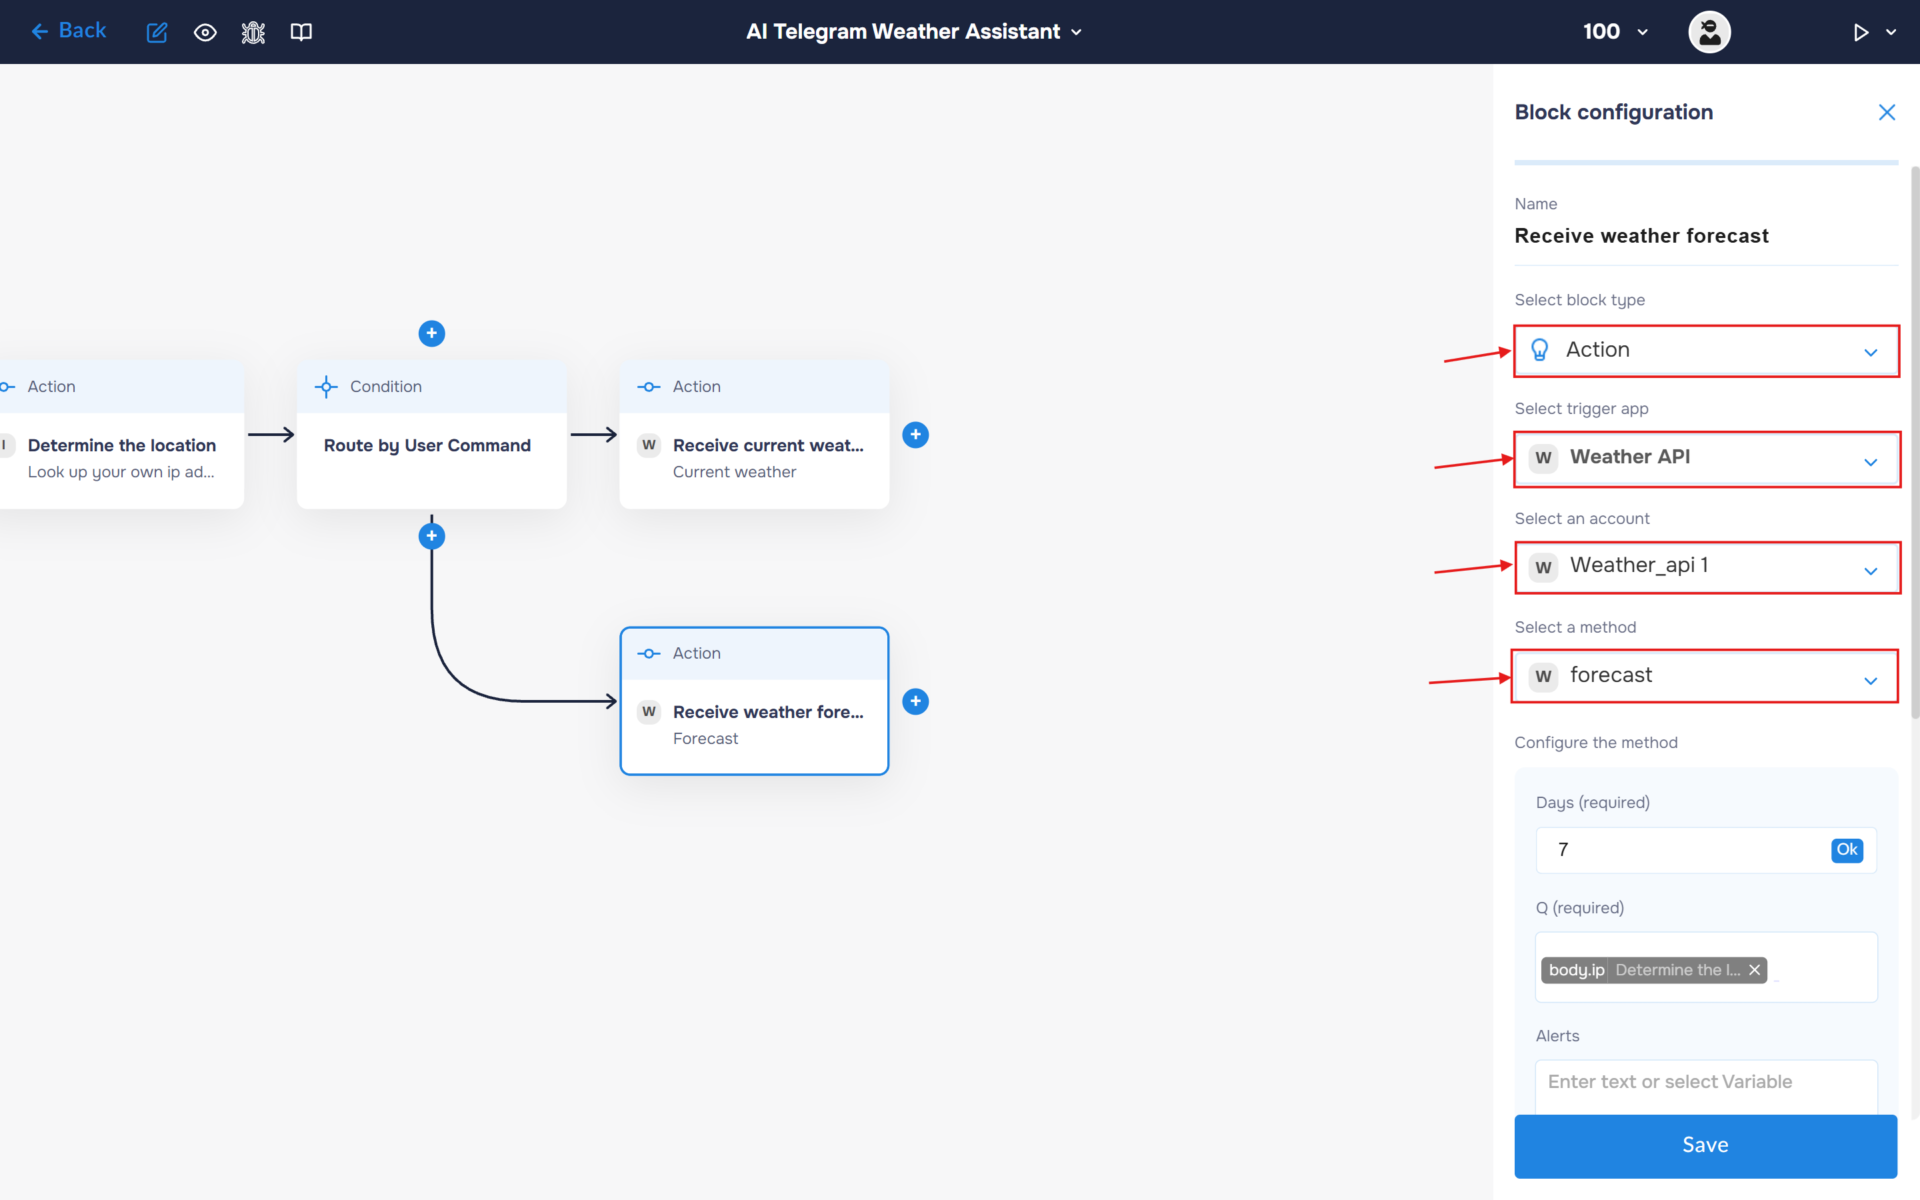
2. Fill the “Q” field with the “ip” variable returned by the IPLocate service, then specify the number of days for which you want to retrieve the weather forecast.
Step 5.1 & 5.2: Generate AI Weather Summaries
Both workflow branches use ChatGPT to convert raw weather data into user-friendly responses. Although the weather data comes from the same API, each branch uses a different prompt to generate a response tailored to the user’s request.
Configure both ChatGPT blocks using the same model and settings. The only difference between them is the prompt: one summarizes the current weather, while the other analyzes the 7-day forecast.
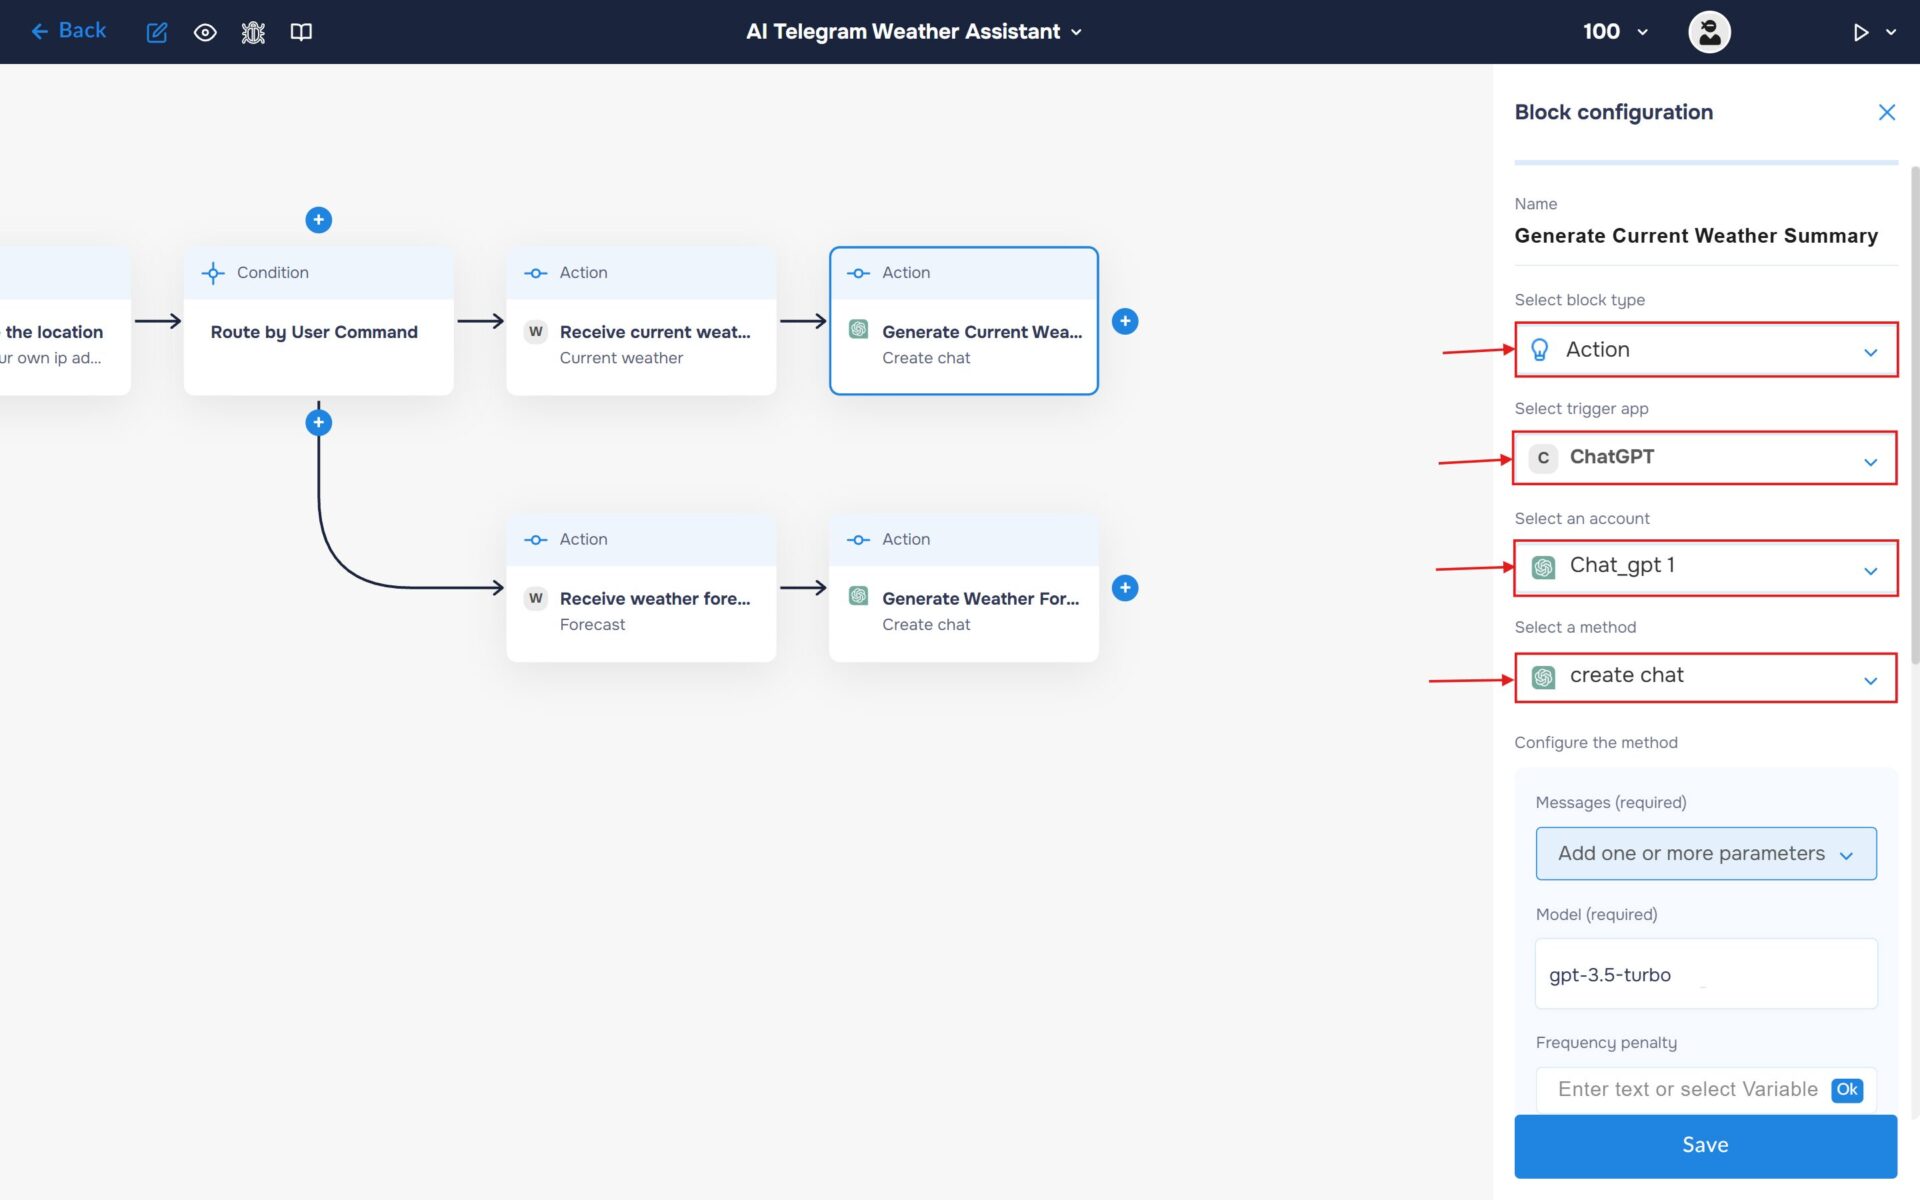
- In the “Block Configuration“ panel, click on the “Select block type“ field and select the “Action” type.
- Next, you need to add ChatGPT service by clicking on the field “Select trigger app“; find and select “ChatGPT“.
- To connect to ChatGPT, you need to create an authorisation. Click on the “Sign in“ button in the “Select an account“ section.
- After clicking the button, a window for creating a new ChatGPT authorization will open. Enter a name for the authorization, provide the required credentials, and save the connection.
- If the authorization is successful, the created authorization will appear in the “Select an account” field. You need to select this authorization to configure the next steps of the block.
- The next step is to select a method, so click on the “Select a method“. Find and select the “create chat” method.
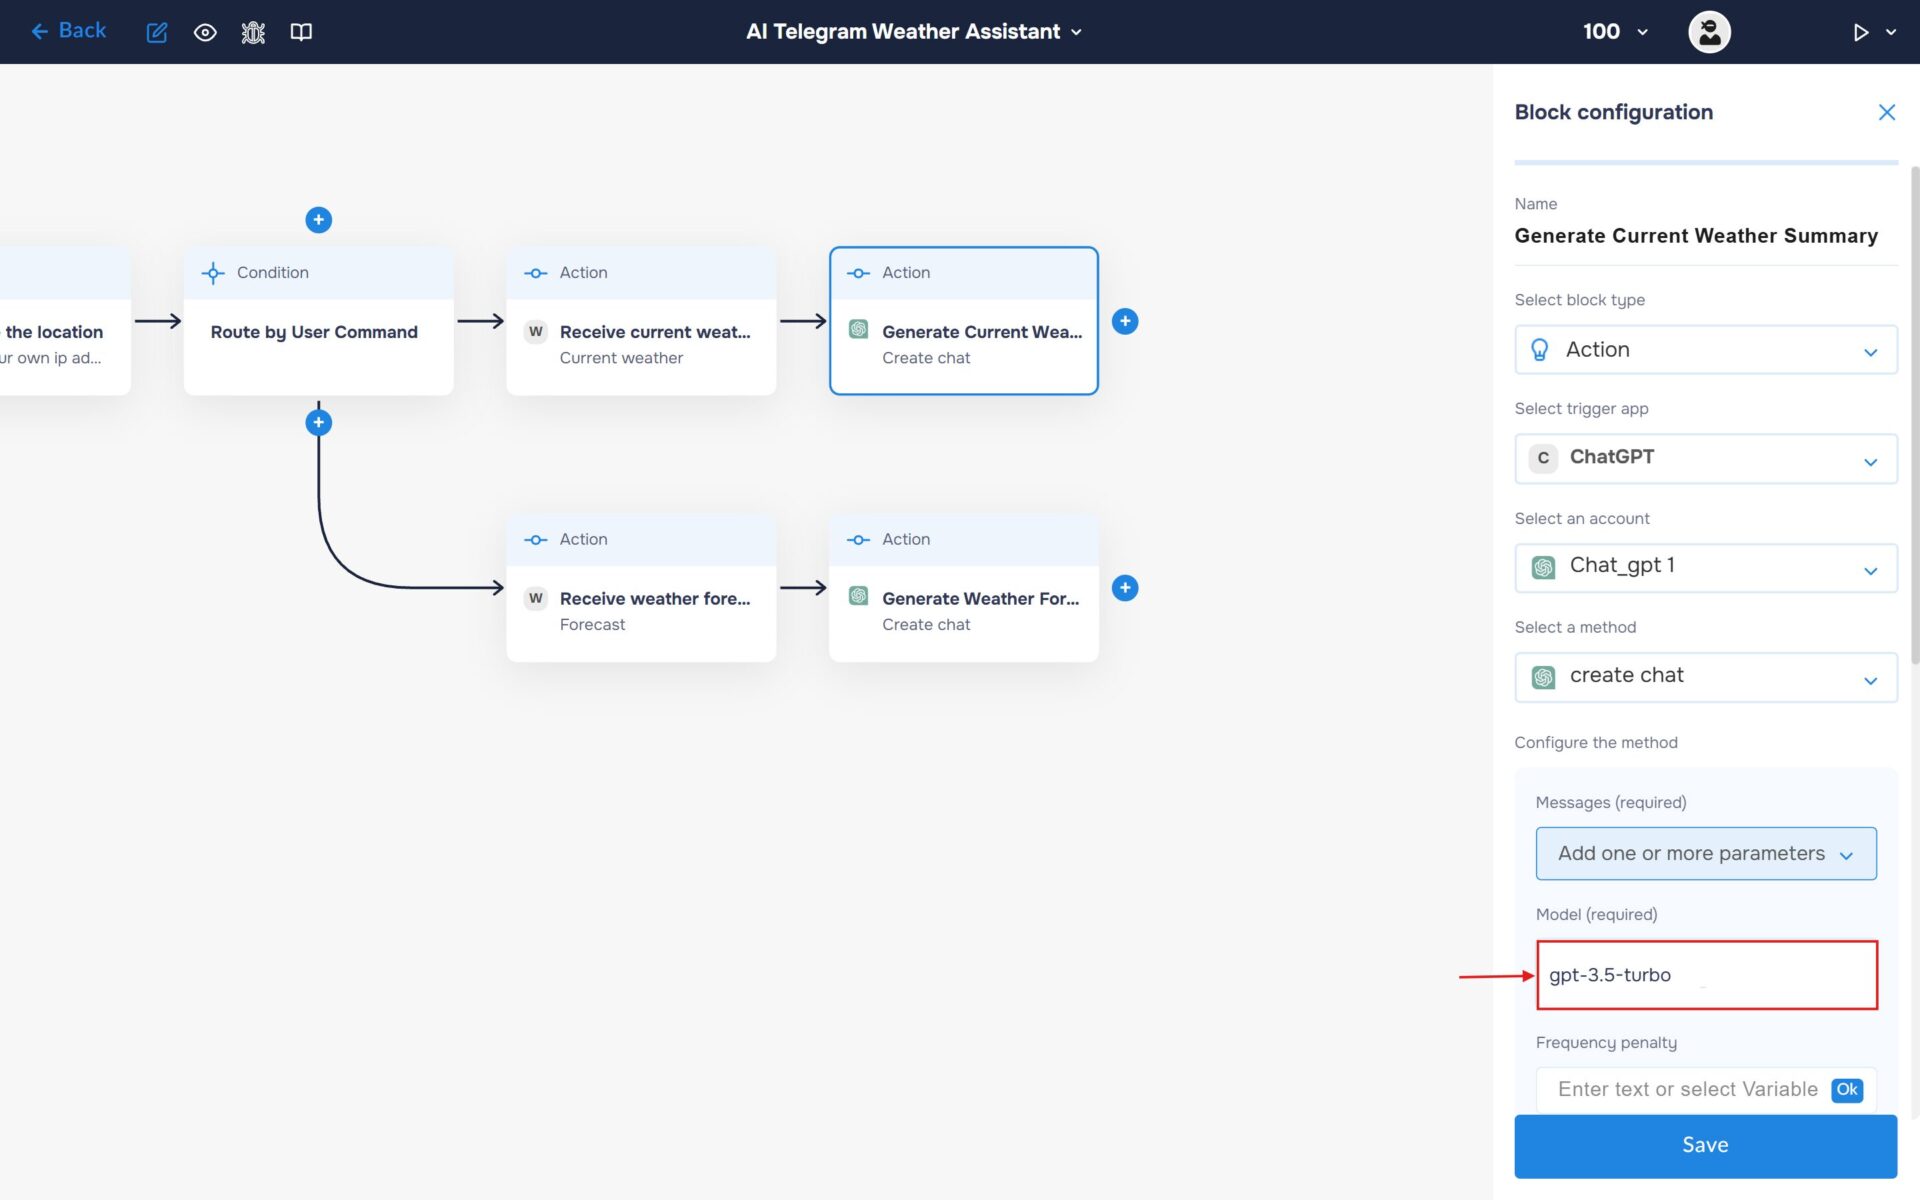
2. Specify the model name in the corresponding field (e.g., gpt-3.5-turbo).
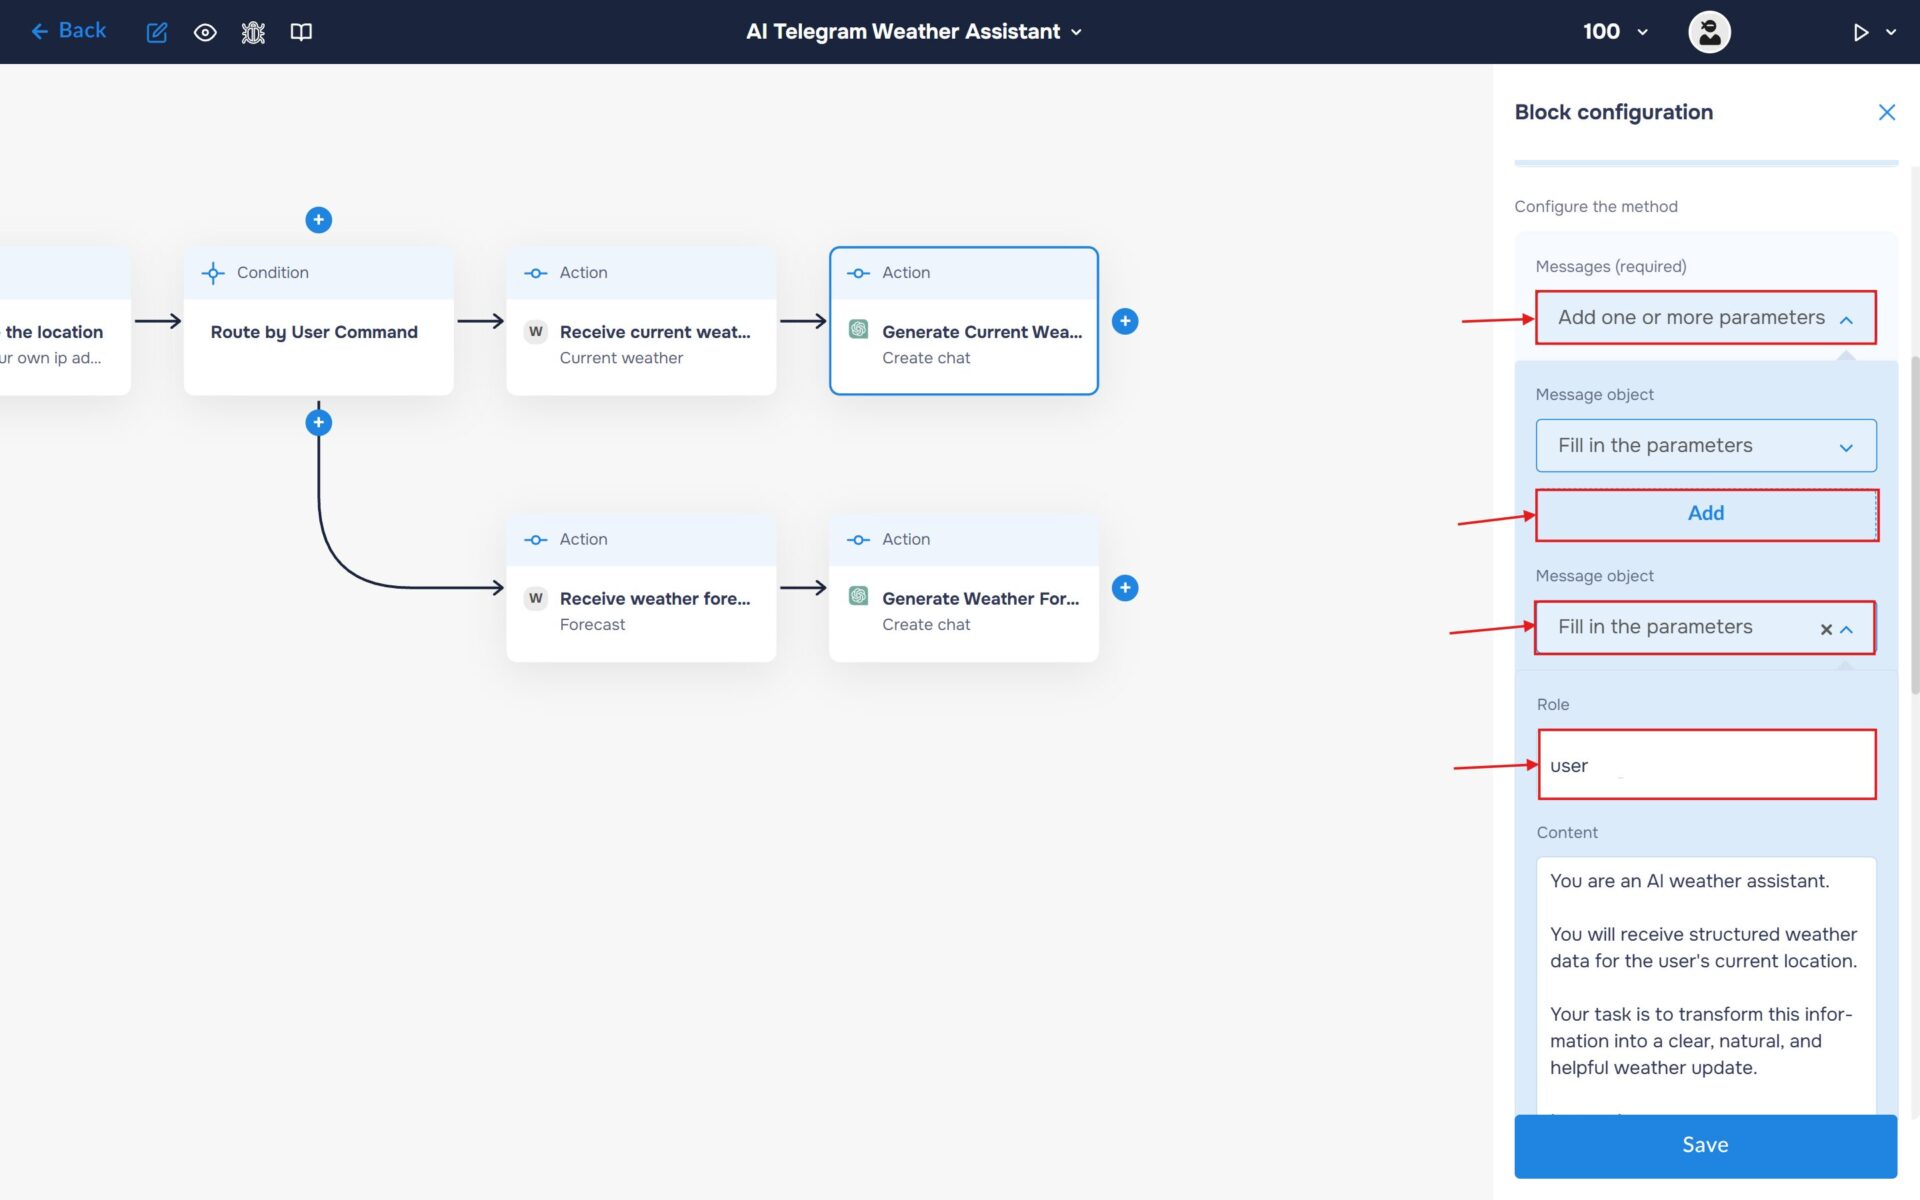
3. In the Messages section, select “Add one or more parameters”. Add a Message object and expand it. This is where you will enter the prompt that will be sent to the AI model for processing.
Fill the “Role” field with the value “user“.
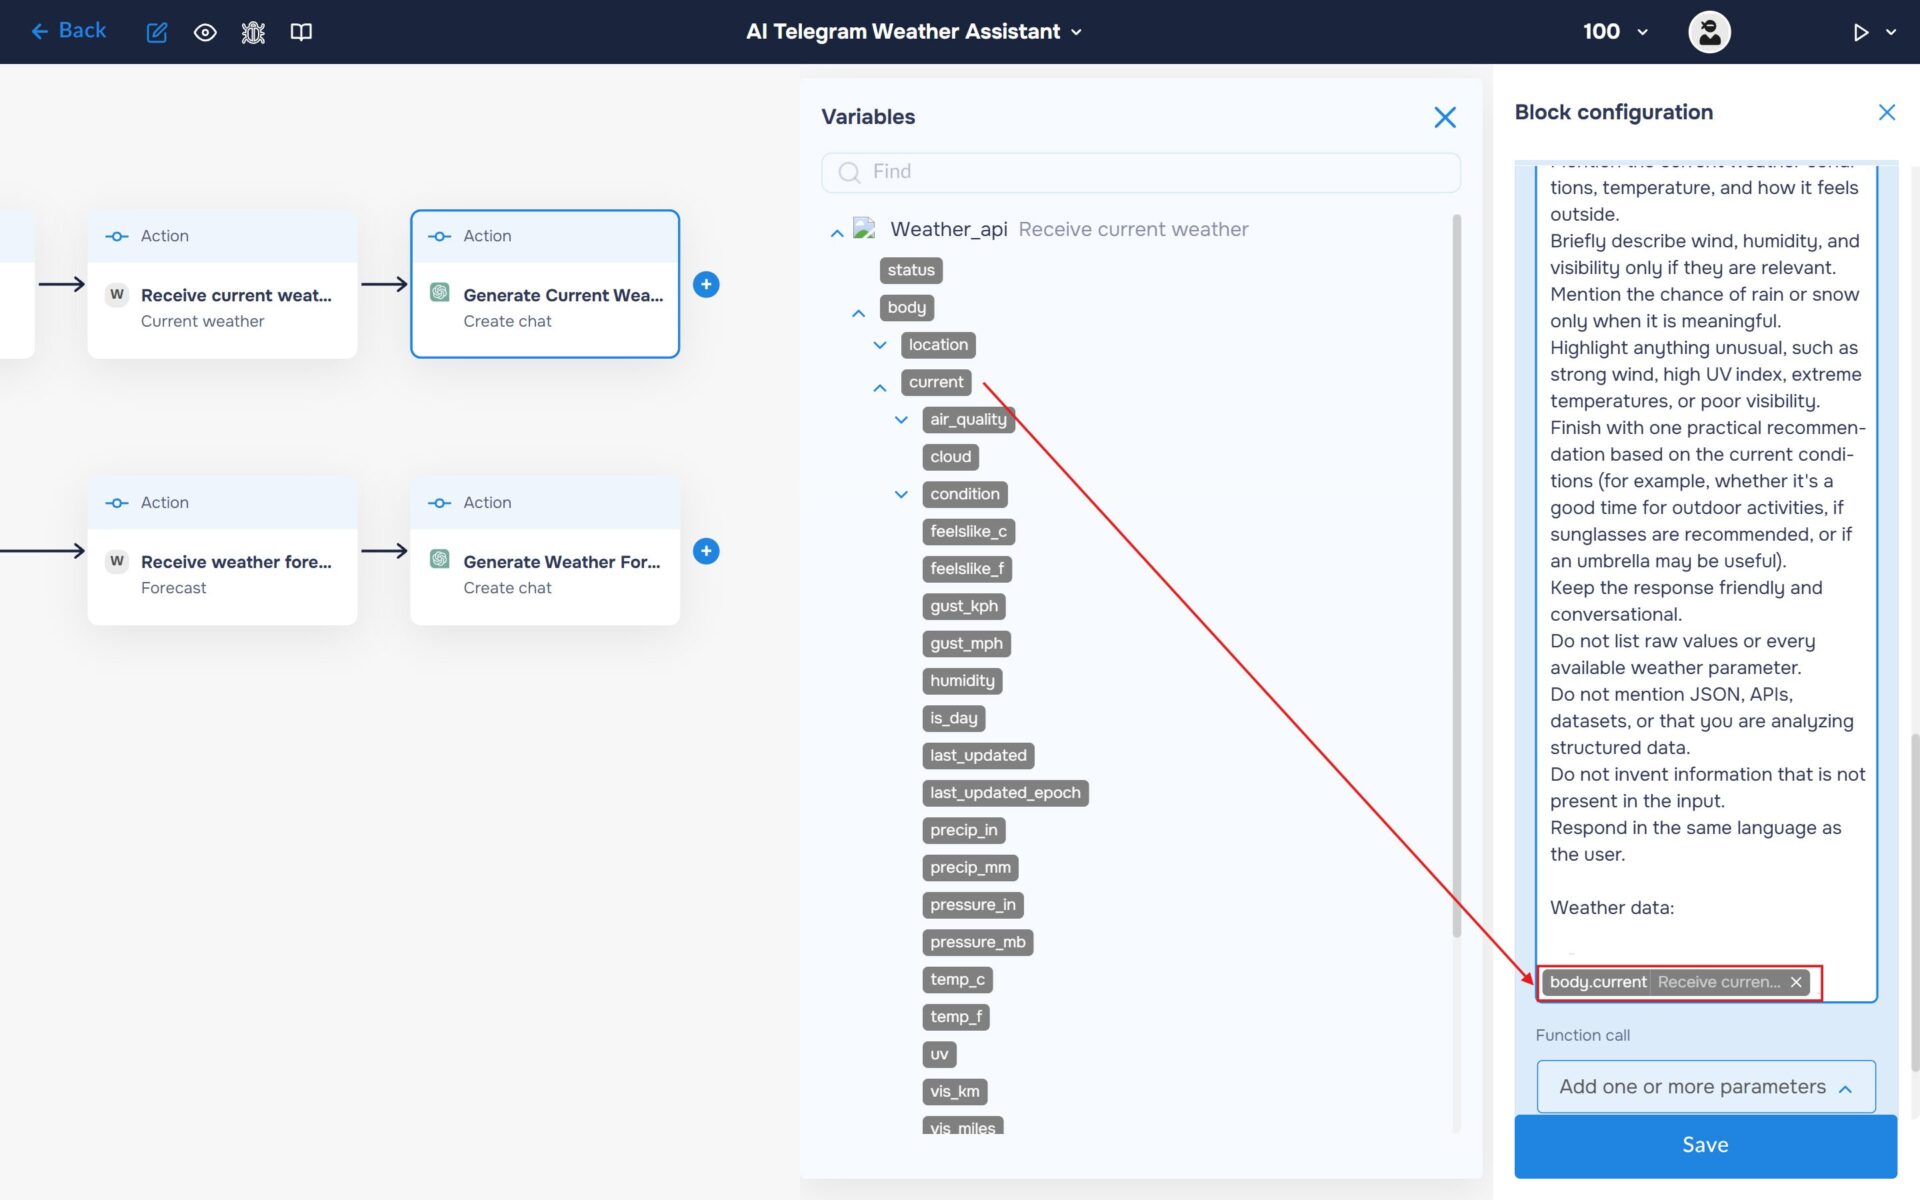
4. Fill the “Text” field with your prompt and insert the “current” variable returned by the WeatherAPI action.
🔧 Default Prompt: You are an AI weather assistant.
You will receive structured weather data for the user’s current location.
Your task is to transform this information into a clear, natural, and helpful weather update.
Instructions:
Summarize the current weather in 1–3 short paragraphs.
Mention the current weather conditions, temperature, and how it feels outside.
Briefly describe wind, humidity, and visibility only if they are relevant.
Mention the chance of rain or snow only when it is meaningful.
Highlight anything unusual, such as strong wind, high UV index, extreme temperatures, or poor visibility.
Finish with one practical recommendation based on the current conditions (for example, whether it’s a good time for outdoor activities, if sunglasses are recommended, or if an umbrella may be useful).
Keep the response friendly and conversational.
Do not list raw values or every available weather parameter.
Do not mention JSON, APIs, datasets, or that you are analyzing structured data.
Do not invent information that is not present in the input.
Respond in the same language as the user.
Weather data: [CURRENT WEATHER DATA]
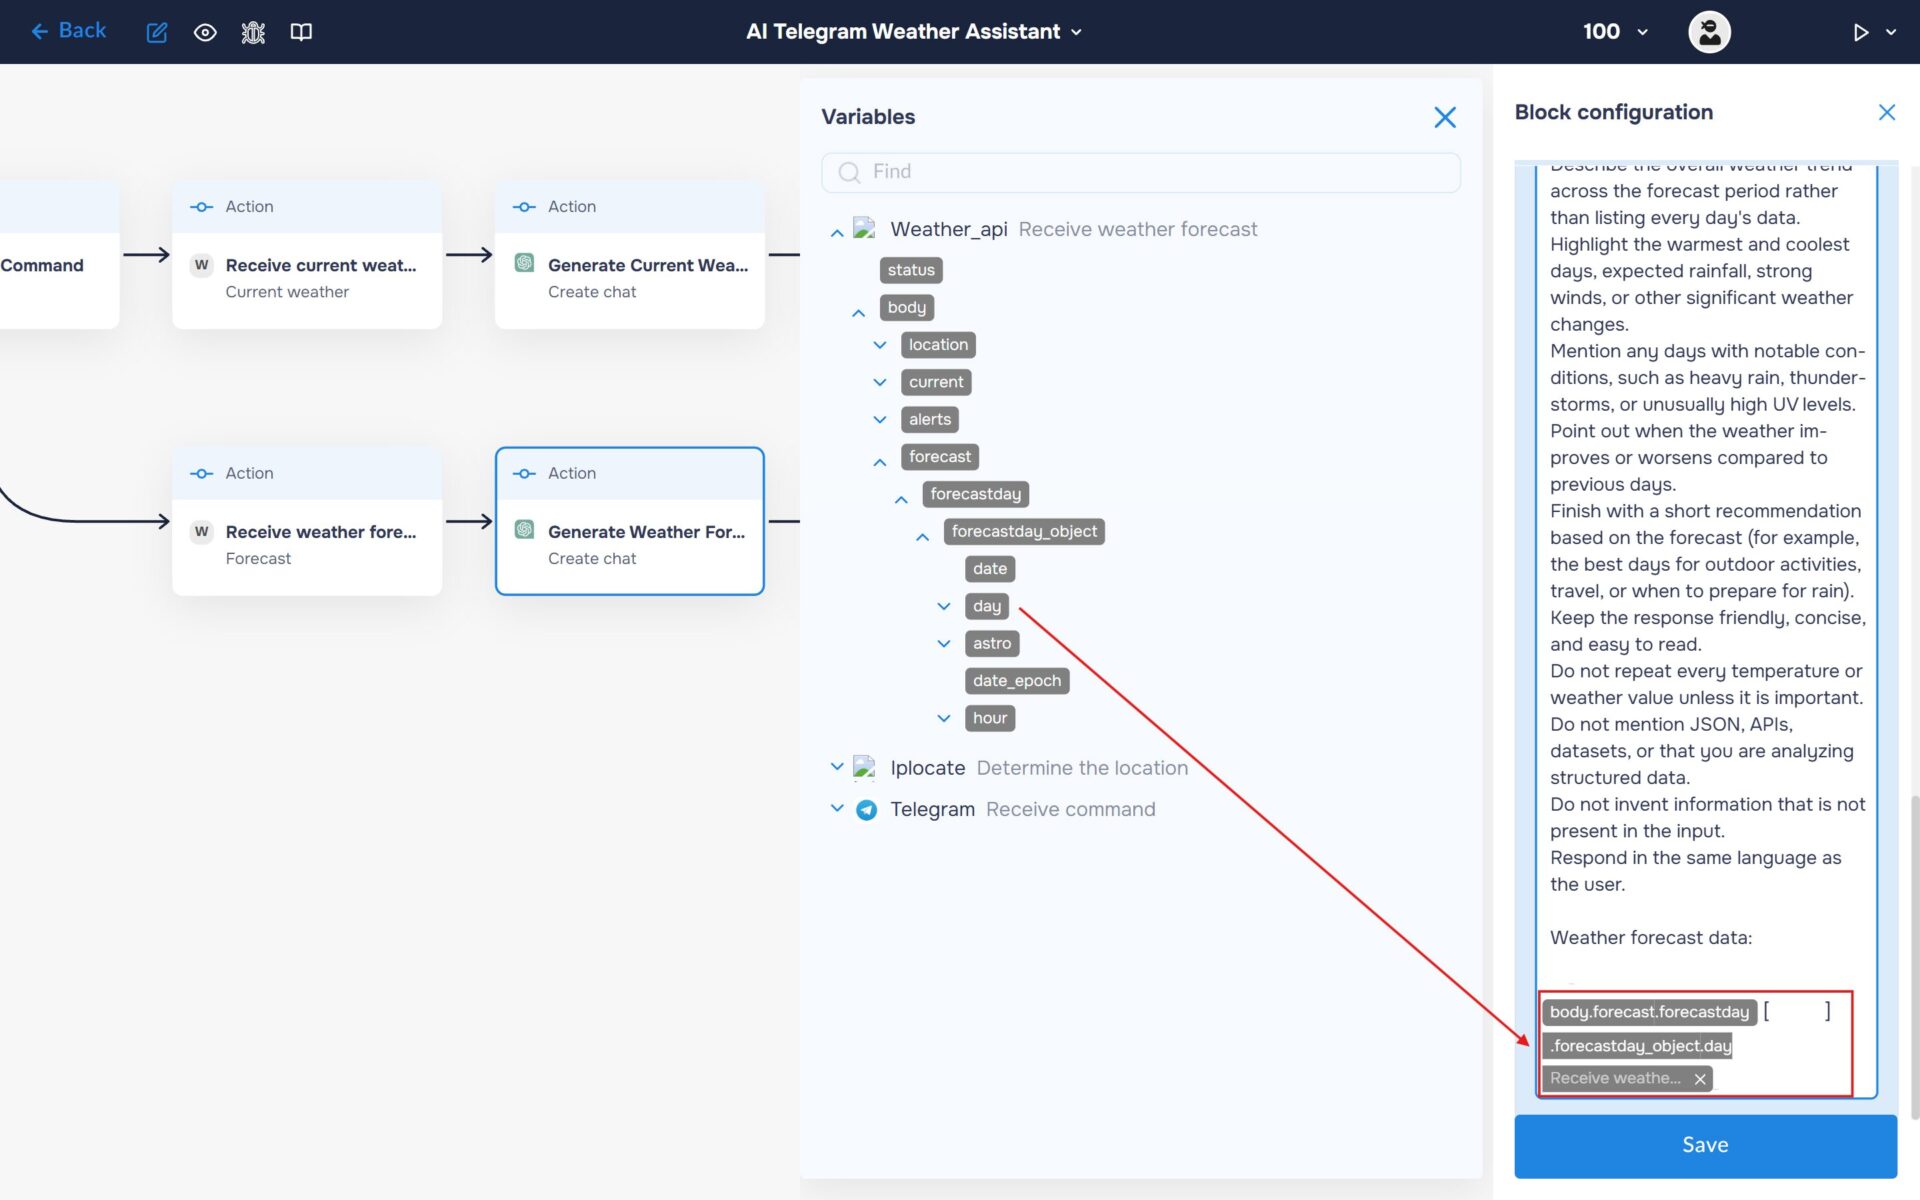
5. Configure the Generate Weather Forecast Summary block in the same way. Use the same model and settings, but replace the prompt with the one designed for forecast analysis and insert the “day” variable returned by the WeatherAPI action.
🔧 Default Prompt: You are an AI weather assistant.
You will receive structured weather data for the user’s current location.
Your task is to transform this information into a clear, natural, and helpful weather update.
Instructions:
Summarize the weather forecast in 2–3 short paragraphs.
Mention the current weather conditions, temperature, and how it feels outside.
Briefly describe wind, humidity, and visibility only if they are relevant.
Mention the chance of rain or snow only when it is meaningful.
Highlight anything unusual, such as strong wind, high UV index, extreme temperatures, or poor visibility.
Finish with one practical recommendation based on the current conditions (for example, whether it’s a good time for outdoor activities, if sunglasses are recommended, or if an umbrella may be useful).
Keep the response friendly and conversational.
Do not list raw values or every available weather parameter.
Do not mention JSON, APIs, datasets, or that you are analyzing structured data.
Do not invent information that is not present in the input.
Respond in the same language as the user.
Weather data: [WEATHER FORECAST DATA]
Step 6.1 & 6.2: Send Personalized Weather Reports to Telegram
1. The final step delivers the AI-generated weather report directly to the user’s Telegram chat. Each branch sends the summary produced by ChatGPT, ensuring users receive a clear, personalized response based on the command they requested.
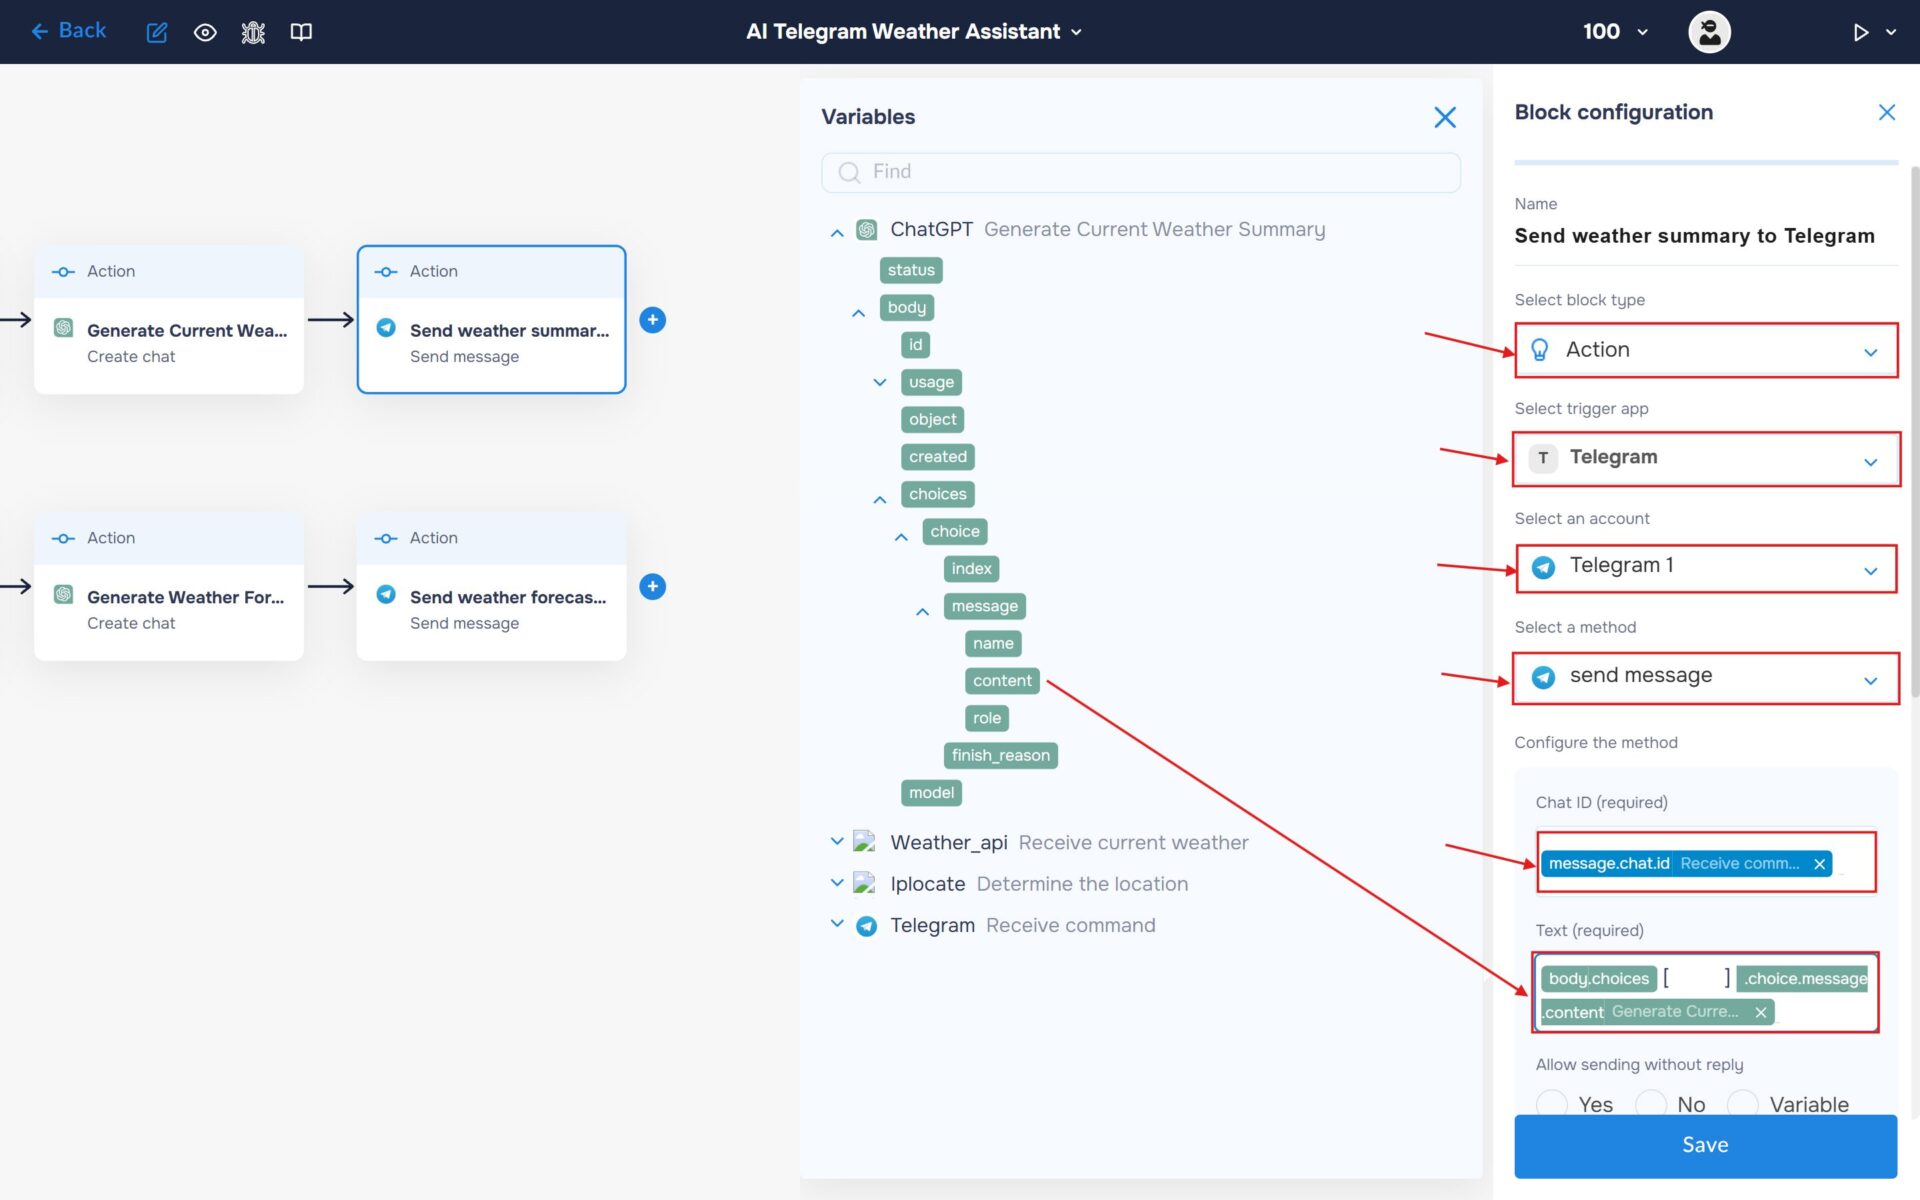
- Select the block type as “Action” and the service as “Telegram“.
- Choose an account and select it.
- Find and select the “send message” method.
- In the “Chat ID” field, enter the Chat ID stored in the “message.chat.id” variable.
- In the “Text field”, insert the summary generated by ChatGPT so that it can be sent to your Telegram chat.
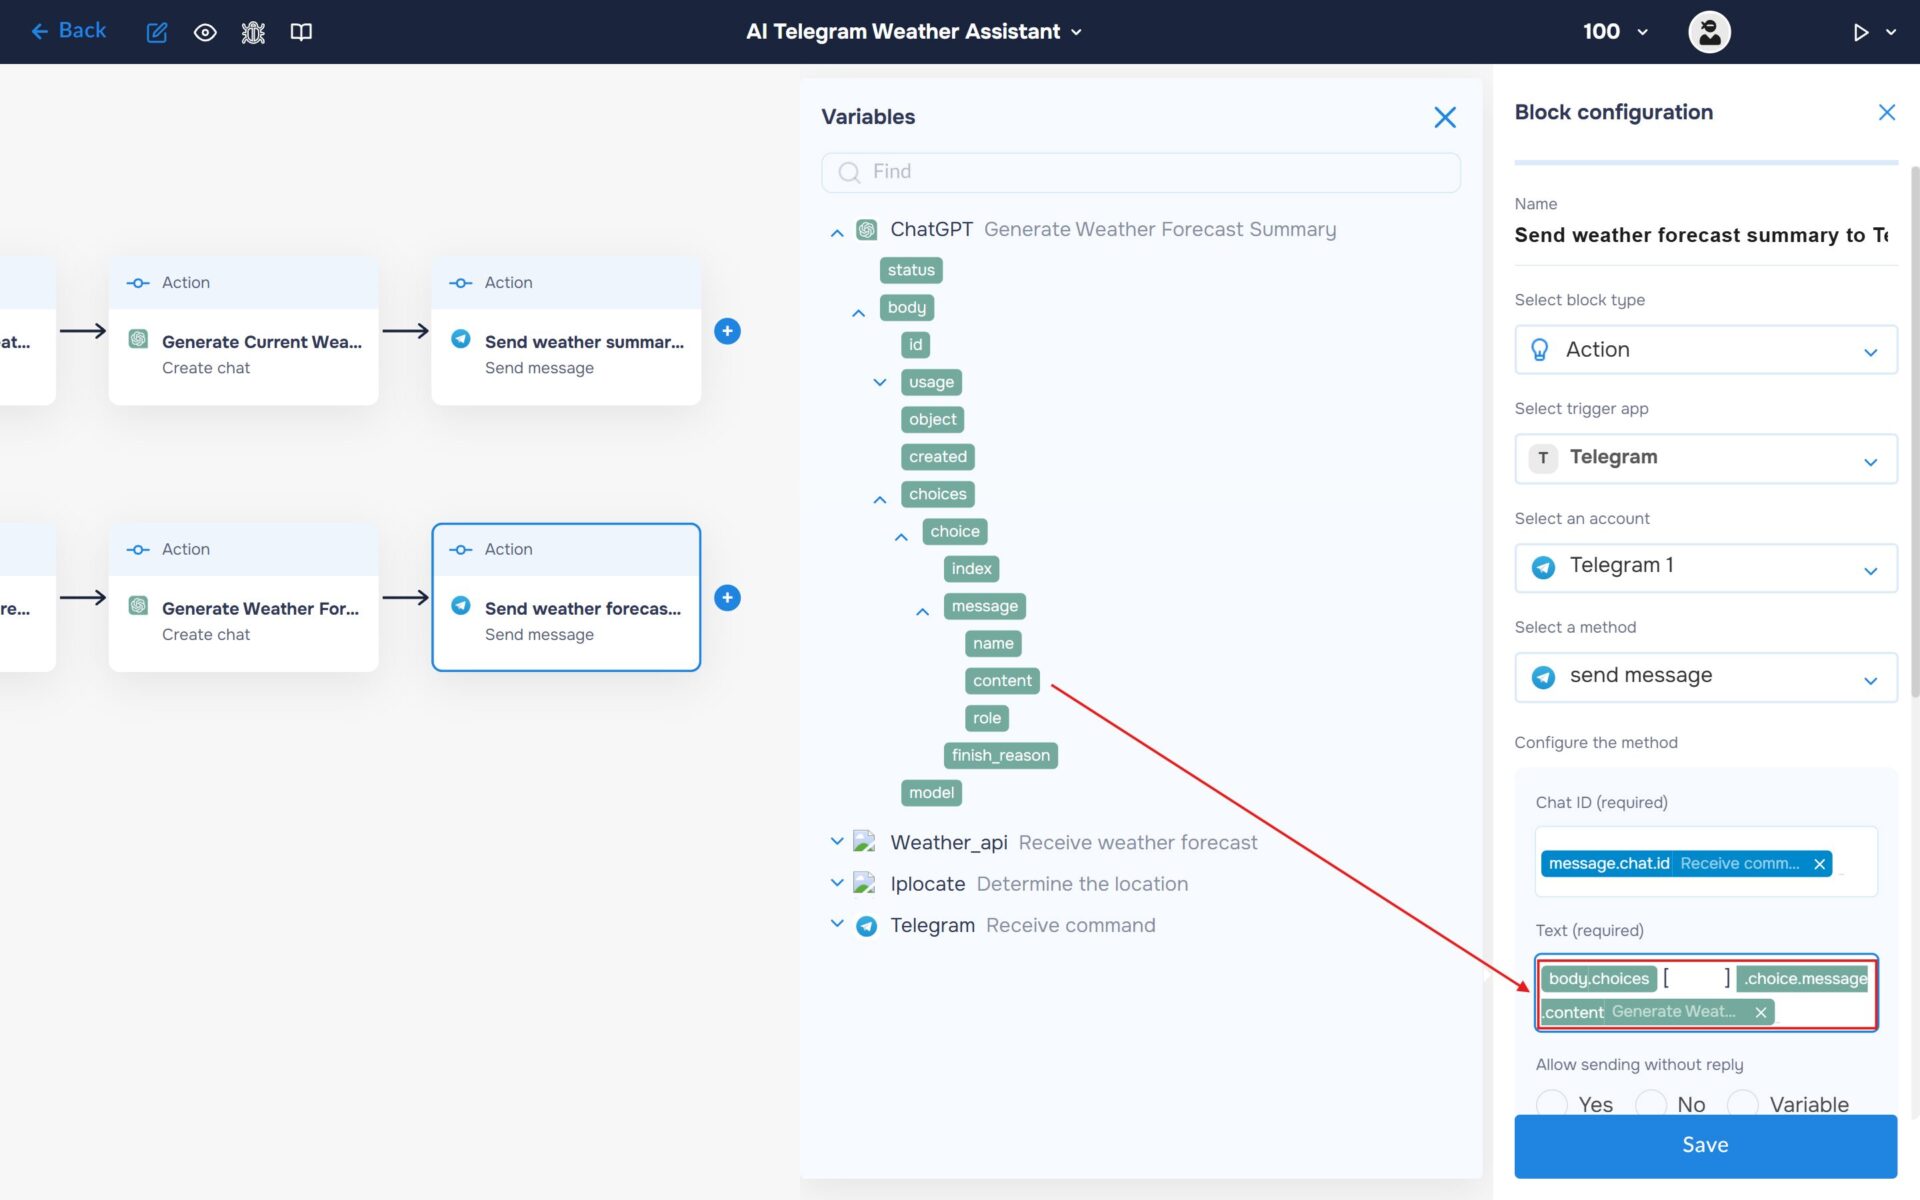
2. Configure the “Send Weather Forecast Summary to Telegram” block in the same way as the previous one. Use the AI-generated forecast summary instead of the current weather summary so users receive the appropriate response for the “/weatherForecast” command.
Run to execute a workflow
1. Your workflow is now fully configured. Let’s try running it. To do this, click the “Run” icon in the top-right corner of the workflow builder and select “Run Live”, or use the keyboard shortcut “Shift+L“. If the launch is successful, the icon color will change from white to blue, and an “L” will appear next to it.
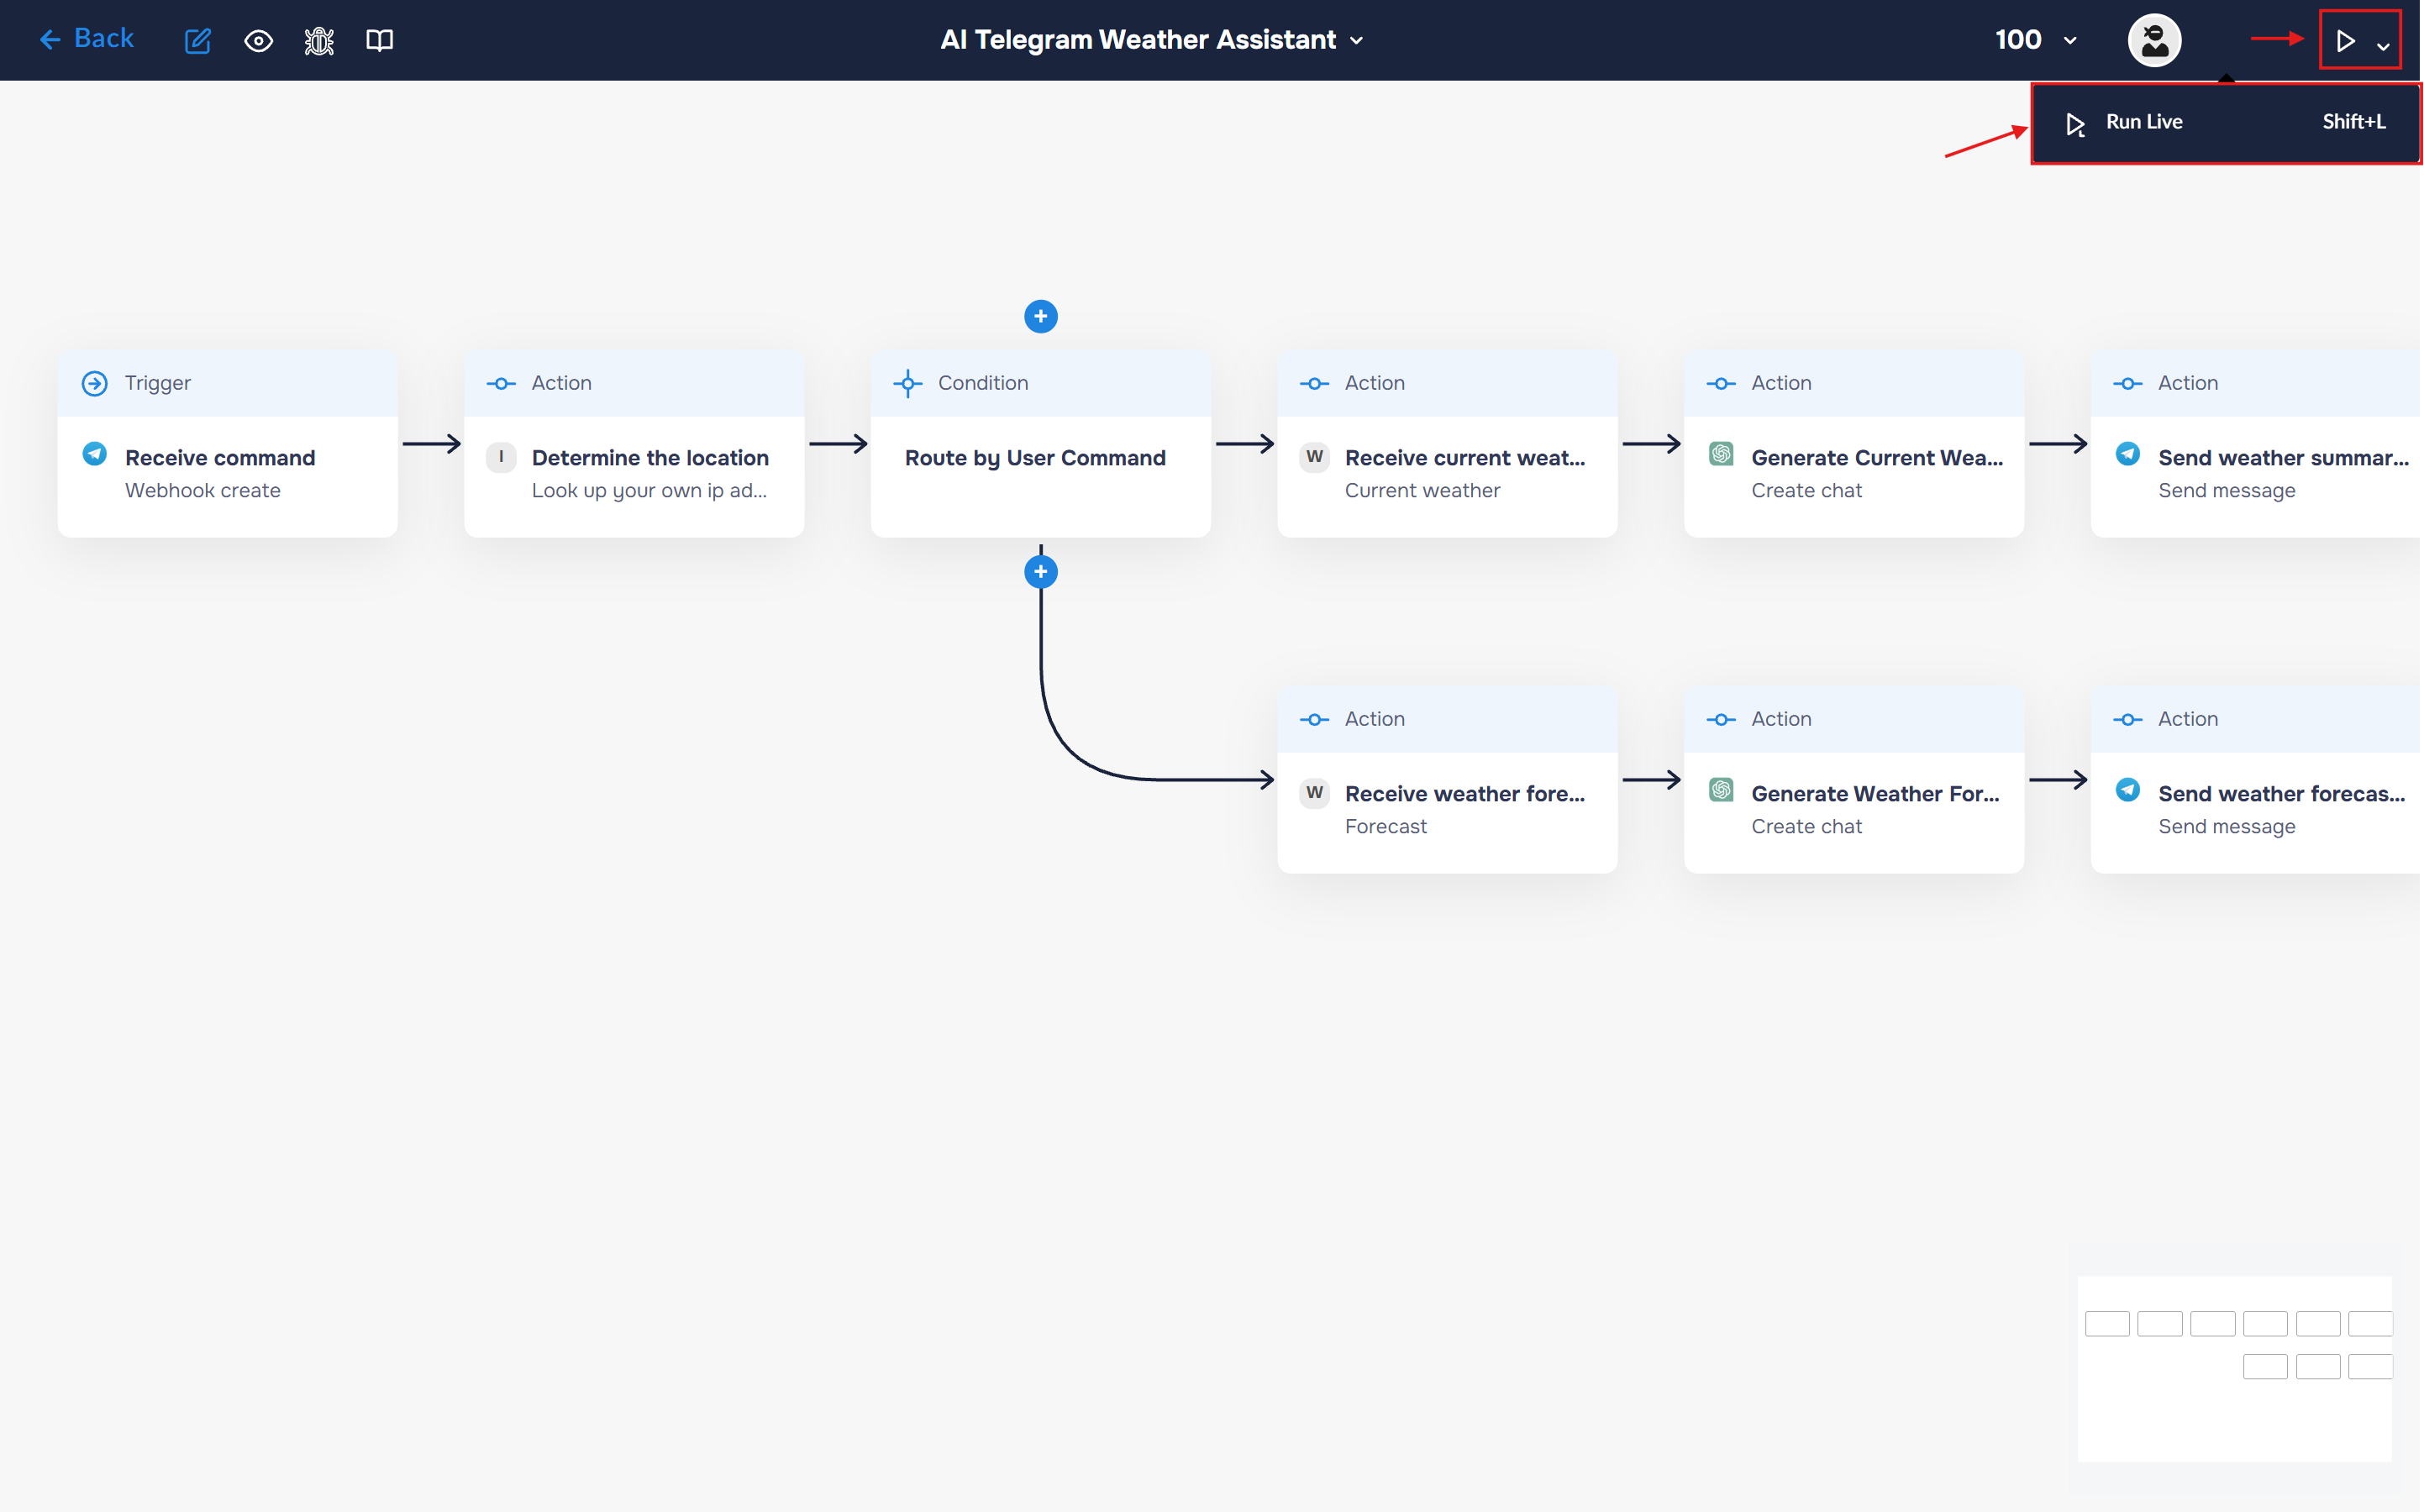
2. Congratulations! You have successfully built an interactive AI-powered weather assistant.
The workflow now accepts multiple Telegram commands, automatically detects the user’s location, retrieves live weather data from WeatherAPI, and uses ChatGPT to generate clear, personalized weather reports tailored to each request.
By combining command routing, external API integration, and AI-powered response generation, you have created a conversational assistant capable of delivering natural-language weather insights directly to users in Telegram.