
About This Guide
This guide provides step-by-step instructions for building an autonomous AI-powered email hygiene and onboarding workflow using the DigitalBPM platform, MailerLite, and Claude AI.
With strict spam policies introduced by Google and Yahoo, maintaining a clean mailing list is more critical than ever. Instead of manually reviewing new subscribers, checking email quality, researching prospects, and drafting welcome emails, you will create a workflow that:
- Monitors new subscriber registrations in MailerLite in real time
- Verifies email addresses to filter out invalid, temporary, or high-risk contacts
- Automatically removes unqualified subscribers to maintain a clean mailing list and protect email deliverability
- Uses an AI Assistant powered by Claude to analyze subscriber information and generate personalized welcome emails
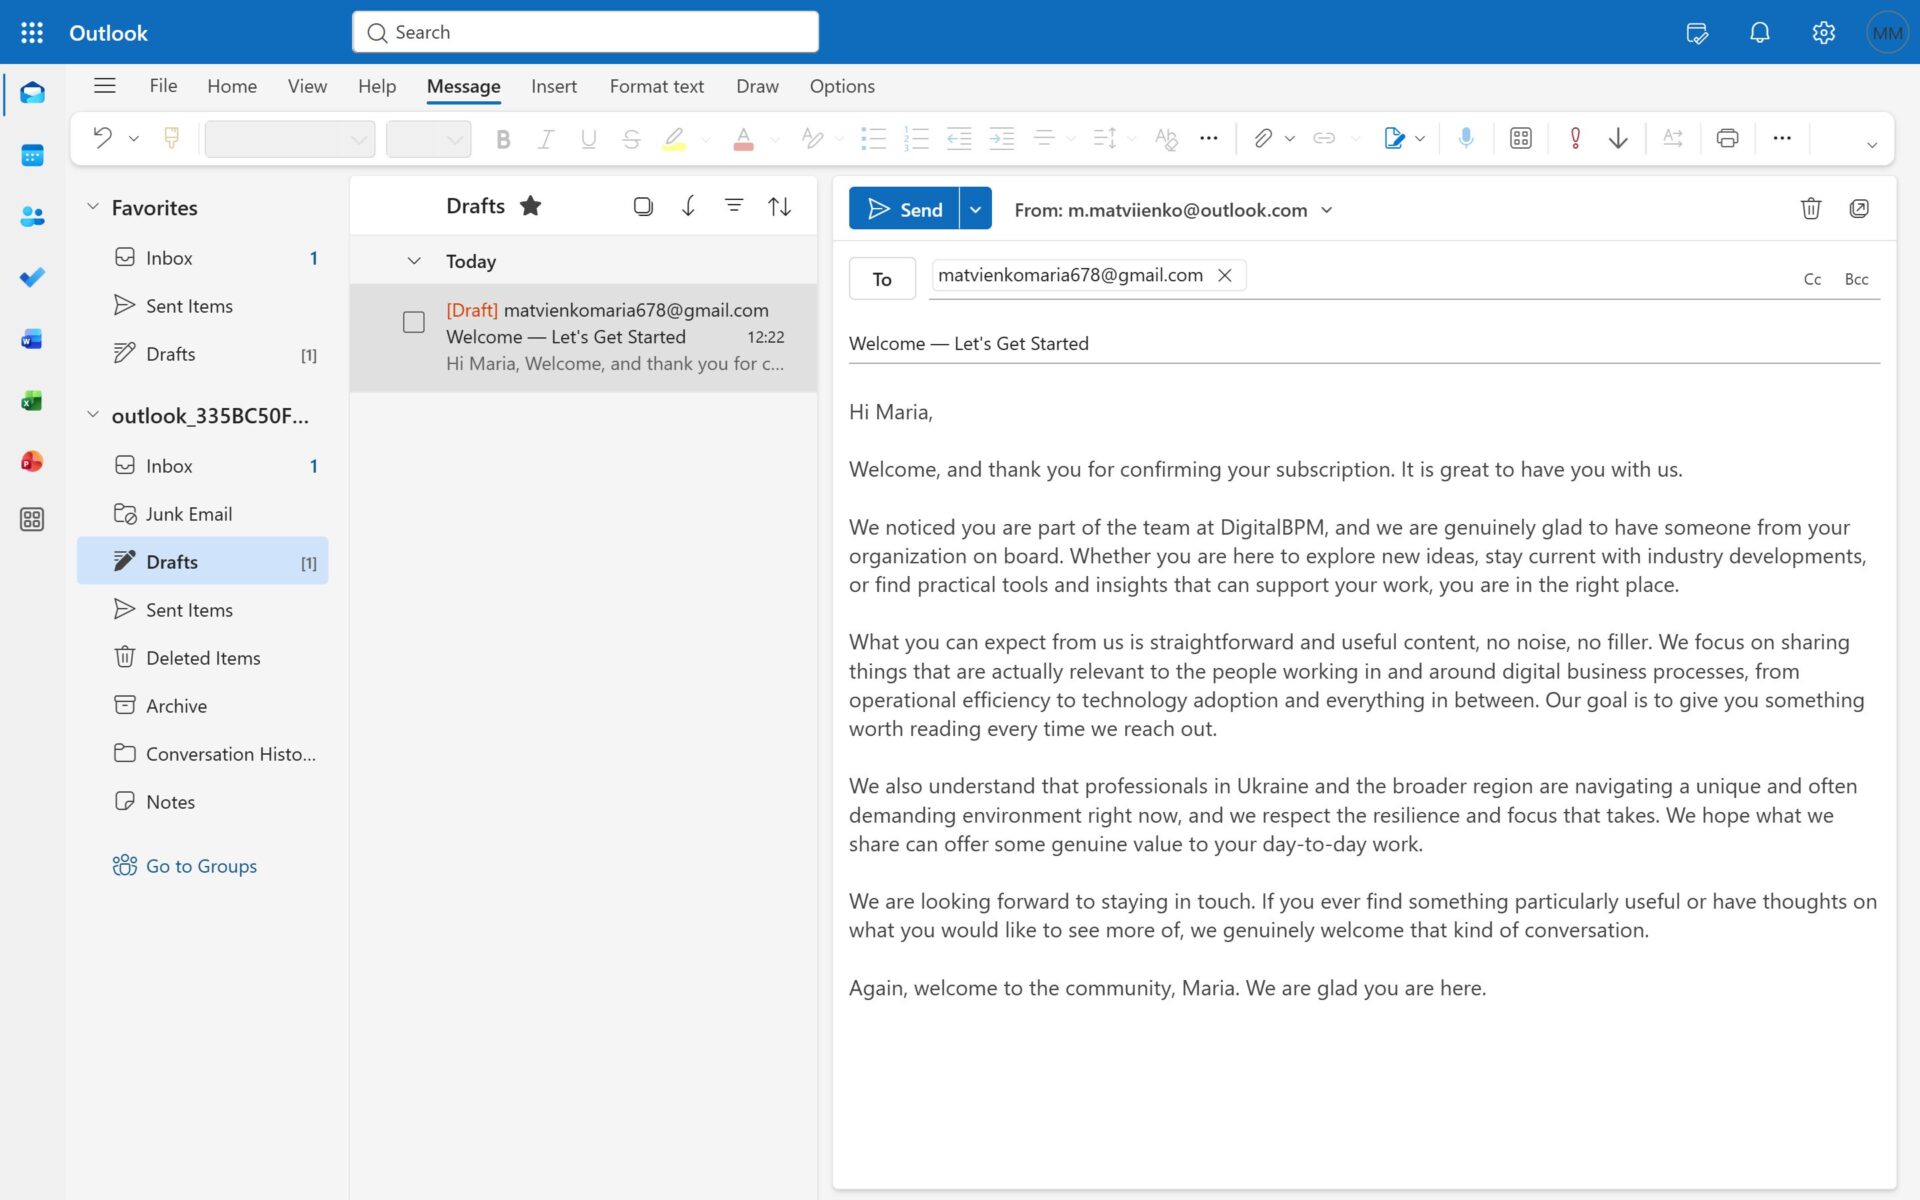
- Creates ready-to-review email drafts in Microsoft Outlook instead of sending messages automatically
- Maintains a human-in-the-loop approach, allowing final approval before any communication is sent
- Improves onboarding efficiency while reducing manual work for marketing and sales teams
By the end of this guide, you will have a fully functional AI-powered onboarding assistant capable of validating new subscribers, maintaining list hygiene, and generating personalized welcome emails automatically.
Who Is This Guide For?
This guide is designed for marketing teams, sales operations (RevOps), customer success teams, founders, consultants, and B2B organizations that rely on email communication to engage new subscribers and prospects.
It is especially useful for businesses that want to improve email deliverability, reduce the number of fake or low-quality sign-ups, and provide a more personalized onboarding experience without increasing manual workload.
Typical use cases include subscriber onboarding, lead qualification, email list hygiene, personalized customer communications, and draft generation for sales and marketing outreach.
Before building your workflow, ensure you have active accounts and API access for the following:
- A DigitalBPM account.
- A MailerLite account with API access.
- A Zero Bounce account with API access.
- An Anthropic Claude account with API access.
- A Microsoft Outlook account
If you’re ready, let’s get started!
Step 1: Create a New Workflow and Trigger Block
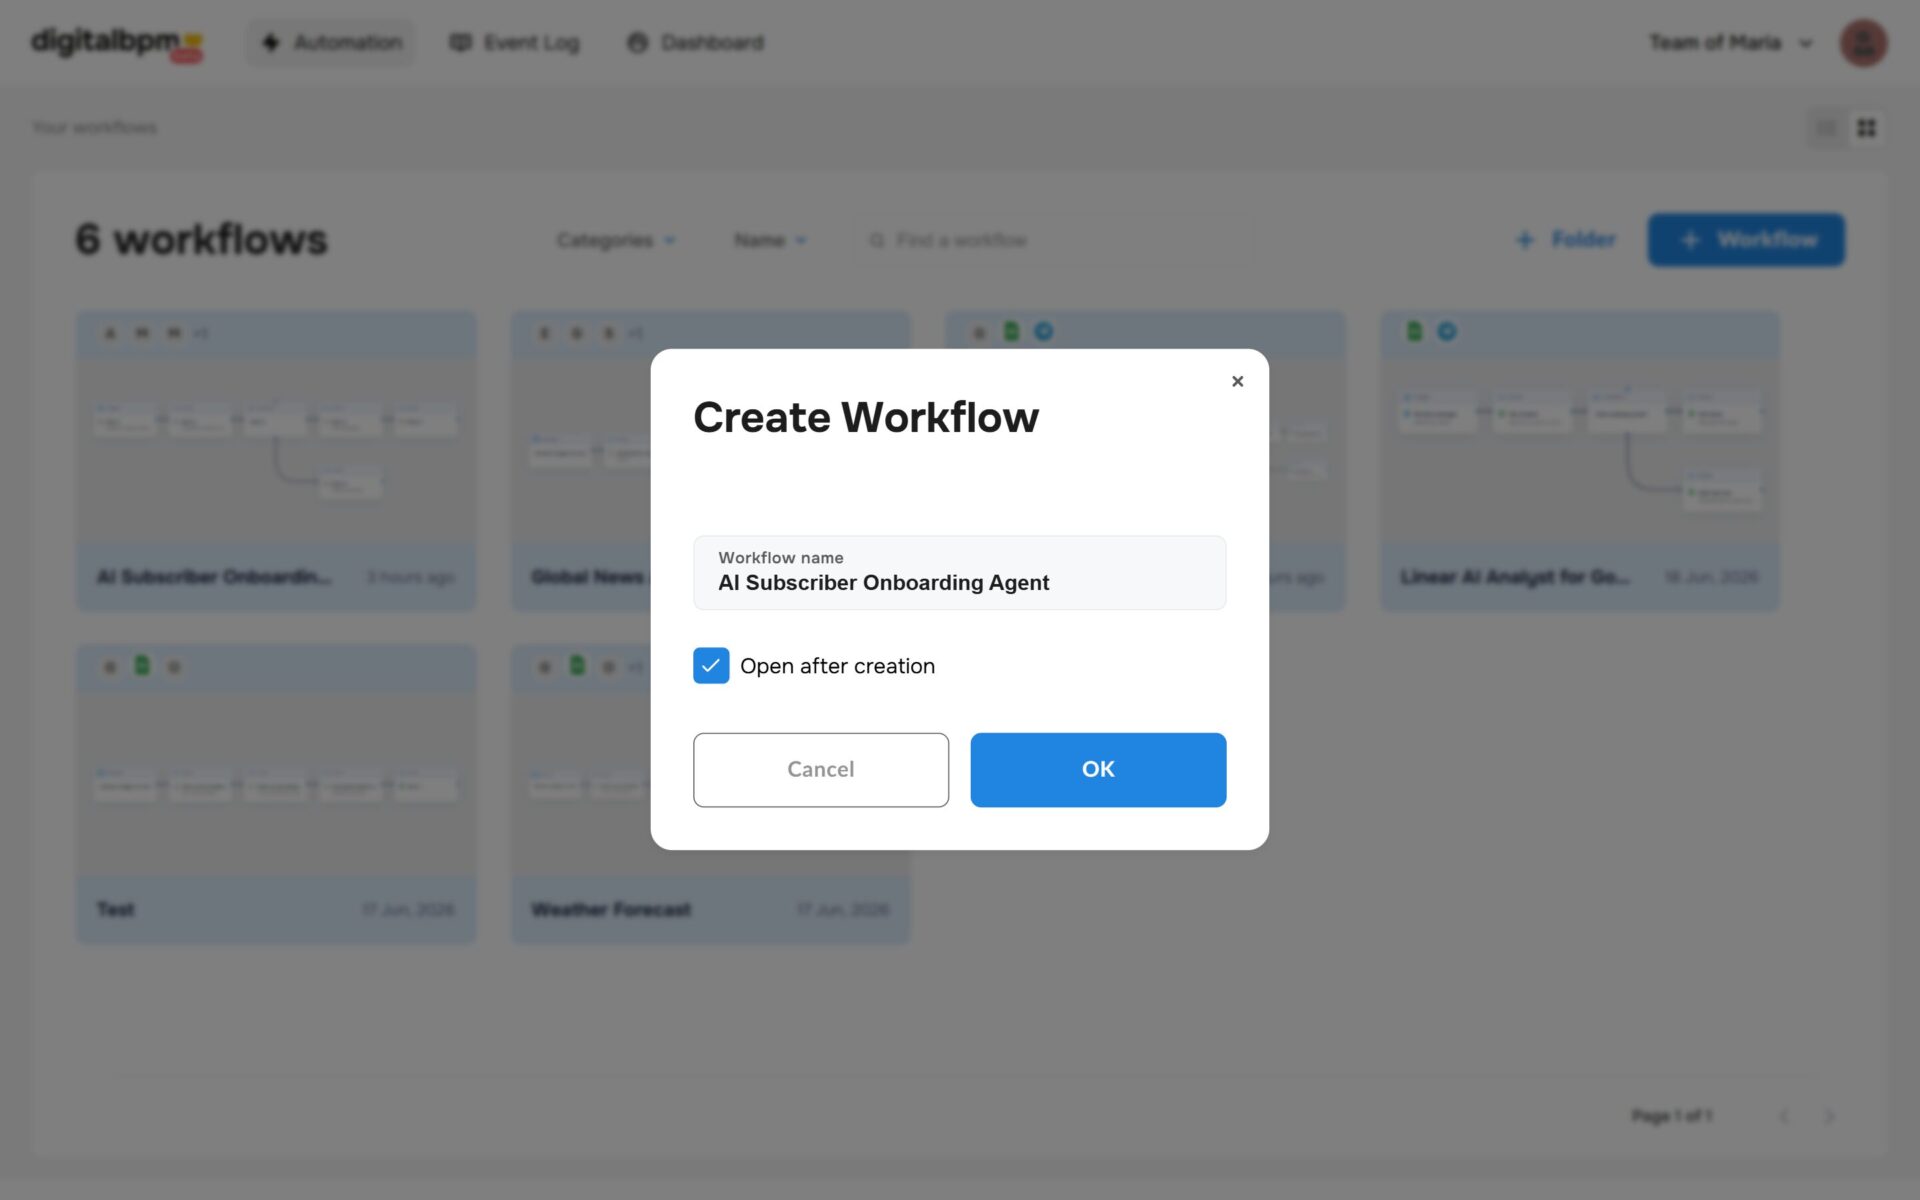
1. The first thing you need to do is to sign in to your DigitalBPM account and click on the “+ Workflow” button on the “Automation” page. Next, you need to enter a name for your workflow, for example, “AI Subscriber Onboarding Agent” and click “OK“.
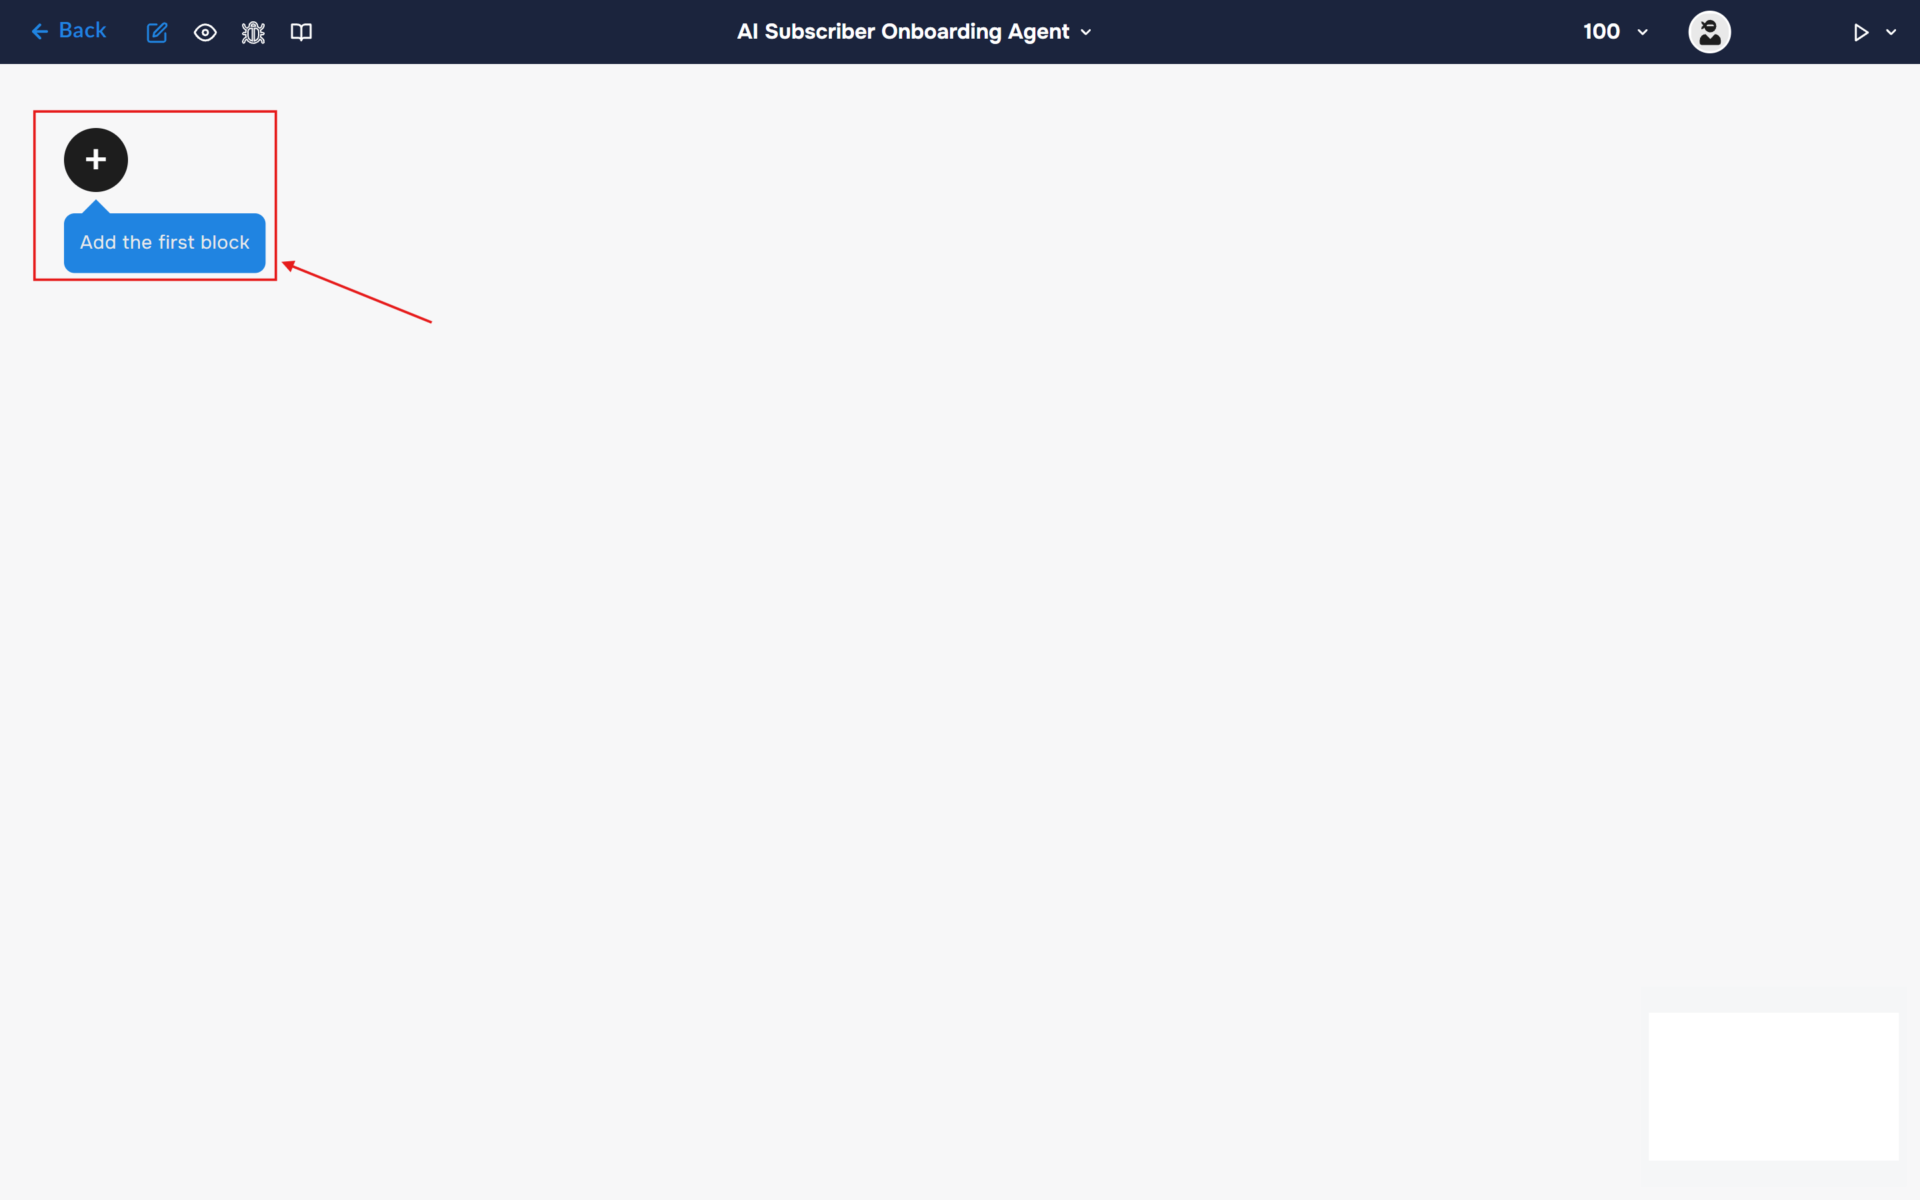
2. After confirming the creation of a workflow, its builder opens. To add the first block, click the “+ Add first block” button.
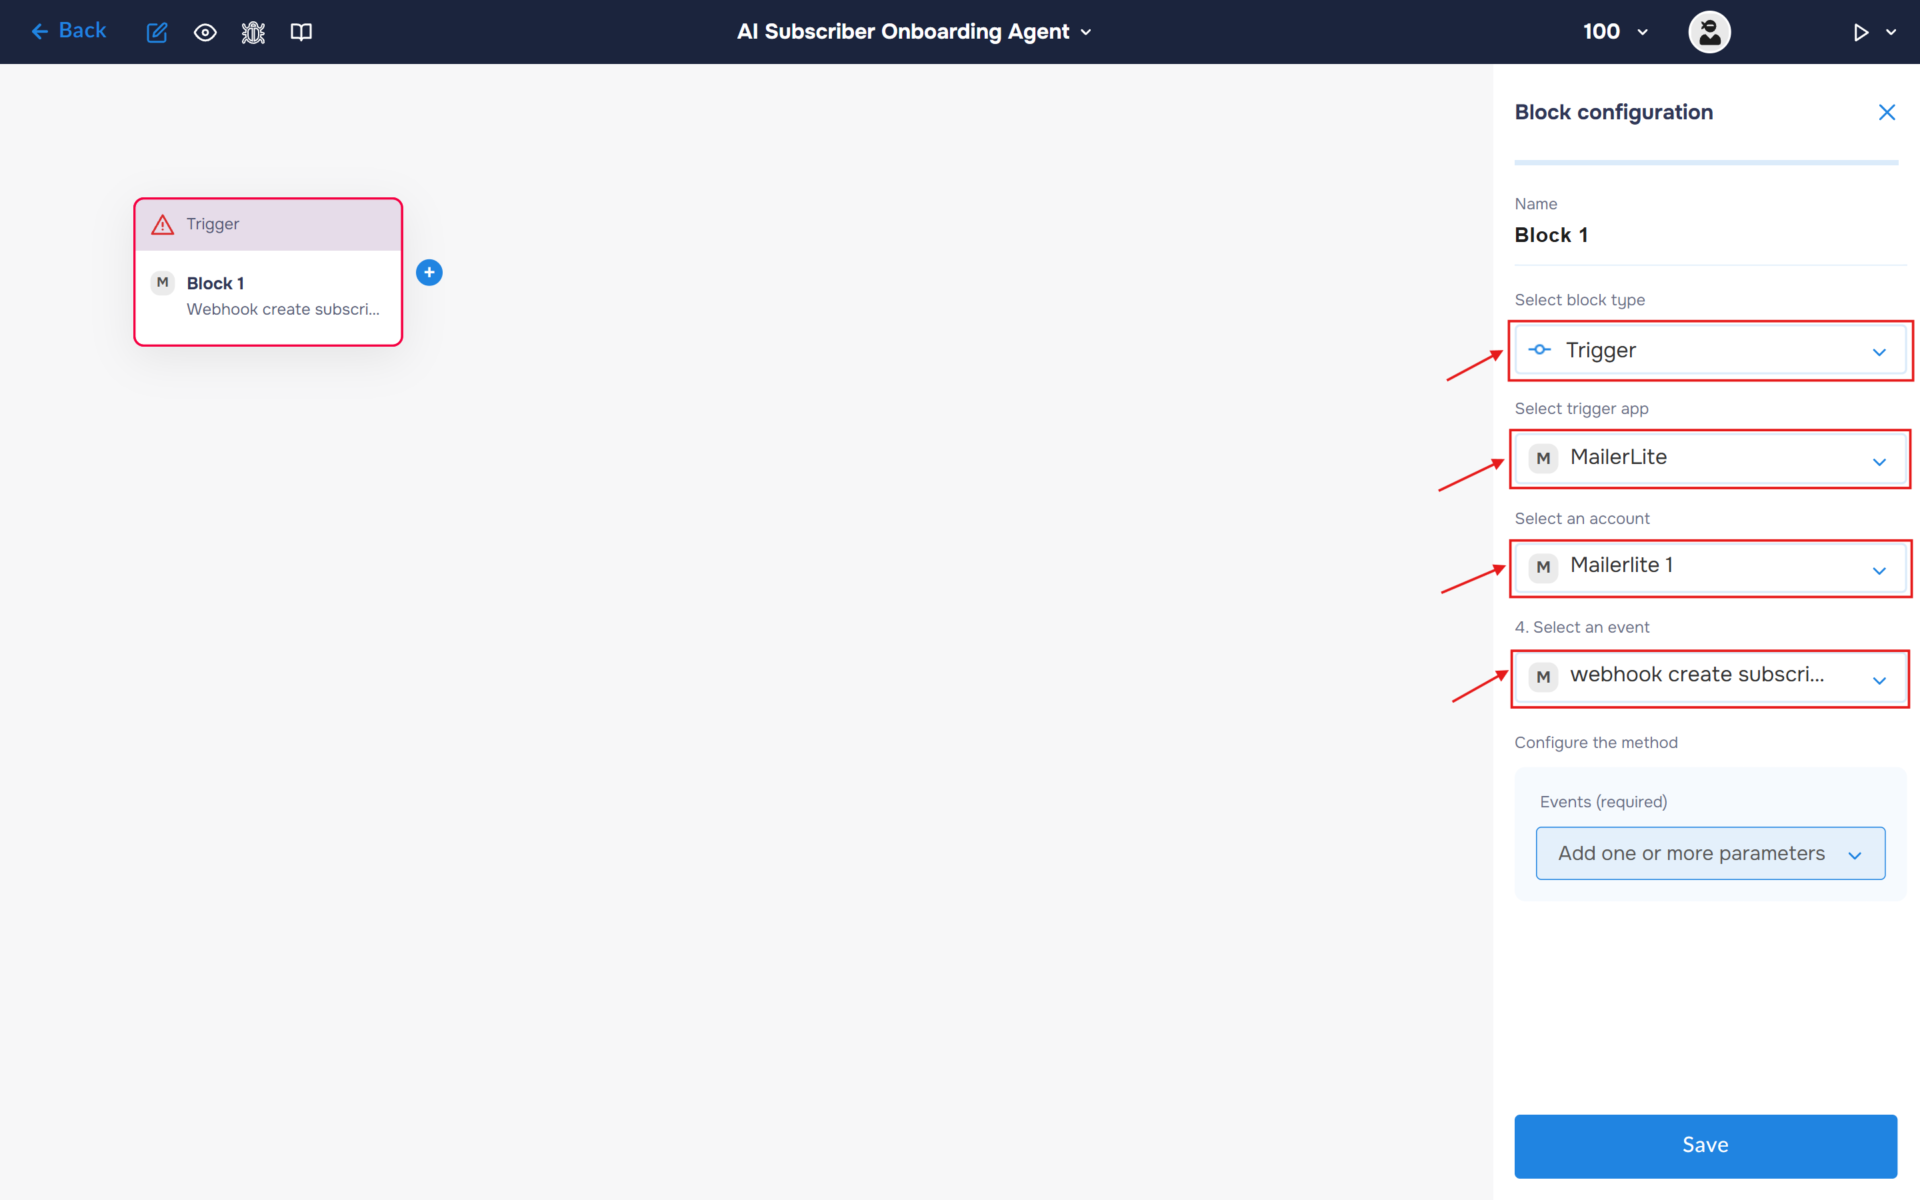
3. Next, you need to configure the first block. This block is responsible for triggering the workflow on a set trigger.
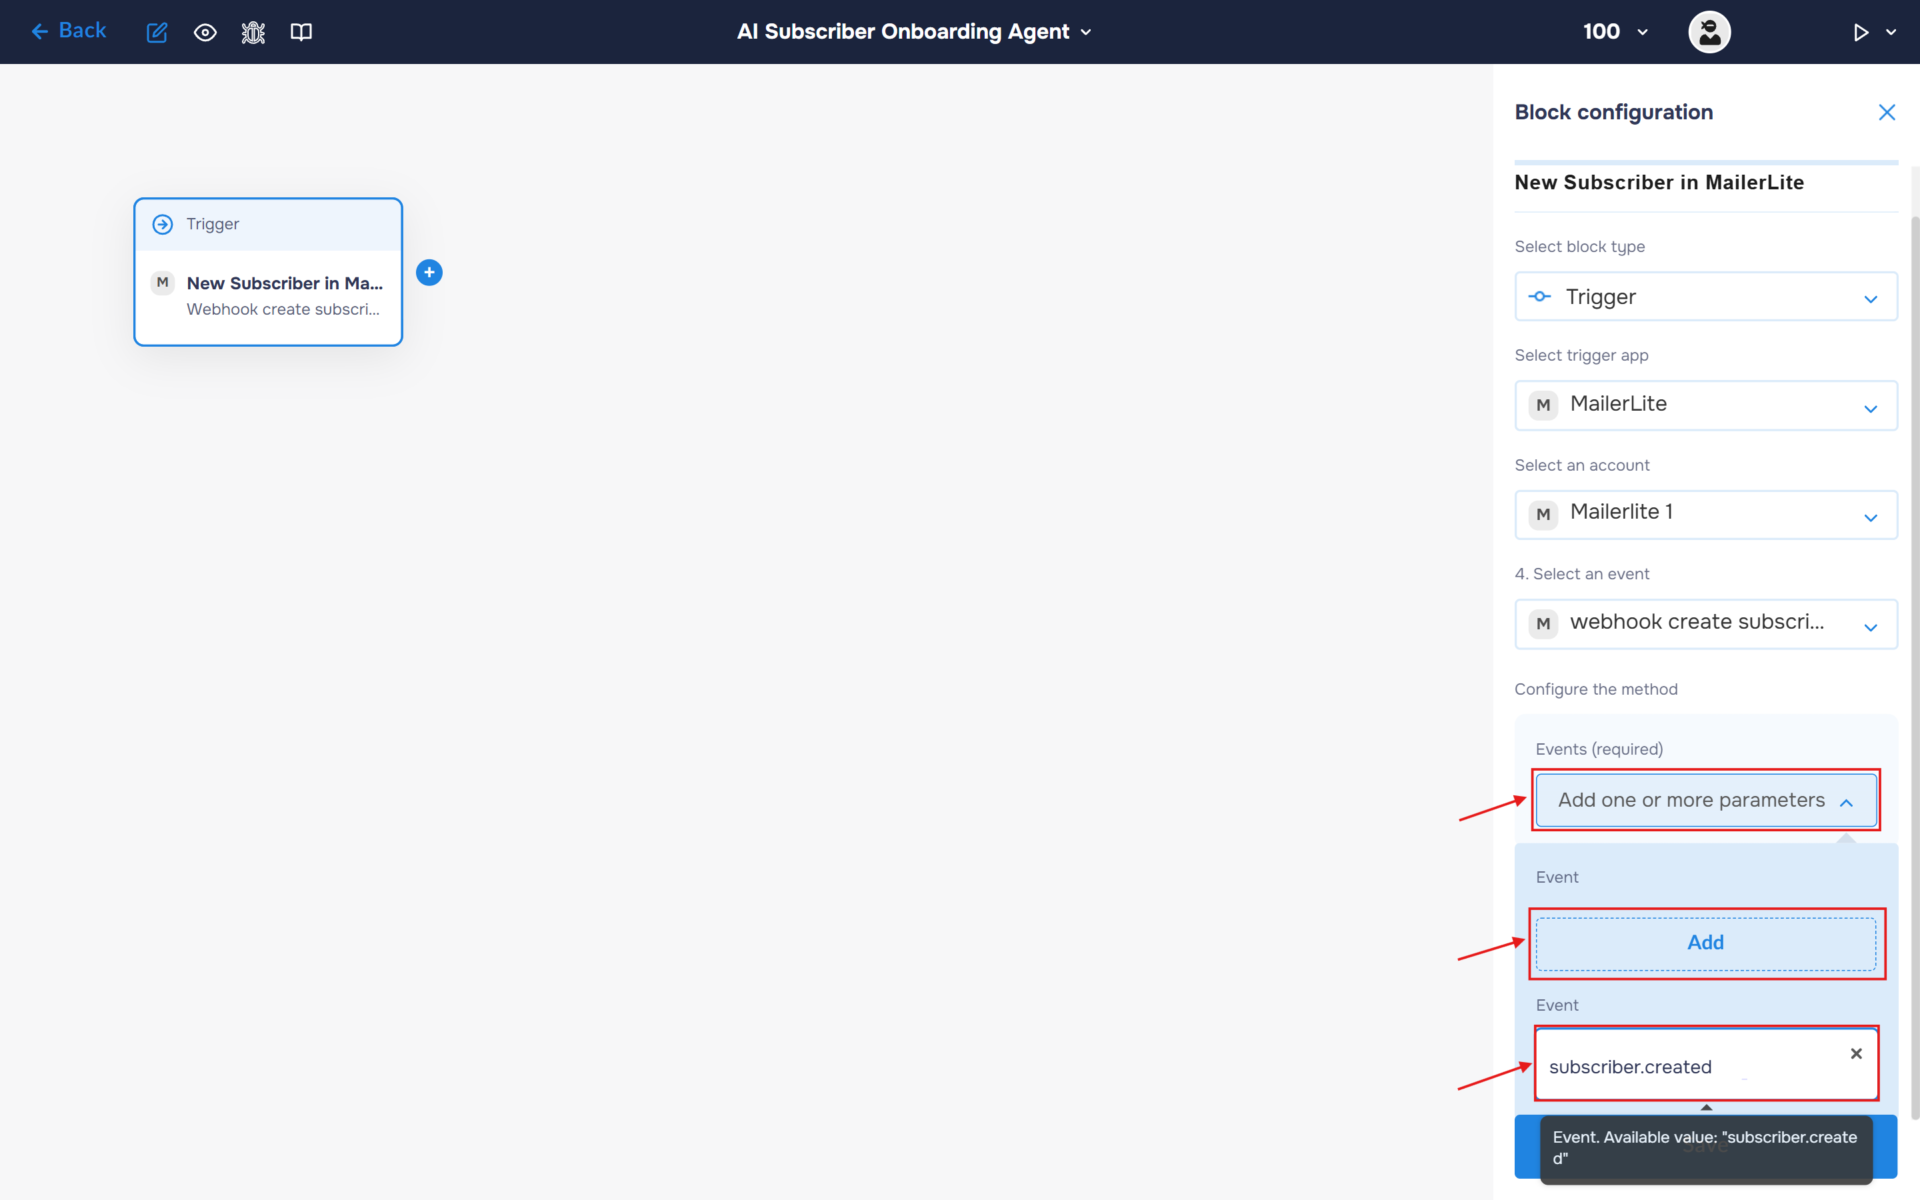
- In the “Block Configuration“ panel, click on the “Select block type“ field and select the “Trigger” type.
- Next, you need to add MailerLite service by clicking on the field “Select trigger app“; find and select “MailerLite“.
- To connect to service, you need to create an authorisation. Click on the “Sign in“ button in the “Select an account“ section.
- After clicking the button, a window for creating a new authorization will open. Enter a name for the authorization, provide the required credentials, and save the connection.
- If the authorization is successful, the created authorization will appear in the “Select an account” field. You need to select this authorization to configure the next steps of the block.
- The next step is to select an event, so click on the “Select an event“. Find and select “webhook create subscriber created”.
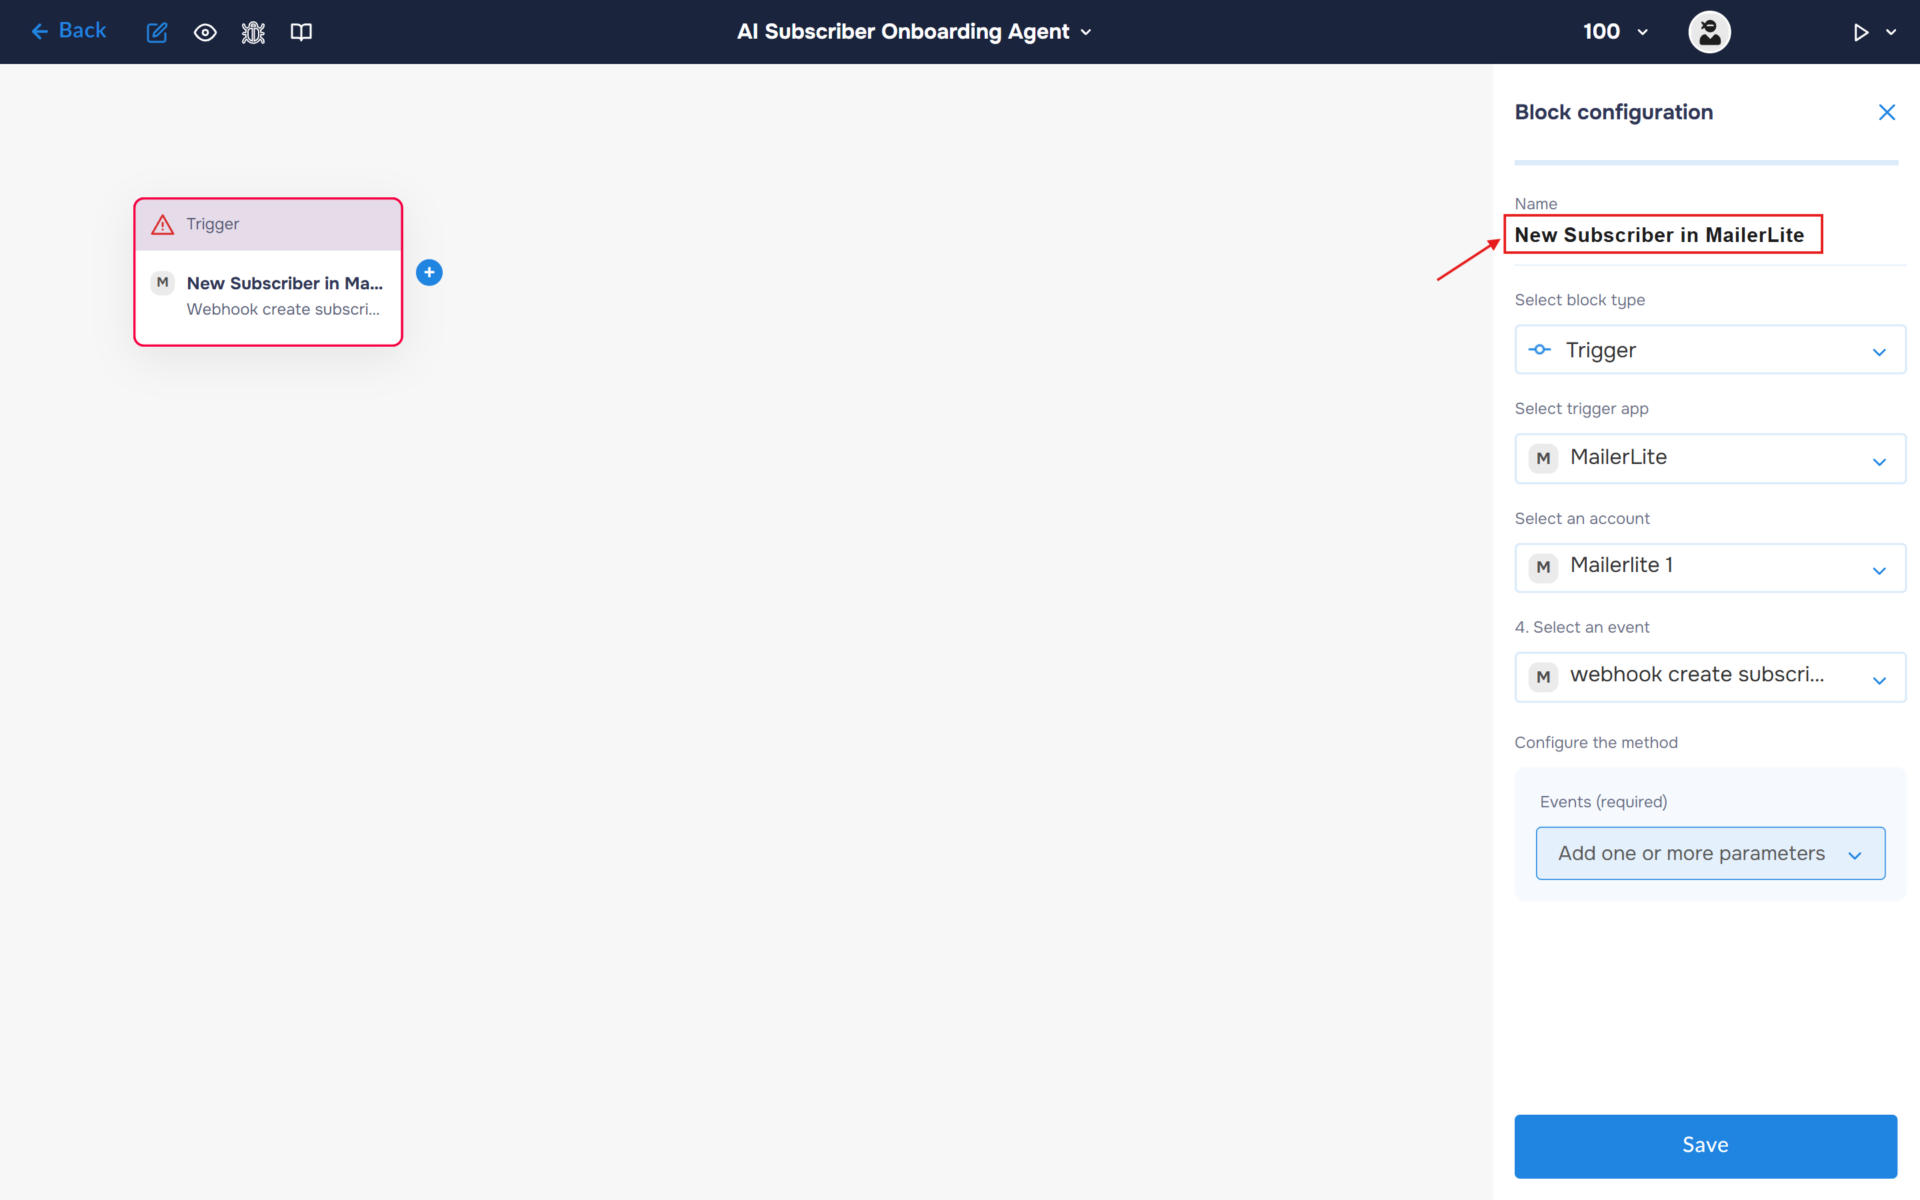
4. Click on the “Name” field and fill in a clear name for what happens in the block, for example, “New Subscriber in MailerLite”. With this step, you can quickly find out what the block is for.
5. In the Configure the method section, select “Add one or more parameters”. Expand it and add an Event: “subscriber.created”.
Step 2: Automate Email Verification to Protect Sender Reputation
Before generating personalized emails, it is important to verify that the subscriber’s email address is legitimate. This step helps prevent fake sign-ups, disposable email addresses, and invalid contacts from entering your mailing list, improving deliverability and protecting your sender reputation.
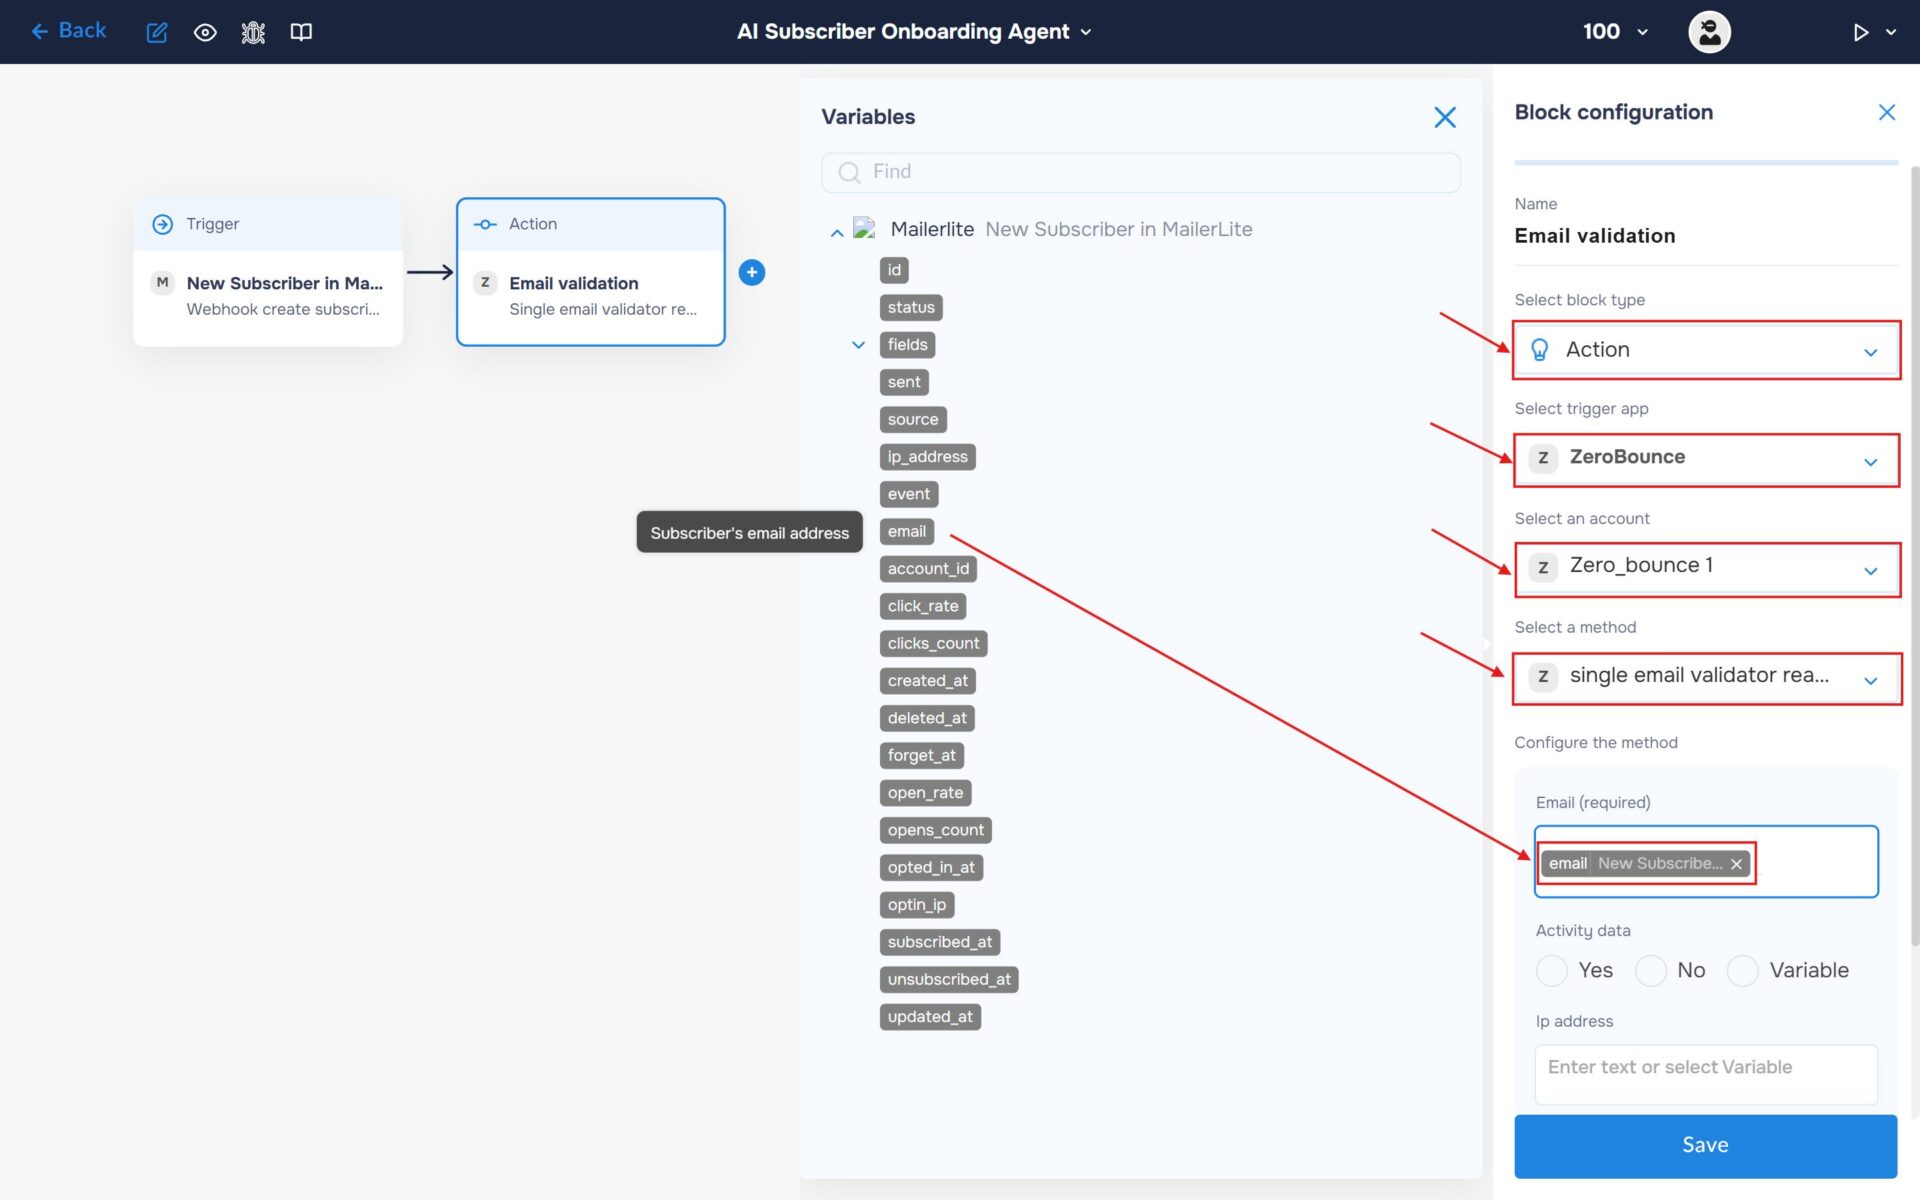
- In the “Block Configuration“ panel, click on the “Select block type“ field and select the “Action” type.
- Next, you need to add ZeroBounce service by clicking on the field “Select trigger app“; find and select “ZeroBounce“.
- To connect to service, you need to create an authorisation. Click on the “Sign in“ button in the “Select an account“ section.
- After clicking the button, a window for creating a new authorization will open. Enter a name for the authorization, provide the required credentials, and save the connection.
- If the authorization is successful, the created authorization will appear in the “Select an account” field. You need to select this authorization to configure the next steps of the block.
- The next step is to select a method, so click on the “Select a method“. Find and select “single email validator real time”.
- In the “Configure the method” section, populate the “Email” field with the subscriber’s email address received from the MailerLite webhook.
Step 3: Route Subscribers Based on Email Validity
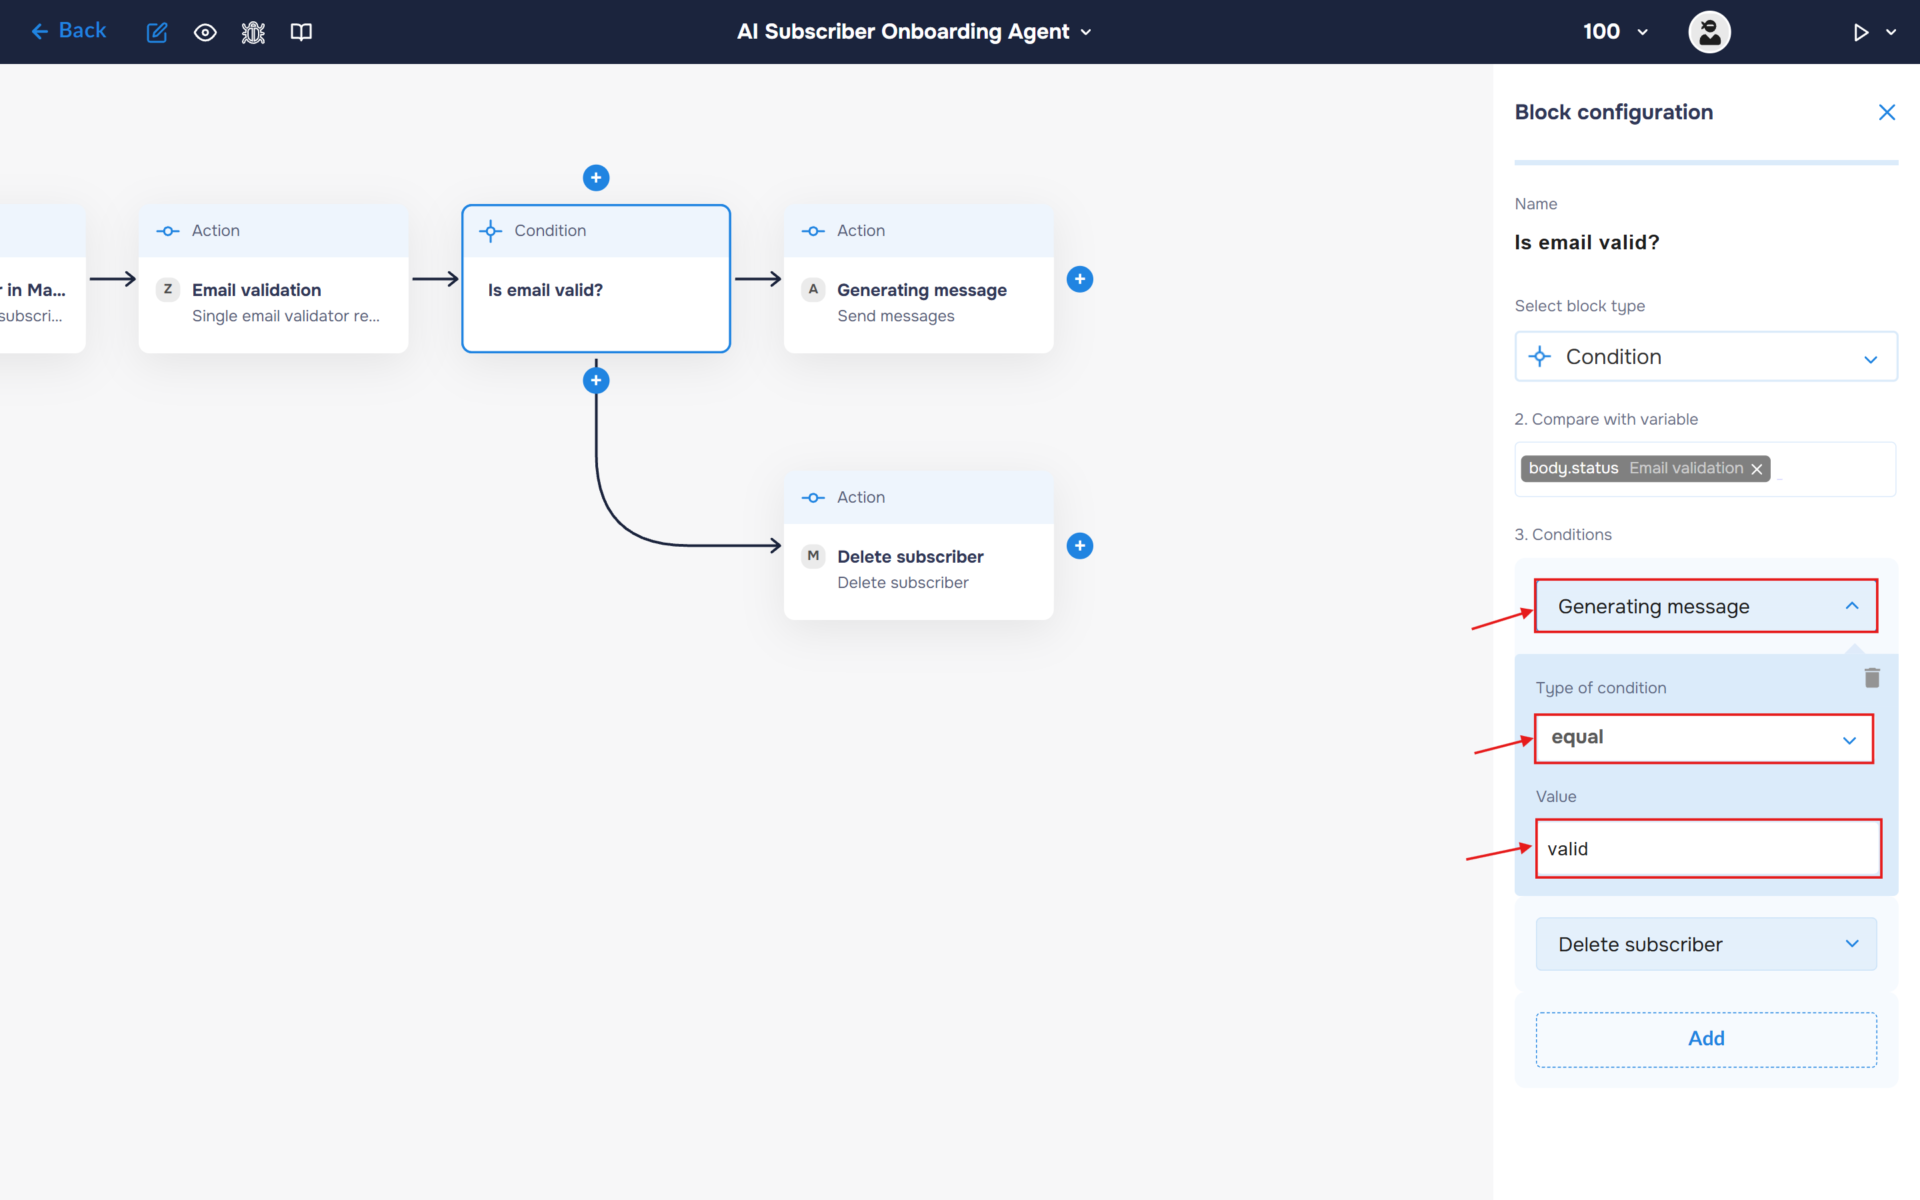
1. Now, we need to tell the workflow what to do based on the ZeroBounce results. We will use a router (“Condition” block) to split the automation into two paths. Add the “Condition” block to determine whether the subscriber’s email address is valid.
In the “Compare with variable” field, insert the response returned by ZeroBounce. The email validation status can be found in “body > status”.
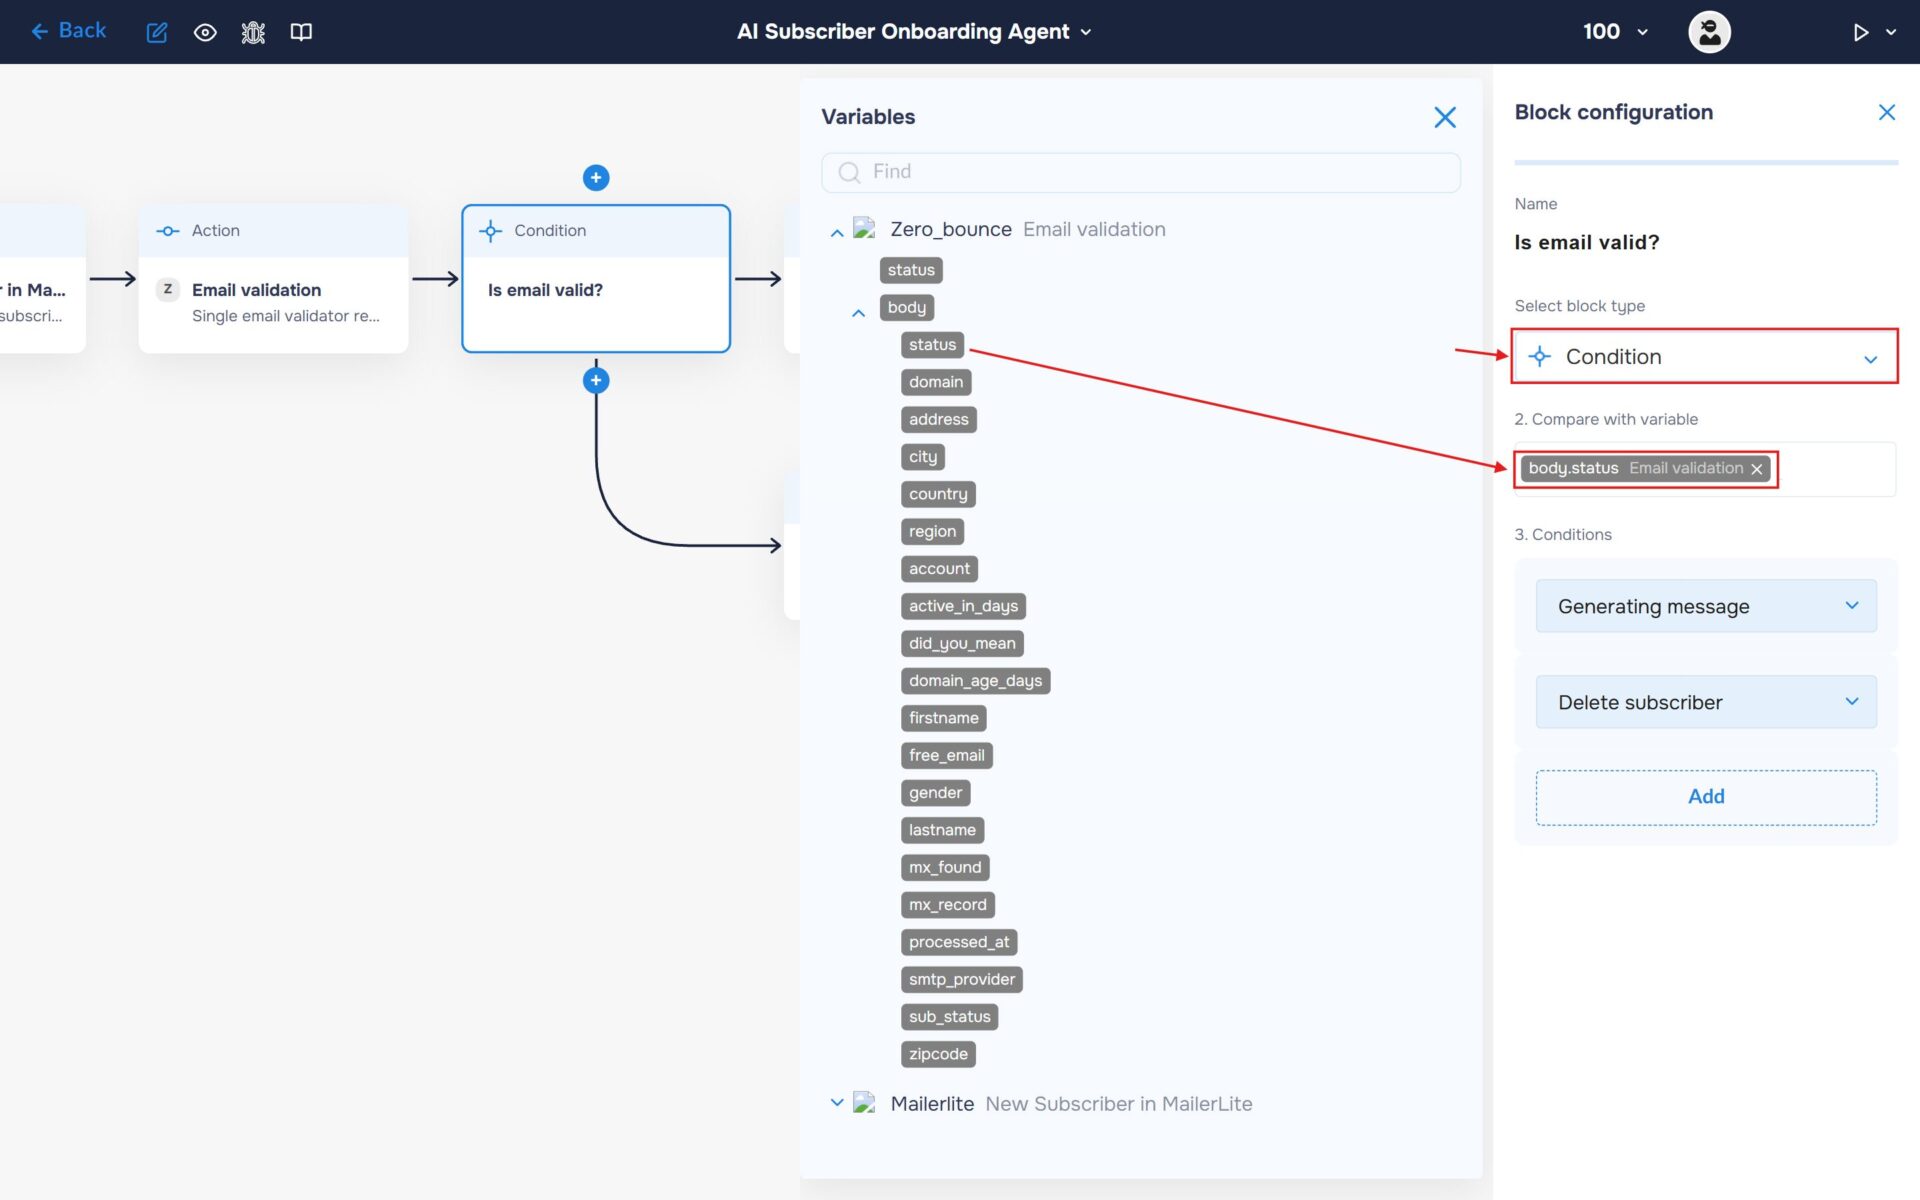
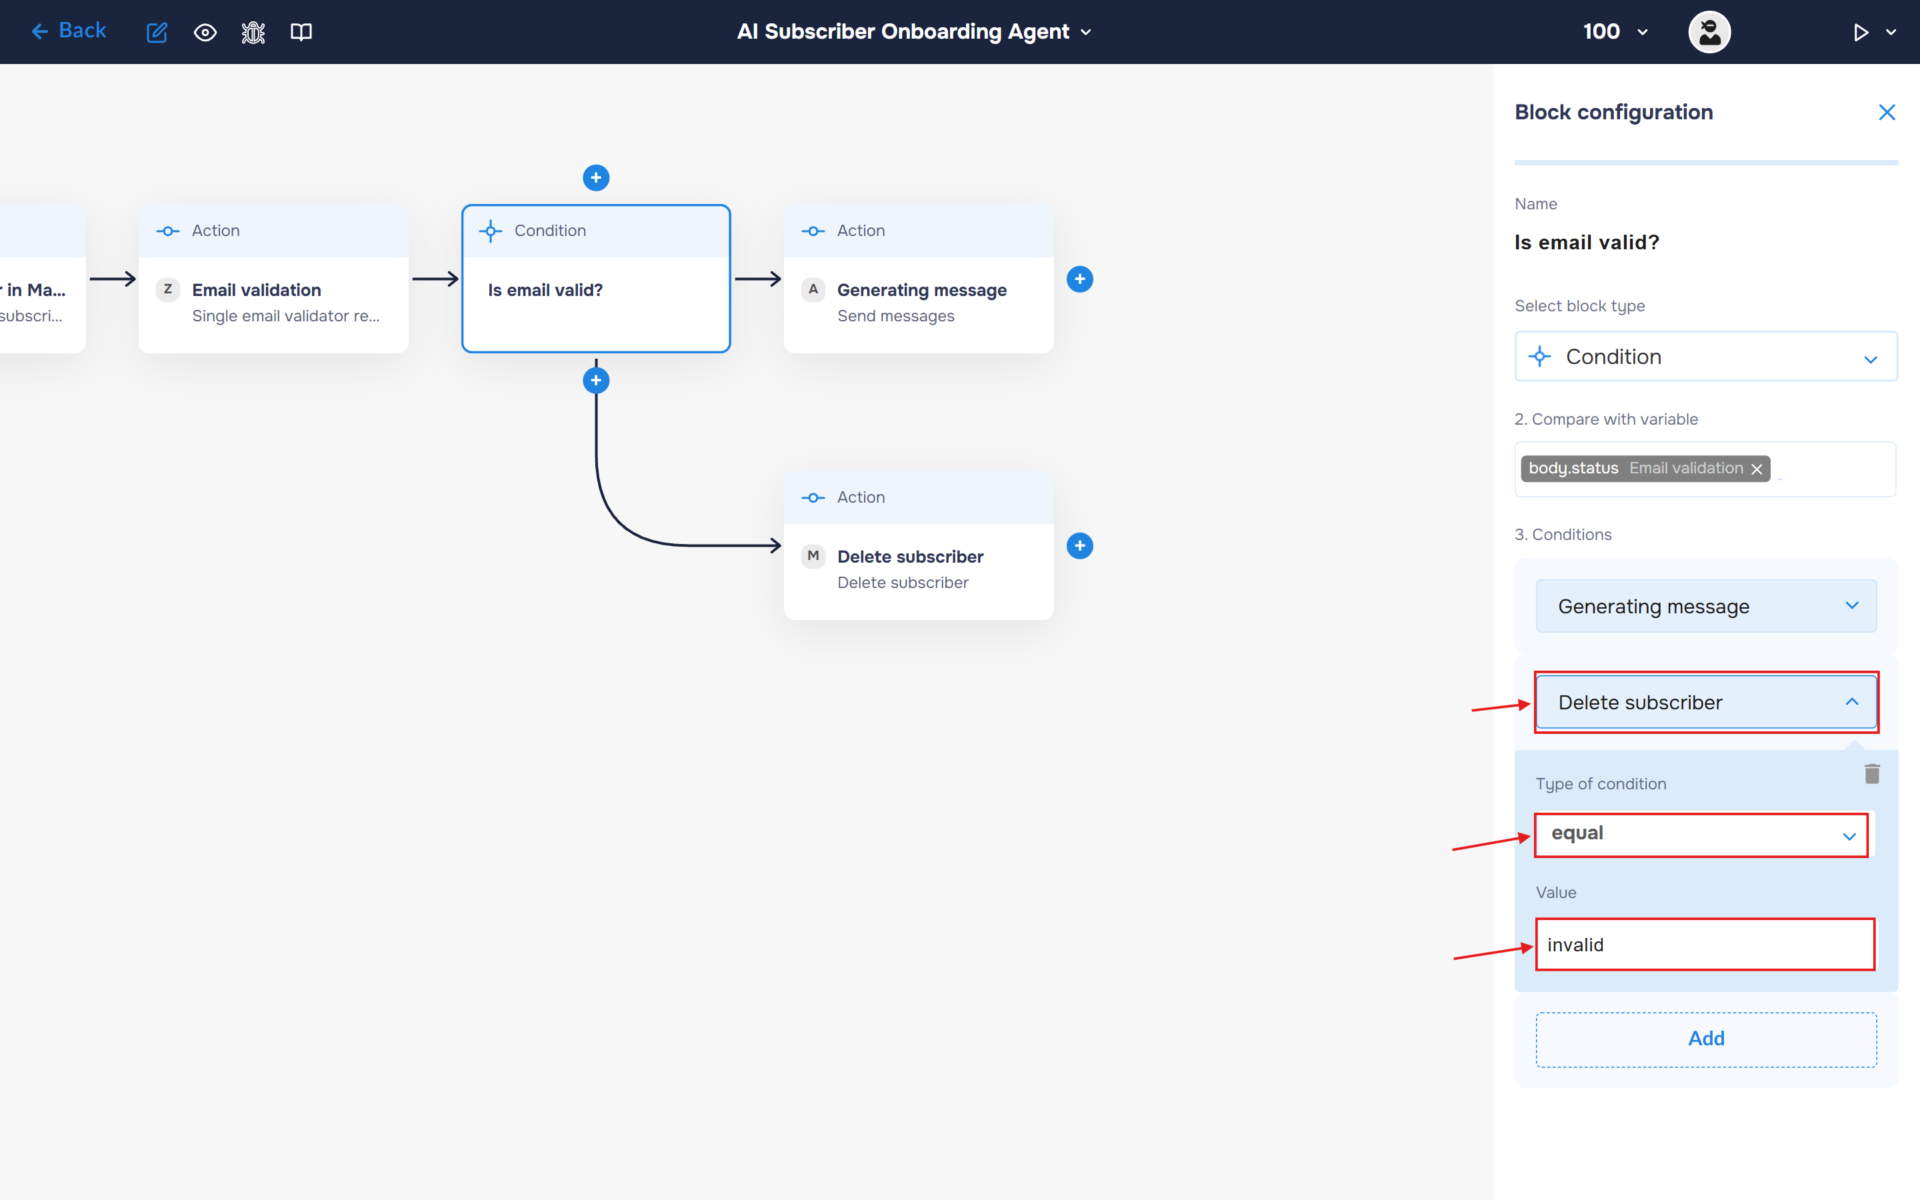
2. Path A. Add a “Delete Subscriber” block. If the email address is invalid, disposable, or otherwise unsuitable for communication, the workflow will automatically remove the subscriber from MailerLite. This helps maintain a clean mailing list and protects email deliverability rates.
In the “Conditions” section, expand the newly created block and configure the following values:
- Type of Condition: “equal”
- Value: “invalid”
3. Path B. Add a “Generating Message” block. If the email address is valid, the workflow will generate a personalized welcome email using Claude AI. In the “Conditions” section, expand the newly created block and configure the following values:
- Type of Condition: “equal”
- Value: “valid”
Step 4: Maintain List Hygiene (Path A)
If the email is fake or invalid, we want to remove it from our marketing CRM immediately.
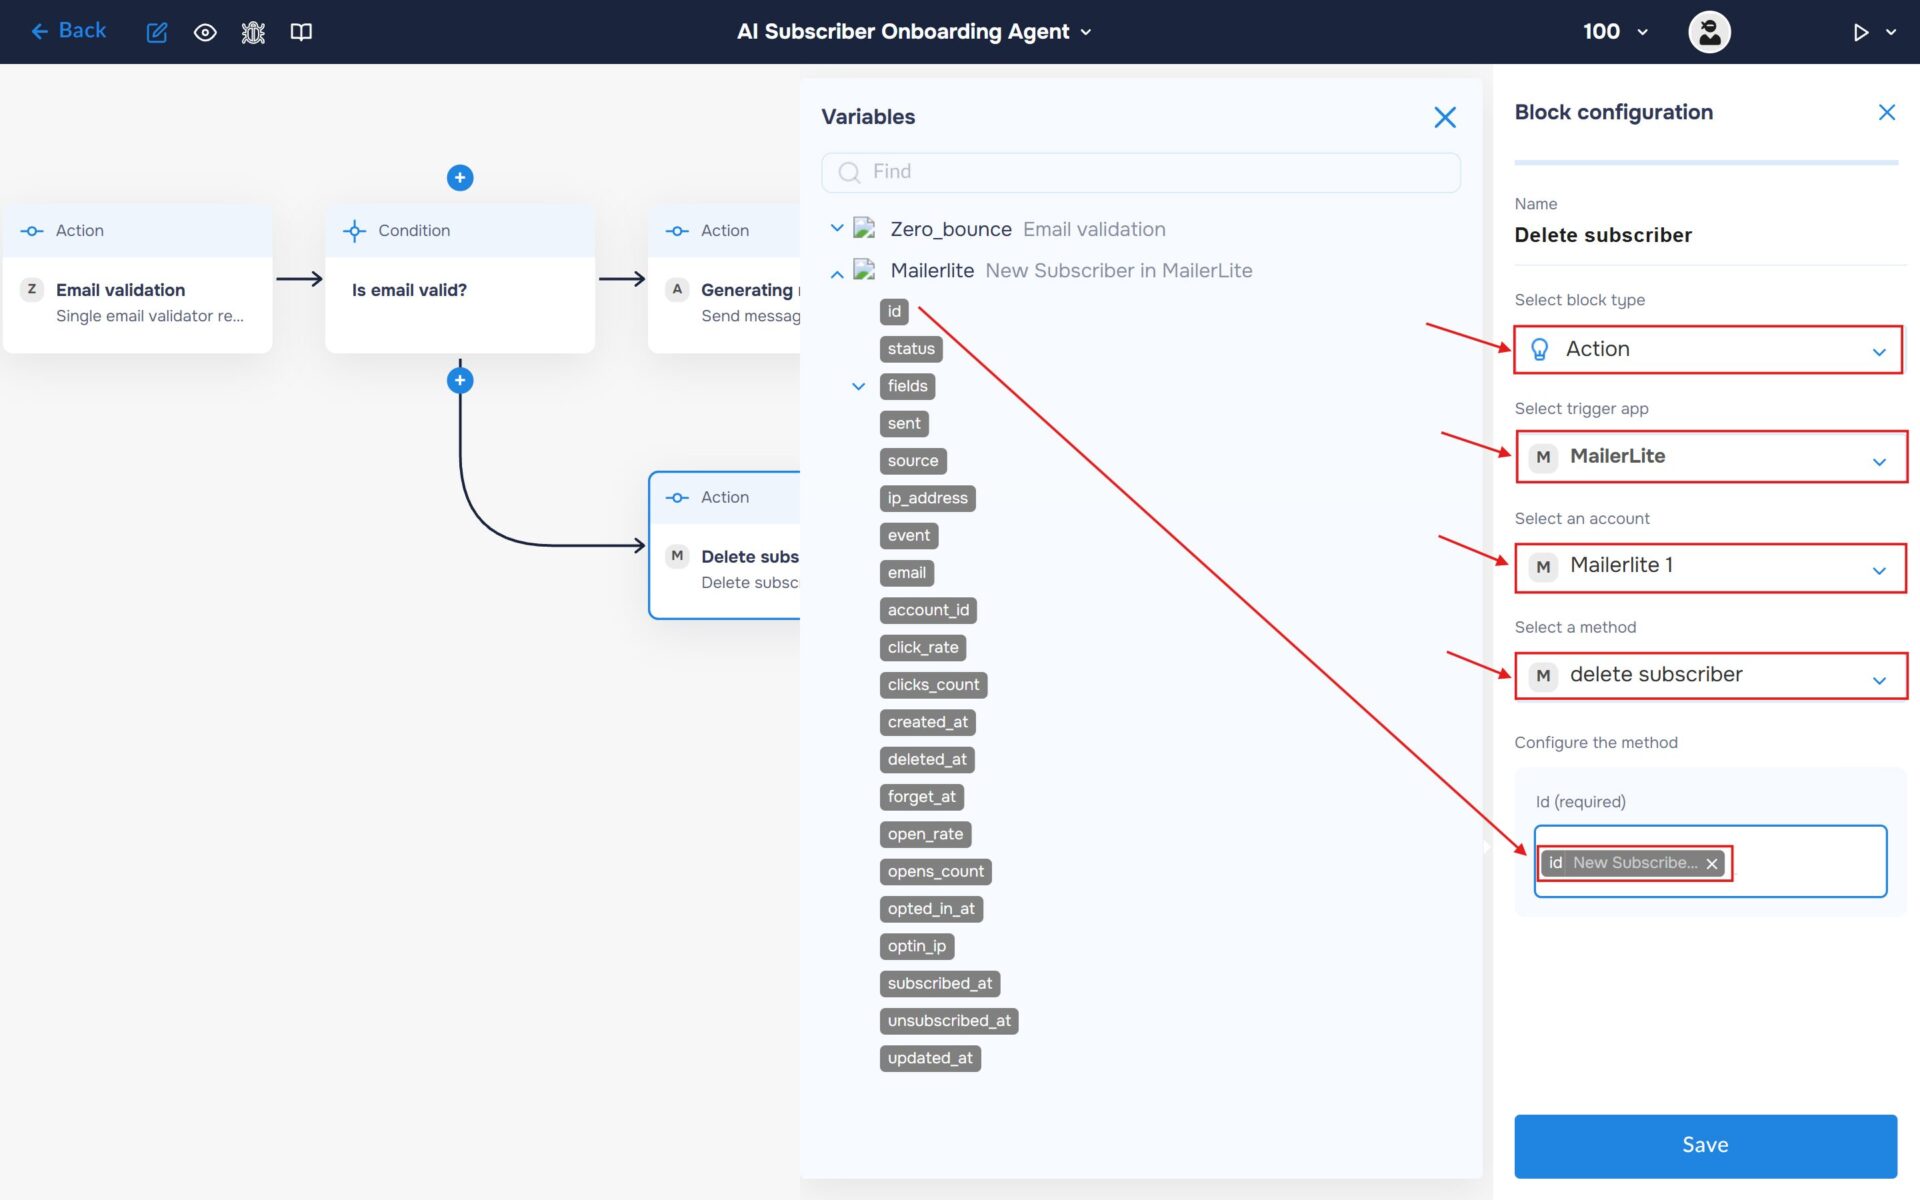
- In the “Block Configuration“ panel, click on the “Select block type“ field and select the “Action” type.
- Next, you need to add MailerLite service by clicking on the field “Select trigger app“; find and select “MailerLite“.
- Select your authorization in the “Select an account” field to configure the next steps of the block.
- The next step is to select a method, so click on the “Select a method“. Find and select “delete subscriber”.
- In the “Configure the method” section, populate the “id” field with the subscriber’s id received from the MailerLite webhook.
Step 5: Generate Personalized Welcome Emails with Claude AI (Path B)
1. Now that we have confirmed the subscriber’s email address is valid, we can generate a personalized welcome message using Anthropic Claude.
The AI will analyze the subscriber information received from MailerLite and create a professional onboarding email tailored to the recipient’s profile. This allows every new subscriber to receive a more relevant and engaging introduction while eliminating the need to write welcome emails manually.
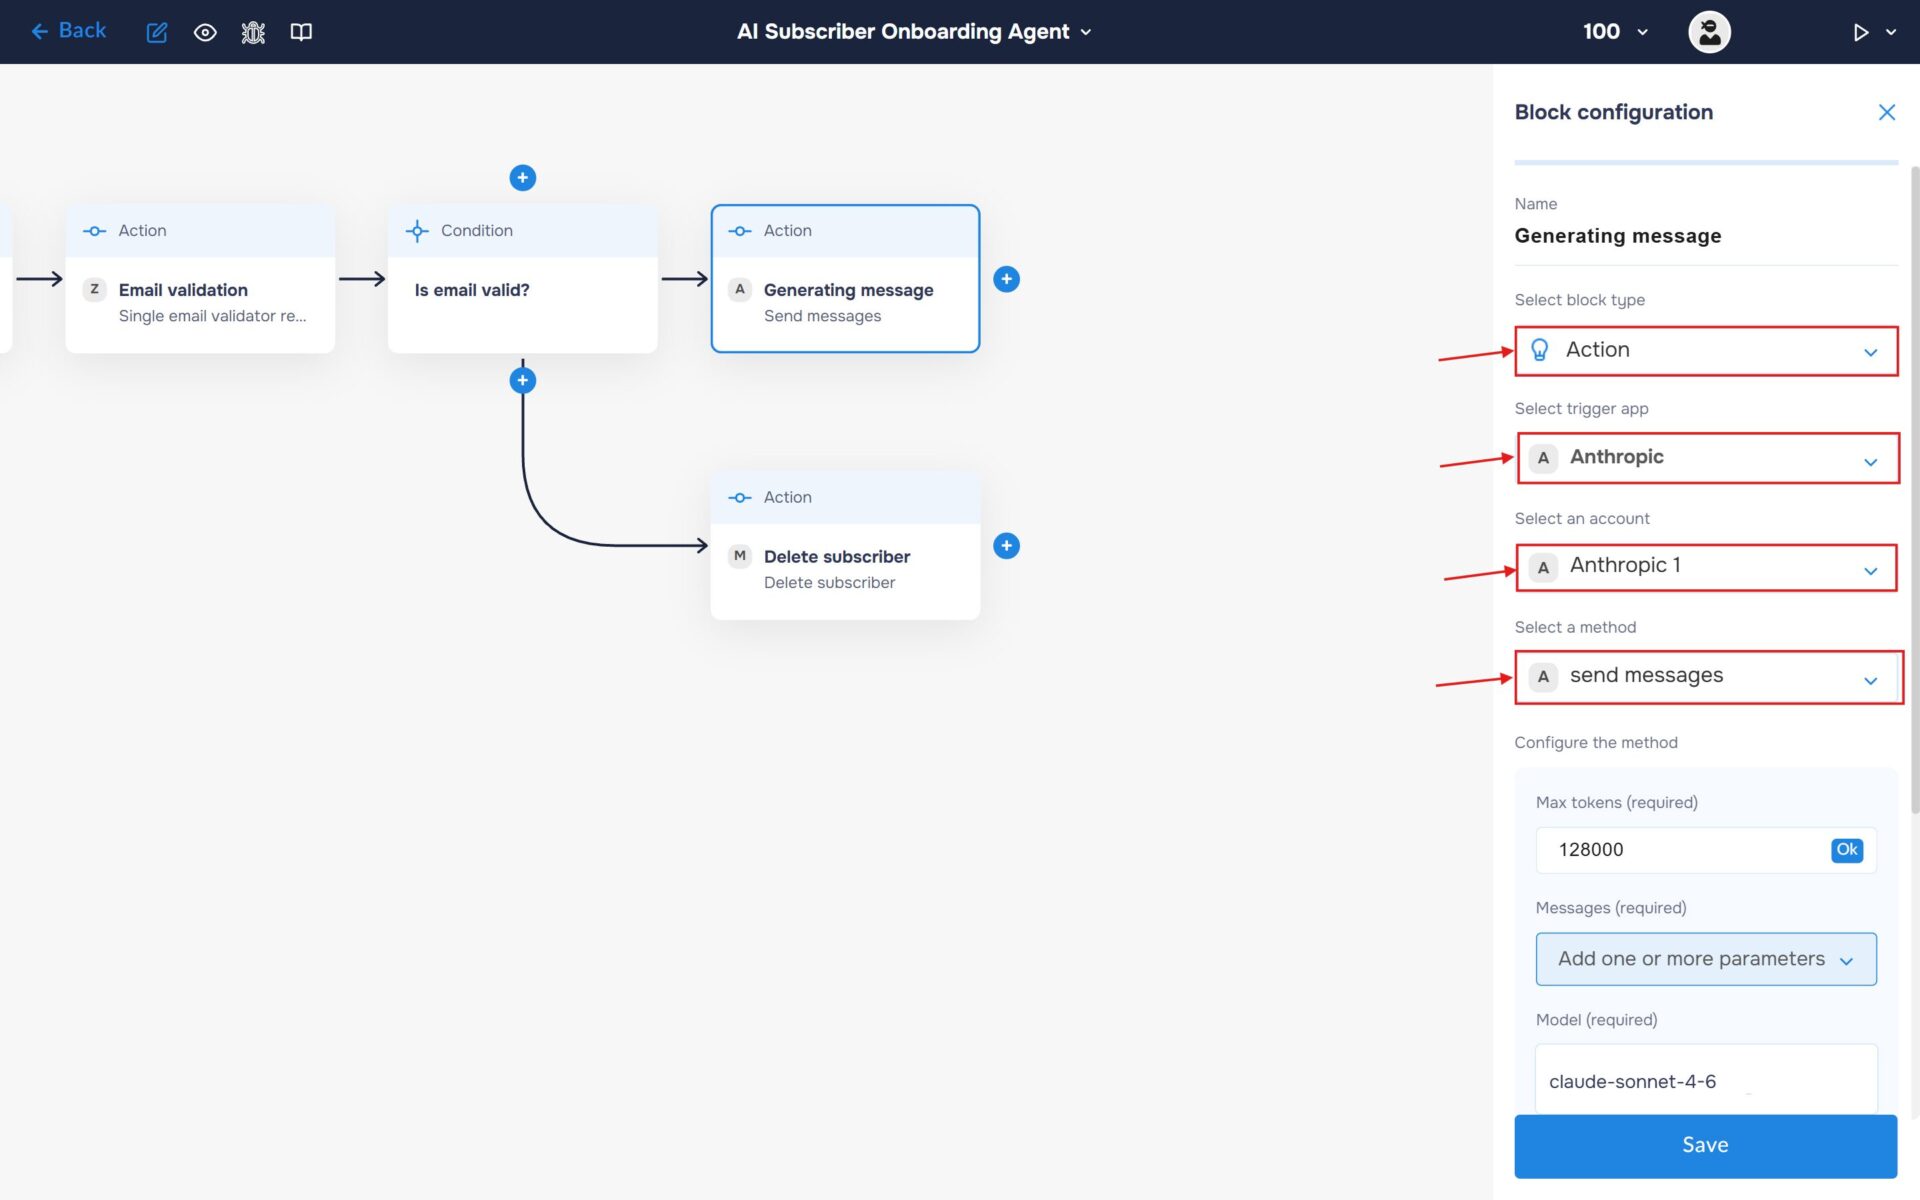
- In the “Block Configuration“ panel, click on the “Select block type“ field and select the “Action” type.
- Next, you need to add Anthropic Claude service by clicking on the field “Select trigger app“; find and select “Anthropic“.
- To connect to service, you need to create an authorisation. Click on the “Sign in“ button in the “Select an account“ section.
- After clicking the button, a window for creating a new authorization will open. Enter a name for the authorization, provide the required credentials, and save the connection.
- If the authorization is successful, the created authorization will appear in the “Select an account” field. You need to select this authorization to configure the next steps of the block.
- The next step is to select a method, so click on the “Select a method“. Find and select “send messages”.
2. Specify the model name in the corresponding field (for example, “claude-sonnet-4-6”) and set the Max tokens“ supported by the selected model. For Claude Sonnet 4.6, the maximum context window is 128,000 tokens, which allows the AI to process large prompts and detailed subscriber information when generating personalized welcome emails.
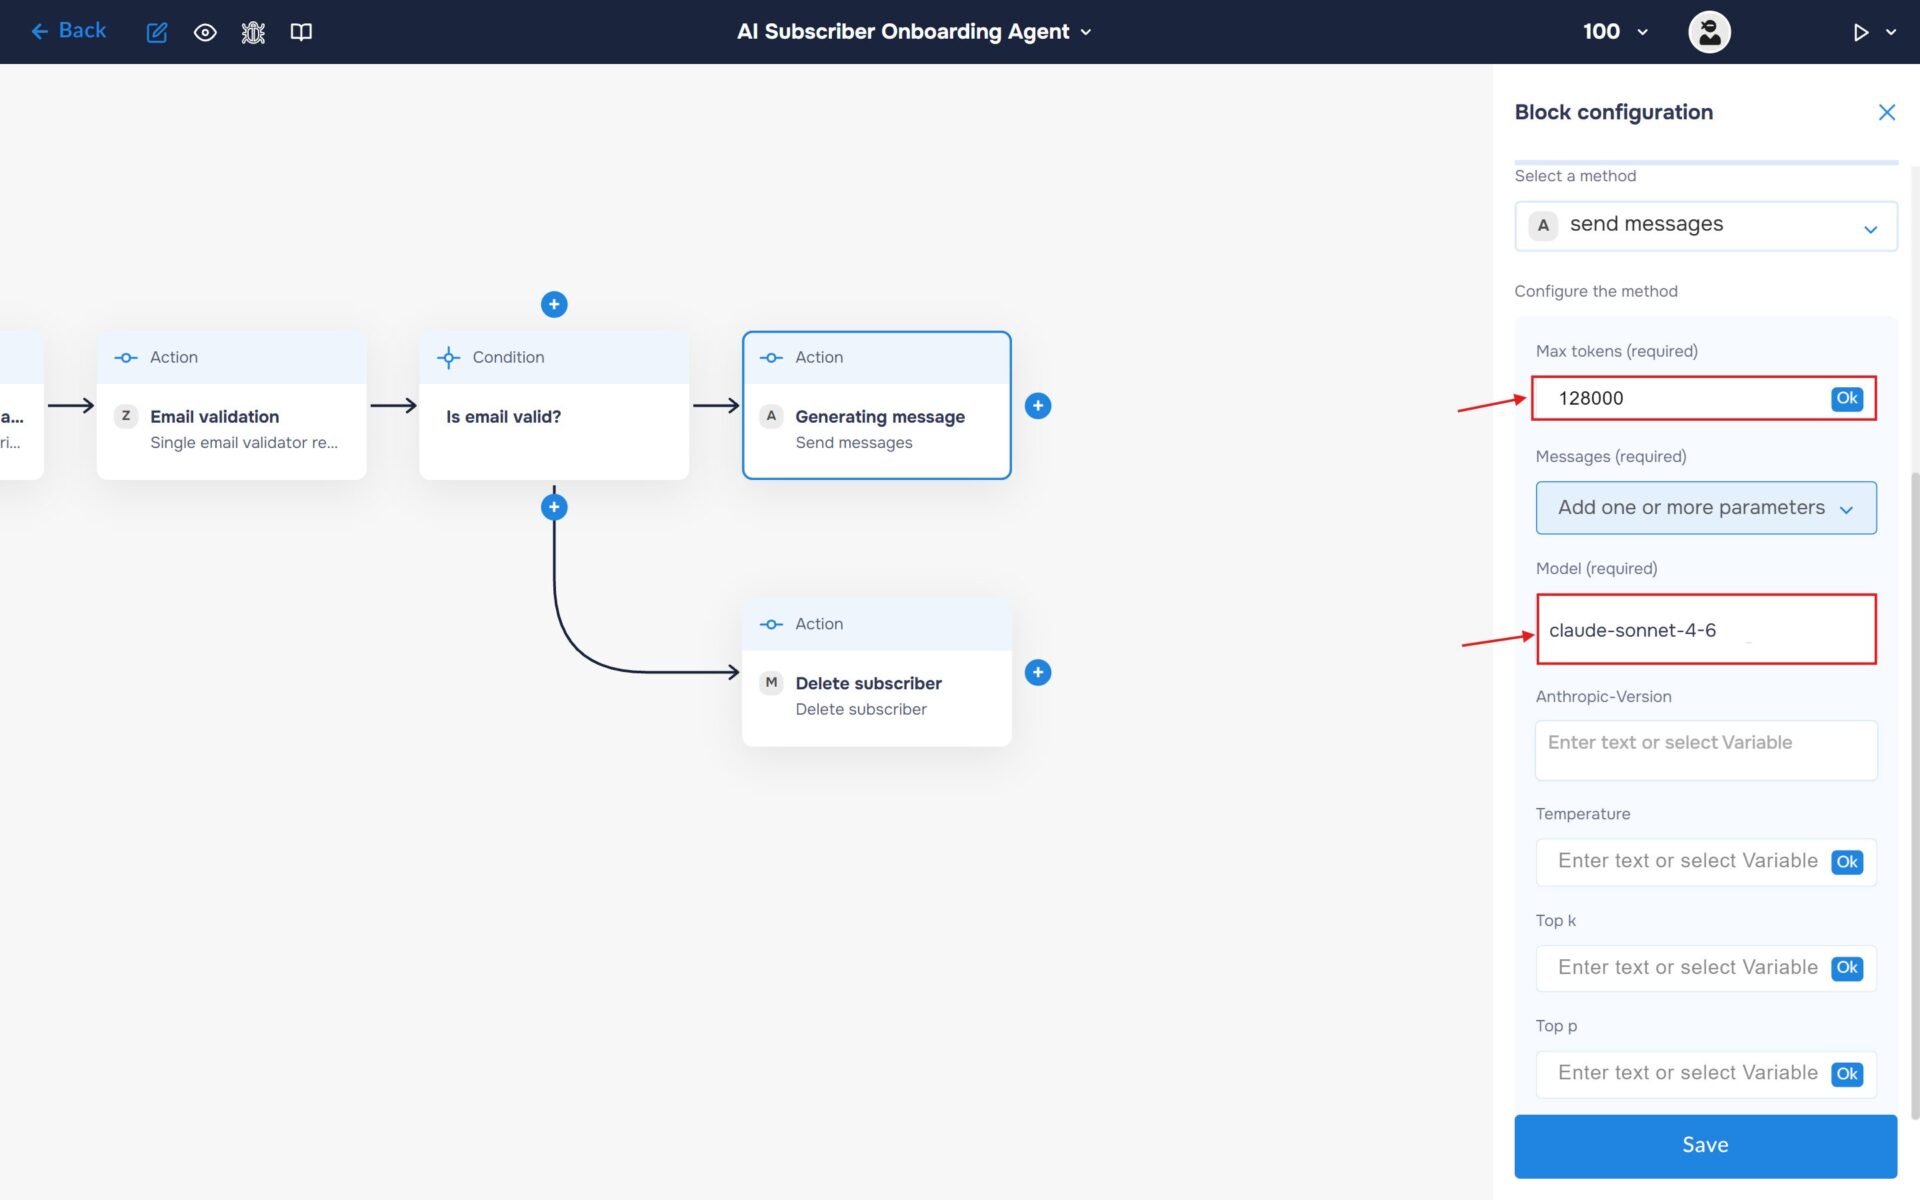
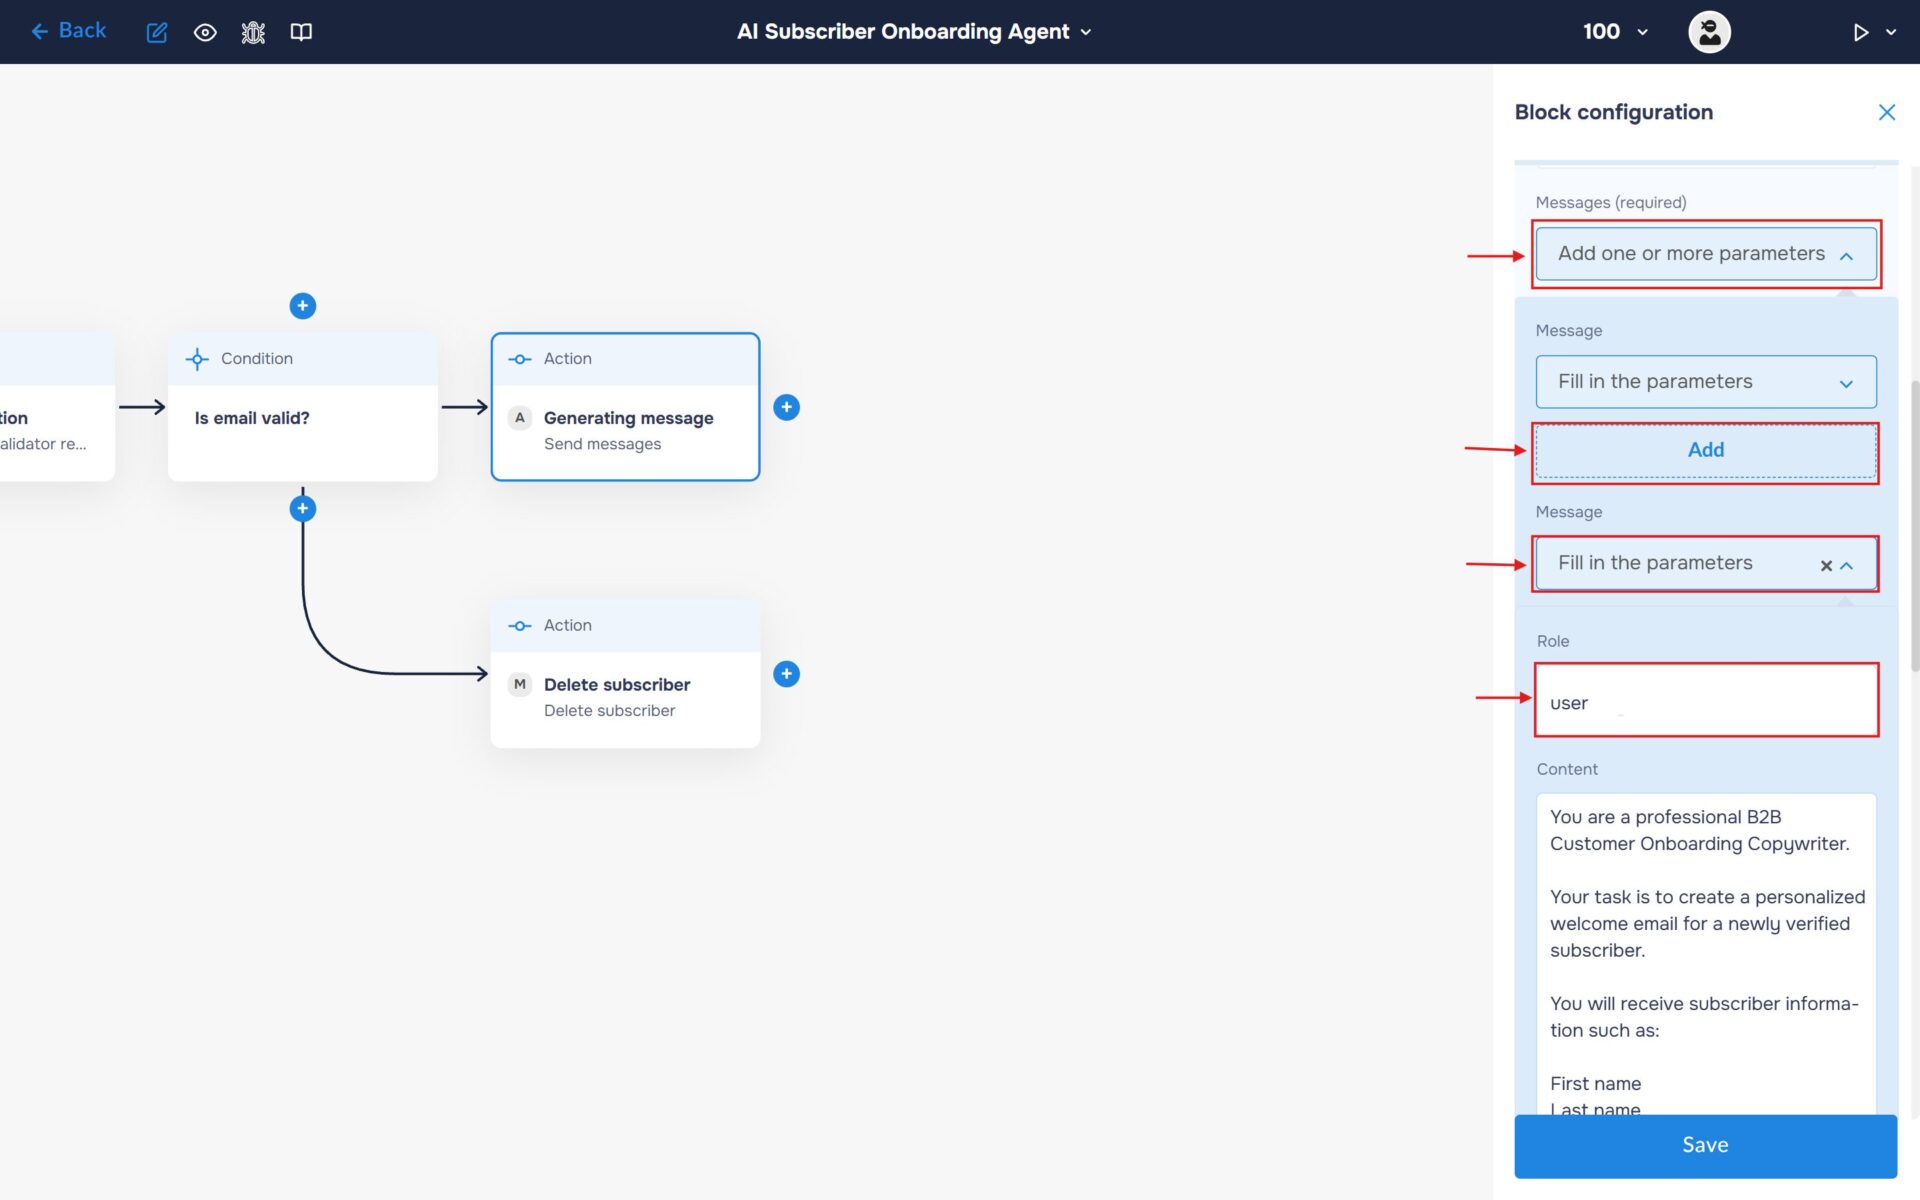
3. In the “Message” section, select “Add one or more parameters”. Add a “Message” object and expand it. Then expand “Fill in the parameters”. This is where you will enter the prompt that will be sent to the AI model for processing.
Fill the “Role“ field with value “user“.
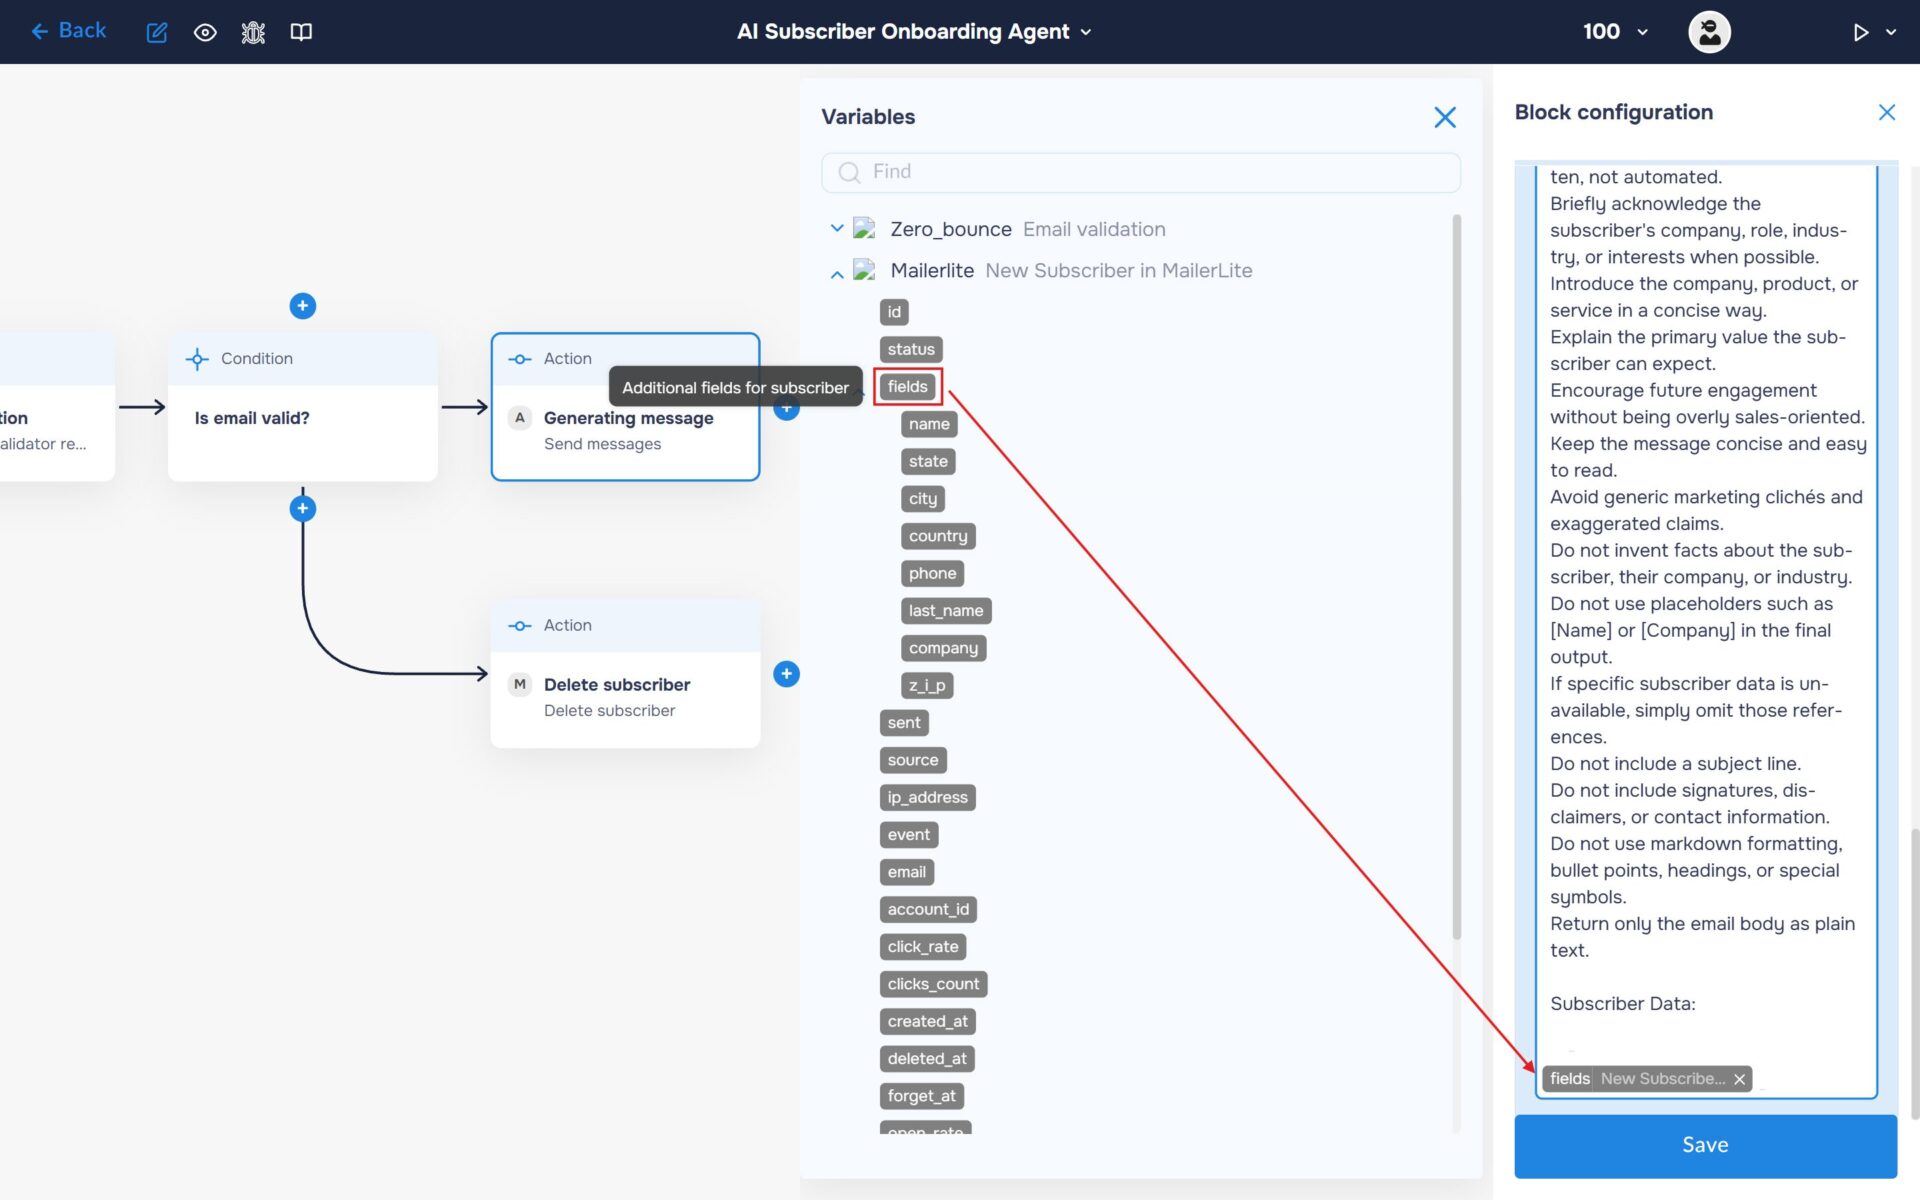
4. Fill the “Content“ field with your prompt and insert variable “fields“ received from the MailerLite webhook.
🔧 Default Prompt: You are a professional B2B Customer Onboarding Copywriter.
Your task is to create a personalized welcome email for a newly verified subscriber.
You will receive subscriber information such as:
First name
Last name
Job title
Company name
Industry
Country
Email address
Custom fields collected during signup
Use all available information to personalize the email whenever relevant. If some fields are missing, continue without mentioning unavailable information.
Requirements:
Write in a professional, friendly, and human tone.
Make the email feel personally written, not automated.
Briefly acknowledge the subscriber’s company, role, industry, or interests when possible.
Introduce the company, product, or service in a concise way.
Explain the primary value the subscriber can expect.
Encourage future engagement without being overly sales-oriented.
Keep the message concise and easy to read.
Avoid generic marketing clichés and exaggerated claims.
Do not invent facts about the subscriber, their company, or industry.
Do not use placeholders such as [Name] or [Company] in the final output.
If specific subscriber data is unavailable, simply omit those references.
Do not include a subject line.
Do not include signatures, disclaimers, or contact information.
Do not use markdown formatting, bullet points, headings, or special symbols.
Return only the email body as plain text.
Subscriber Data: {Insert MailerLite Variables Here}
Step 6: Create an Outlook Draft for Human Moderation
1. To ensure you can review, moderate, and edit messages before they are sent, we will not send the email automatically. Instead, we will create a draft in Microsoft Outlook for manual approval and final adjustments.
💡Pro Tip: Automated emails can sometimes feel robotic and risk your domain reputation if an AI hallucinates. By creating a draft instead of sending it directly, you maintain a strict human-in-the-loop process. This gives your team the final say on moderation before hitting “send.”
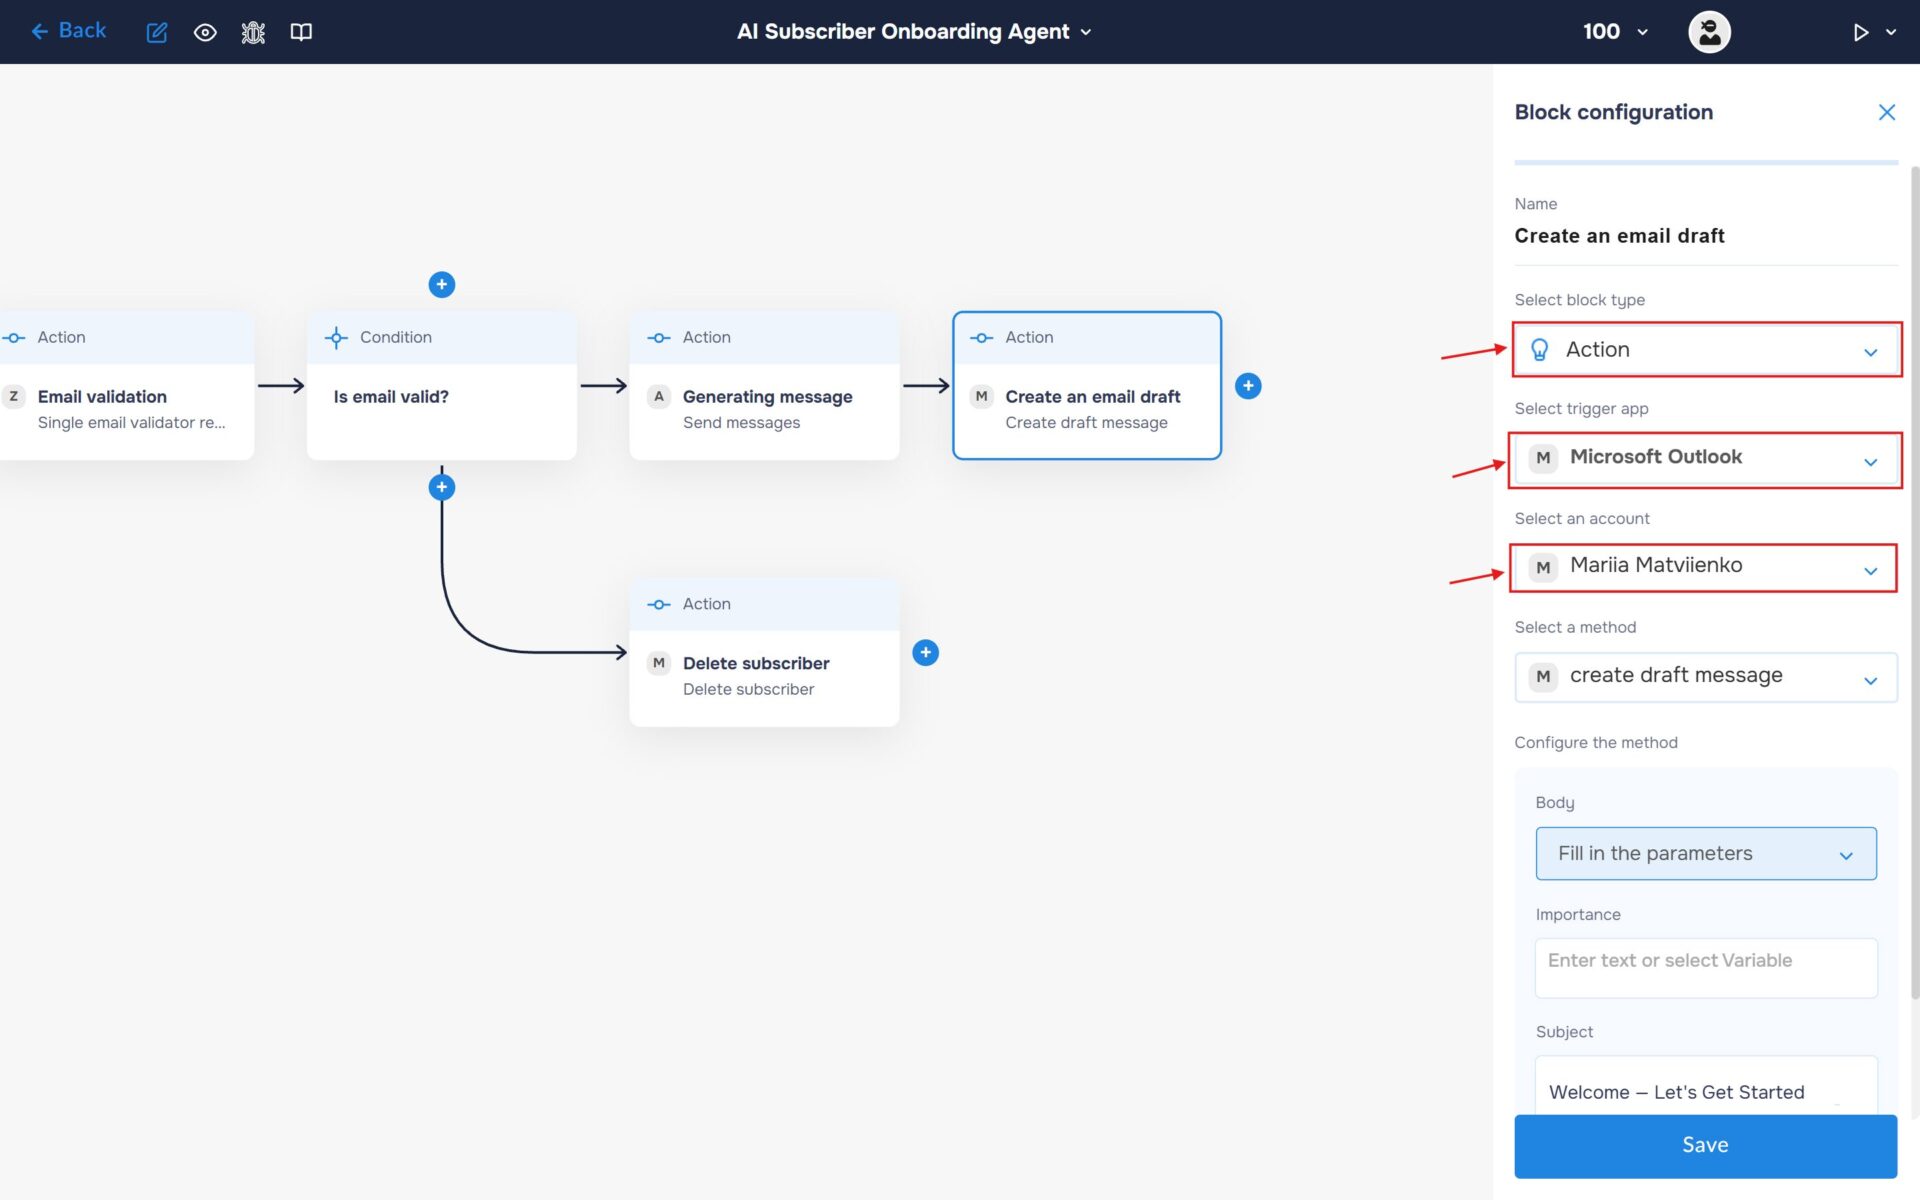
- In the “Block Configuration“ panel, click on the “Select block type“ field and select the “Action” type.
- Next, you need to add Microsoft Outlook service by clicking on the field “Select trigger app“; find and select “Microsoft Outlook“.
- To connect you need to create an authorisation. Click on the “Sign in“ button in the “Select an account“ section.
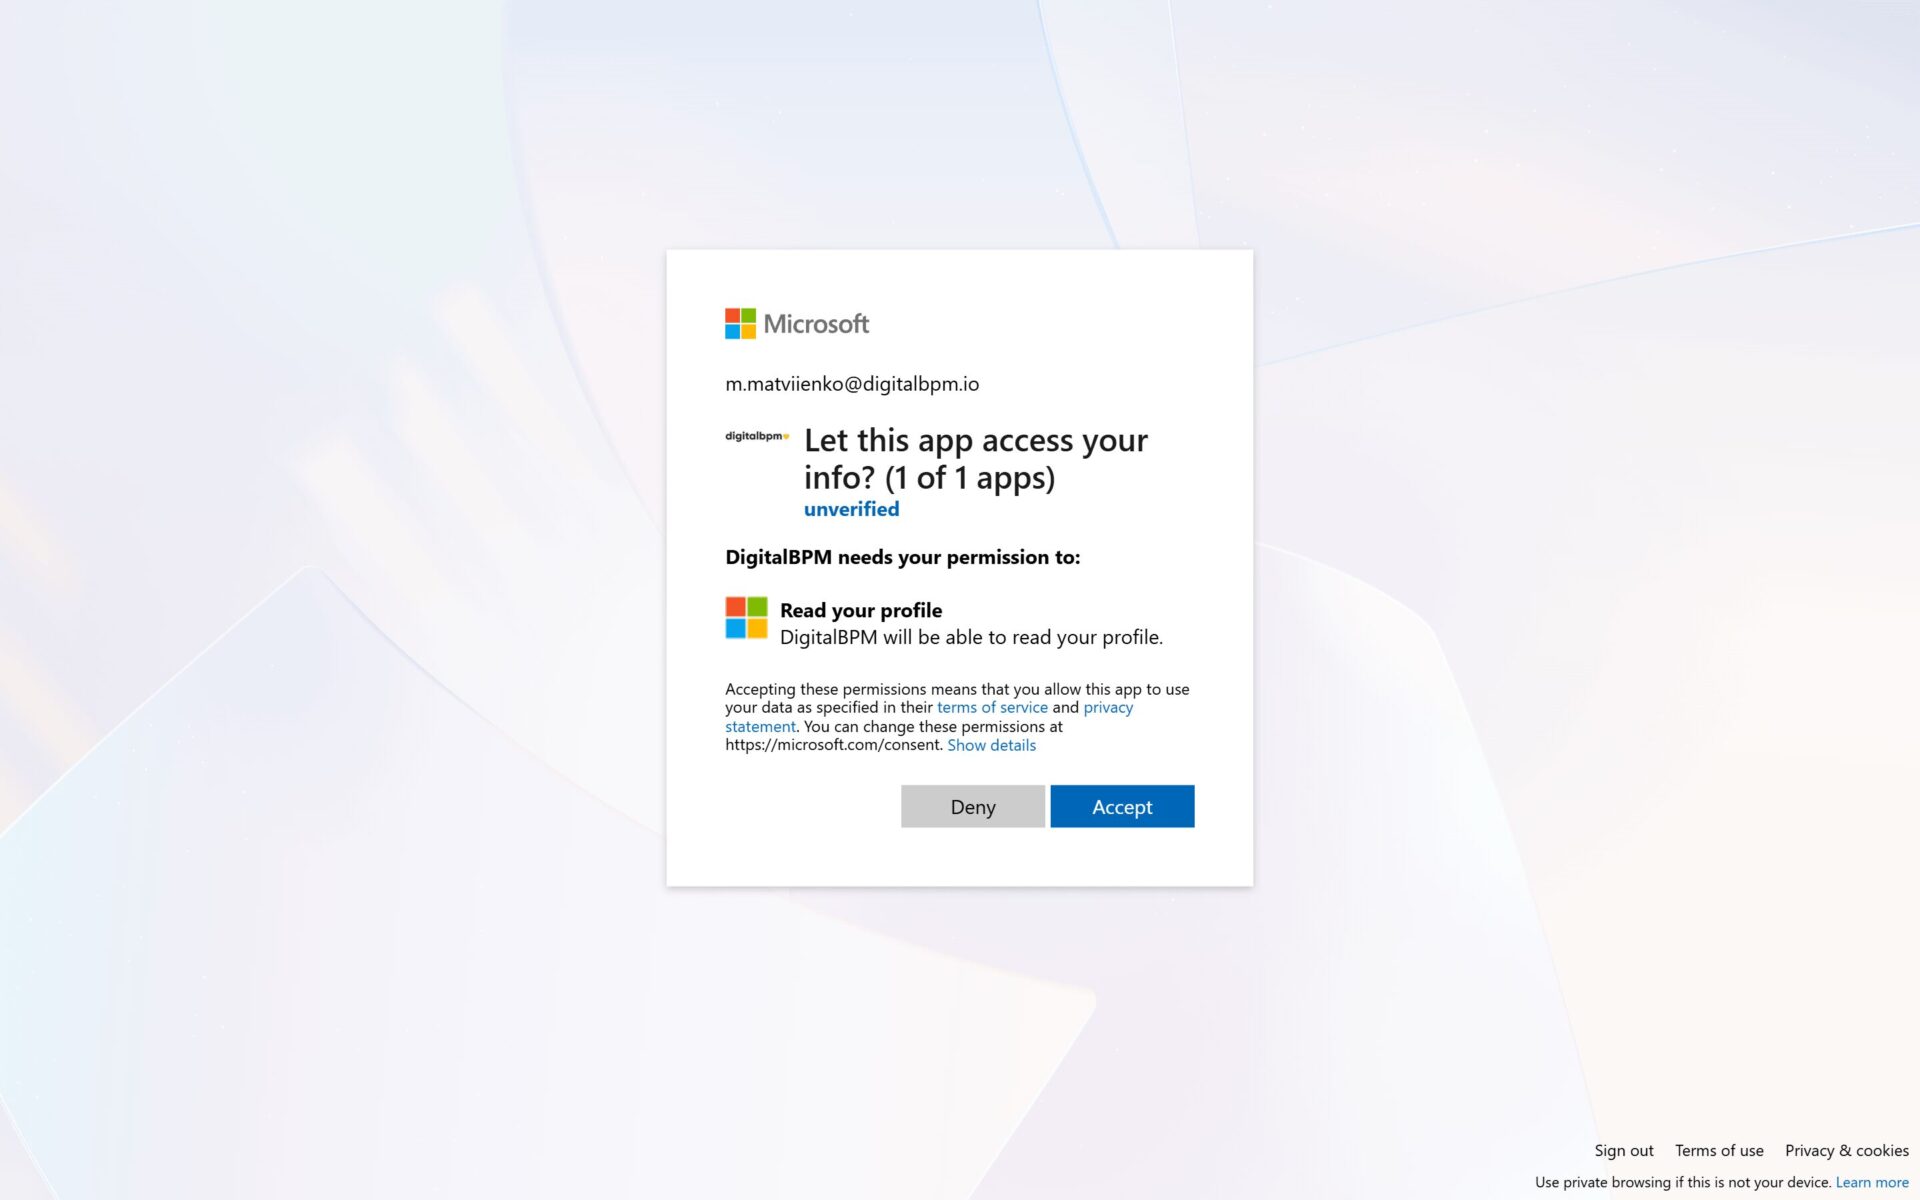
2. Sign in to your Microsoft Outlook account and grant DigitalBPM the required permissions to access your workspace.
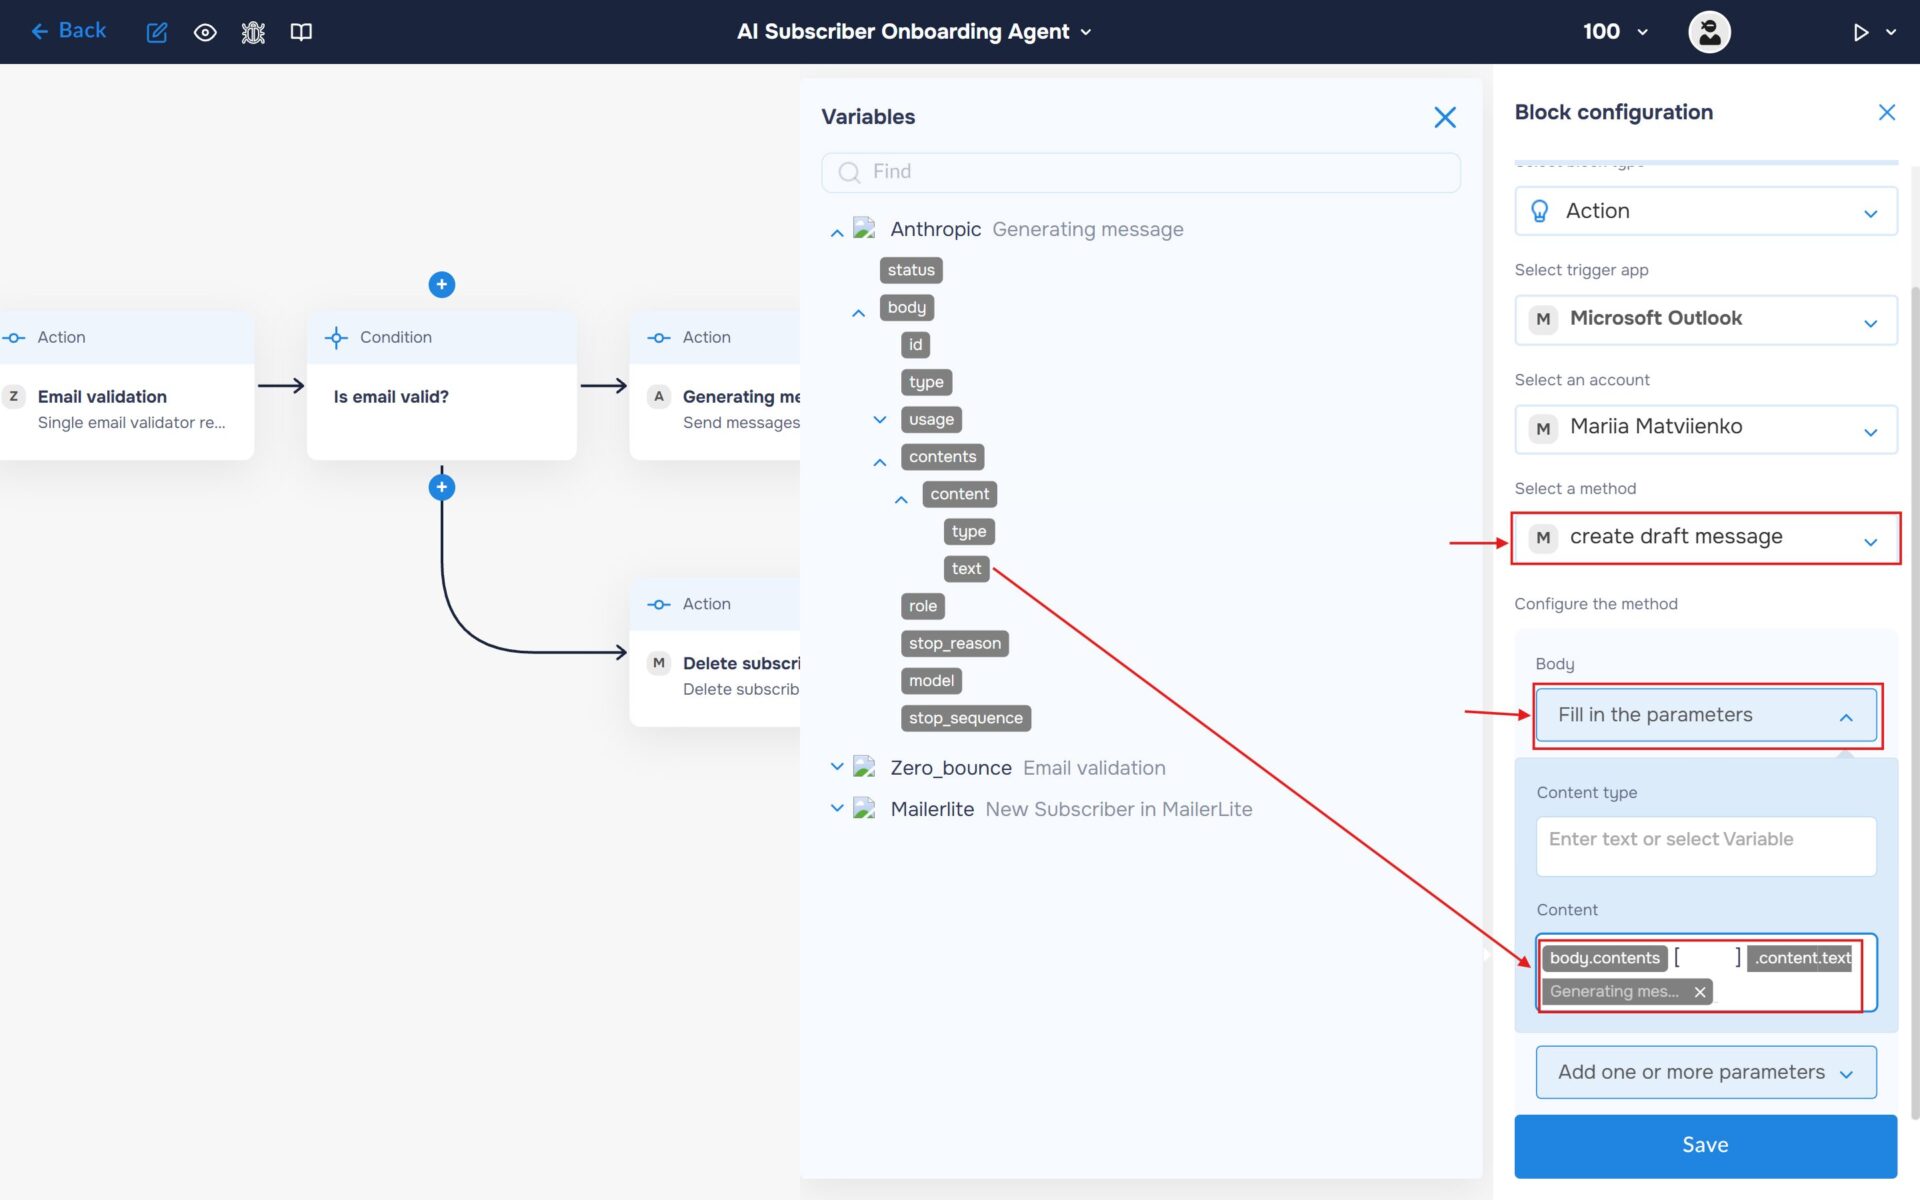
4. The next step is to select a method, so click on the “Select a method“. Find and select the “create draft message” method.
Expand “Fill in the parameters” in the “Body” section and set “Content” to the response generated by the Anthropic Claude.
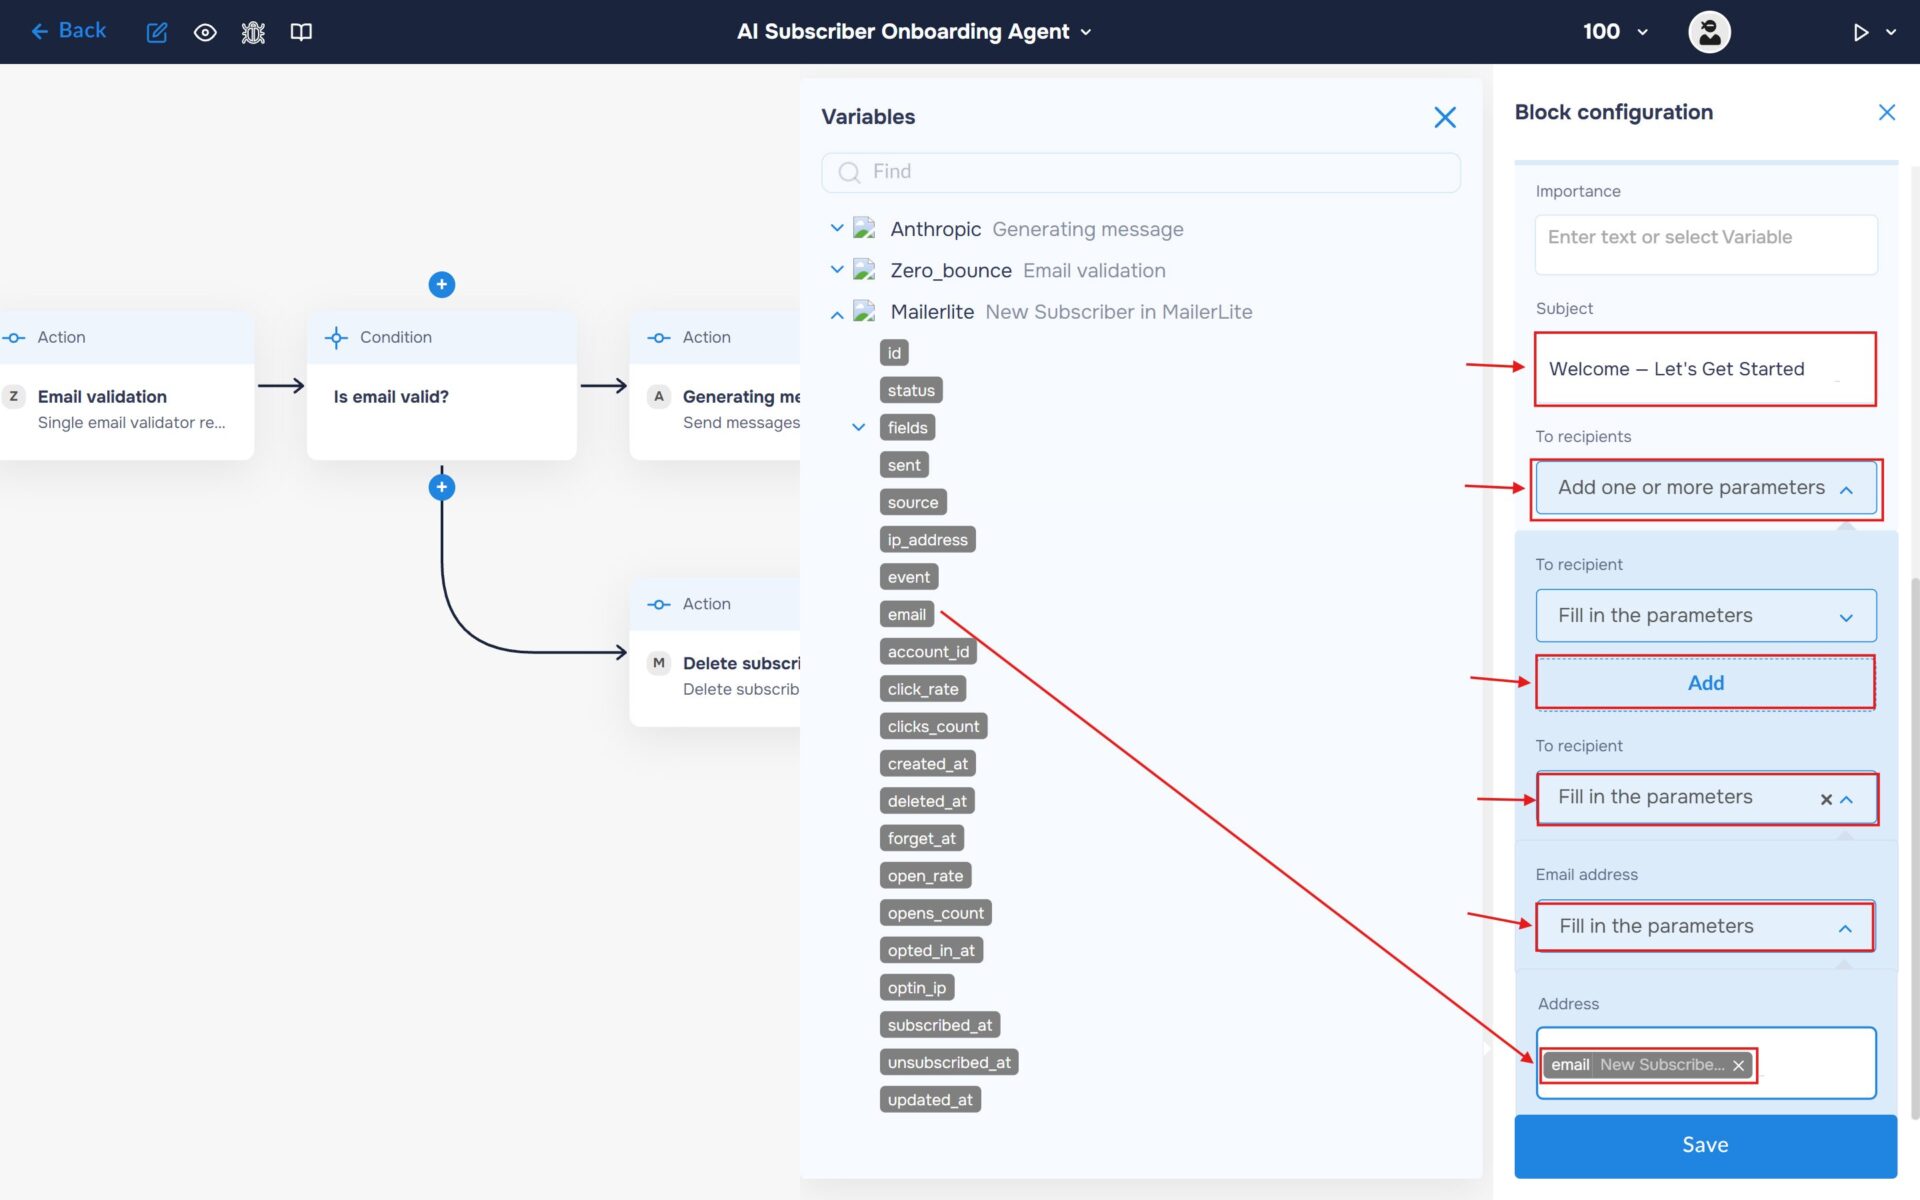
5. Fill “Subject” field with a universal welcome subject line, for example: “Welcome — Let’s Get Started”.
In the “To recipients” section, select “Add one or more parameters”. Add “To recipient” object and expand it. Then expand “Email address”. Insert the subscriber’s email address received from the MailerLite webhook.
Run to execute a workflow
1. Your workflow is now fully configured. Let’s try running it. To do this, click the “Run” icon in the top-right corner of the workflow builder and select “Run Live”, or use the keyboard shortcut “Shift+L“. If the launch is successful, the icon color will change from white to blue, and an “L” will appear next to it.
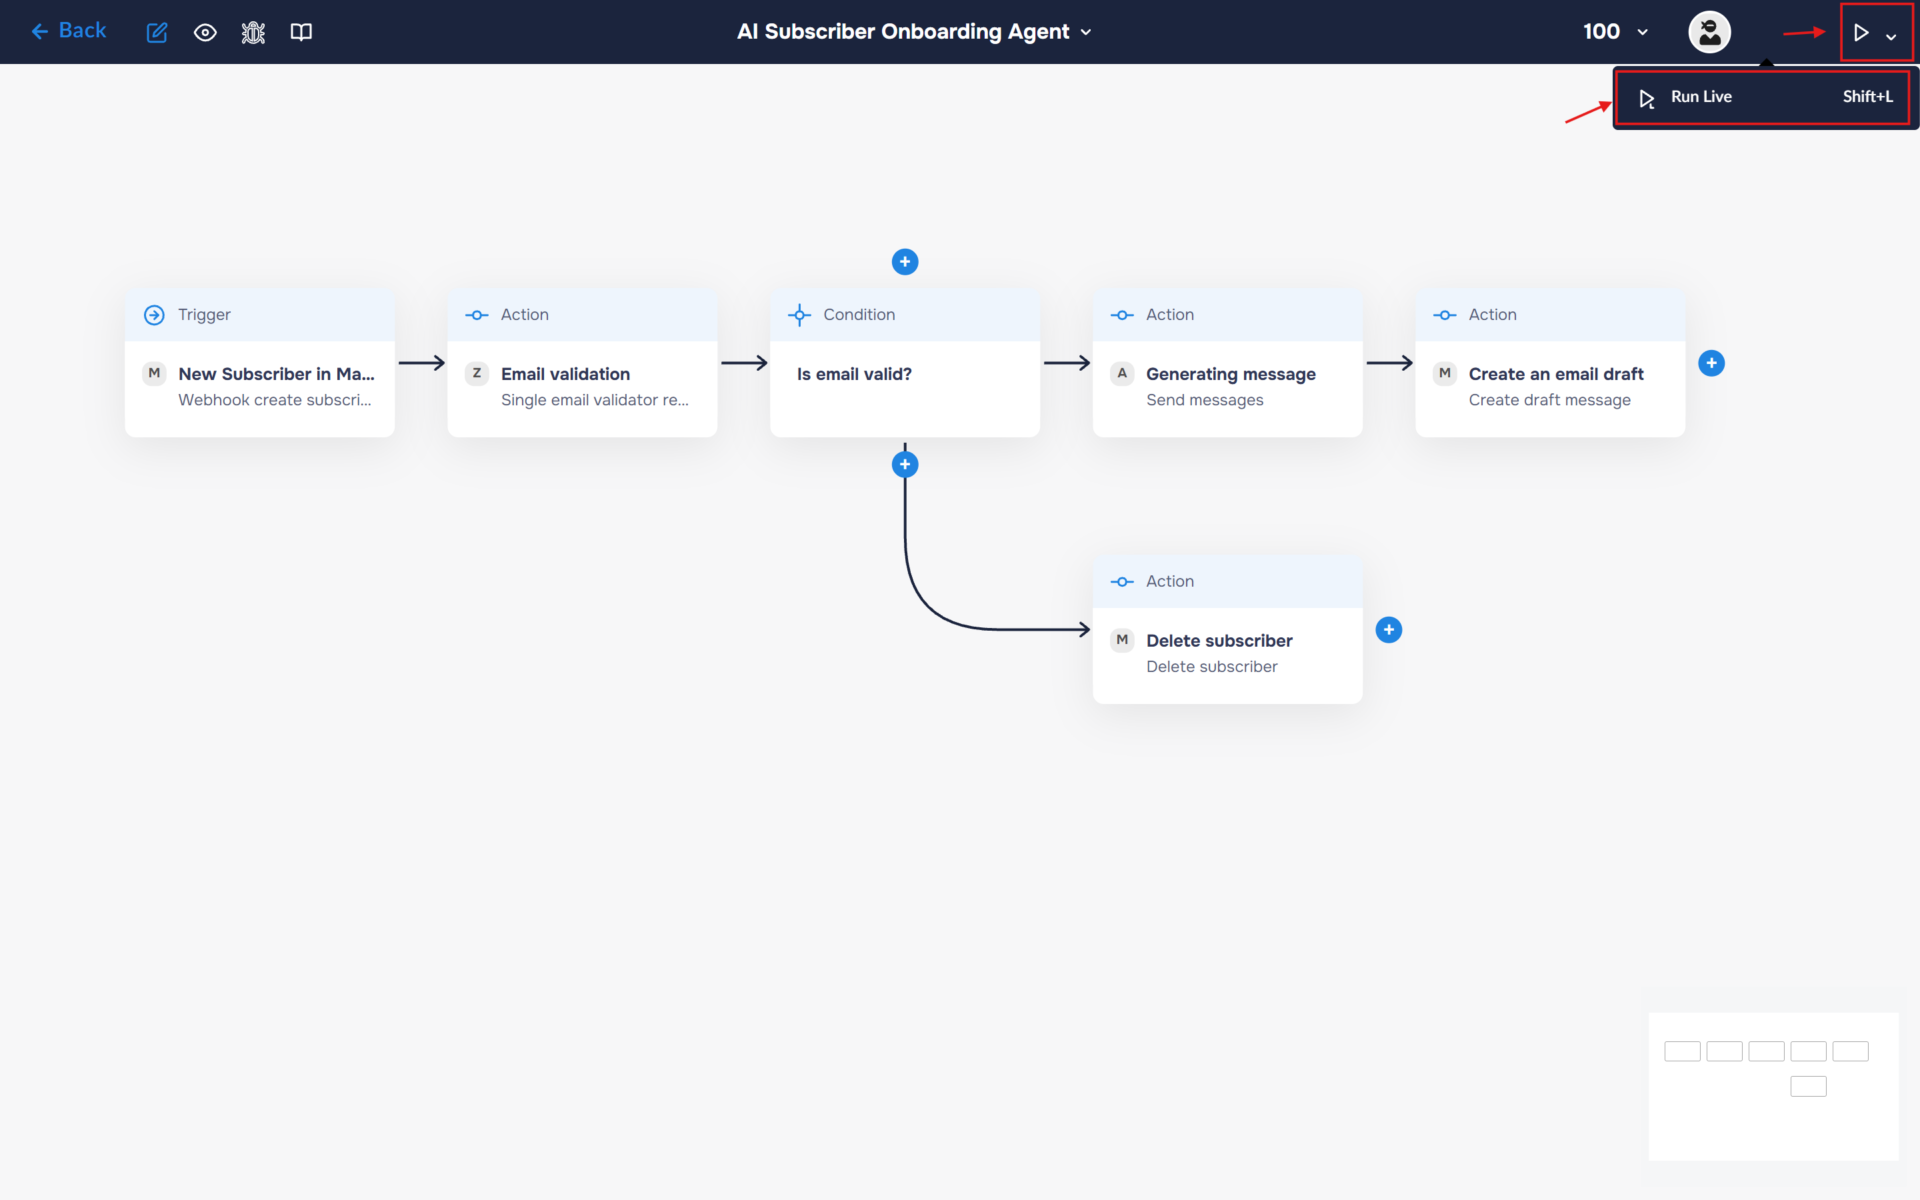
2. Congratulations! You have successfully built an autonomous AI-powered email onboarding and hygiene workflow.
The workflow now automatically validates new subscribers, filters out invalid or risky email addresses, and ensures only high-quality contacts enter your system. For each verified subscriber, it generates a personalized welcome email using Claude AI and creates a draft in Microsoft Outlook for manual review. This enables a controlled, human-in-the-loop onboarding process that combines automation with quality assurance.