About This Guide
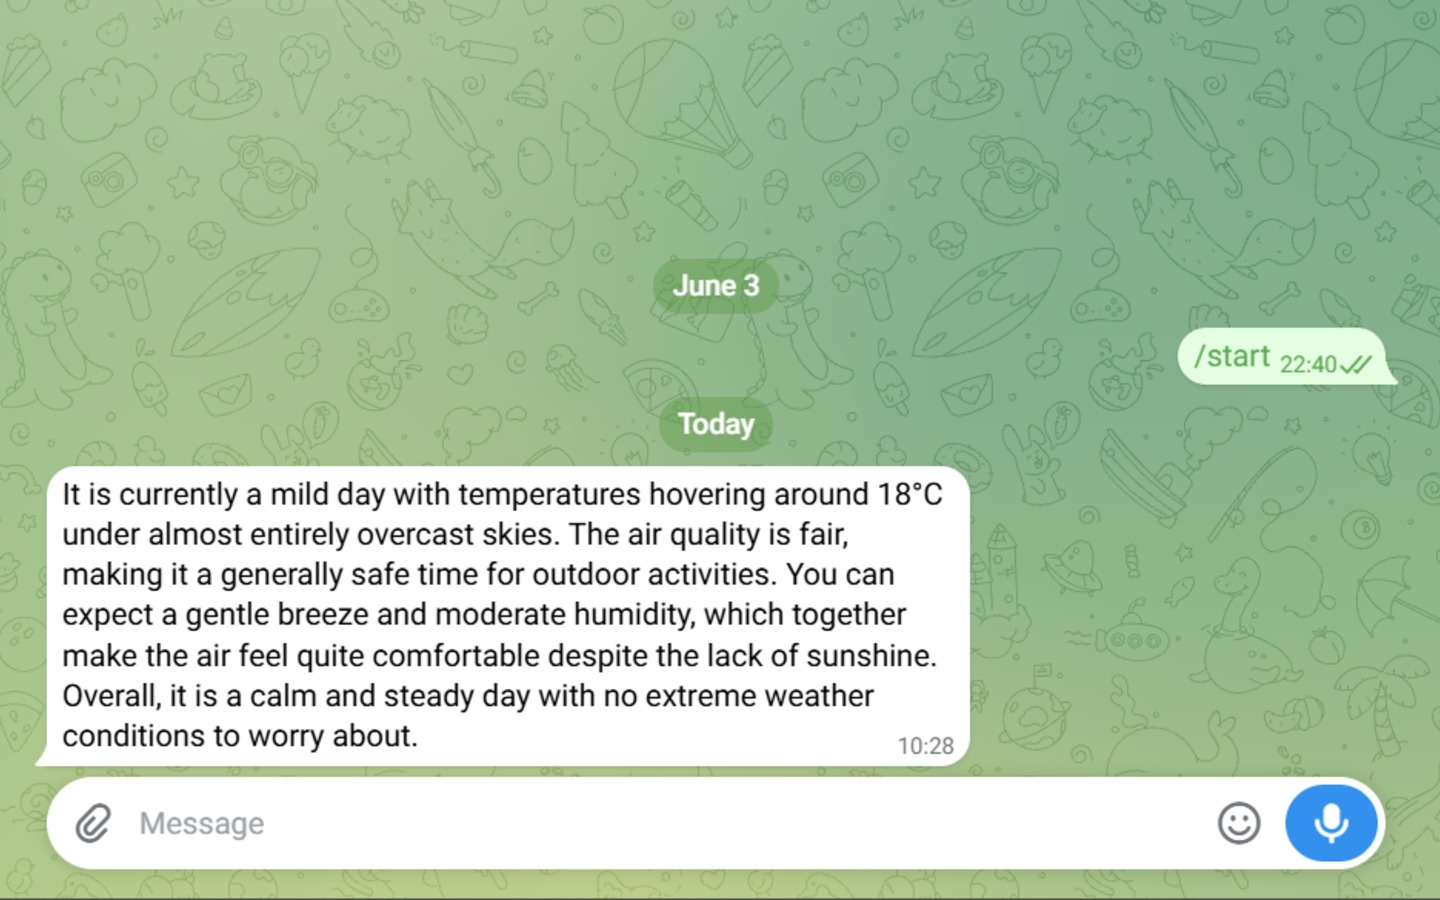
This guide provides step-by-step instructions for building an automated AI-powered weather monitoring workflow using the DigitalBPM platform.
Instead of manually checking weather forecasts and air quality reports, you will create a workflow that:
- Automatically retrieves daily weather and air quality (AQI) data from OpenWeatherMap.
- Stores historical data in Google Sheets or Zoho Sheet for future analysis and reporting.
- Sends the collected data to an AI Agent powered by Gemini AI, which analyzes the weather and air quality metrics and generates a human-readable summary based on the current conditions.
- Delivers the AI-generated weather report directly to a Telegram chat on a predefined schedule.
By the end of this guide, you will have a fully automated system that collects environmental data, maintains a historical record, generates AI-powered insights, and sends weather updates directly to Telegram without manual intervention.
Who Is This Guide For?
This guide is for anyone looking to automate routine weather monitoring and receive regular updates without manual effort.
Whether you want to maintain a historical weather dataset for analysis and forecasting or simply receive AI-generated weather summaries in Telegram, this workflow helps streamline the entire process—from data collection and storage to intelligent processing and notification delivery.
Before you start creating an assistant, make sure you have everything you need:
- A DigitalBPM account.
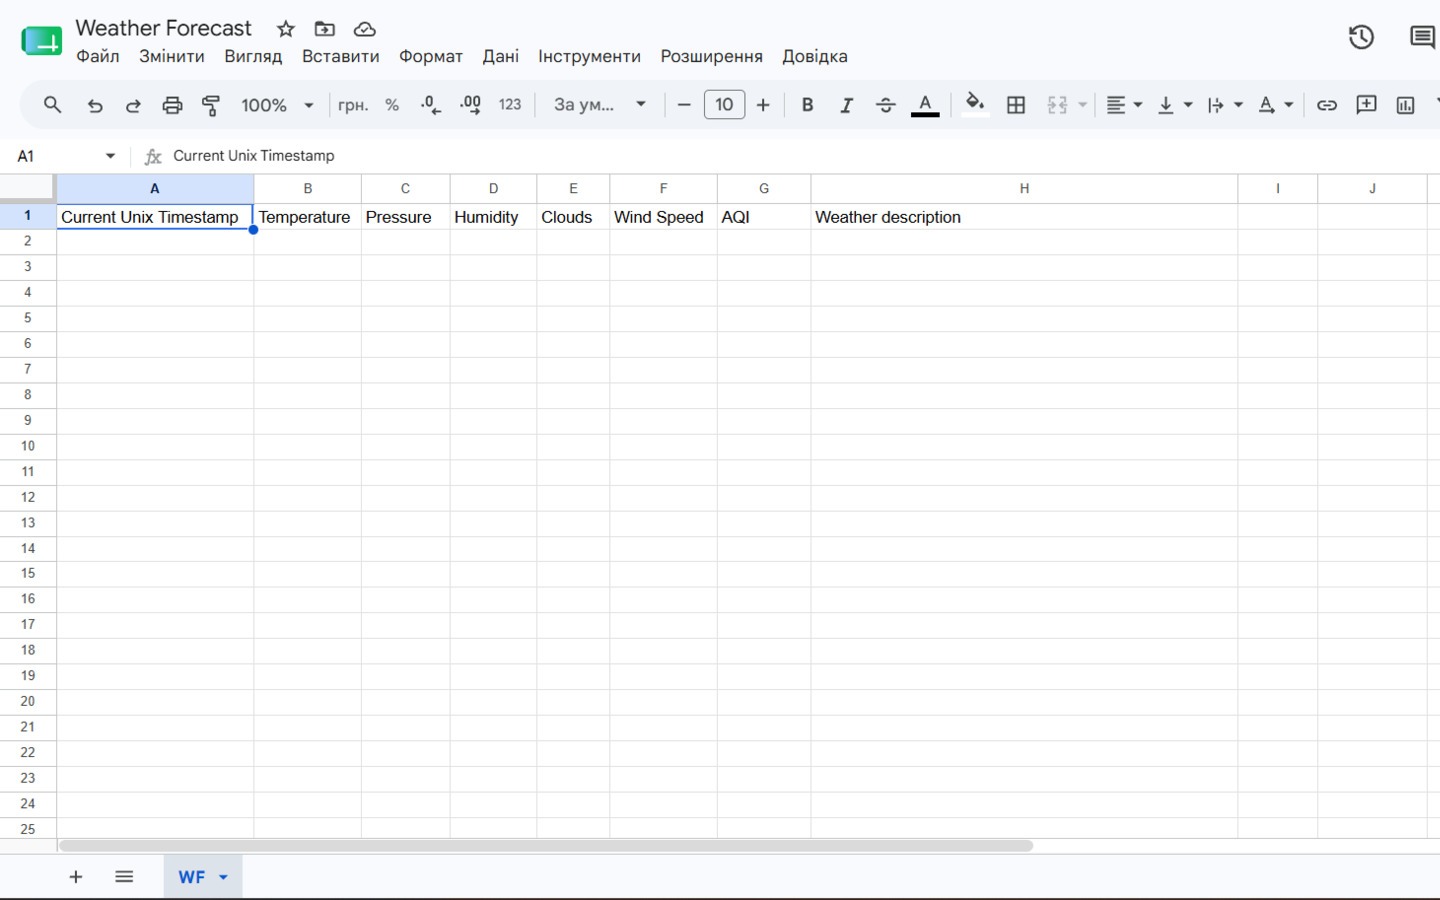
- To analyze the collected data later, you need a place to store it. In this guide, we will use Google Sheets as an example, as it provides a convenient way to organize and analyze weather data over time. Create a spreadsheet in your Google Drive. For reference, you can use the example provided below. Please note that DigitalBPM also supports Zoho Sheet, which can be used as an alternative data storage solution if preferred.
If you’re ready, let’s get started!
Step 1: Create a new workflow and first block
1. The first thing you need to do is to sign in to your DigitalBPM account and click on the “+ Workflow” button on the “Automation” page.

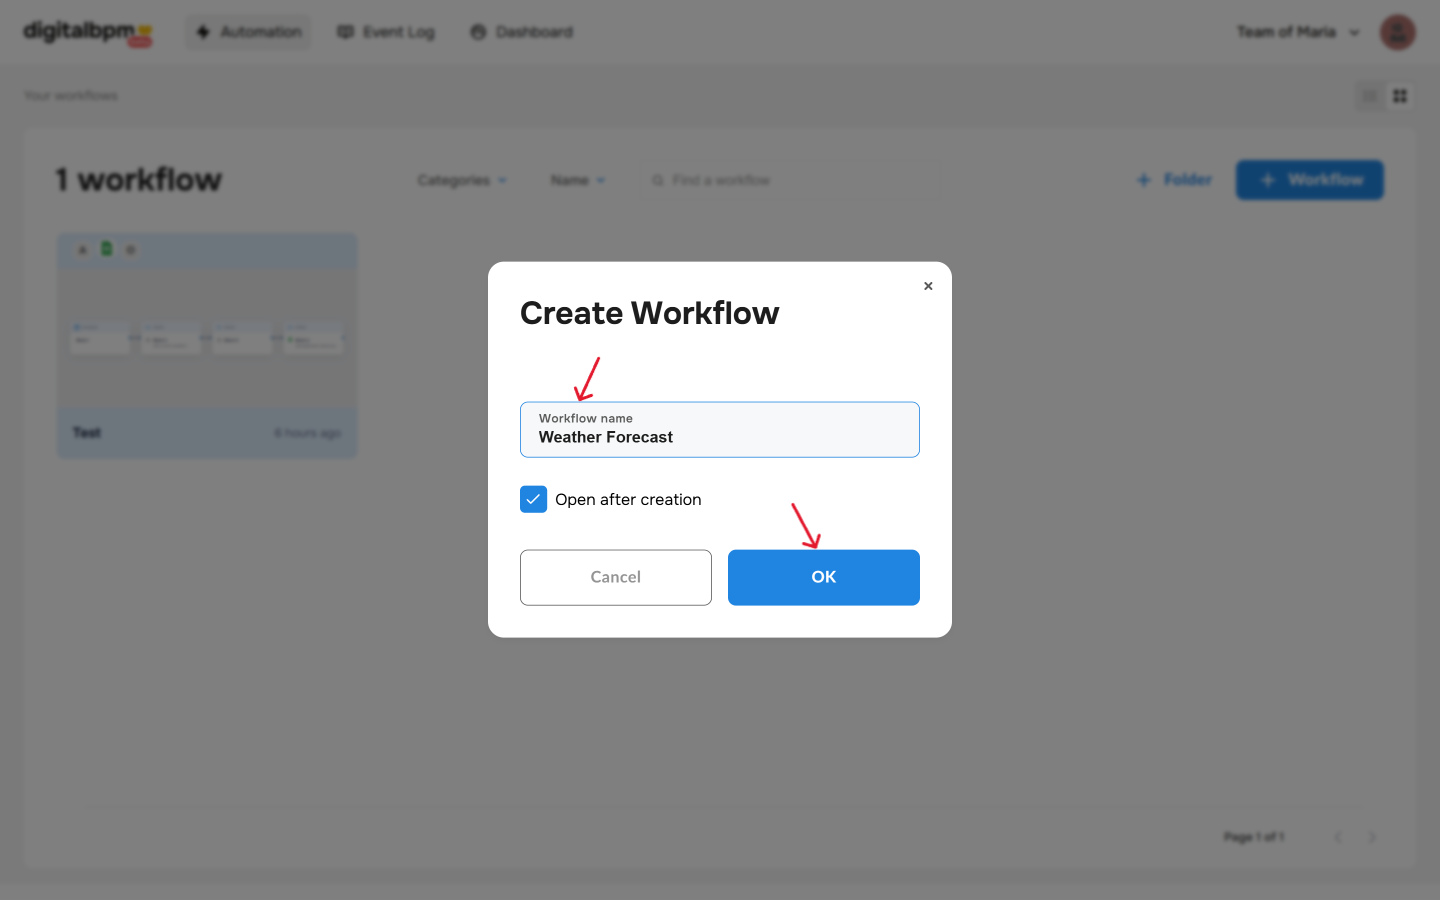
2. Next, you need to enter a name for your workflow, for example, “Weather Forecast” and click “OK“.
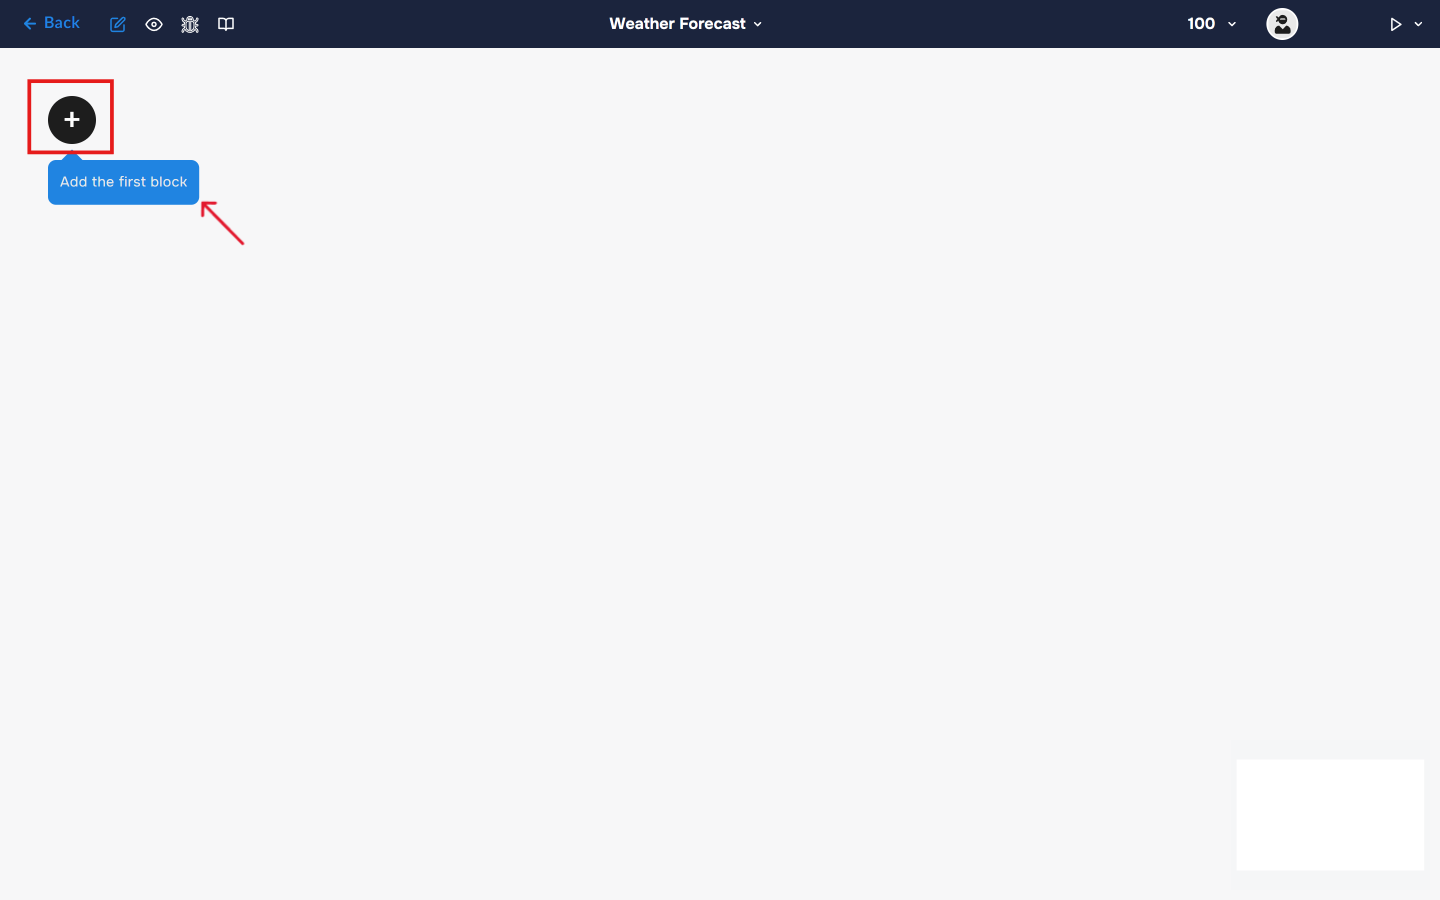
3. After confirming the creation of a workflow, its builder opens. To add the first block, click the “+ Add first block” button.
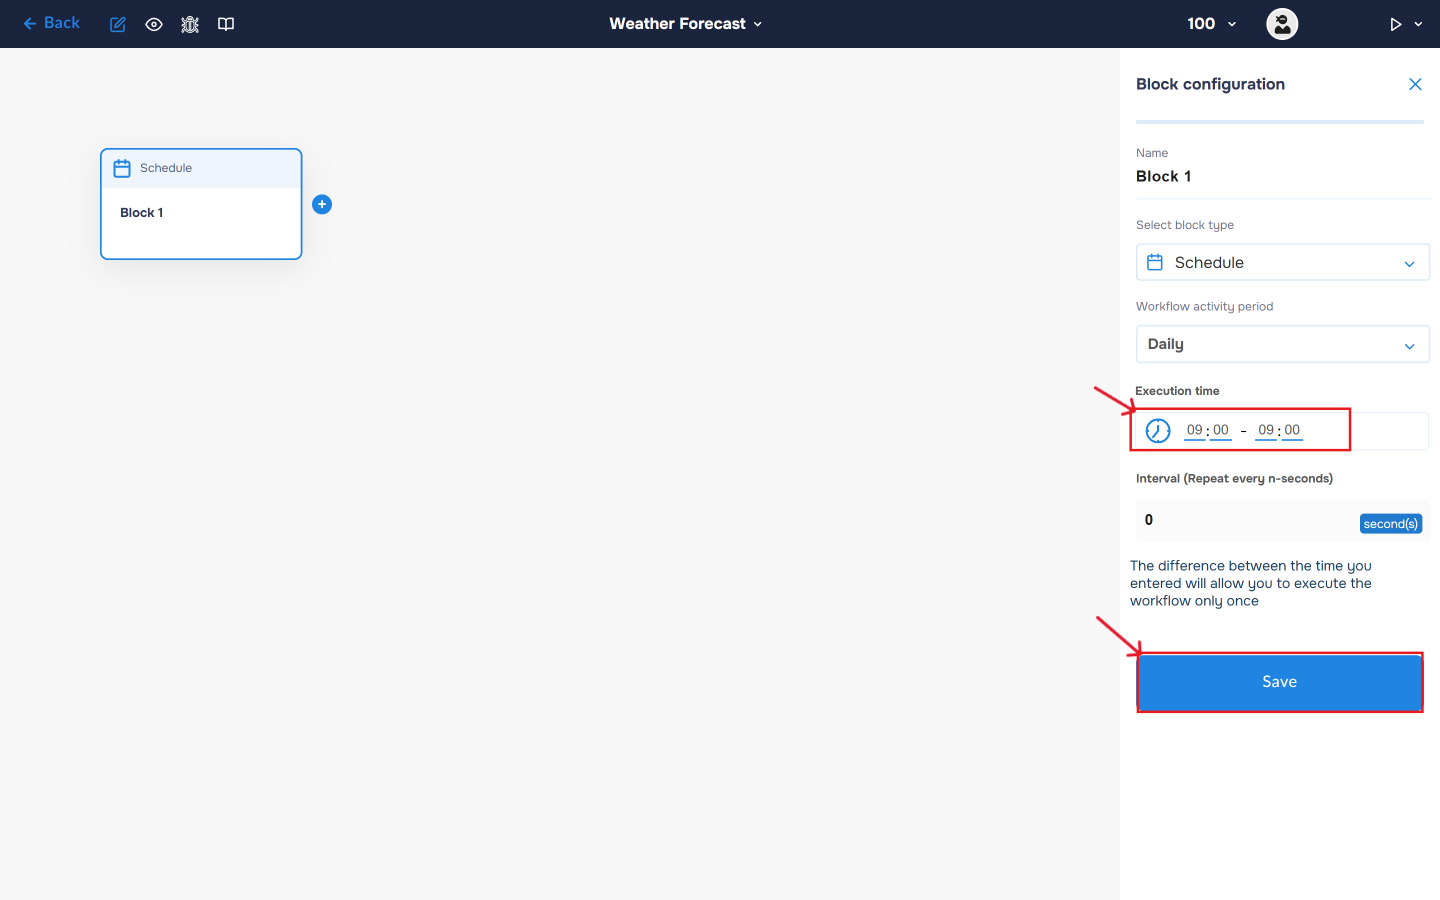
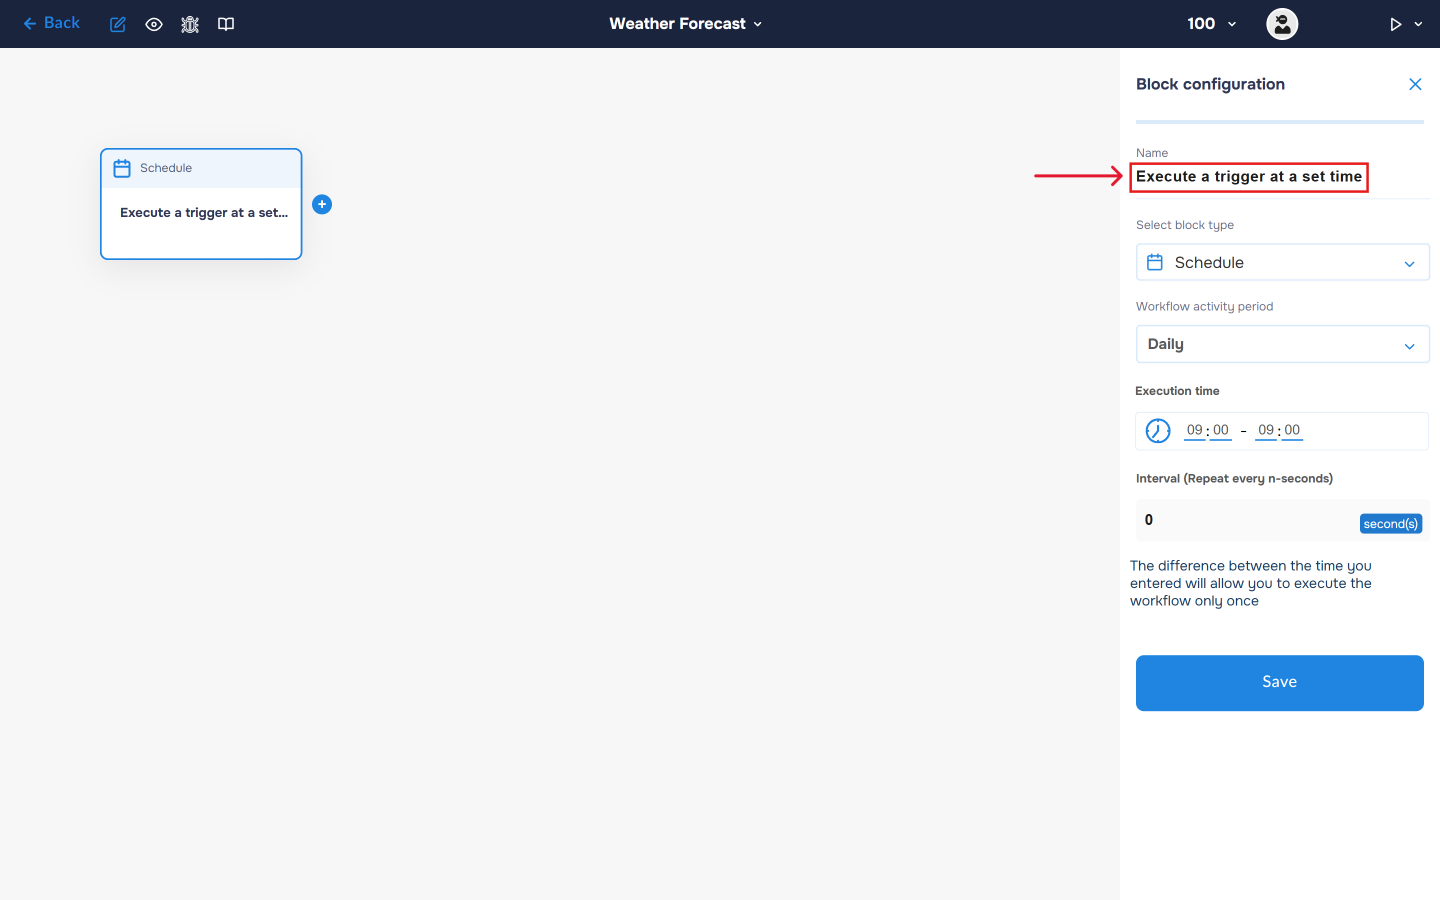
4. Next, you need to configure the first block. This block is responsible for triggering the workflow on a set schedule. To do this, click on the block to open the “Block Configuration” panel, and select the block type “Schedule”.

5. The workflow activation period is set to Daily by default. Set your preferred execution time; for example, we will collect current weather daily at 9:00 AM. Save the settings by clicking the “Save” button.
6. Click on the “Name” field and fill in a clear name for what happens in the block, for example, “Execute a trigger at a set time”. With this step, you can quickly find out what the block is for.
Step 2. Add integration with the OpenWeatherMap. Current weather
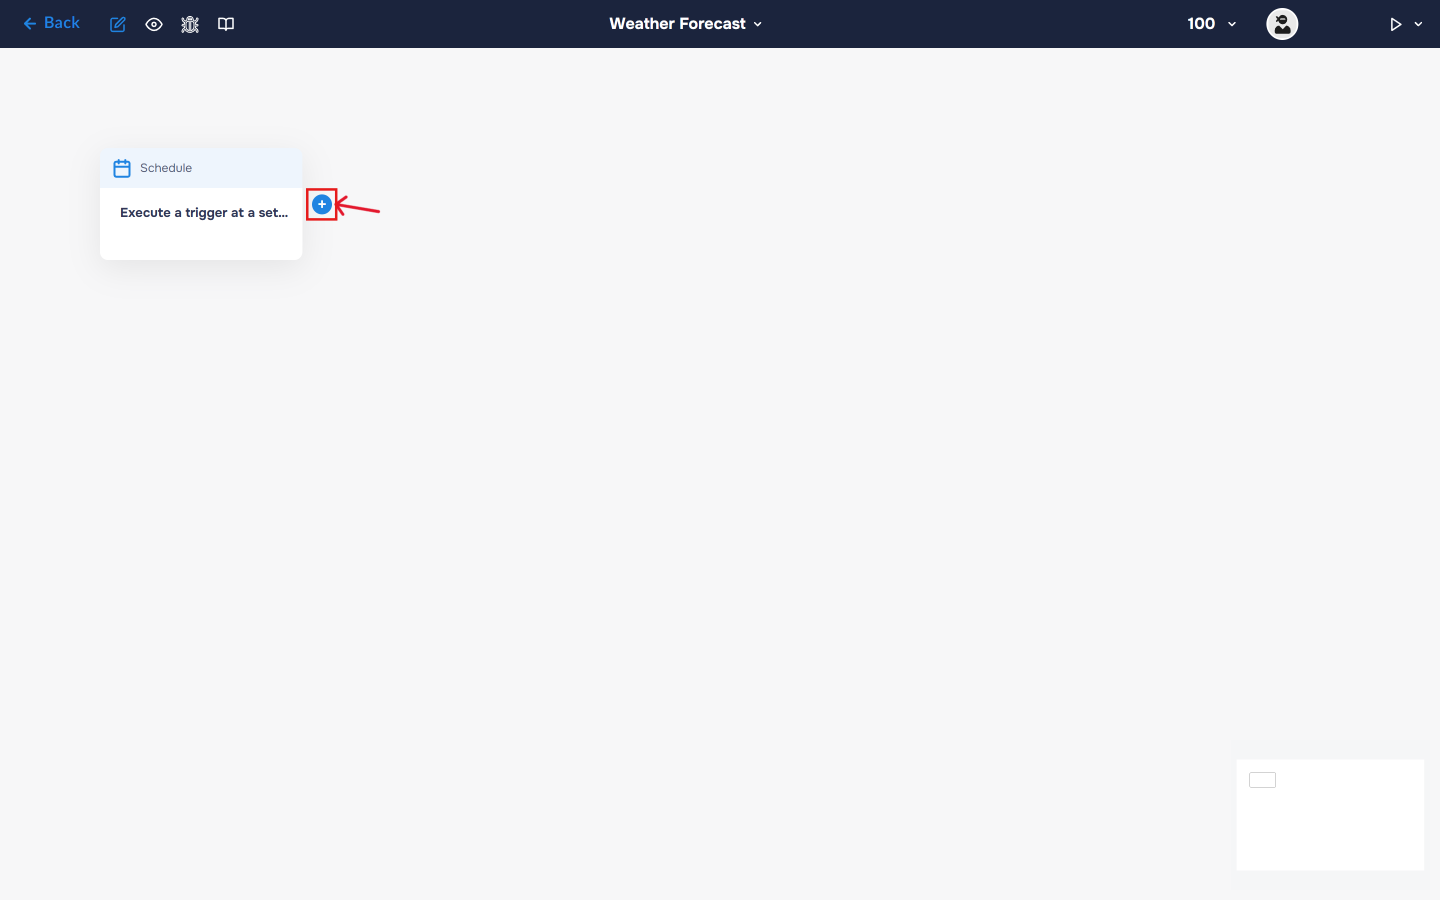
1. Next, you need to add a block with the OpenWeatherMap service to retrieve information about current weather.
To add a new block, click the “+” button to the right of the existing block.
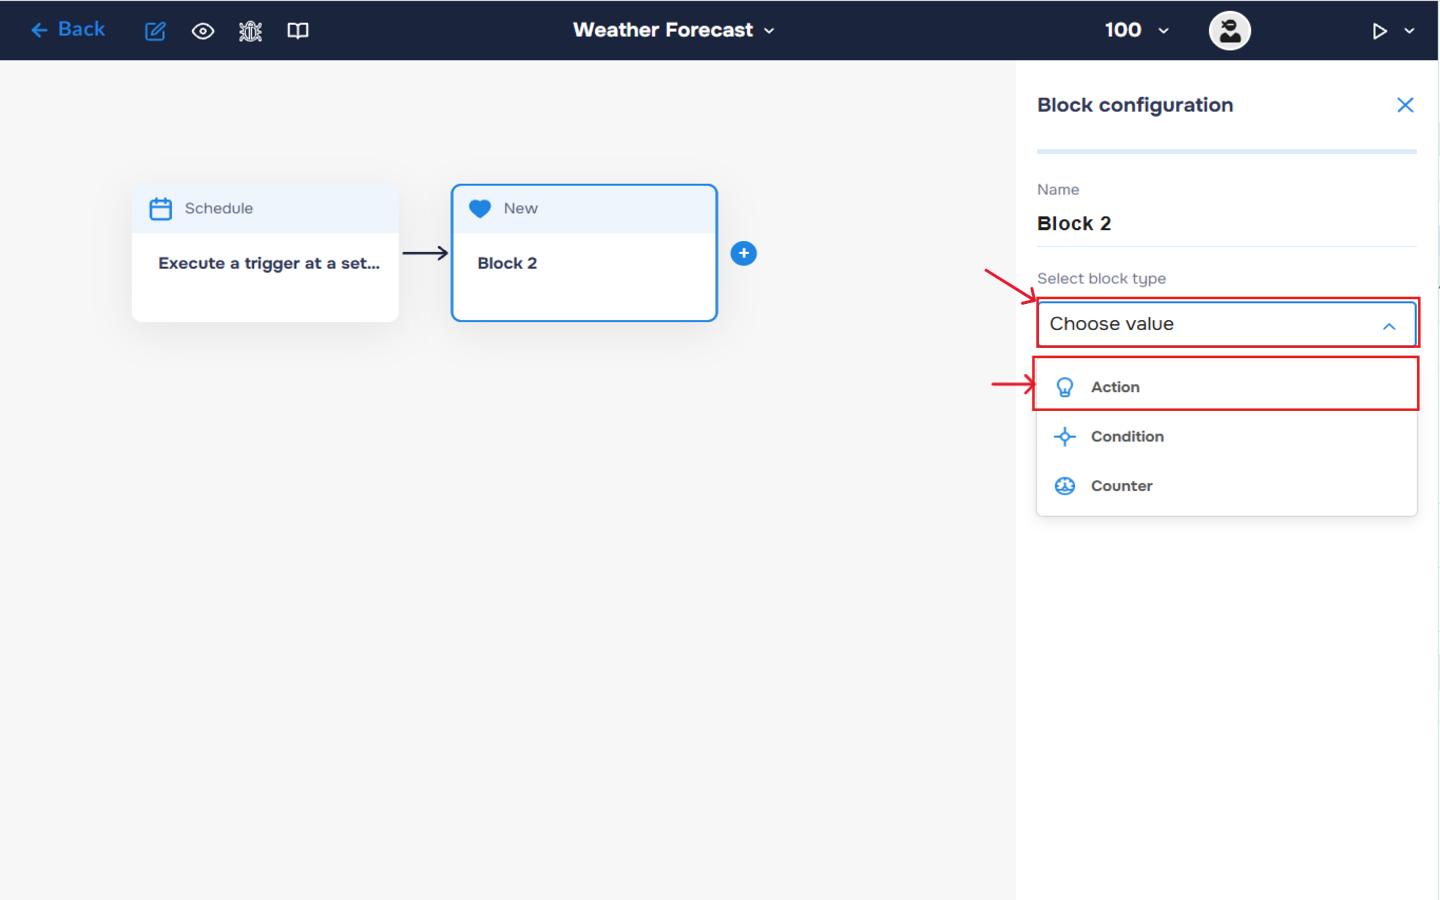
2. In the “Block Configuration“ panel, click on the “Select block type“ field and select the “Action” type.
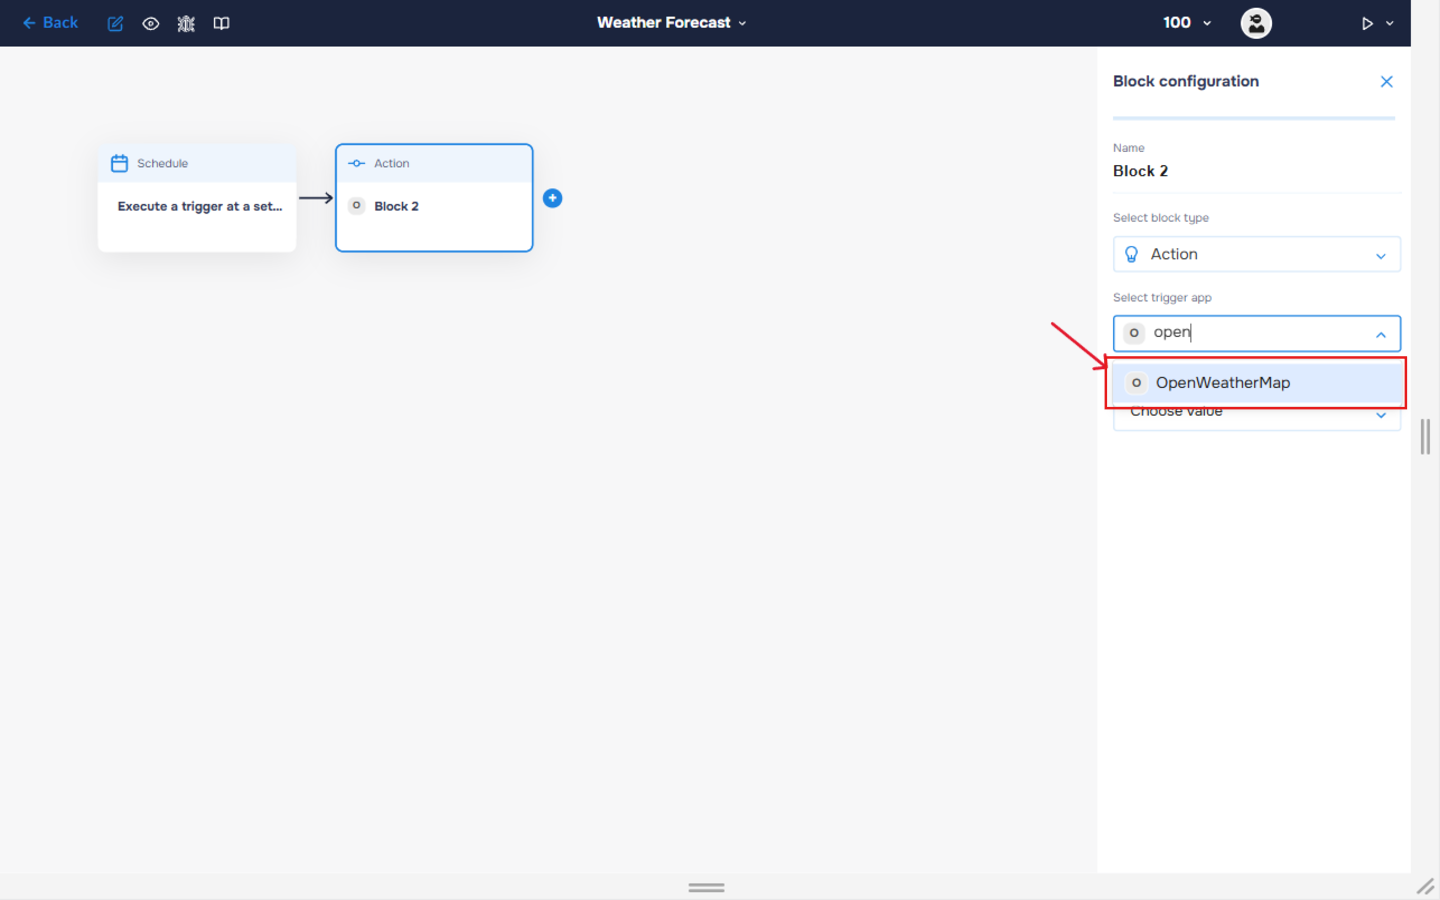
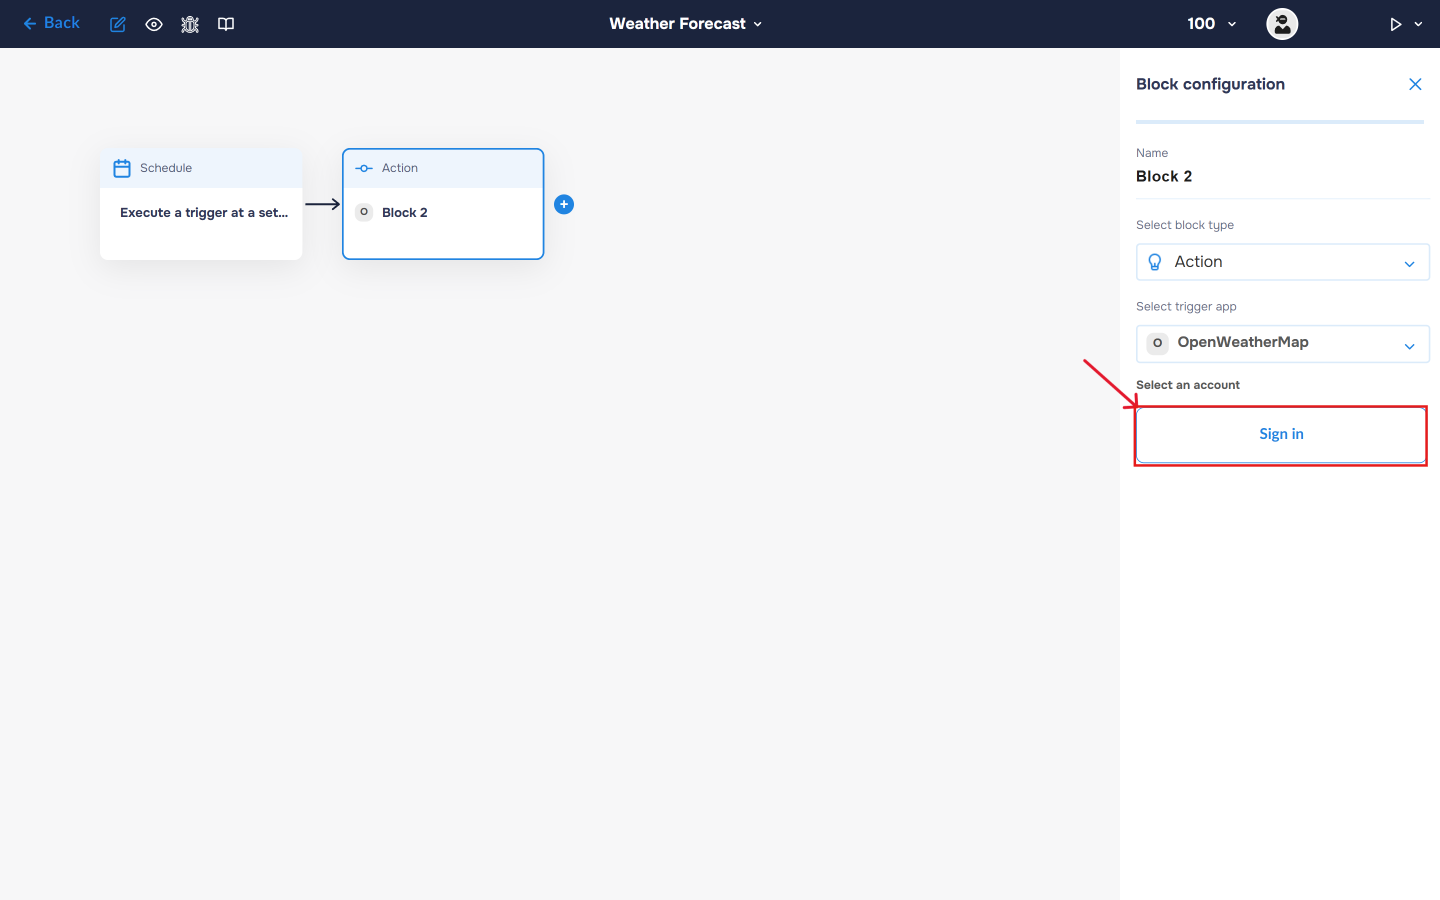
3. Next, you need to add OpenWeatherMap service by clicking on the field “Select trigger app“; find and select OpenWeatherMap.
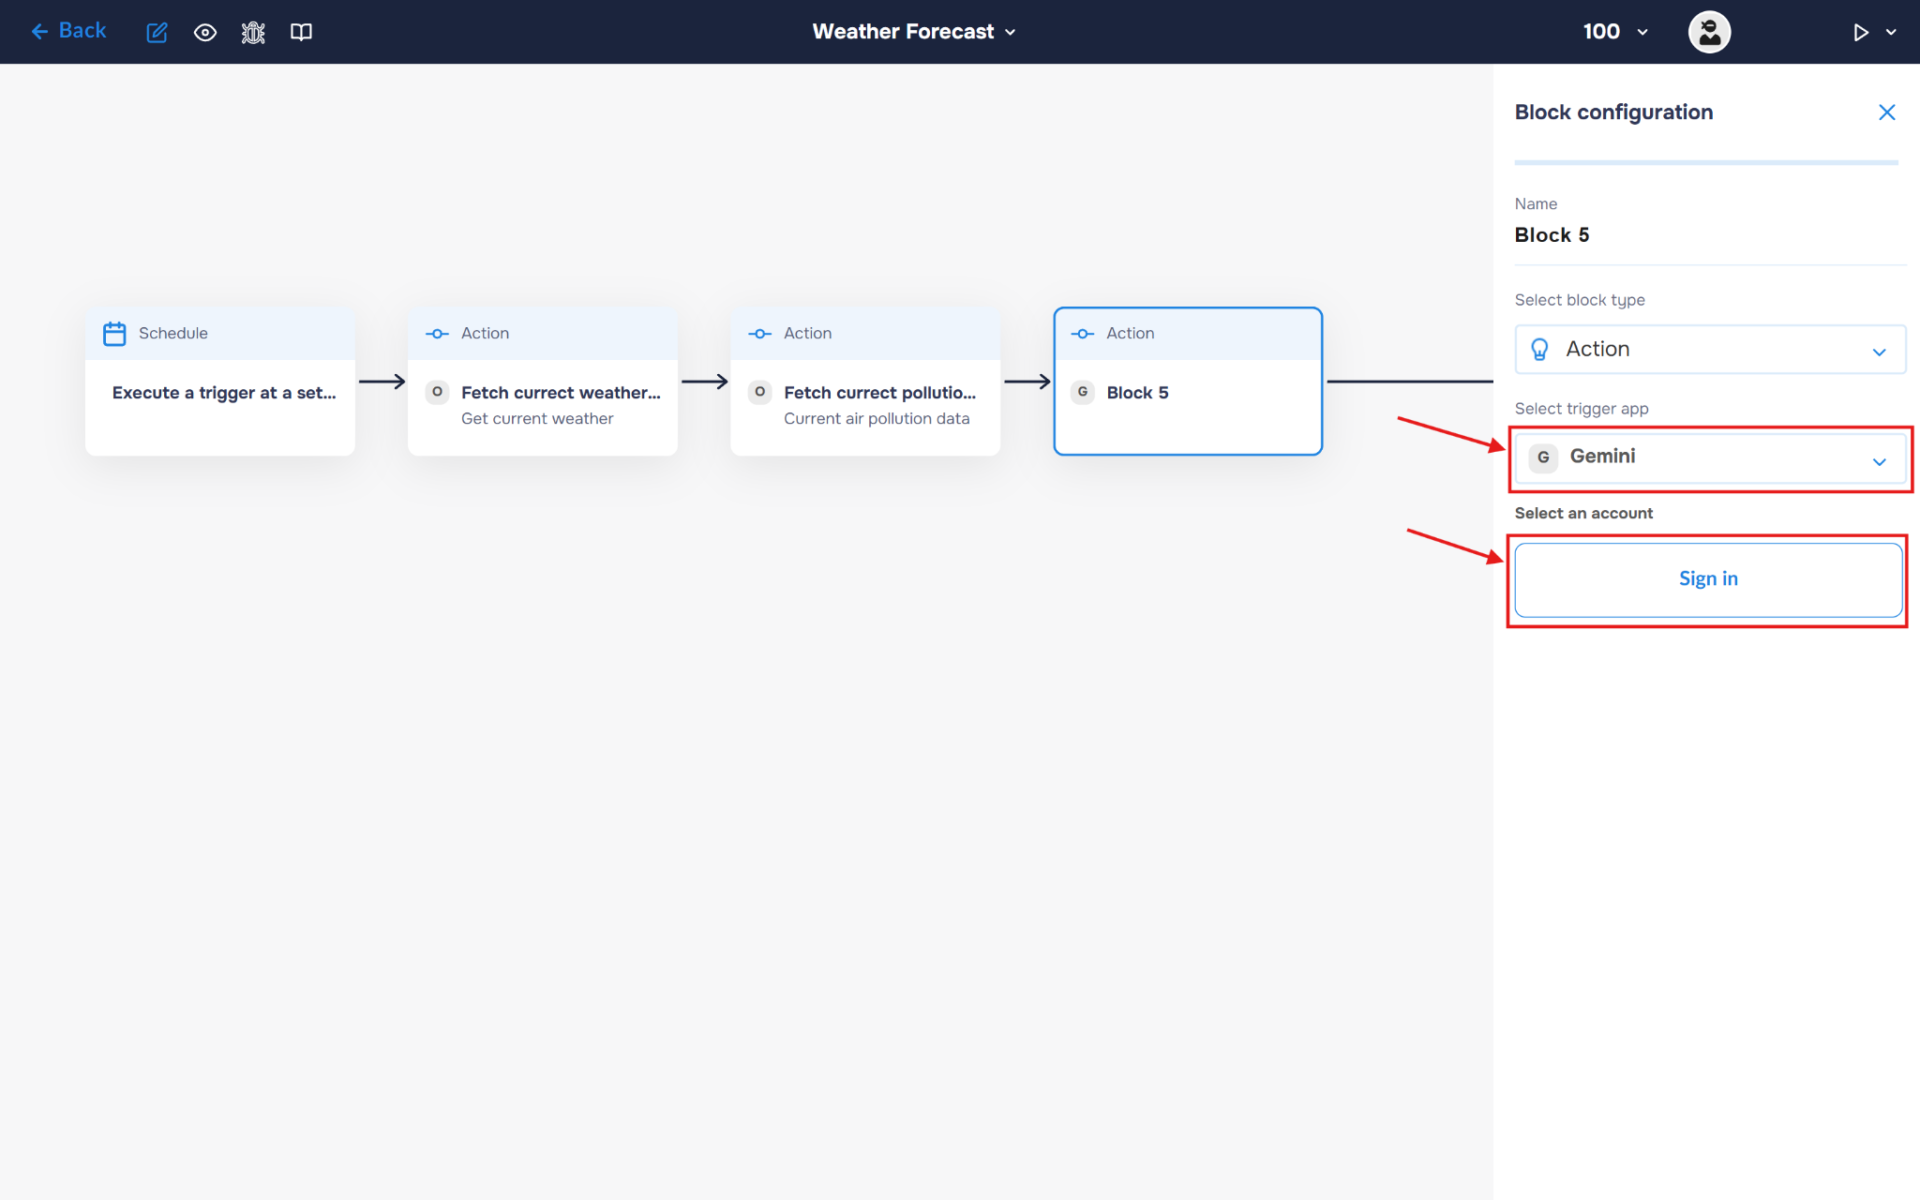
4. To connect to OpenWeatherMap, you need to create an authorisation. Click on the “Sign in“ button in the “Select an account“ section.
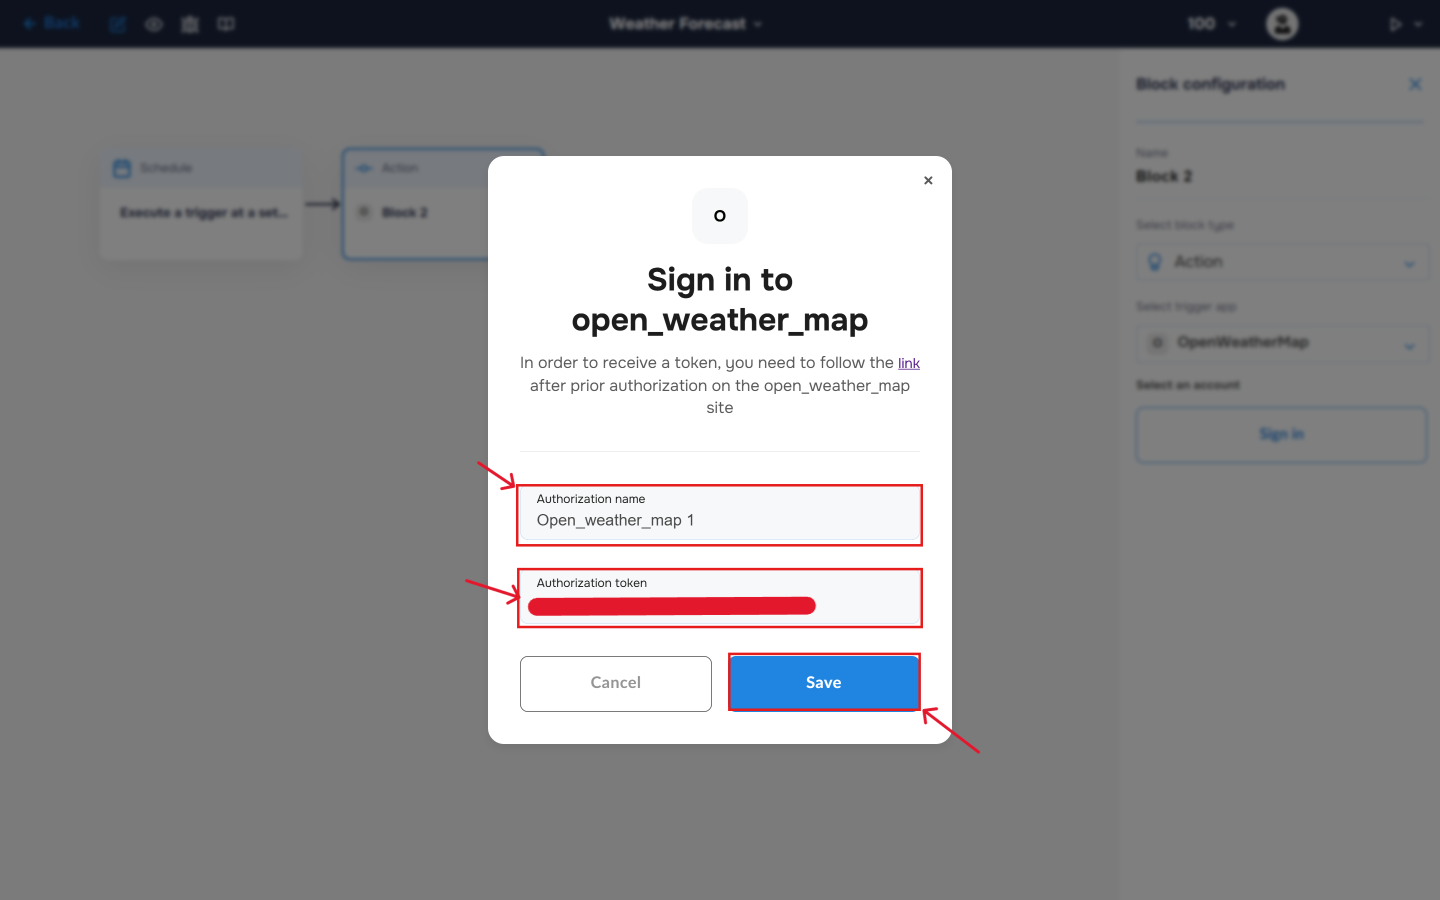
5. After clicking the button, a window for creating a new OpenWeatherMap authorization will open. Enter a name for the authorization, provide the required credentials, and save the connection.
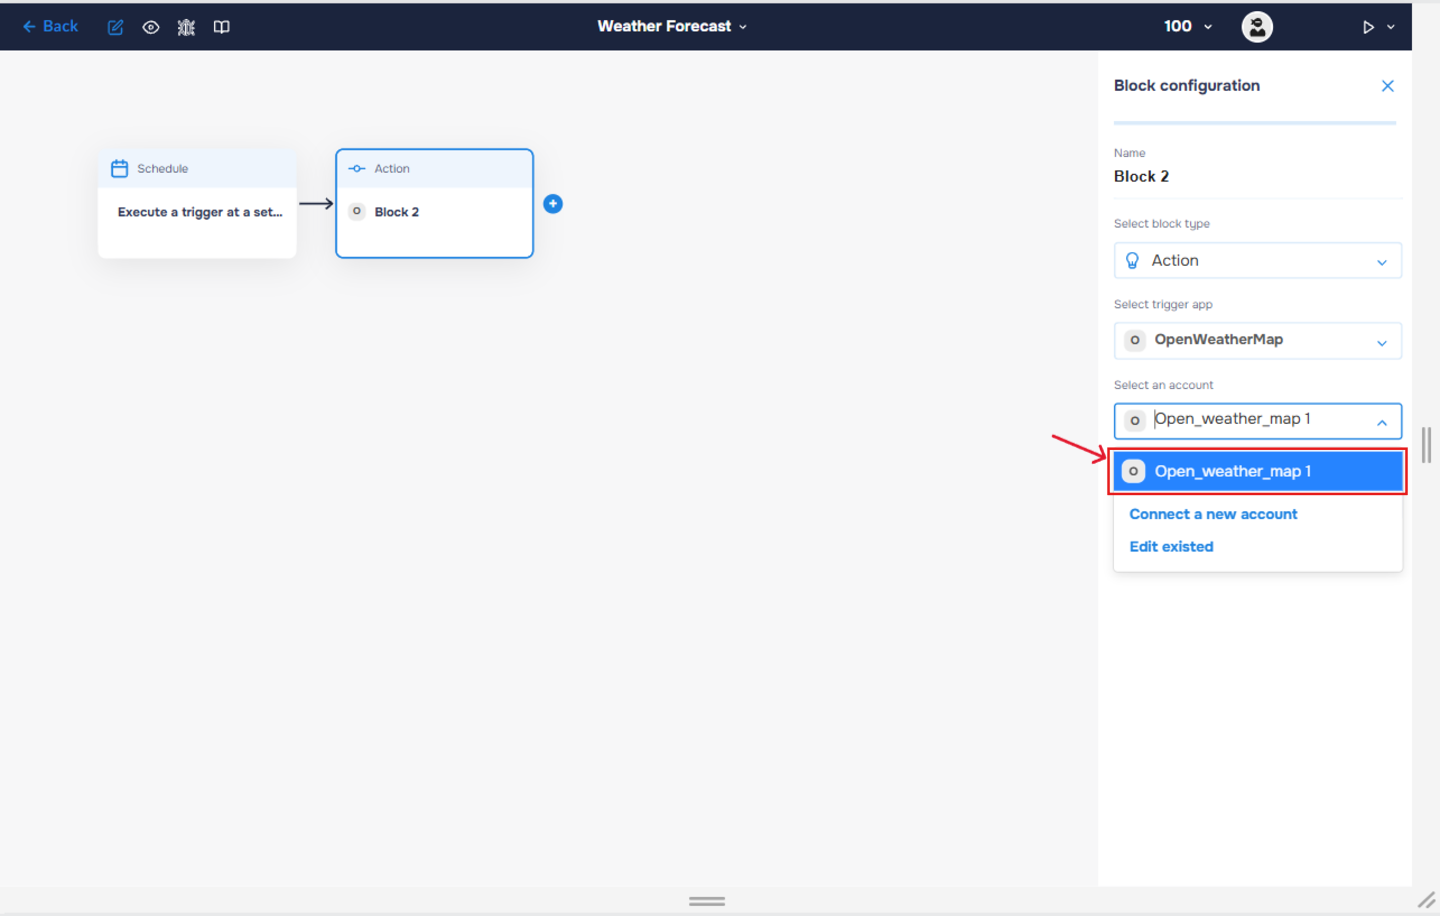
6. If the authorization is successful, the created authorization will appear in the “Select an account” field. You need to select this authorization to configure the next steps of the block.
When expanding this field, you have the opportunity to delete created authorisations using the “Edit existed” button or connect new accounts.
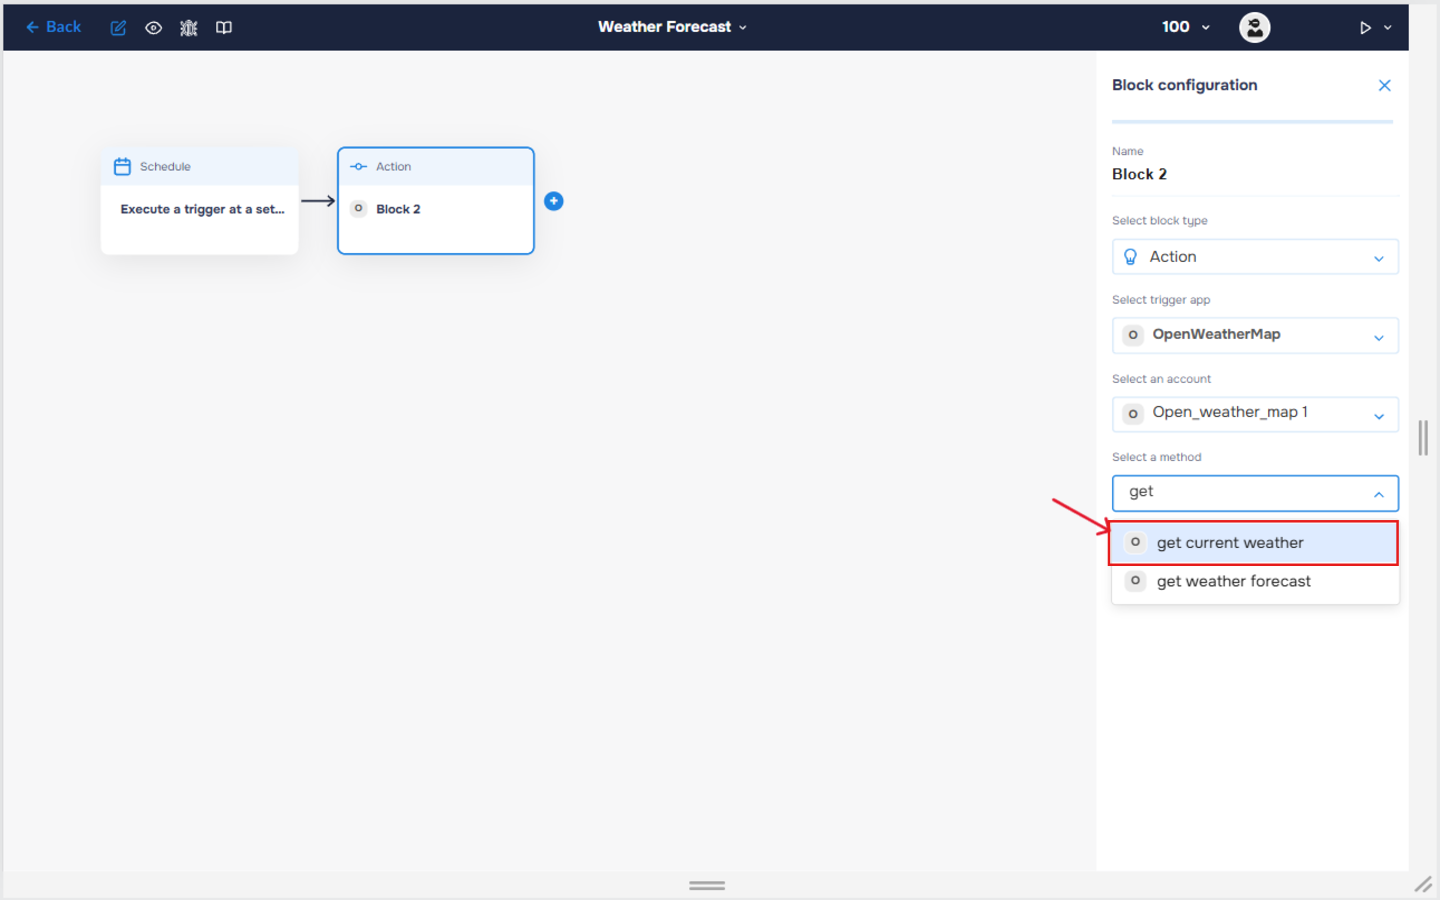
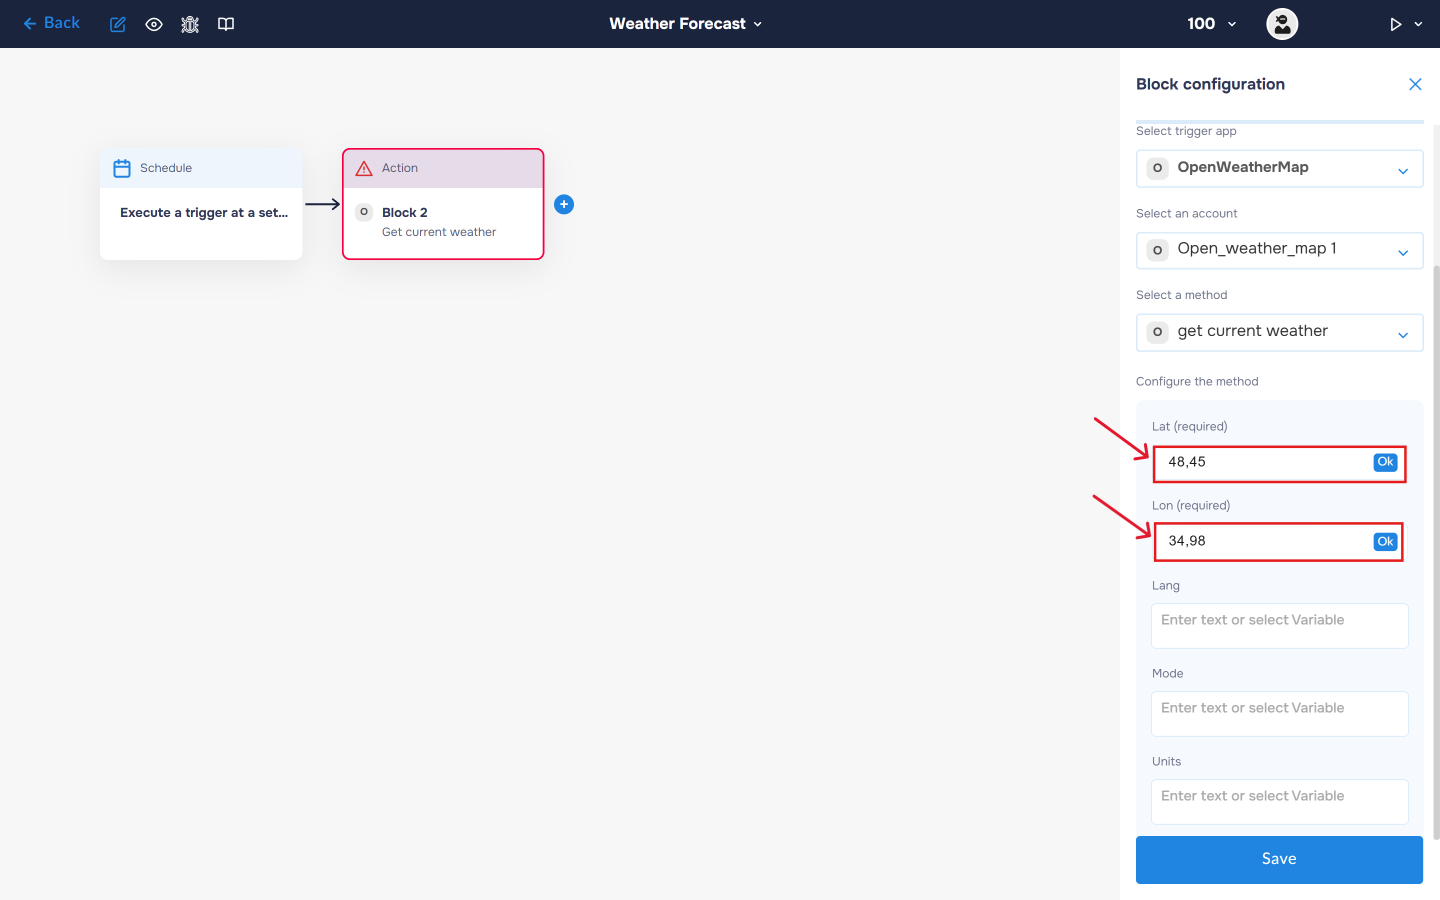
7. The next step is to select a method, so click on the “Select a method“. Find and select the “get current weather” method.
The method is designed to retrieve current weather information for a specified location. It returns data such as temperature, pressure, humidity, wind speed, sunrise and sunset times, and other weather-related details.
8. Next, populate the latitude and longitude fields to specify the location for which the weather data should be retrieved. These coordinates determine the geographical area used by the service when returning current weather conditions and related meteorological information.
Step 3. Add integration with the OpenWeatherMap. Air pollution
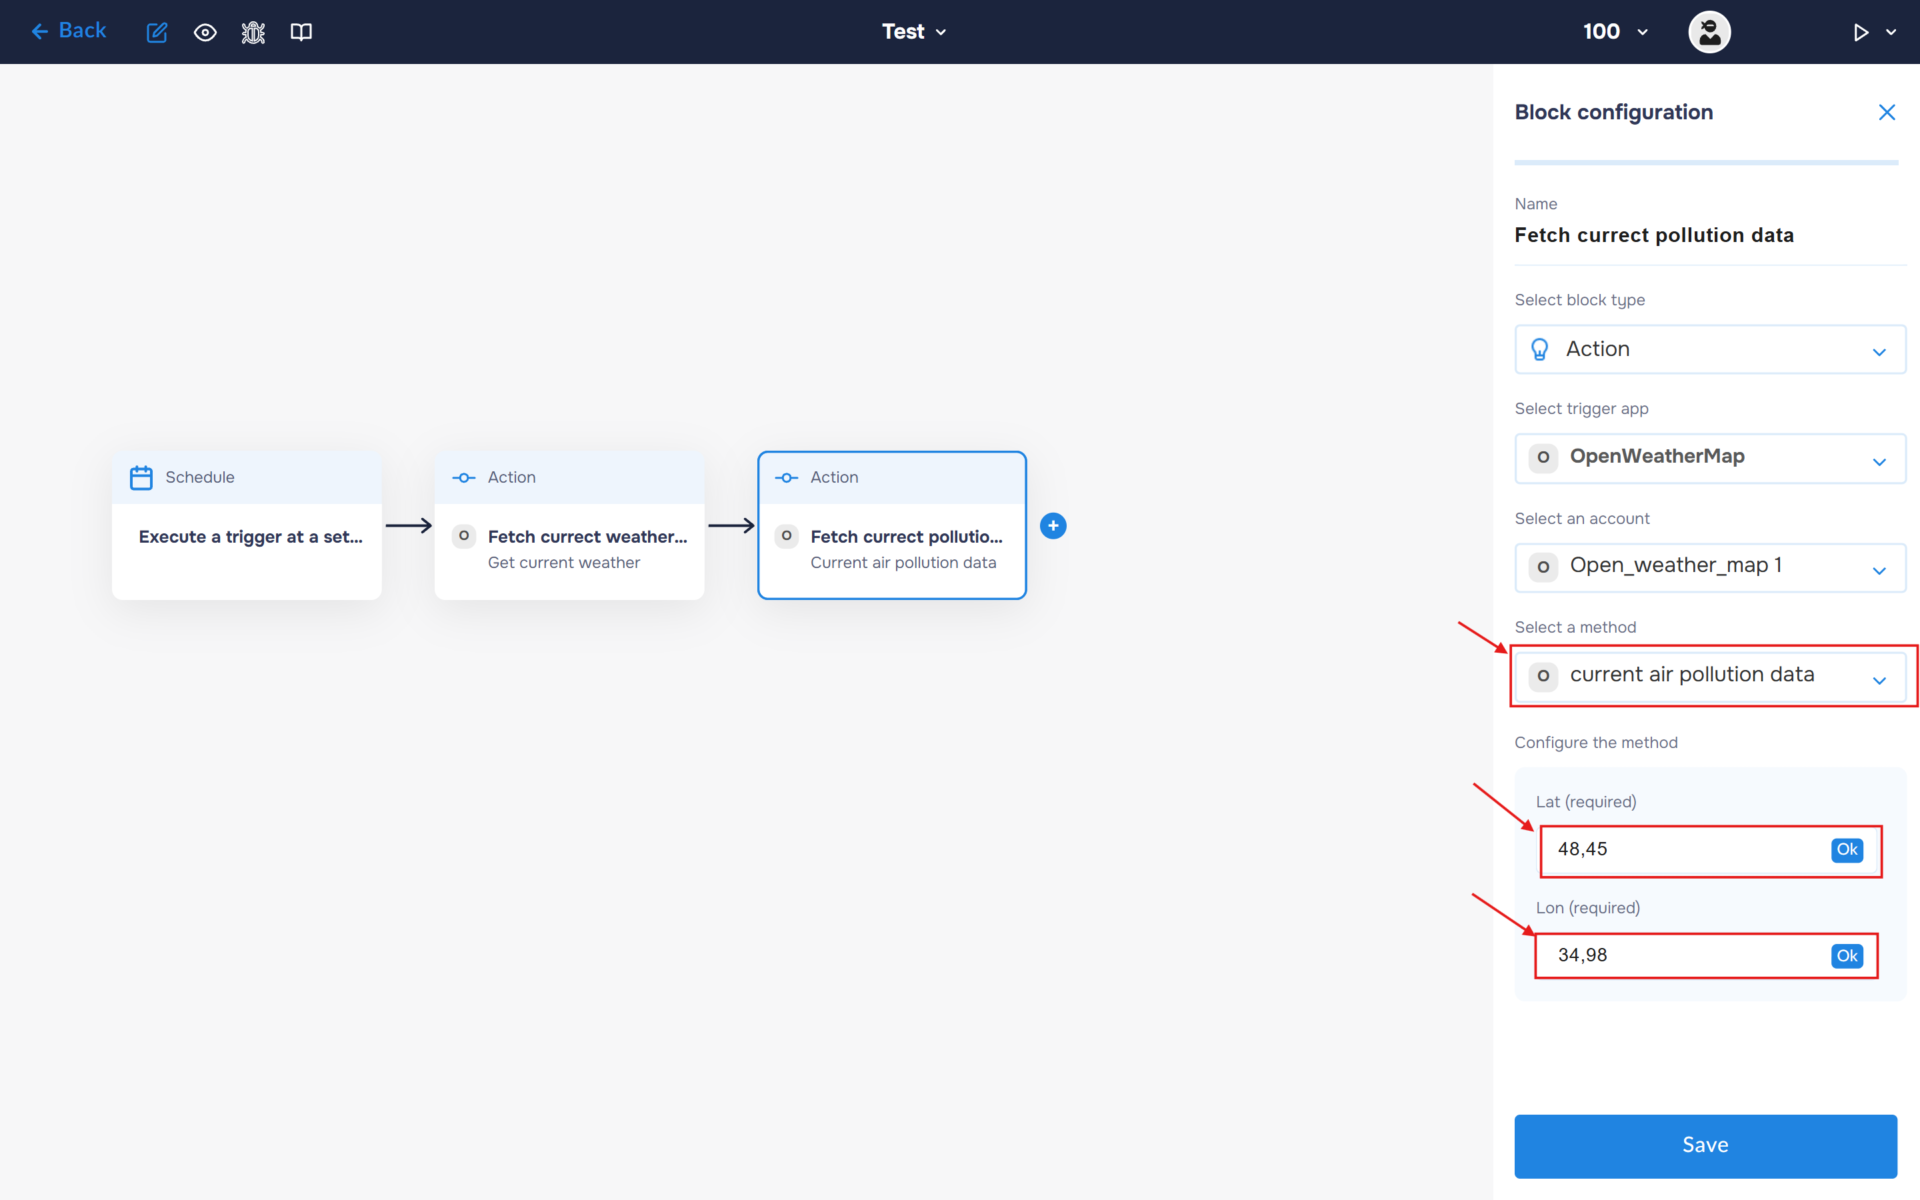
1. In a similar way, retrieve air pollution data. Add another block and sign in to your OpenWeatherMap account. Then select the “get current pollution” method and fill in the latitude and longitude fields to specify the location for which the air quality data should be retrieved.
2. Now let’s process the collected data using AI. In this guide, we will use Gemini as an example – create an account and sign in.
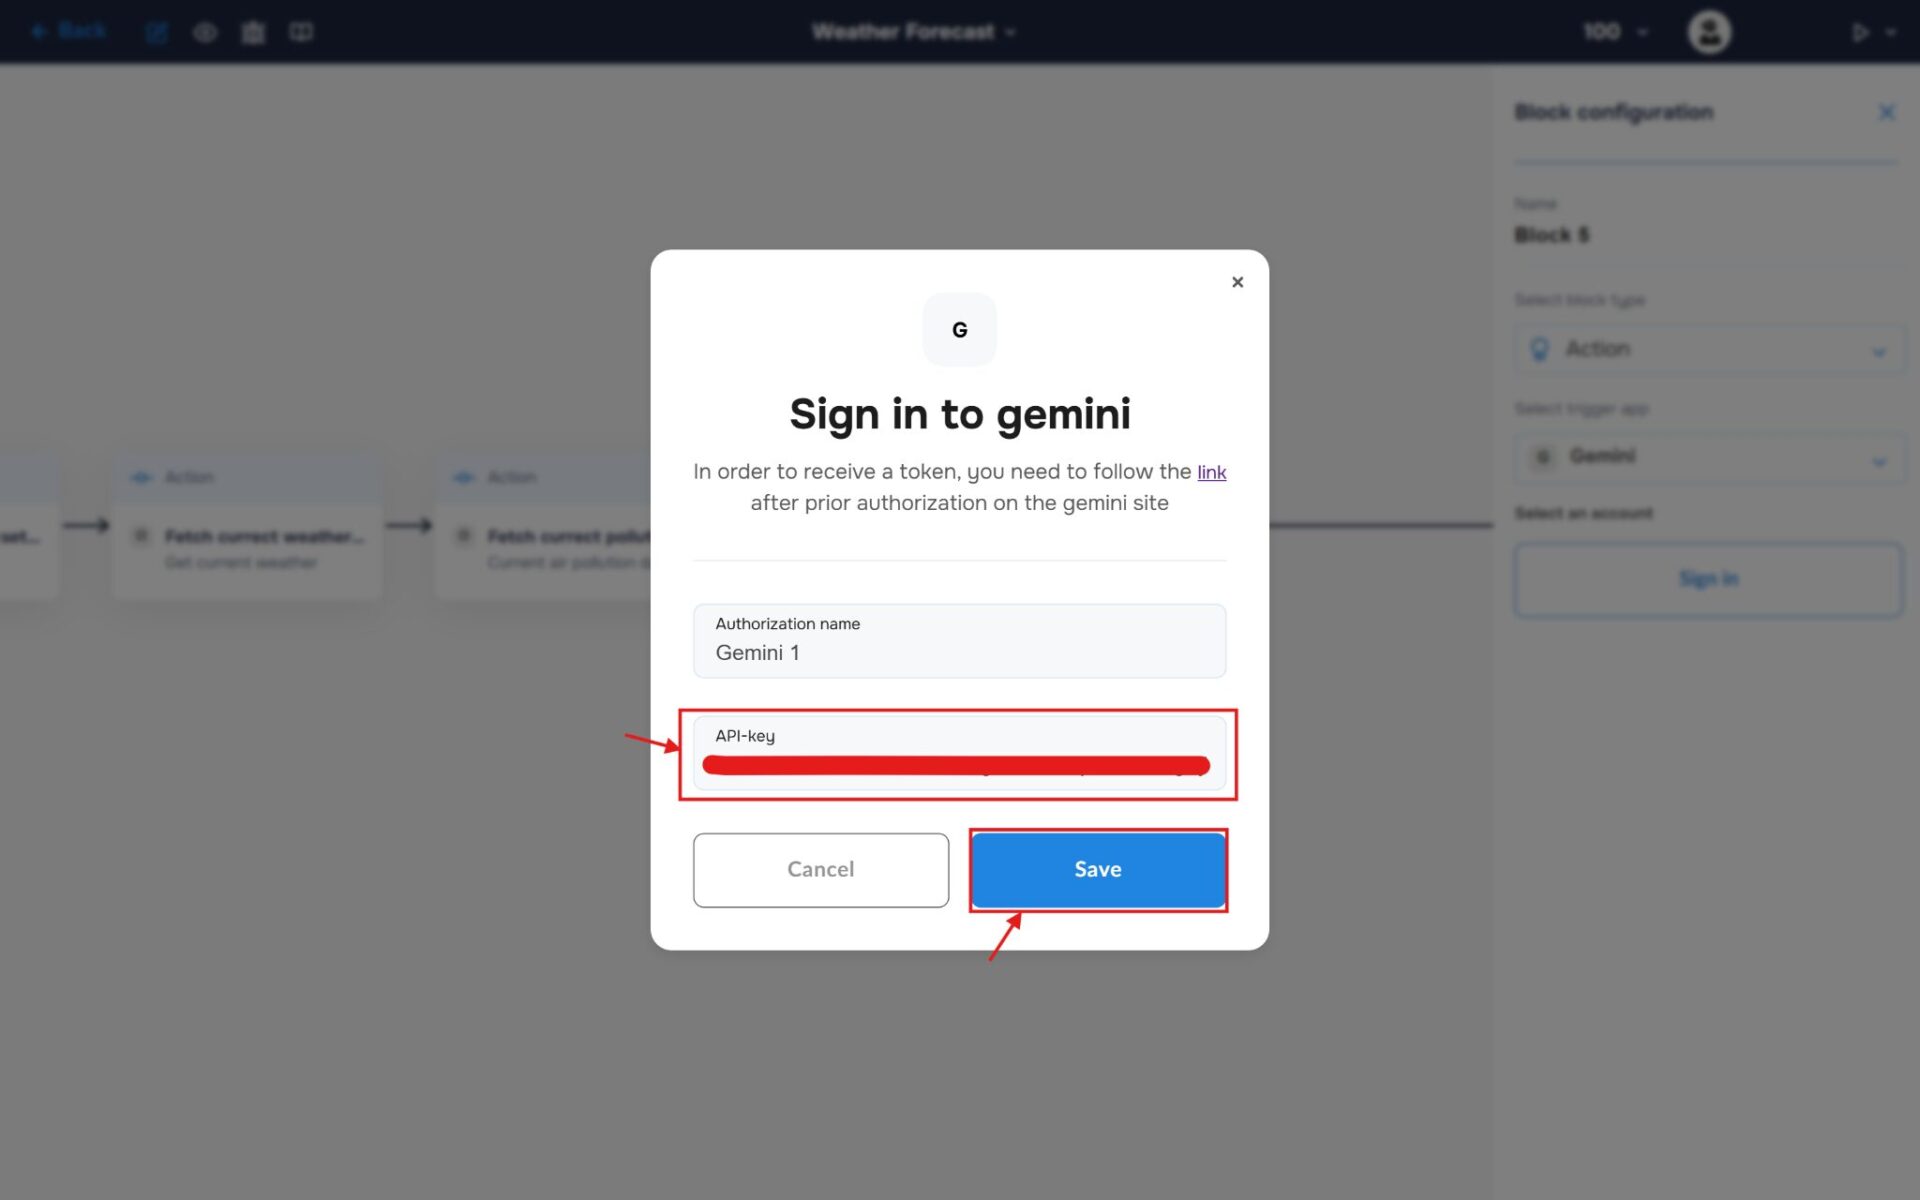
3. In the pop-up, fill in the name field and the API-key that was generated in the Gemini account. To connect, click the “Save“ button.
4. In the Method field, select “Generating Content”. Next, specify the model name in the corresponding field (e.g., gemini-3-flash-preview).
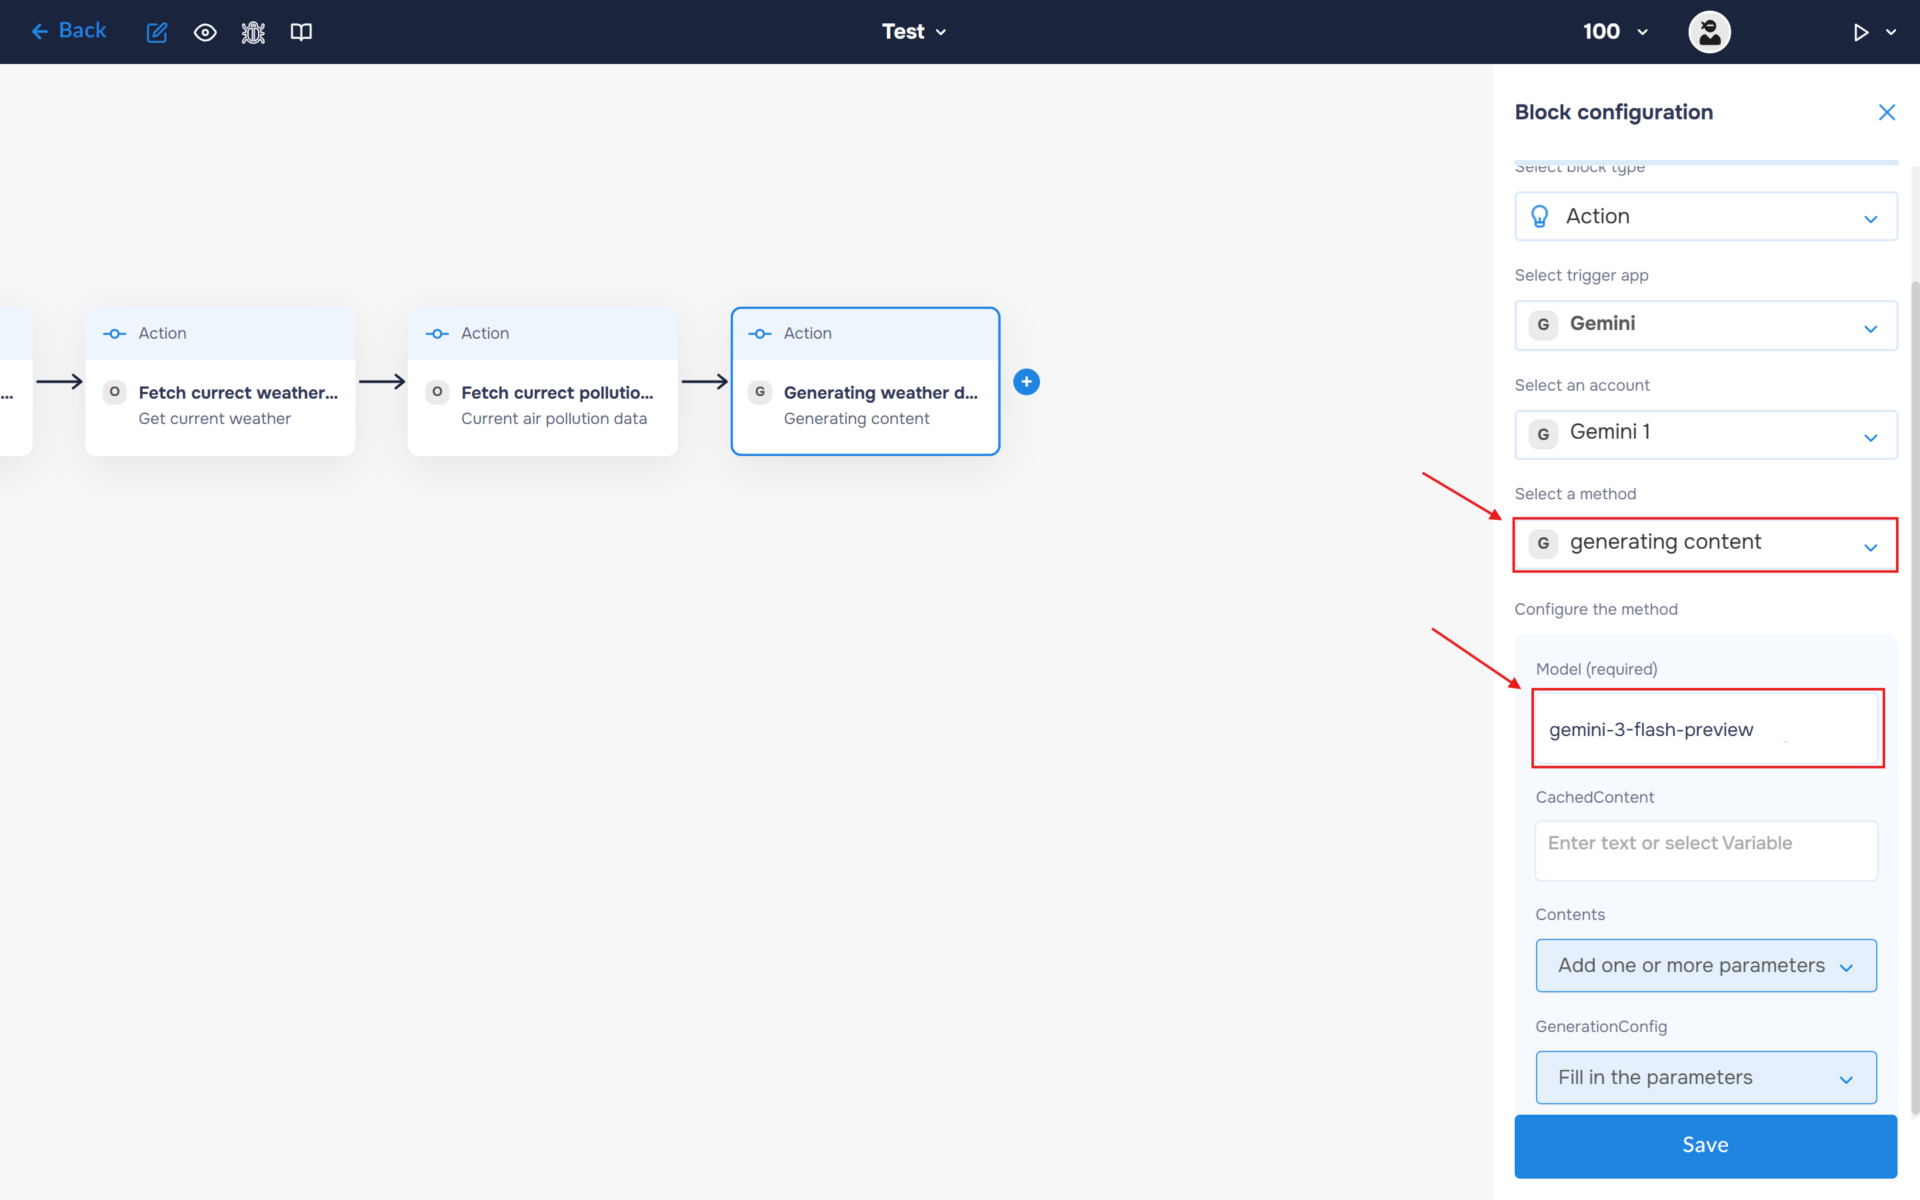
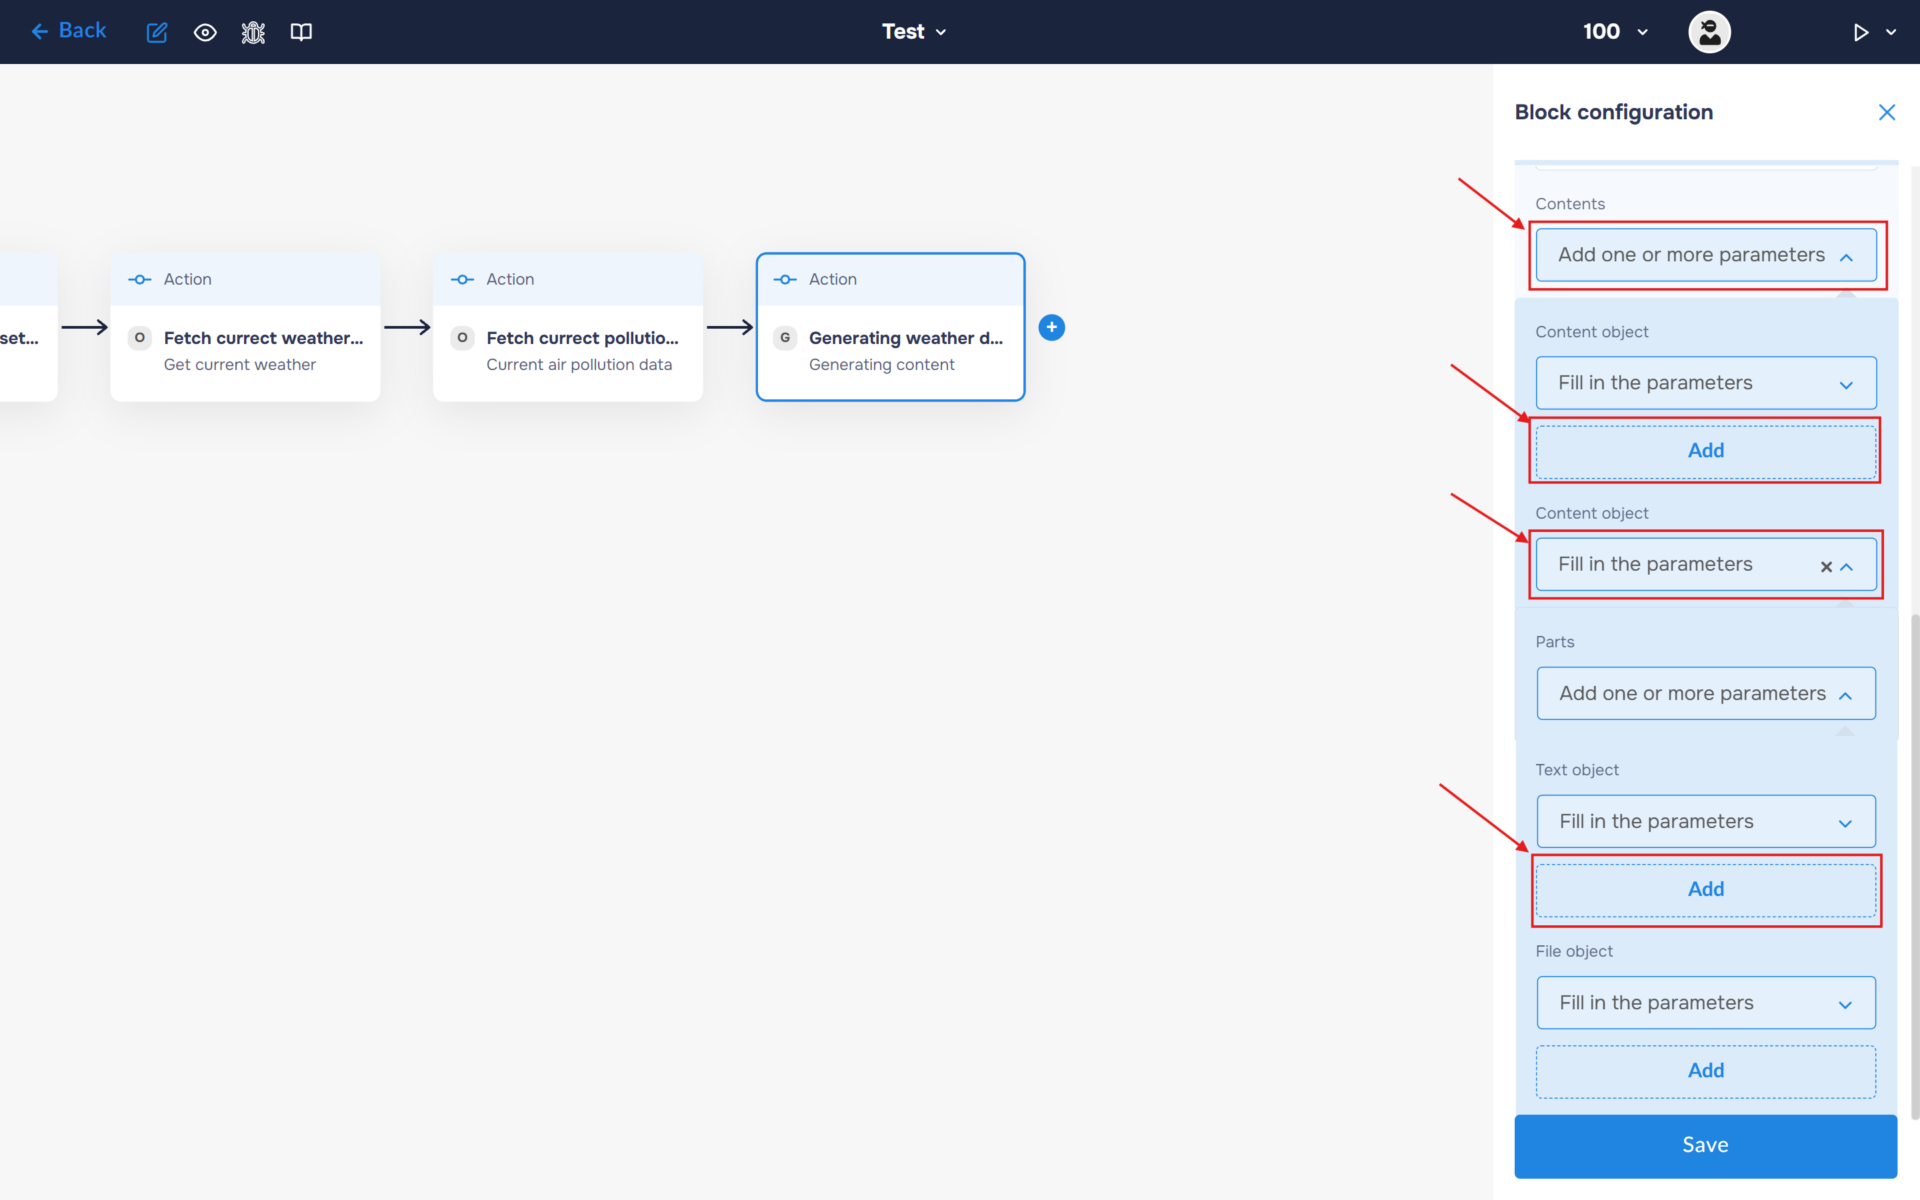
5. In the Content section, select “Add one or more parameters”. Add a Content object and expand it. Then expand Parts and add a Text object. This is where you will enter the prompt that will be sent to the AI model for processing.
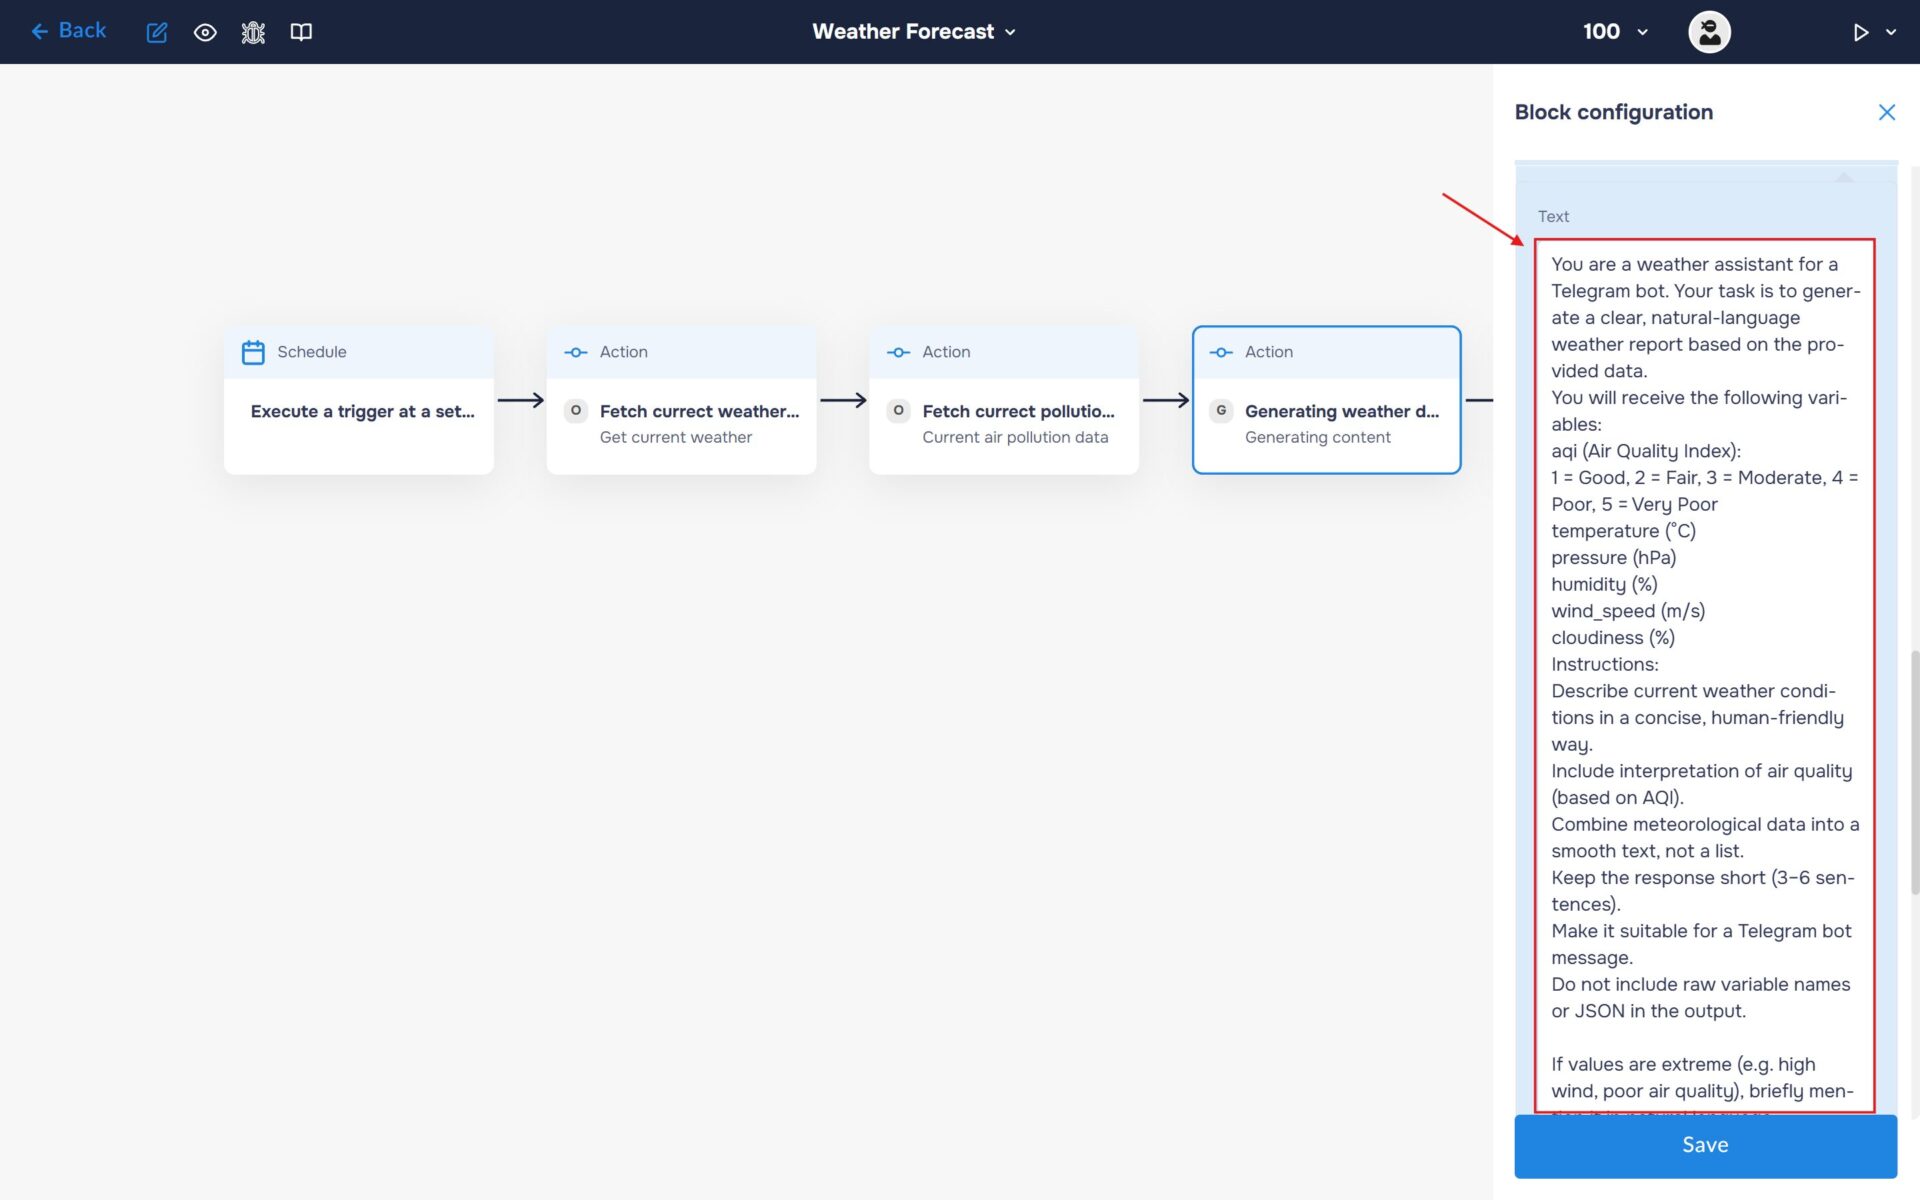
6. Fill the Text field with your prompt. Insert the weather-related variables into the prompt, such as wind speed, temperature, atmospheric pressure, humidity, cloudiness percentage, AQI, and any other weather parameters retrieved from OpenWeatherMap. These variables will be passed to the AI model and used to generate a weather summary based on the current conditions.
🔧 Default Prompt: You are a weather assistant for a Telegram bot. Your task is to generate a clear, natural-language weather report based on the provided data.
You will receive the following variables:
aqi (Air Quality Index): 1 = Good, 2 = Fair, 3 = Moderate, 4 = Poor, 5 = Very Poor
temperature (°C)
pressure (hPa)
humidity (%)
wind_speed (m/s)
cloudiness (%)
Instructions:
Describe current weather conditions in a concise, human-friendly way. Include interpretation of air quality (based on AQI).
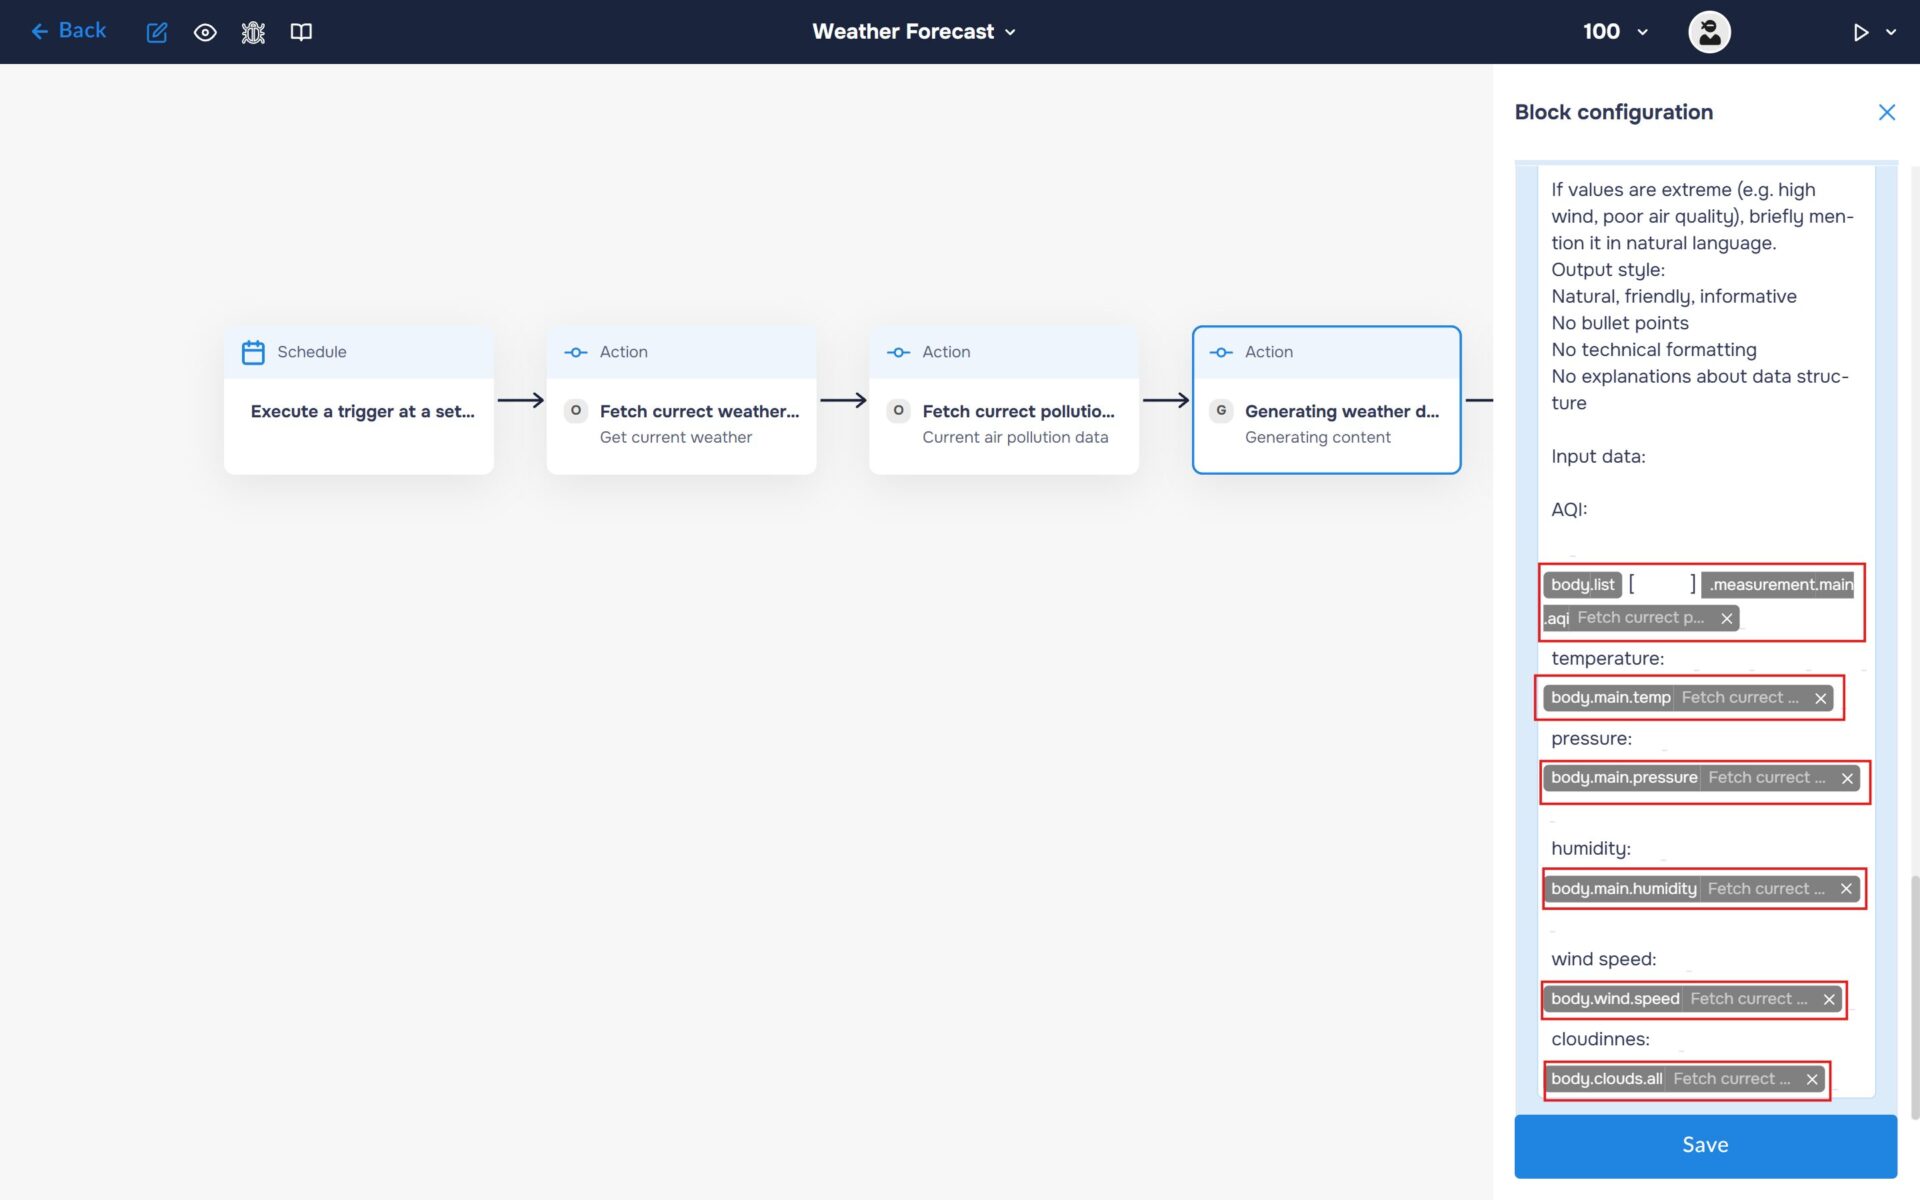
Combine meteorological data into a smooth text, not a list. Keep the response short (3–6 sentences). Make it suitable for a Telegram bot message. Do not include raw variable names or JSON in the output. If values are extreme (e.g. high wind, poor air quality), briefly mention it in natural language.
Output style:
Natural, friendly, informative
No bullet points
No technical formatting
No explanations about data structure
Input data:
*put your variables here*
7. Add the variables containing the data retrieved in the previous steps. These variables will be passed to the AI Agent as input and used to generate the weather summary.
Step 4. Add integration with Google Sheets
1. Add a new block. Select the block type as “Action” and the service as “Google Sheets“. Next, create an authorisation. To do this, click the “Sign in” button.
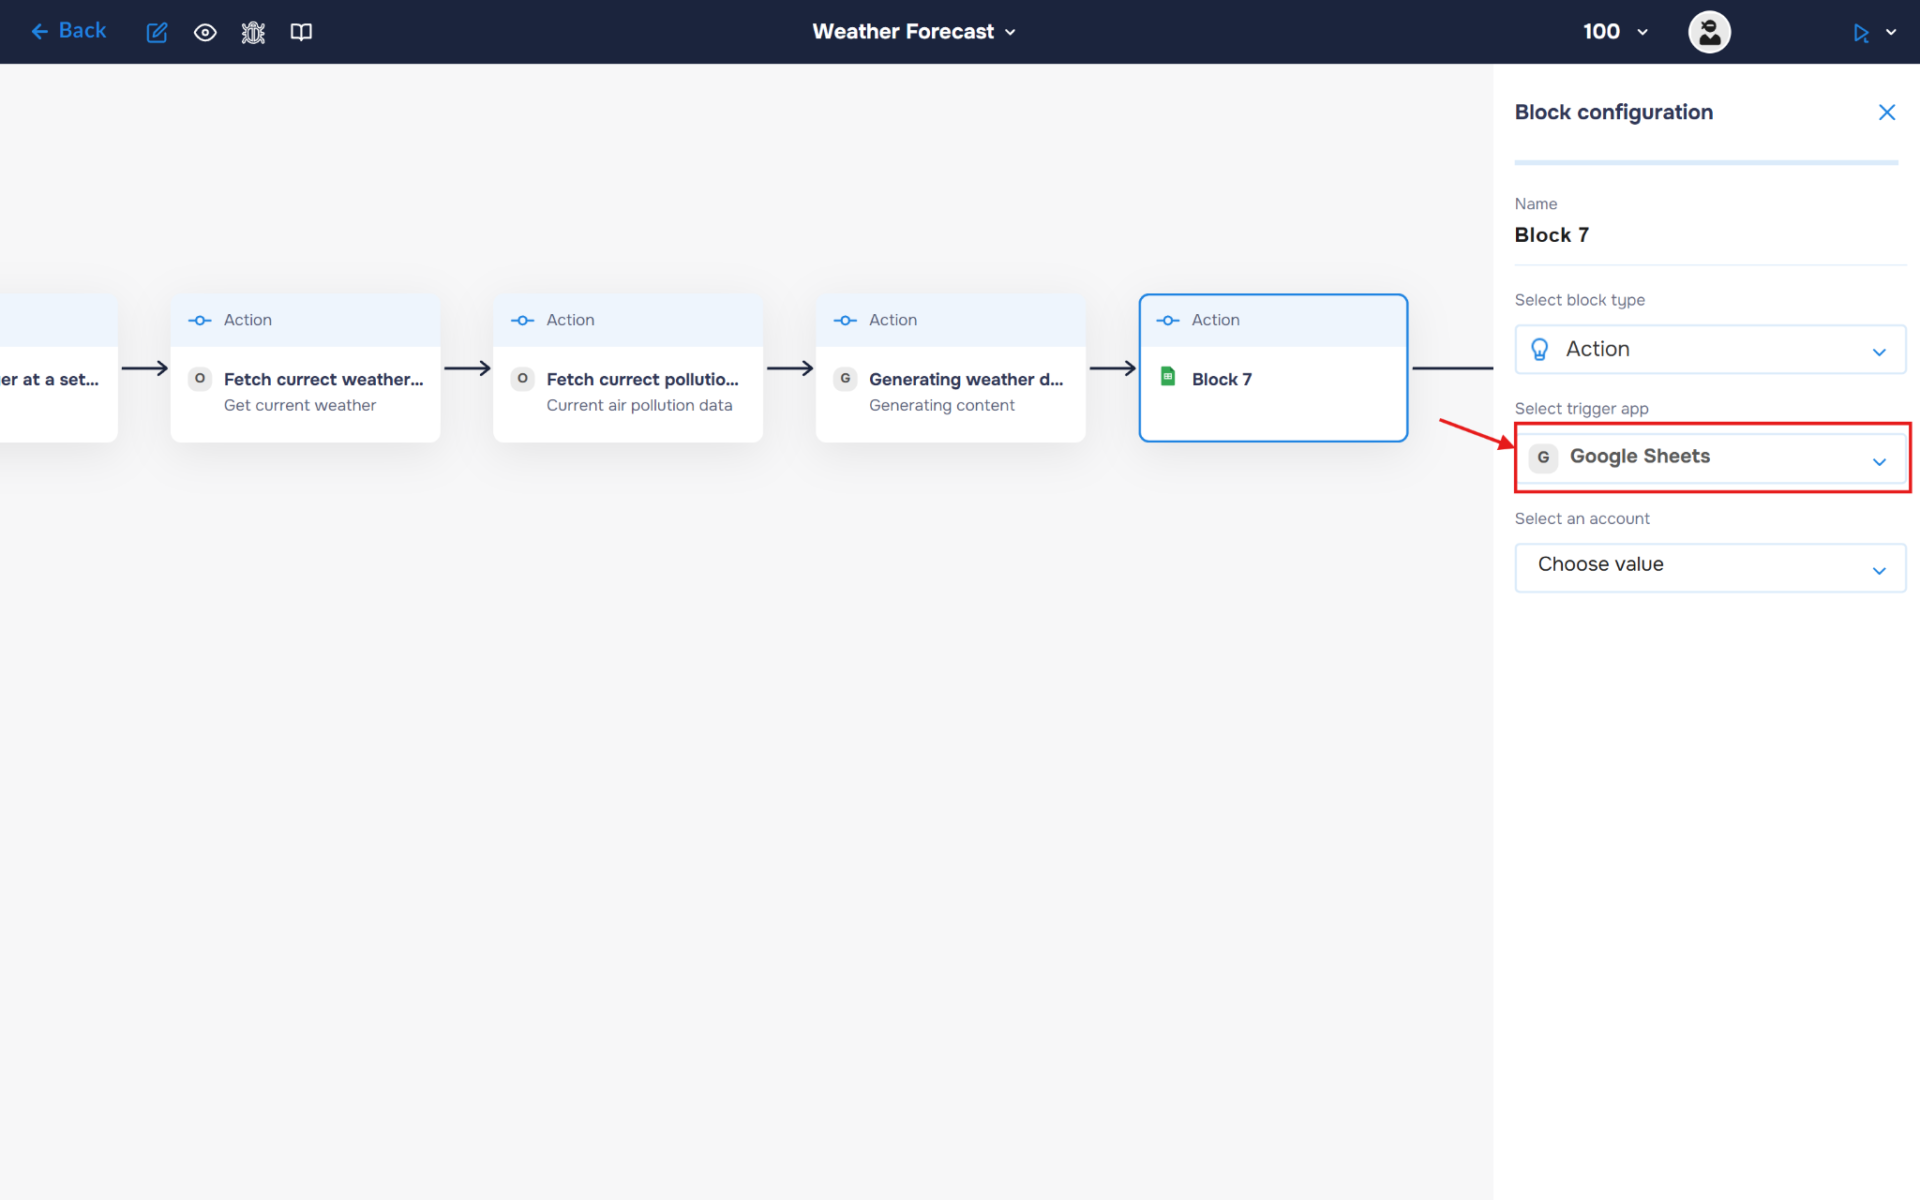
2. Choose an account. Note: choose the account where you created the table at the beginning of the guide.

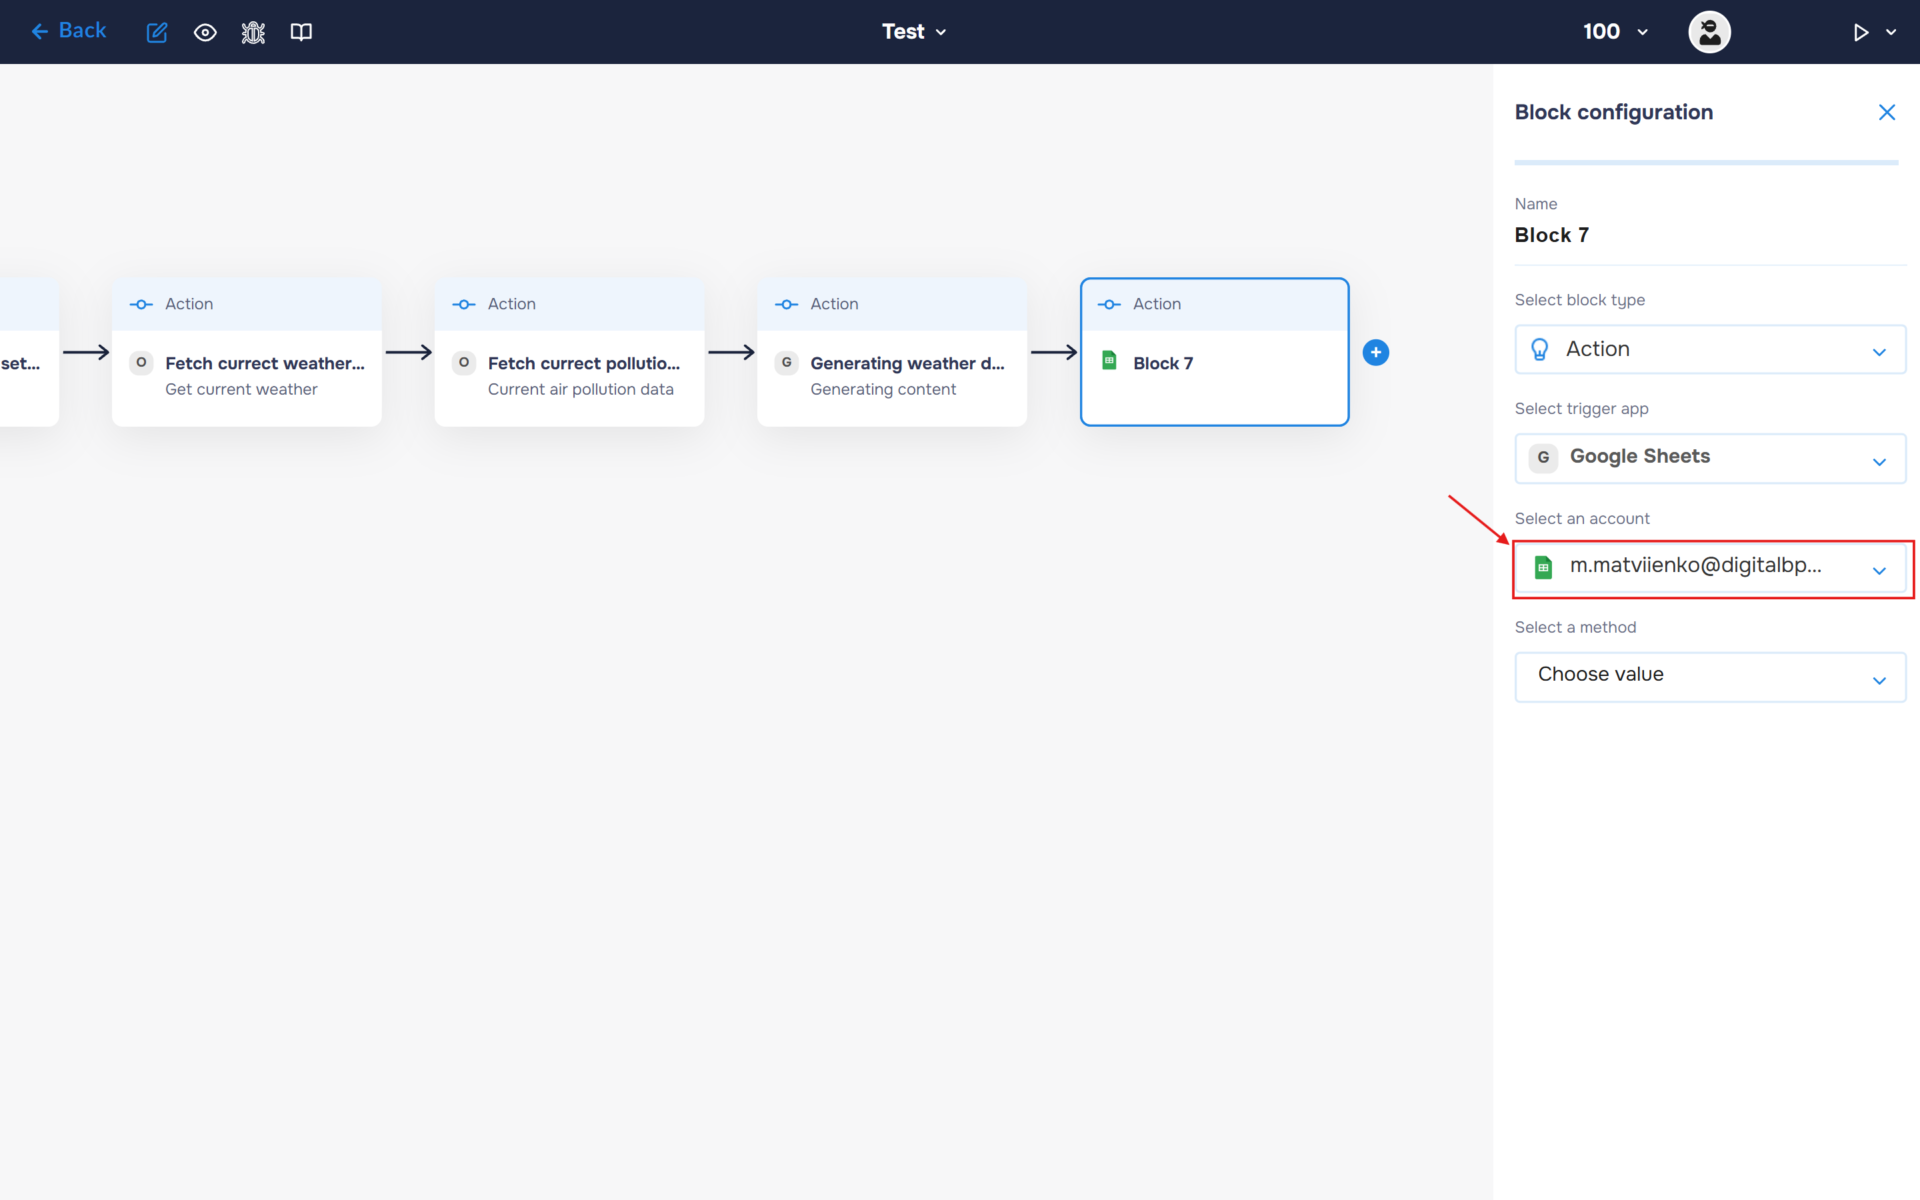
3. After choosing an account, you need to go through all the steps to connect your account to the DigitalBPM service.

4. If the authorization is successful, the created authorization will appear in the “Select an account” field. You need to select this authorization to configure the next steps of the block.
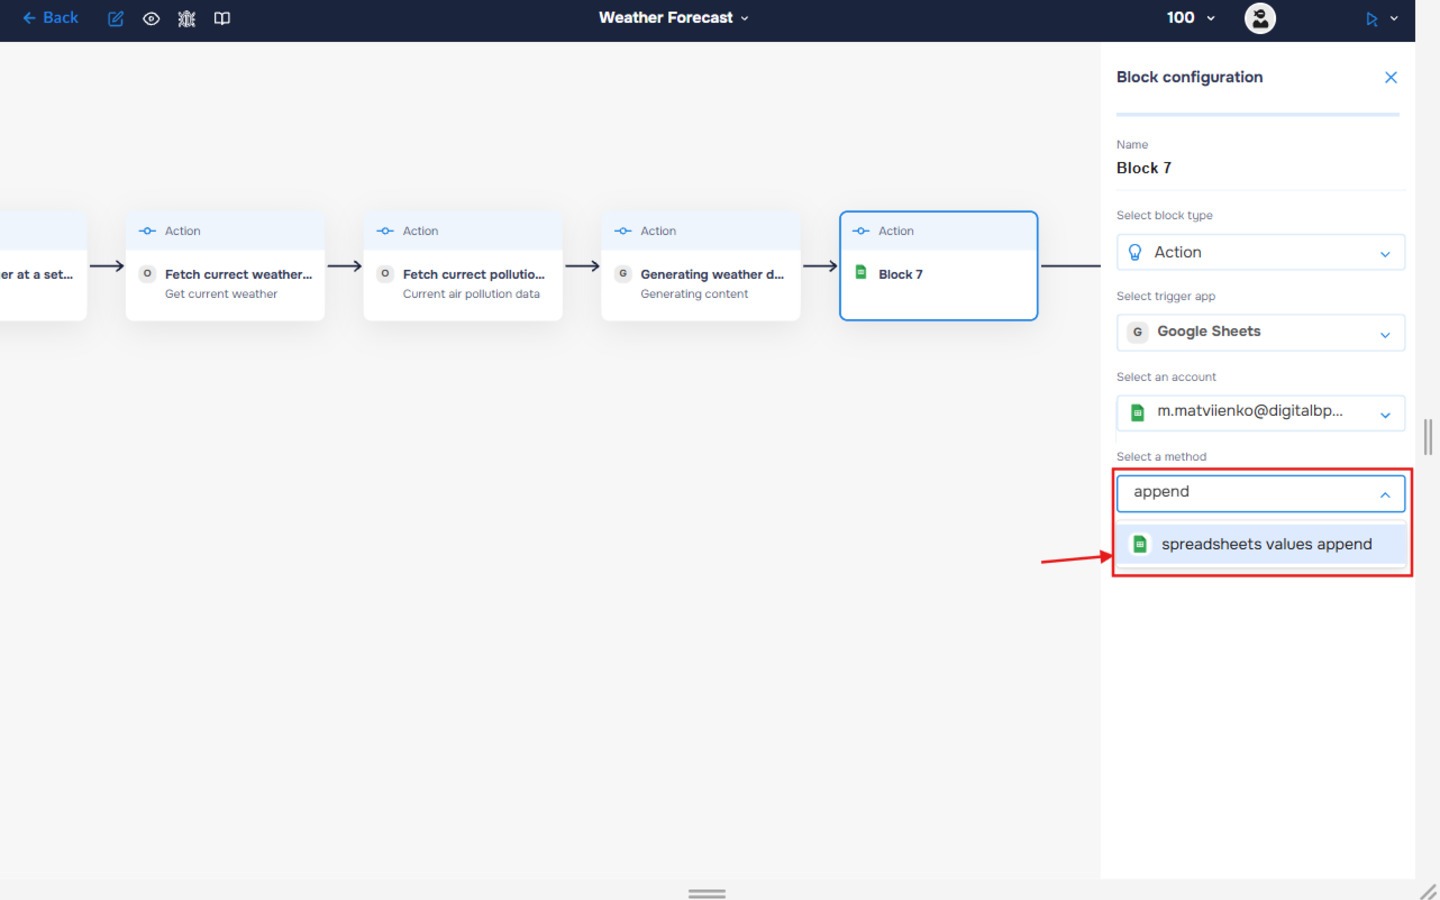
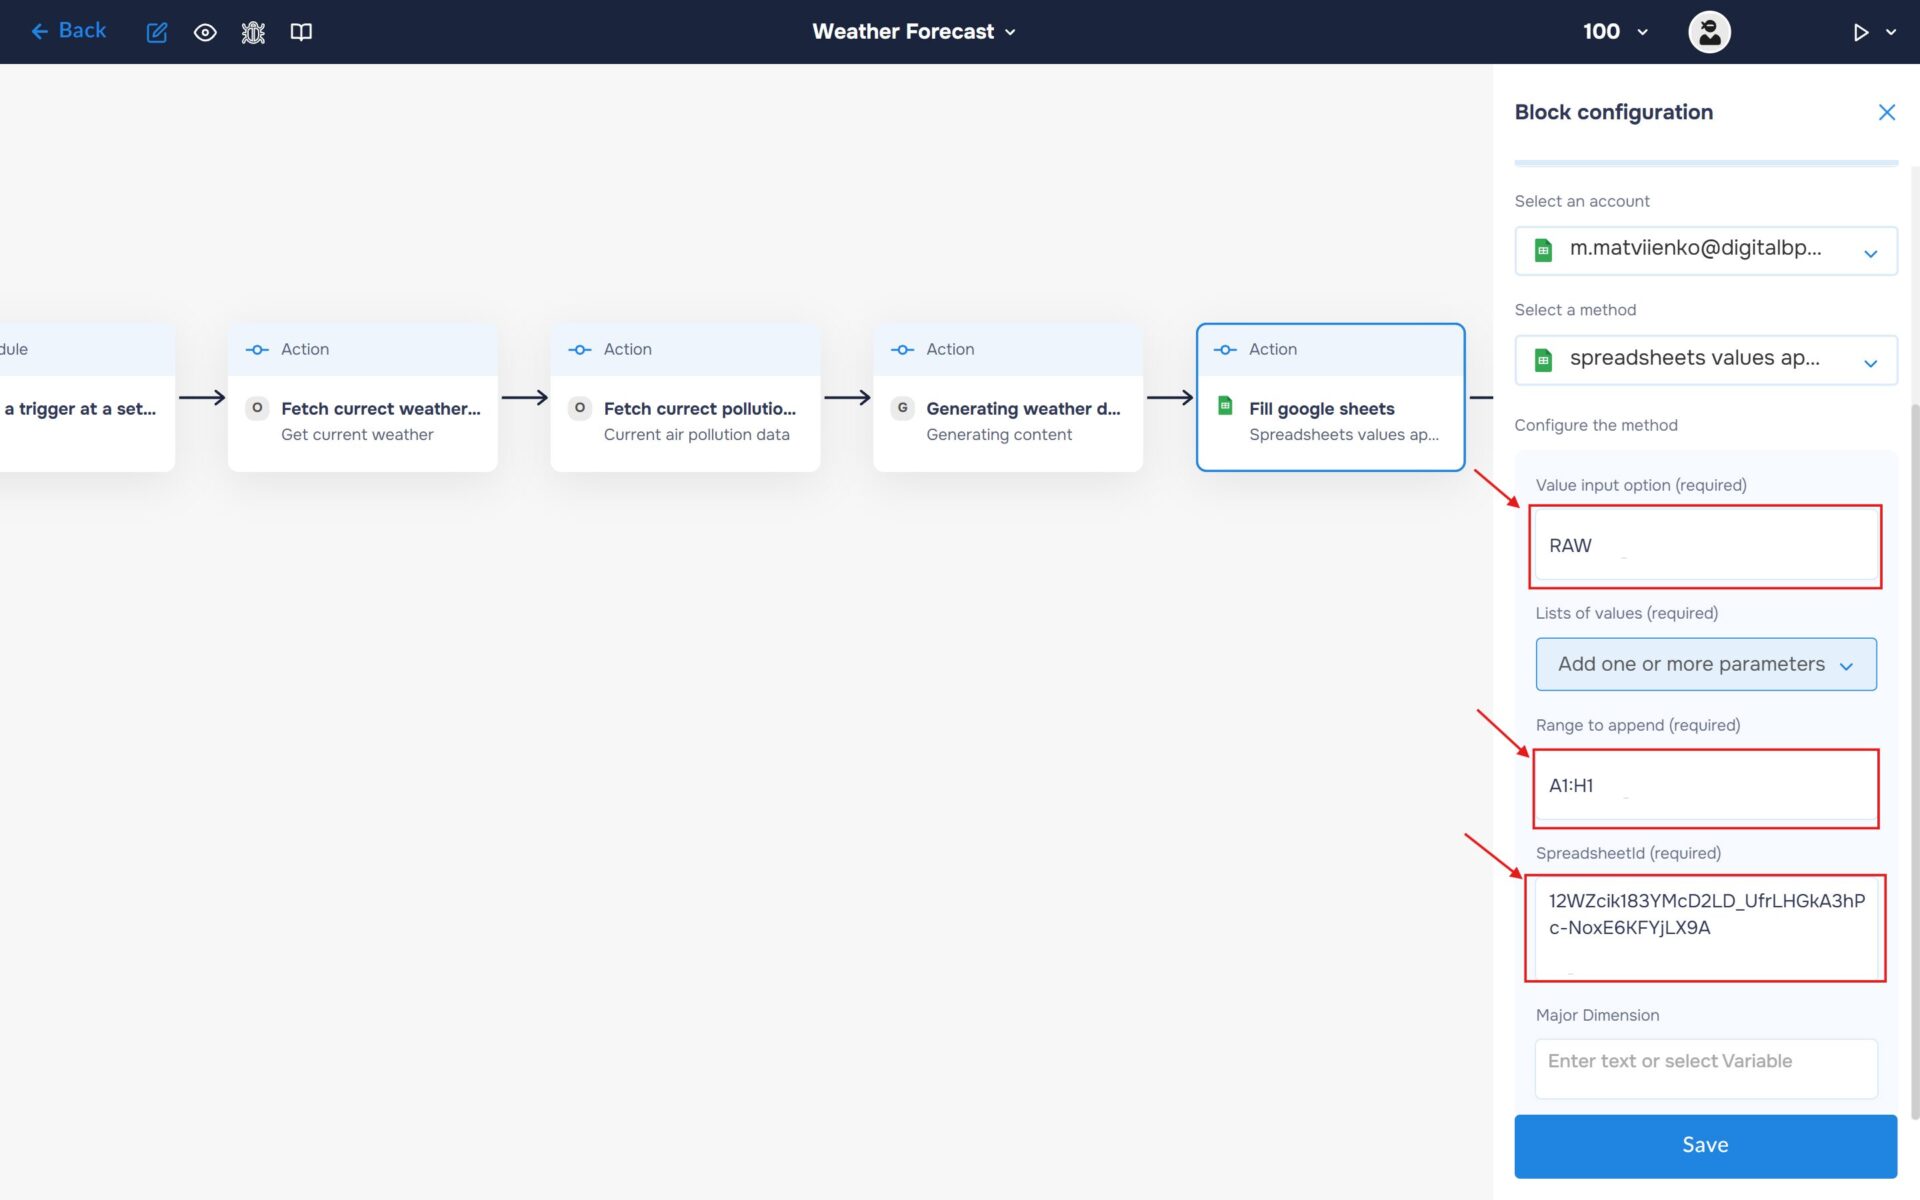
5. Find and select the “spreadsheets values append” method. Use this method to add new rows of data to the spreadsheet. You will use it to populate the table with weather information retrieved from the OpenWeatherMap service.
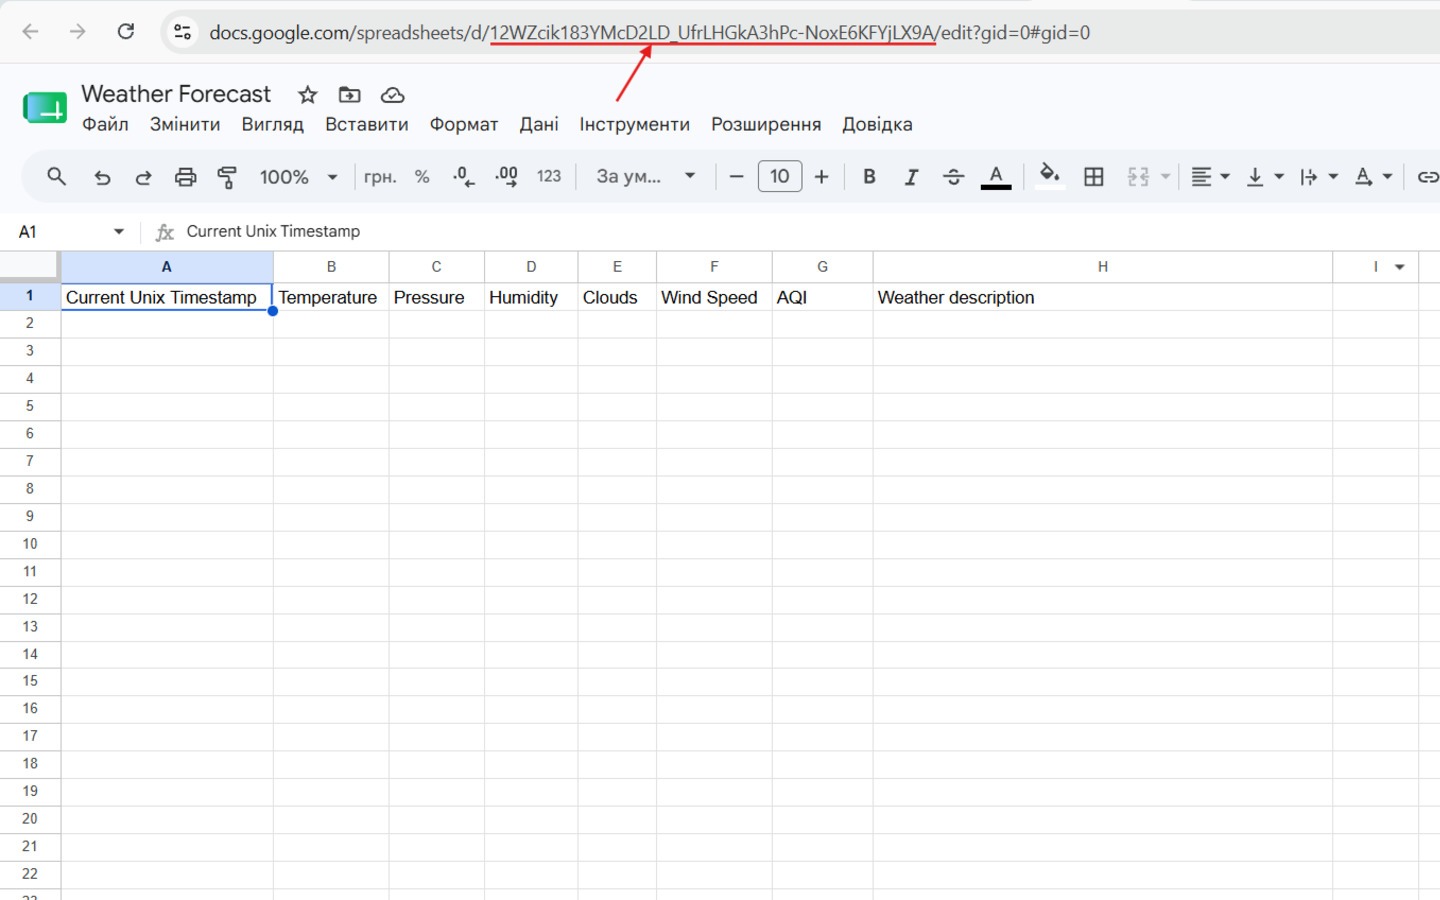
6. Go to the table and copy the table ID located in the link.
7. Fill in the required fields for the selected method. In the “Value input option” field, enter the value “RAW” – Select RAW if you want to write plain data, or USER_ENTERED if you want Google Sheets to parse strings into dates and numbers automatically;
in the “Range to append” field, enter the range of the table headers or the first row where the first data will be placed;
and enter the spreadsheet identifier in the “Spreadsheet ID” field. Don’t forget to save the block configuration.
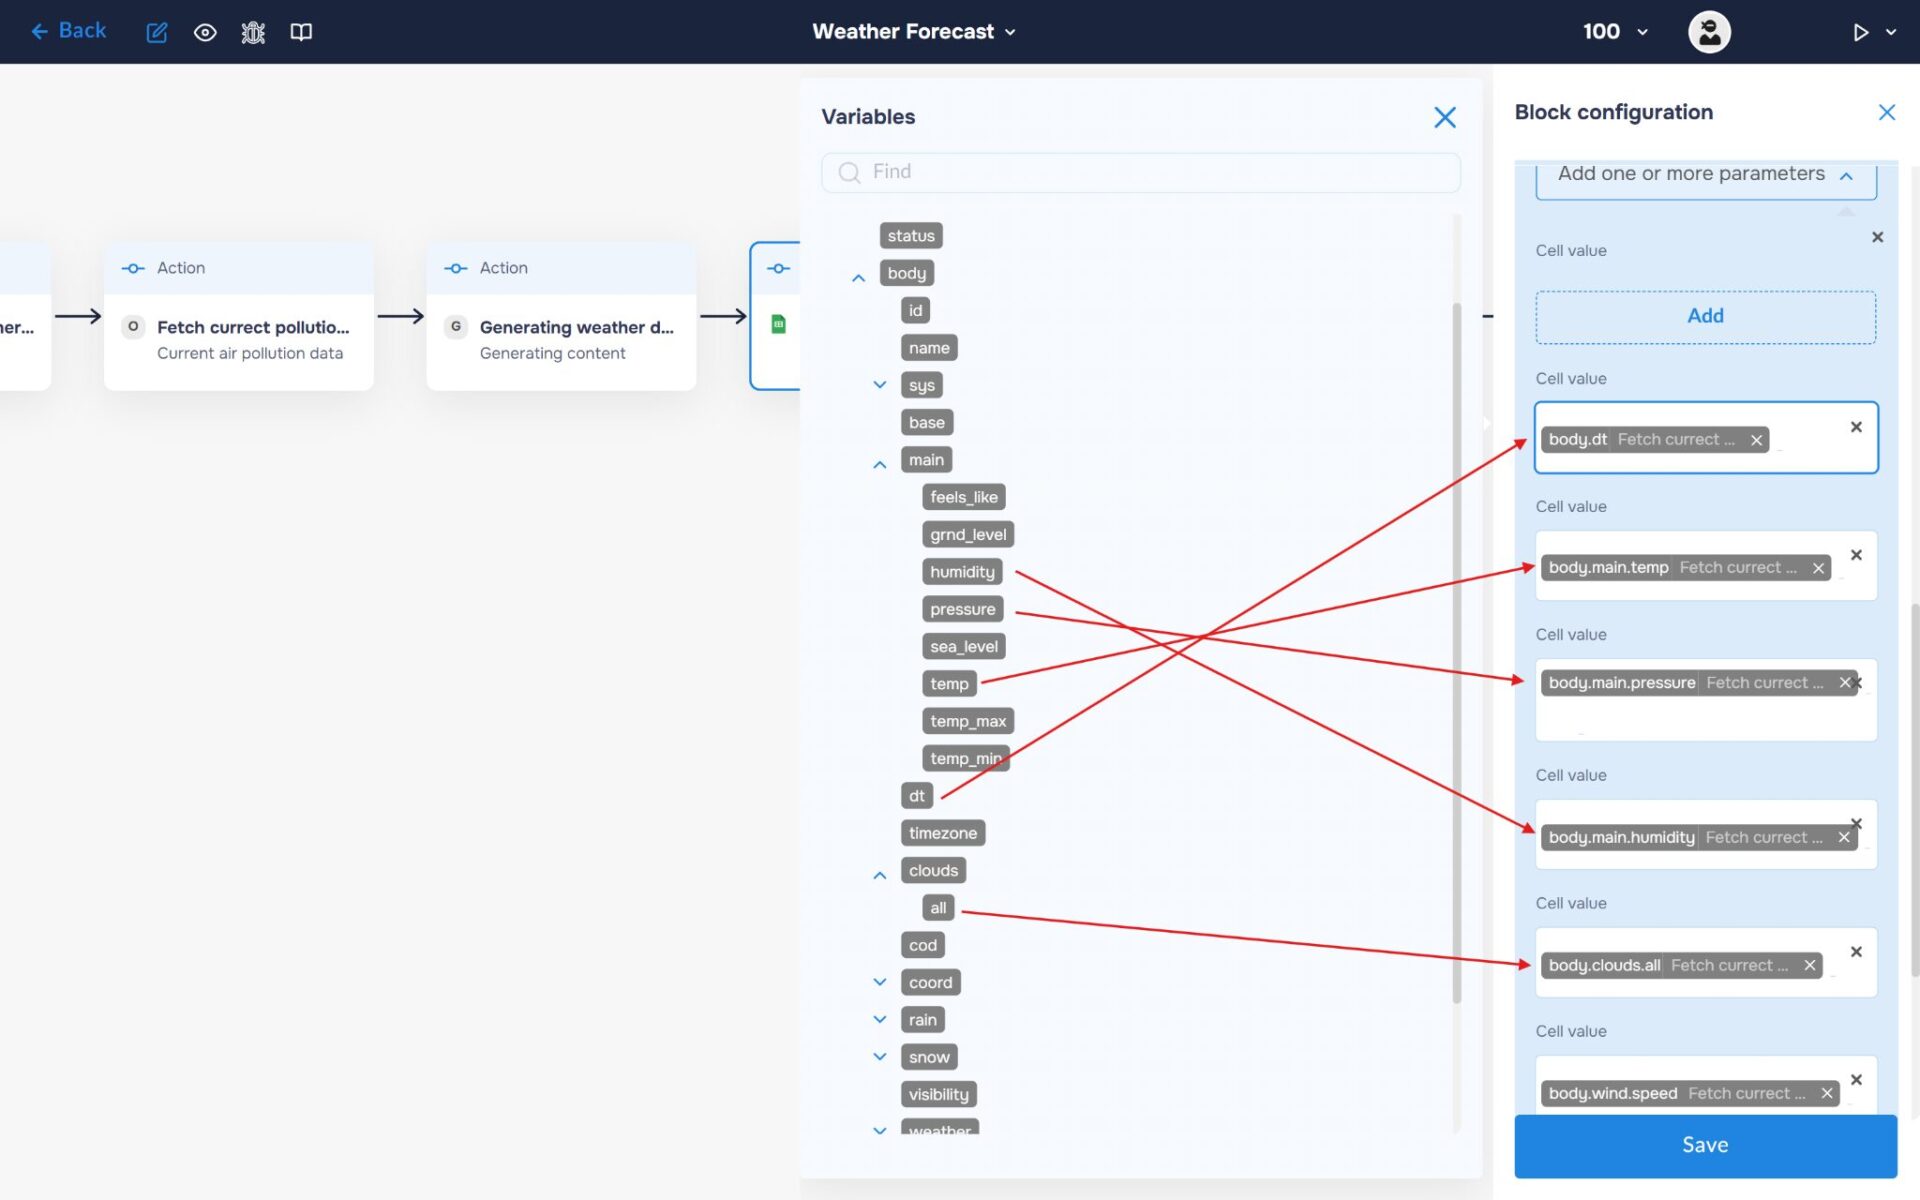
8. Now let’s add the weather information to the spreadsheet. Expand the “List of Values” and create the first list, which corresponds to the row we will be adding. For the created list, add the fields that correspond to the cells.
Step 5. Add integration with Telegram
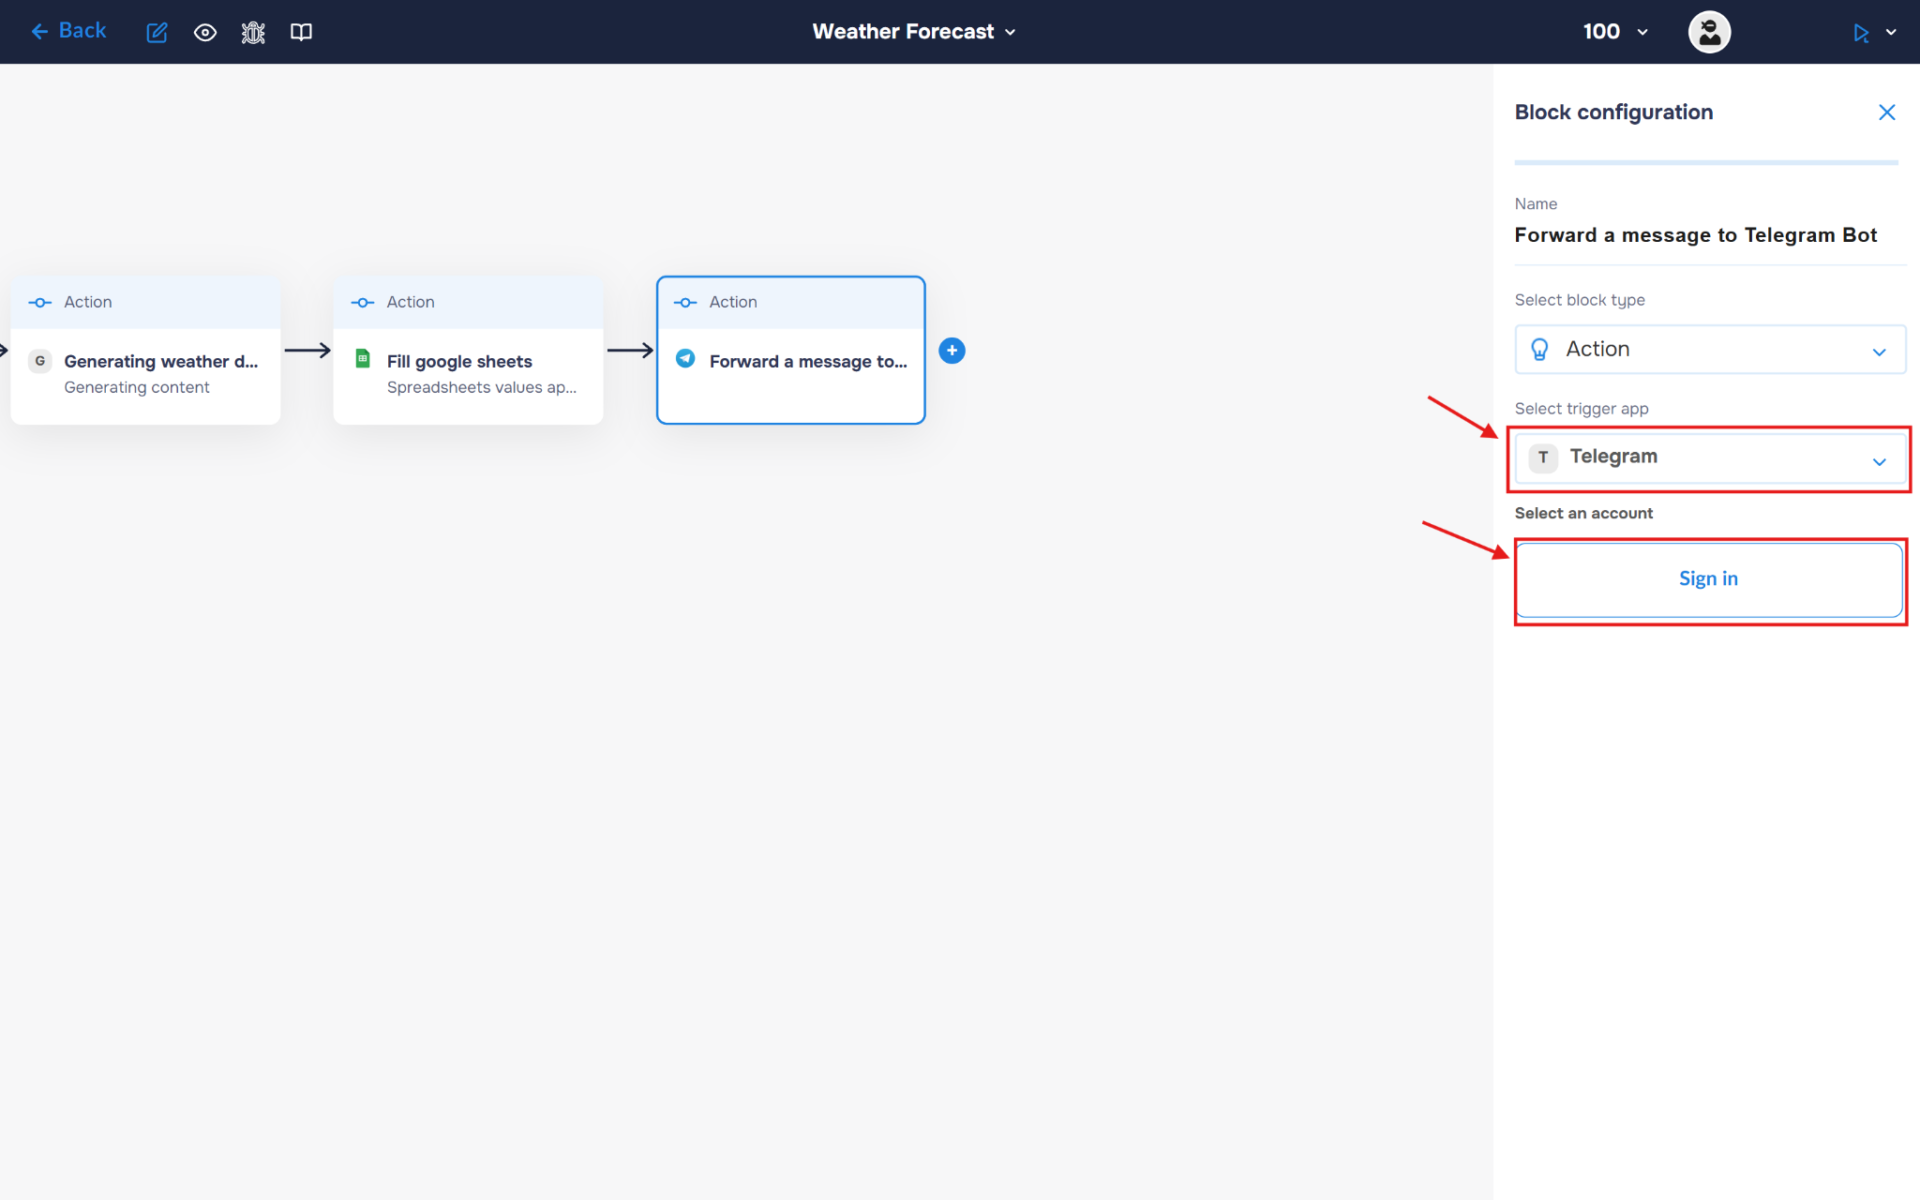
1. You need to connect your Telegram bot with the DigitalBPM service. To do this, select Telegram from the list of available services and click the “Sign in” button.
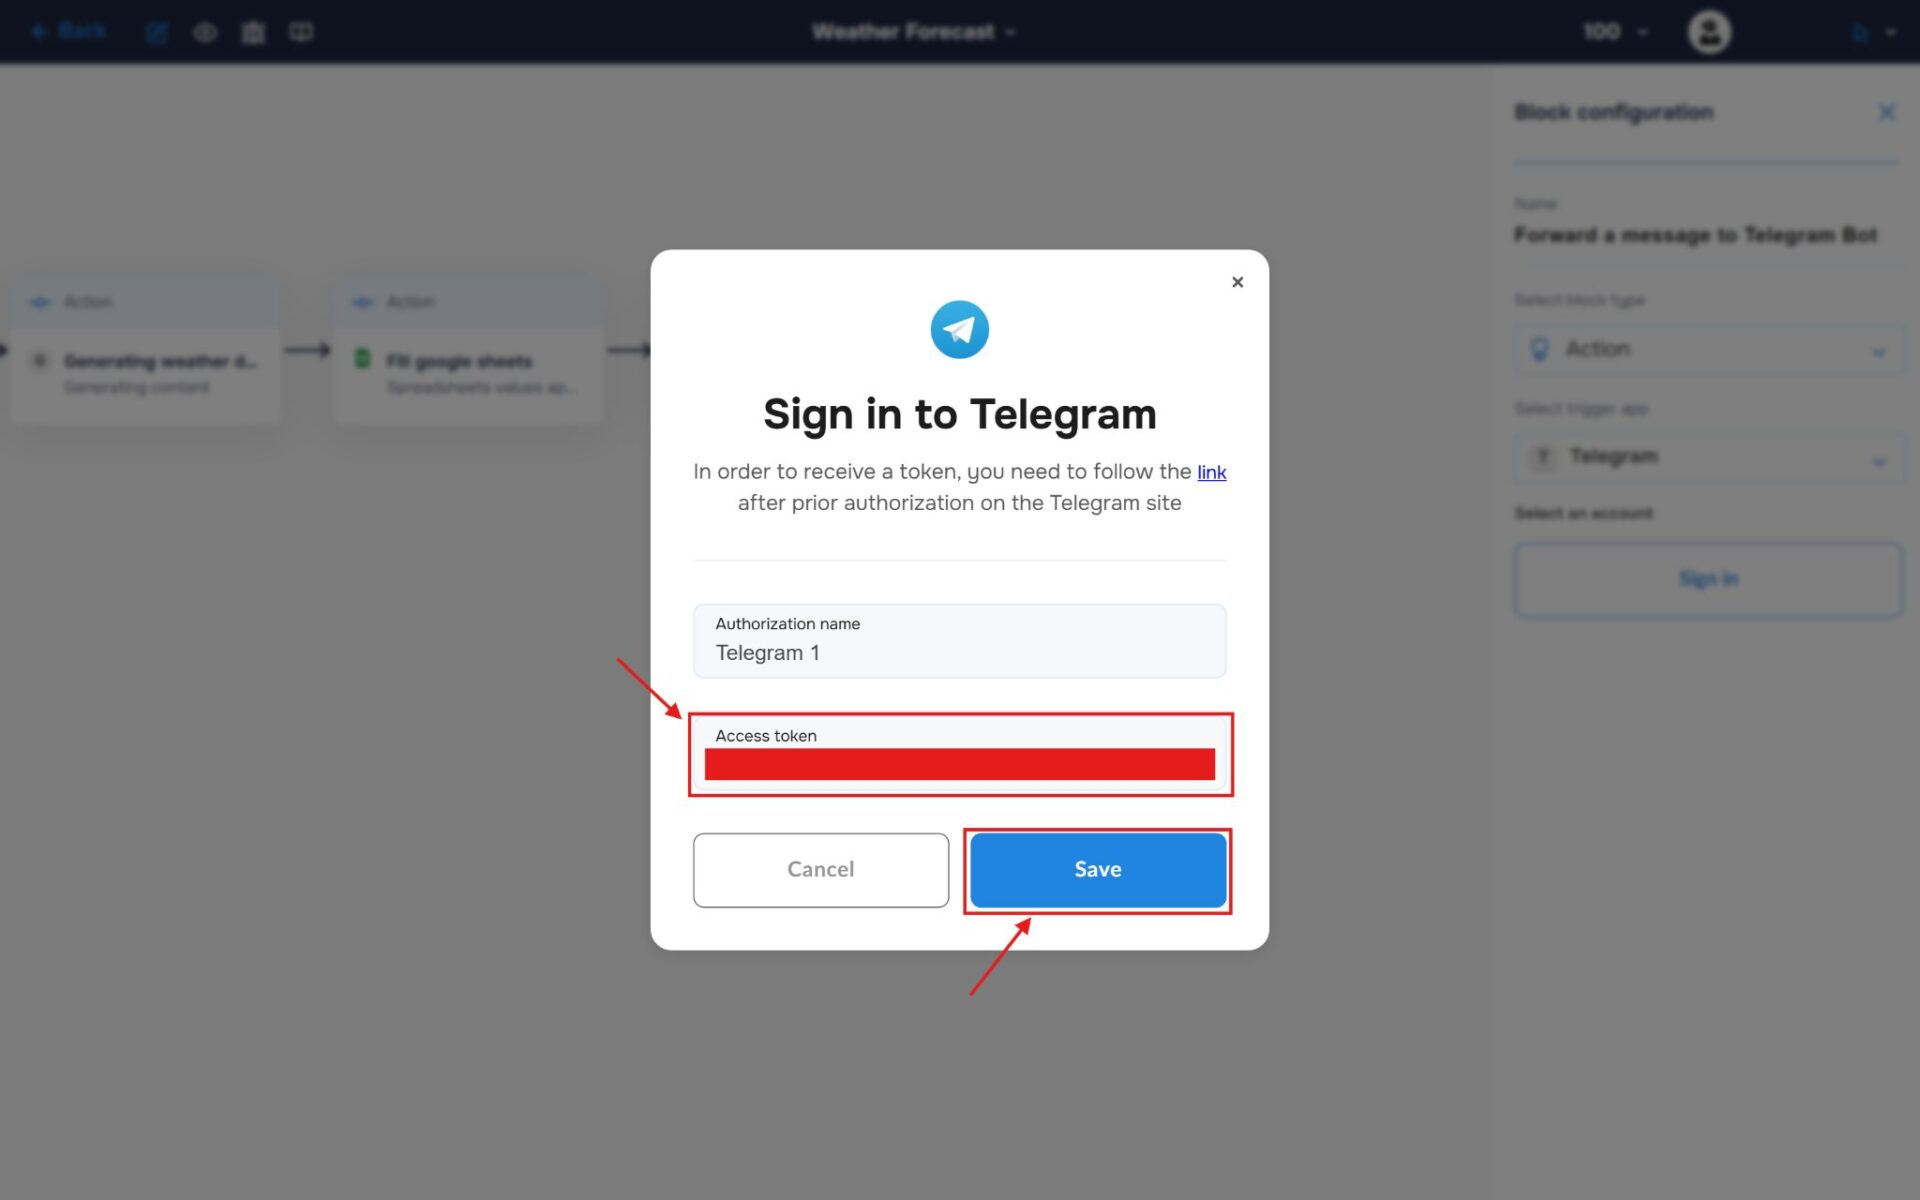
2. In the pop-up that appears, you need to fill in the name field for authorisation and the token that was received when creating the Telegram bot. To connect, click the “Save“ button.
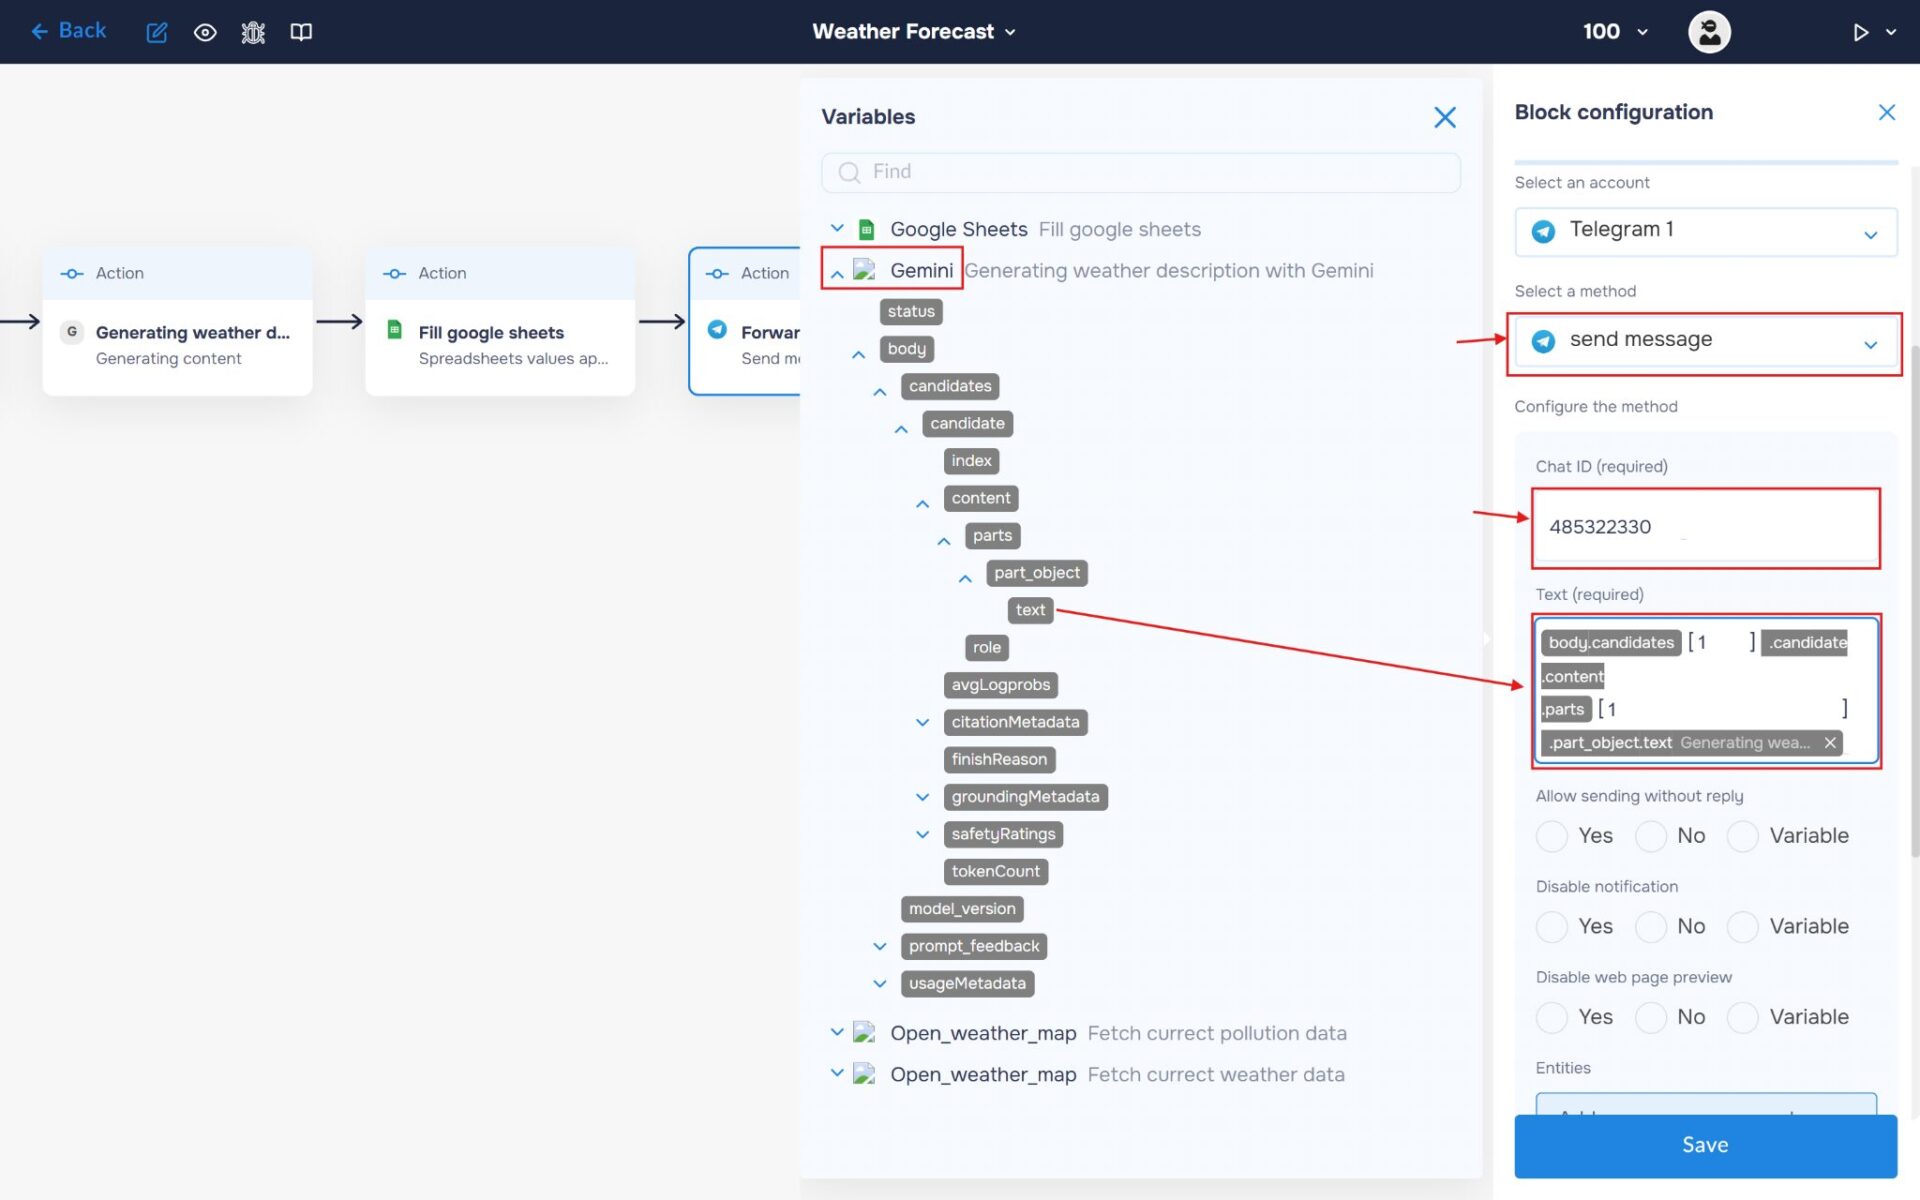
3. Select the “Send Message” method and fill in the ChatId and Text fields. To obtain your ChatId, you can use the Telegram bot @id_bot. In the “Text field”, insert the weather summary generated by Gemini so that it can be sent to your Telegram chat.
Run to execute a workflow
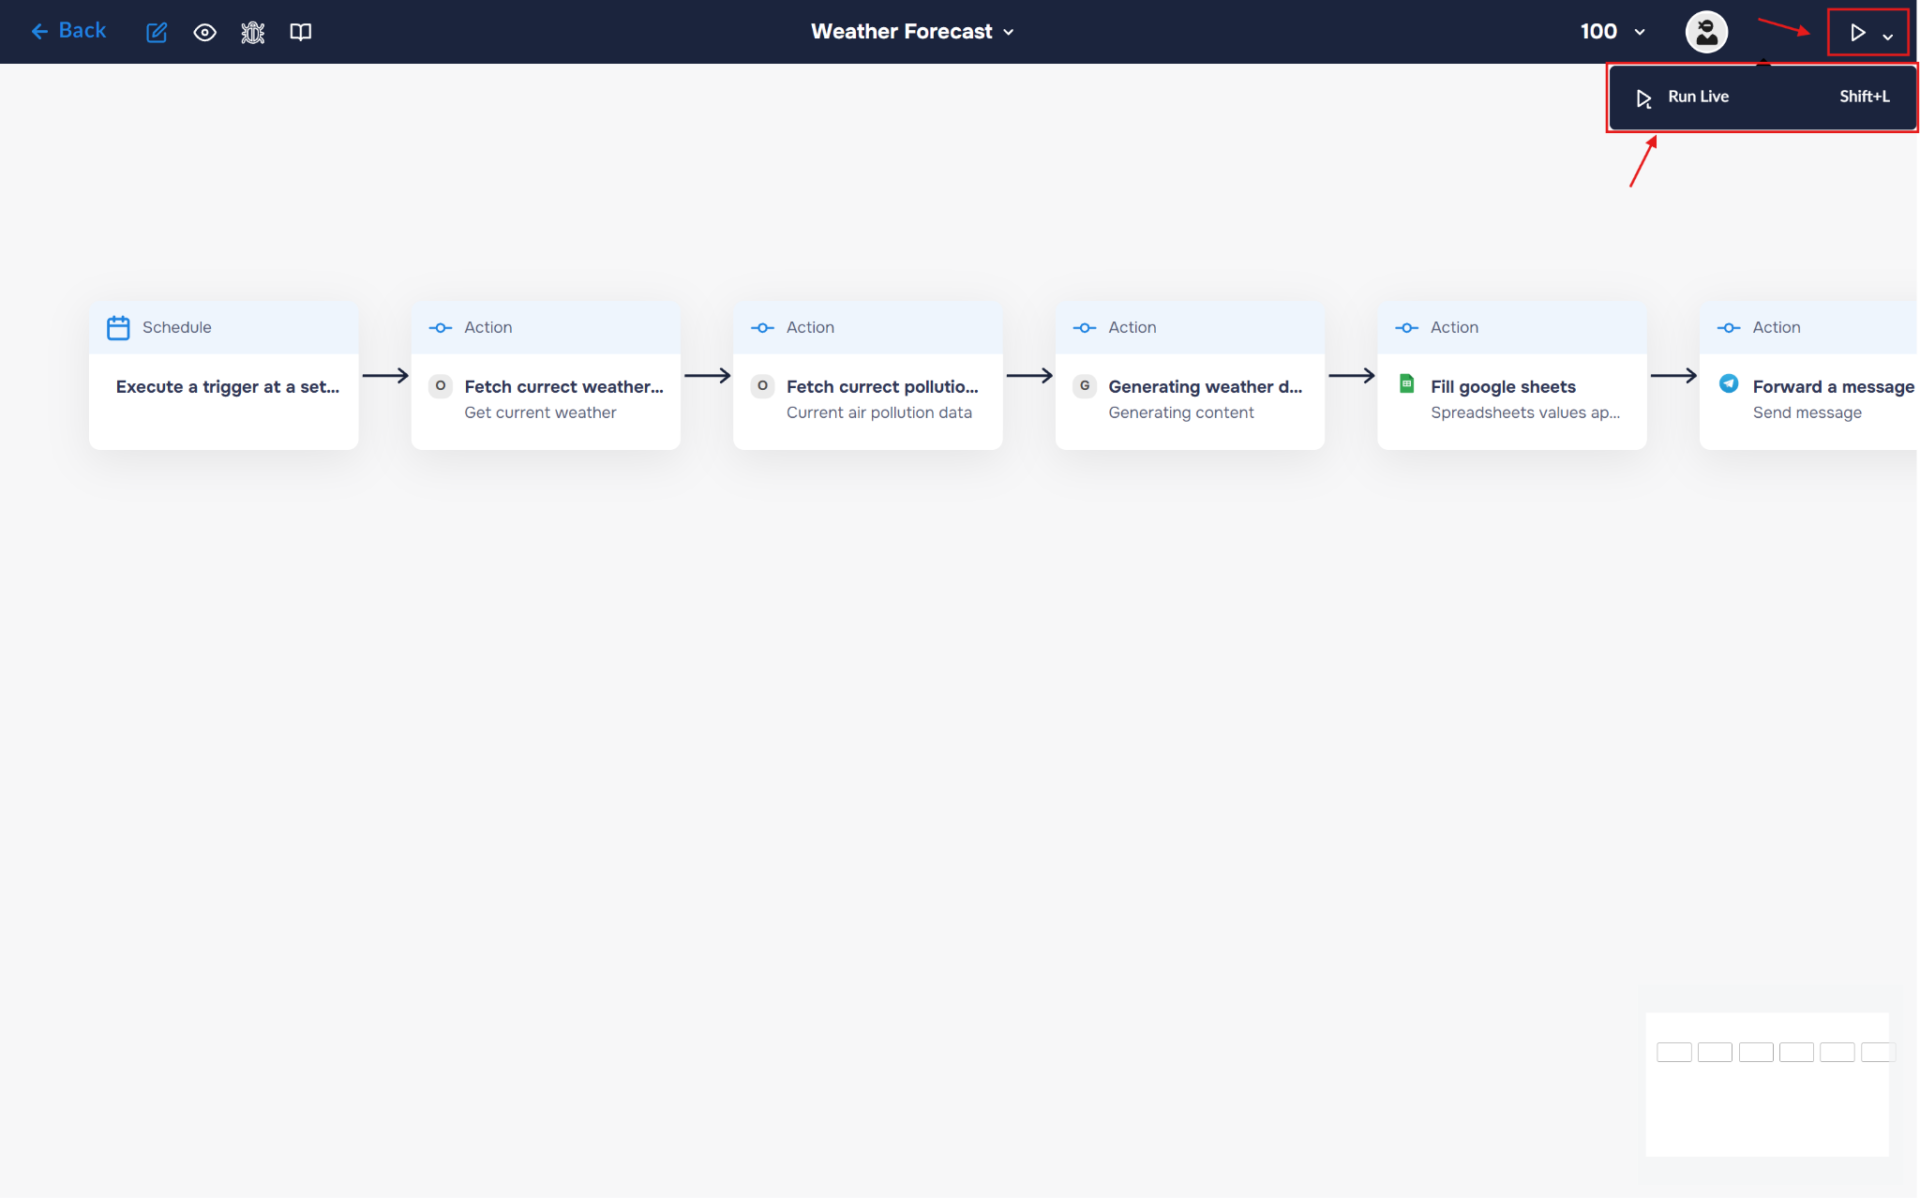
1. Your workflow is now fully configured. Let’s try running it. To do this, click the “Run” icon in the top-right corner of the workflow builder and select “Run Live”, or use the keyboard shortcut “Shift+L“. If the launch is successful, the icon color will change from white to blue, and an “L” will appear next to it.
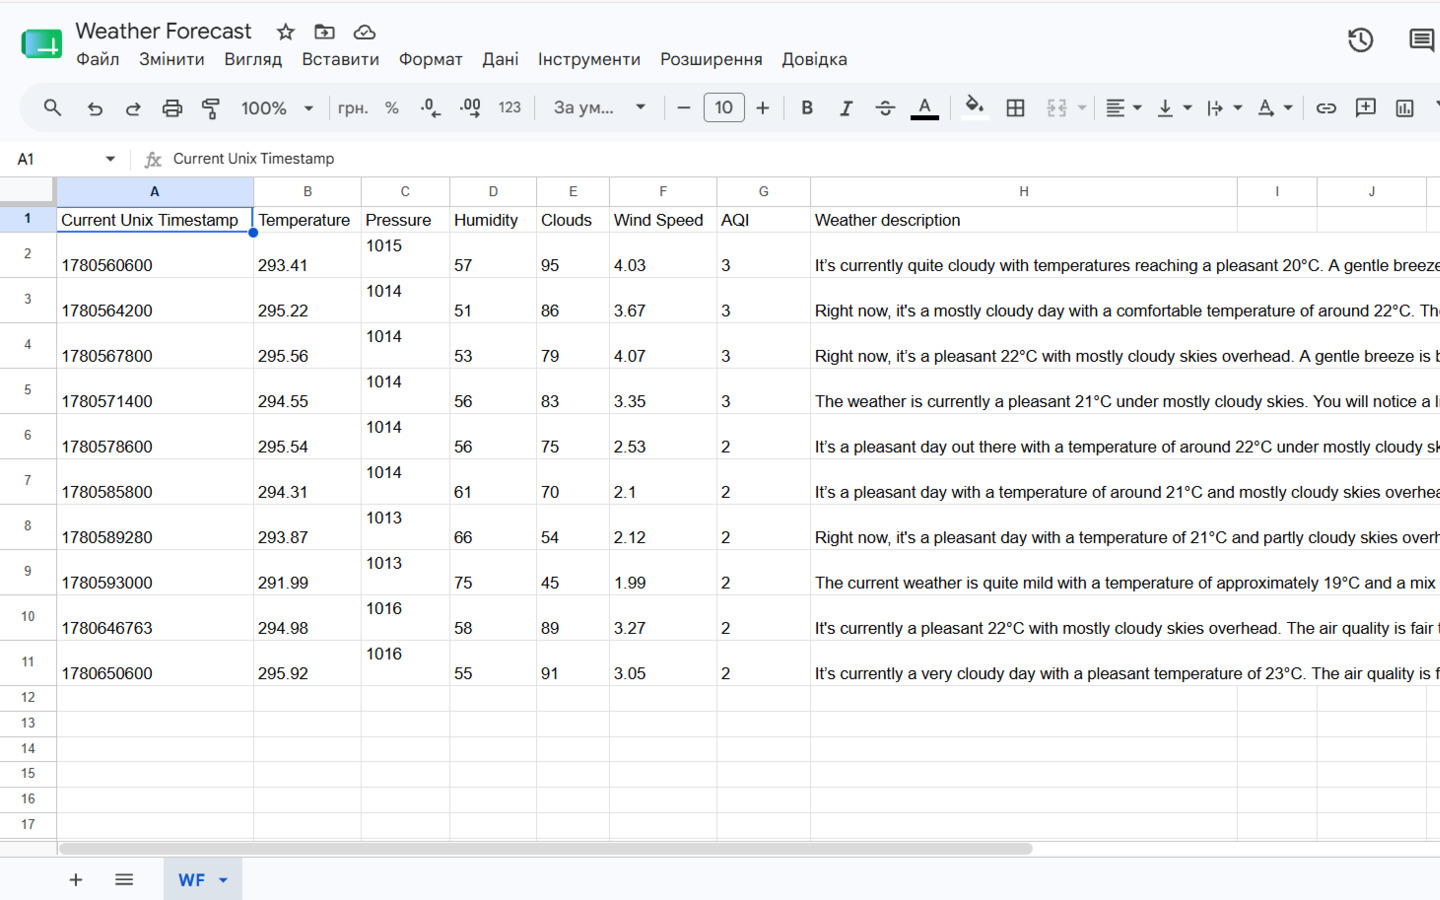
2. Congratulations! You can now automatically collect and store daily weather data in your spreadsheet. Over time, this dataset can be used to track weather trends, compare conditions across different periods, and create charts or graphs for further analysis.
In addition, the workflow will automatically send a weather summary to your Telegram chat at the scheduled time, allowing you to receive up-to-date weather information without manually checking forecasts.