About This Guide
This guide provides step-by-step instructions for building an autonomous AI-powered data analysis workflow using the DigitalBPM platform and Google Sheets.
Instead of manually exploring spreadsheets, building dashboards, or writing queries, you will create a workflow that:
- Retrieves structured data from Google Sheets in real time
- Processes user questions using an AI Analyst powered by Gemini AI
- Uses a lightweight conversation summary to maintain context between user interactions
- Generates accurate, data-driven responses directly from the dataset
- Maintains conversation memory without storing full chat history, using a summarization mechanism that reduces token usage and API costs
- Operates on a linear architecture, ensuring absolute stability and eliminating the infinite loops often caused by complex autonomous agents
- Applies strict data grounding rules to reduce hallucinations and ensure responses are based only on available spreadsheet data
By the end of this guide, you will have a fully functional AI Data Analyst capable of answering business questions about sales, finance, marketing, and other structured data stored in Google Sheets.
Who Is This Guide For?
This guide is designed for business users, analysts, marketers, consultants, founders, and teams that store operational data stored in Google Sheets.
It is especially useful for organizations that want AI-powered analytics without building custom dashboards or implementing complex BI tools. Typical use cases include sales and revenue analysis, marketing performance tracking, financial reporting, KPI monitoring, and answering ad-hoc business questions through a chat interface.
For optimal performance and response speed, the approach works best with clean spreadsheets containing up to 2,000–5,000 rows of data.
Before you start building your AI Analyst, ensure you have the following ready:
- A DigitalBPM account.
- A Telegram account and bot. If you haven’t created a bot yet, follow our guide — How to Register a Chatbot in Telegram — a perfect starting point if you’re searching how to make a Telegram bot.
- A Gemini AI account with API access.
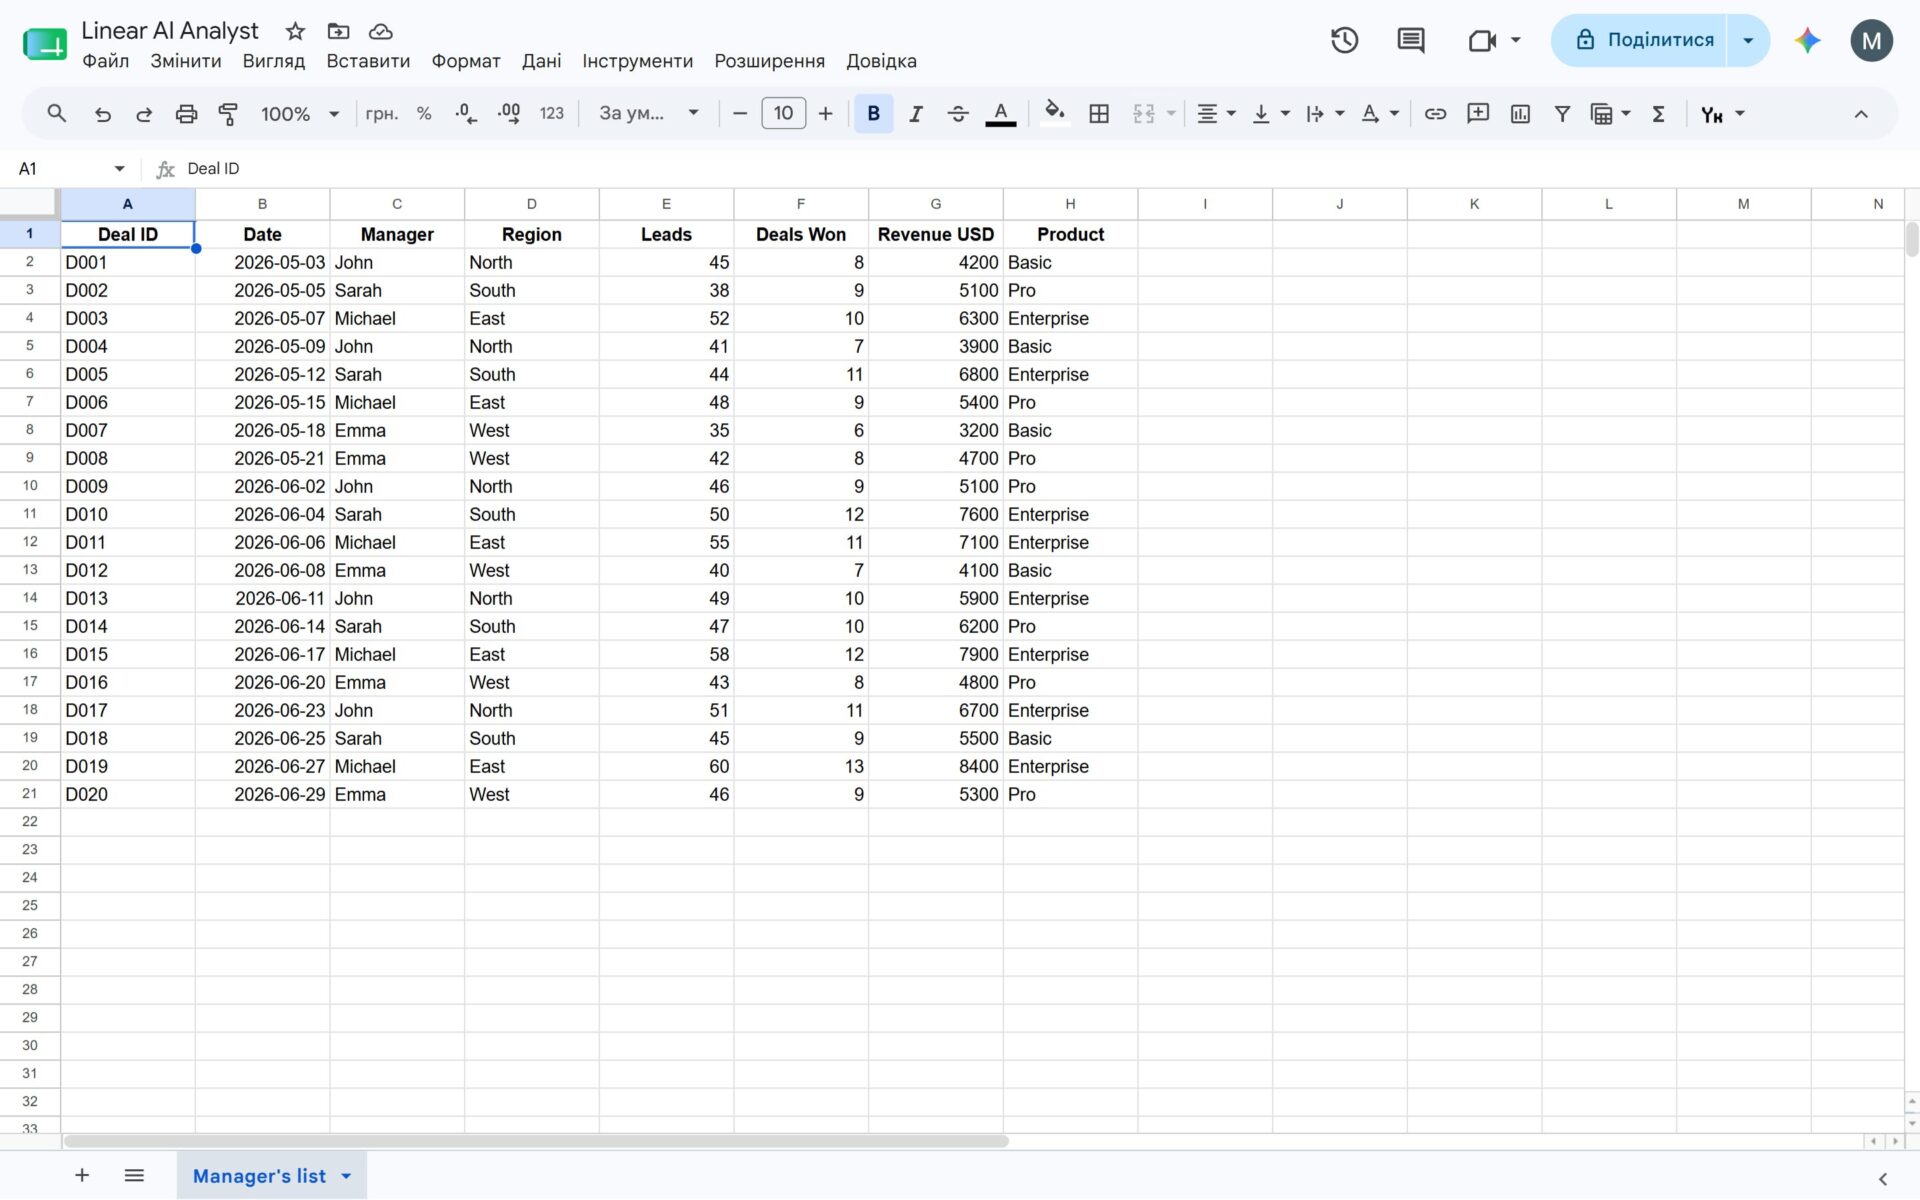
Prepare two Google Sheets:
The Data Sheet: The primary source containing your business data. Crucial: This sheet must be “clean.” The first row must contain clear column names, with no merged cells or complex formatting.
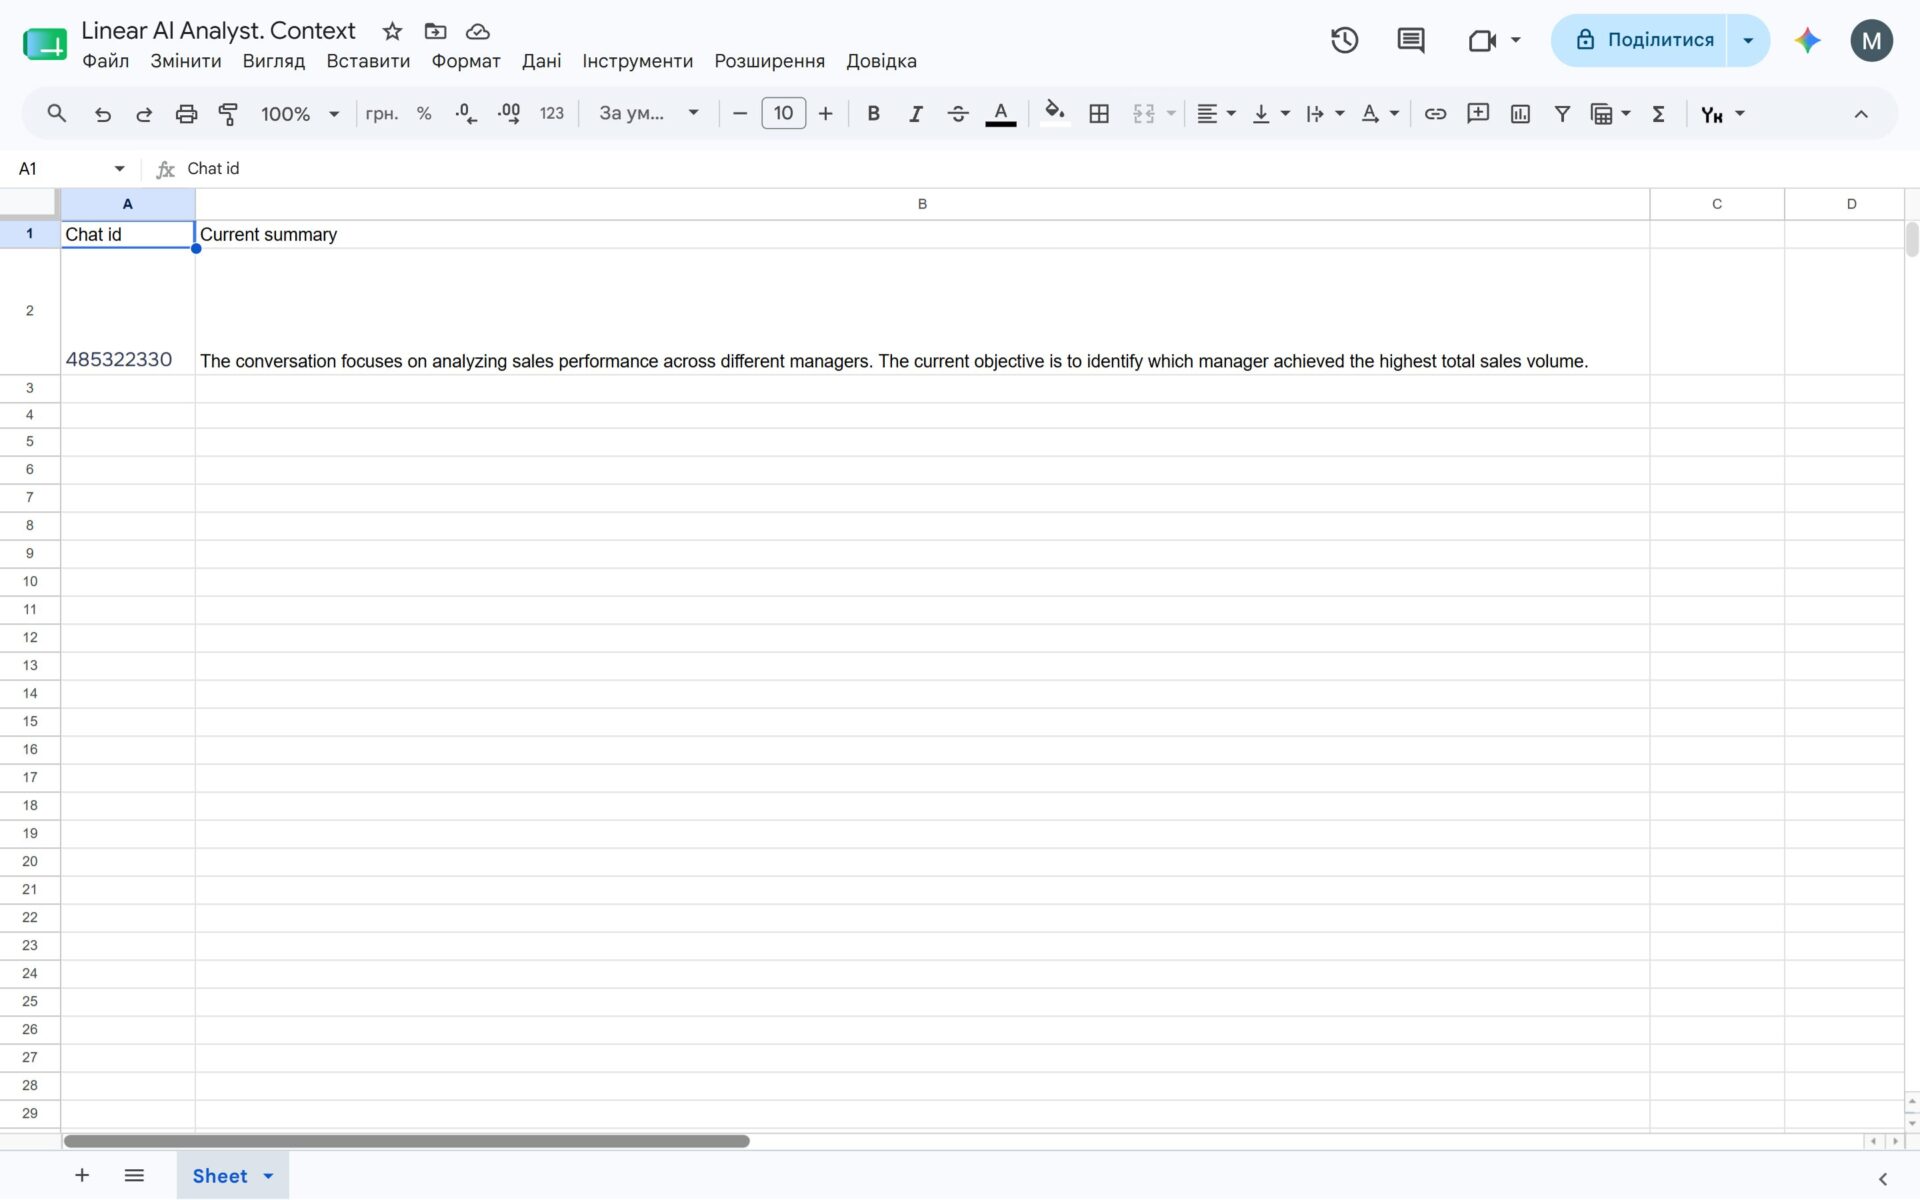
The Memory Sheet: A technical spreadsheet used exclusively to store the AI’s conversation summary and maintain context.

If you’re ready, let’s get started!
Step 1: Create a New Workflow and Trigger Block
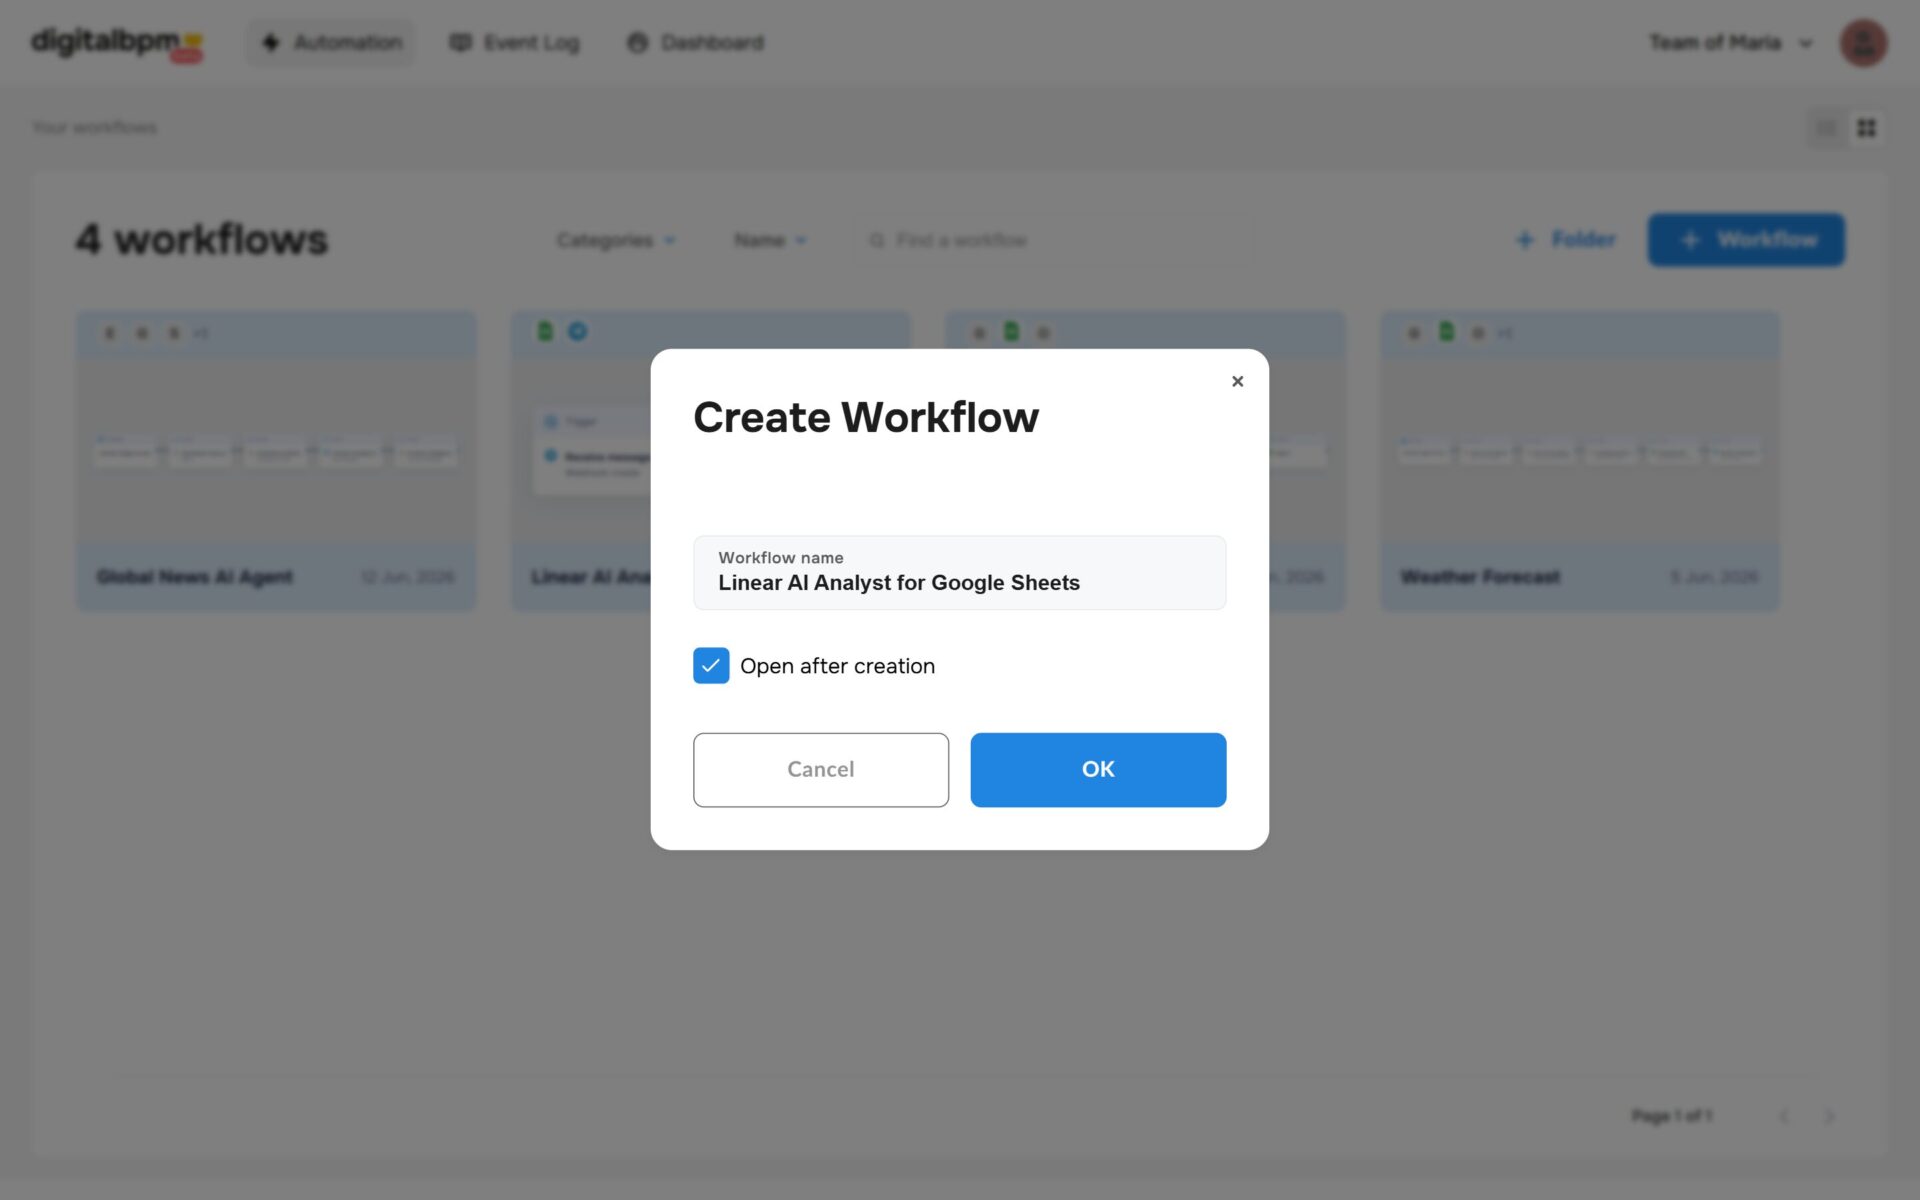
1. The first thing you need to do is to sign in to your DigitalBPM account and click on the “+ Workflow” button on the “Automation” page. Next, you need to enter a name for your workflow, for example, “Linear AI Analyst for Google Sheets” and click “OK“.
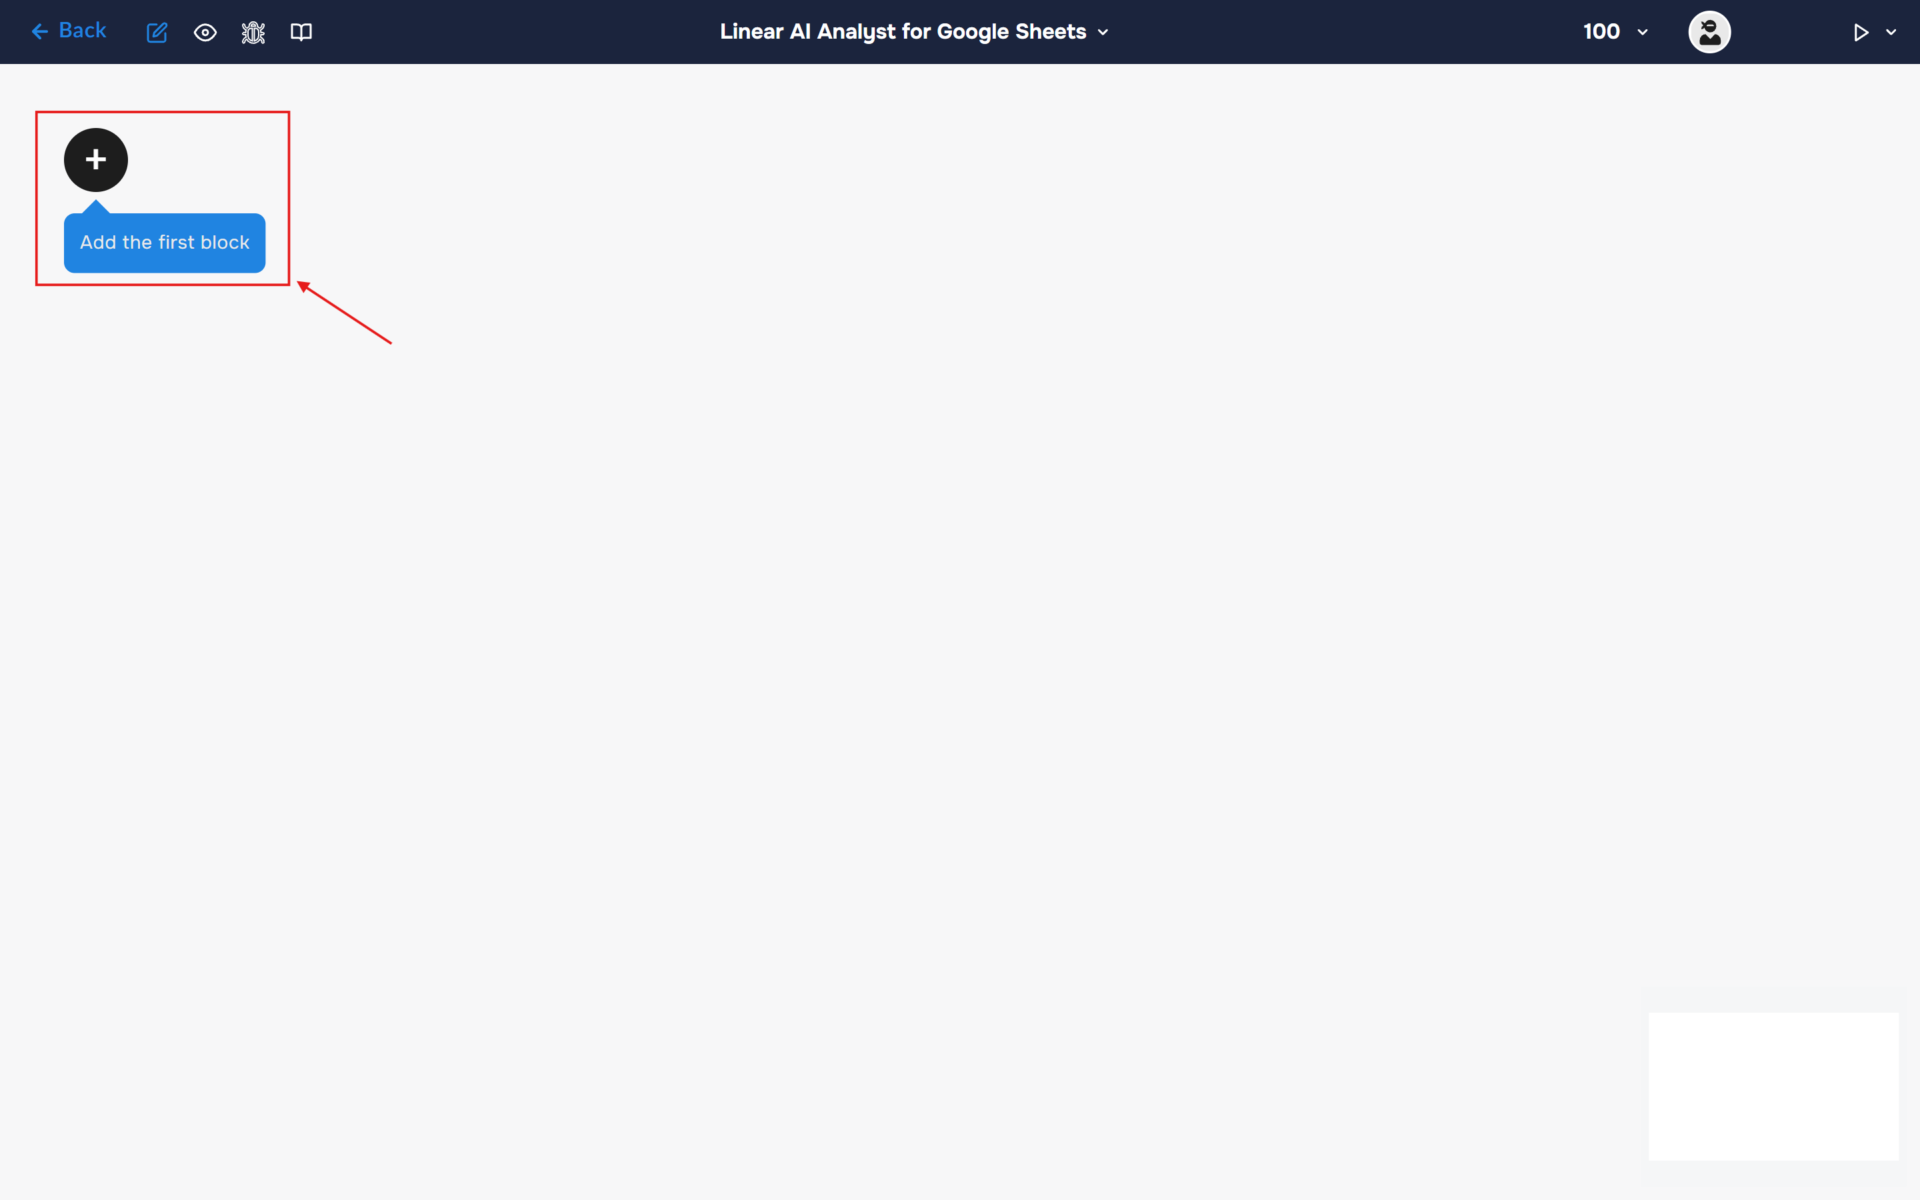
2. After confirming the creation of a workflow, its builder opens. To add the first block, click the “+ Add first block” button.
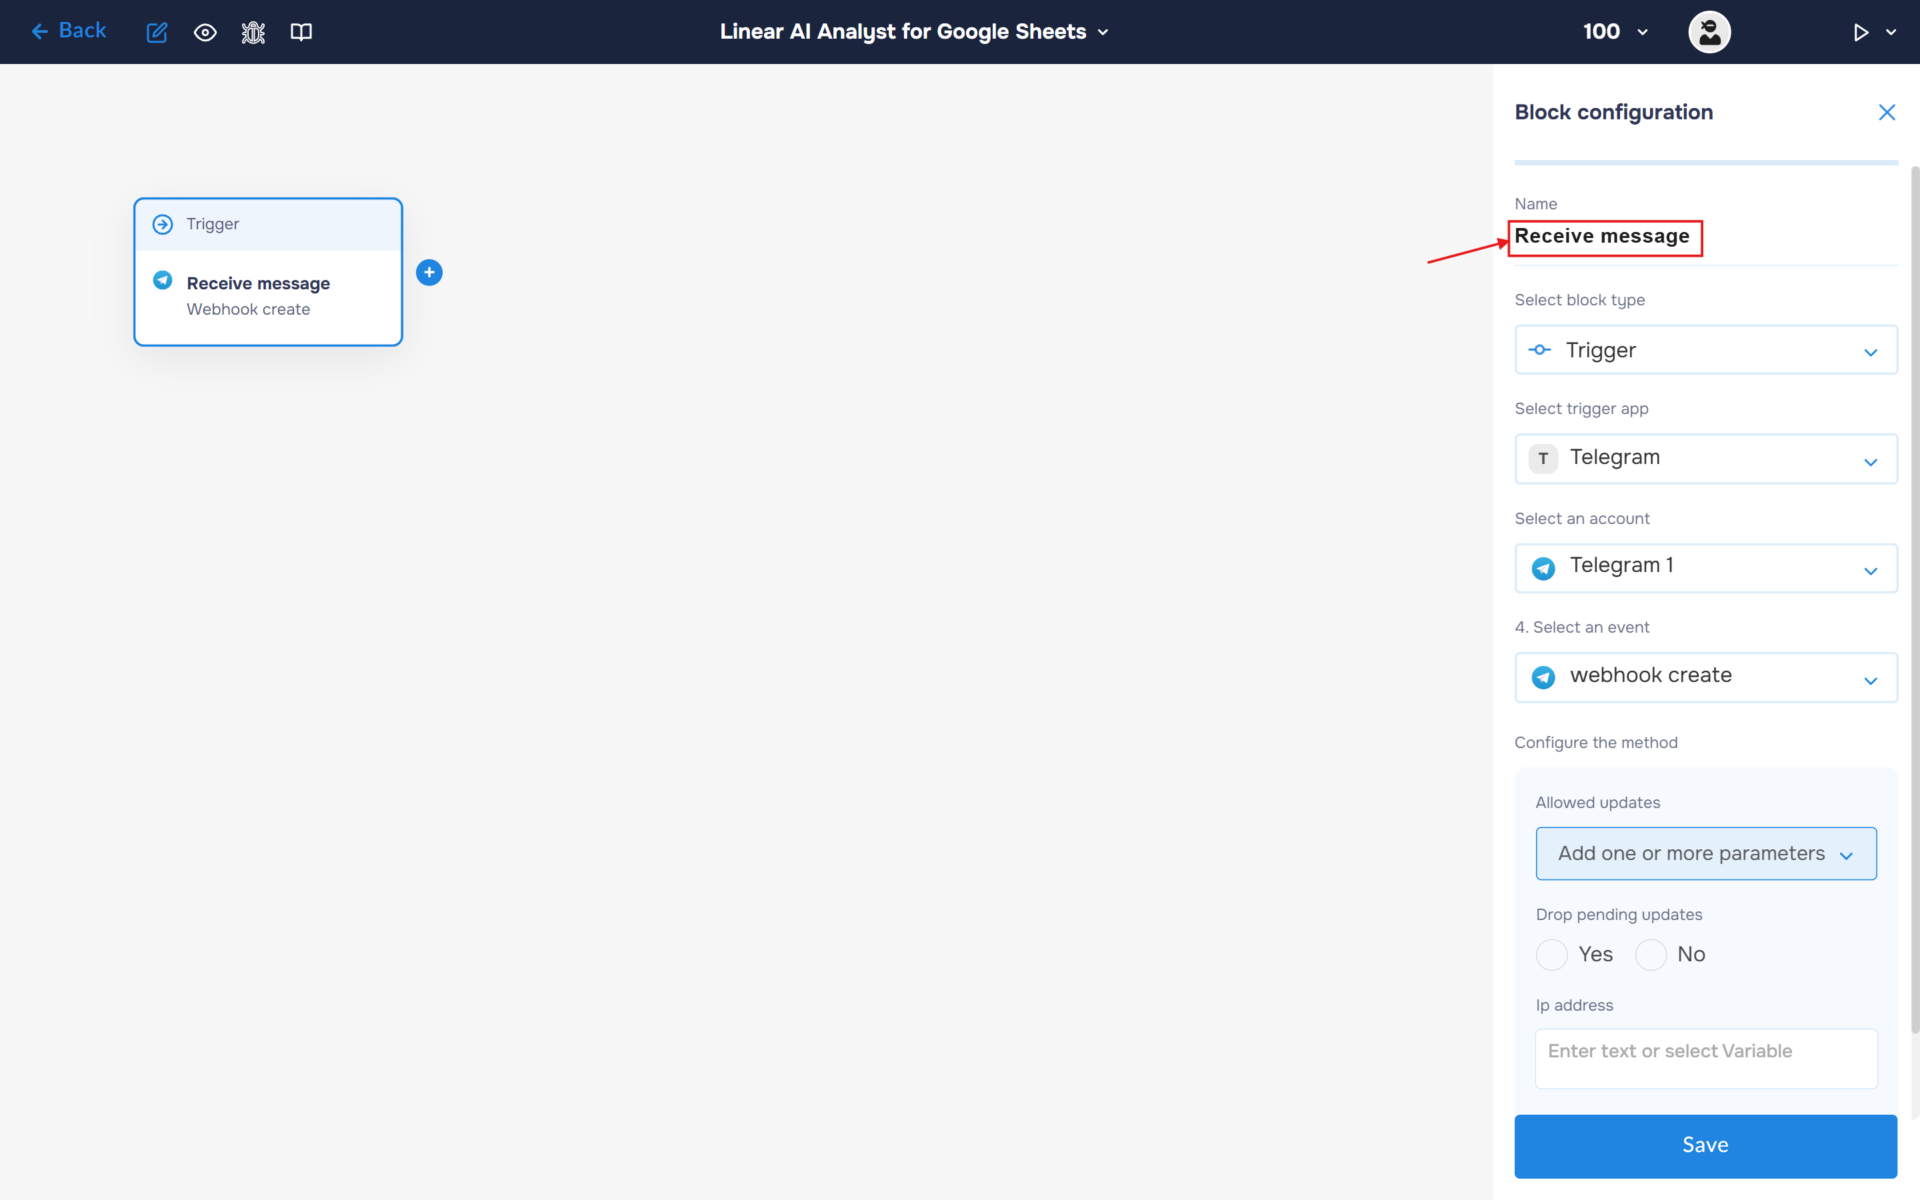
3. Next, you need to configure the first block. This block is responsible for triggering the workflow on a set trigger.
- In the “Block Configuration“ panel, click on the “Select block type“ field and select the “Trigger” type.
- Next, you need to add Telegram service by clicking on the field “Select trigger app“; find and select “Telegram“.
- To connect to Telegram, you need to create an authorisation. Click on the “Sign in“ button in the “Select an account“ section.
- After clicking the button, a window for creating a new authorization will open. Enter a name for the authorization, provide the required credentials, and save the connection.
- If the authorization is successful, the created authorization will appear in the “Select an account” field. You need to select this authorization to configure the next steps of the block.
- The next step is to select a method, so click on the “Select an event“. Find and select “webhook create”.
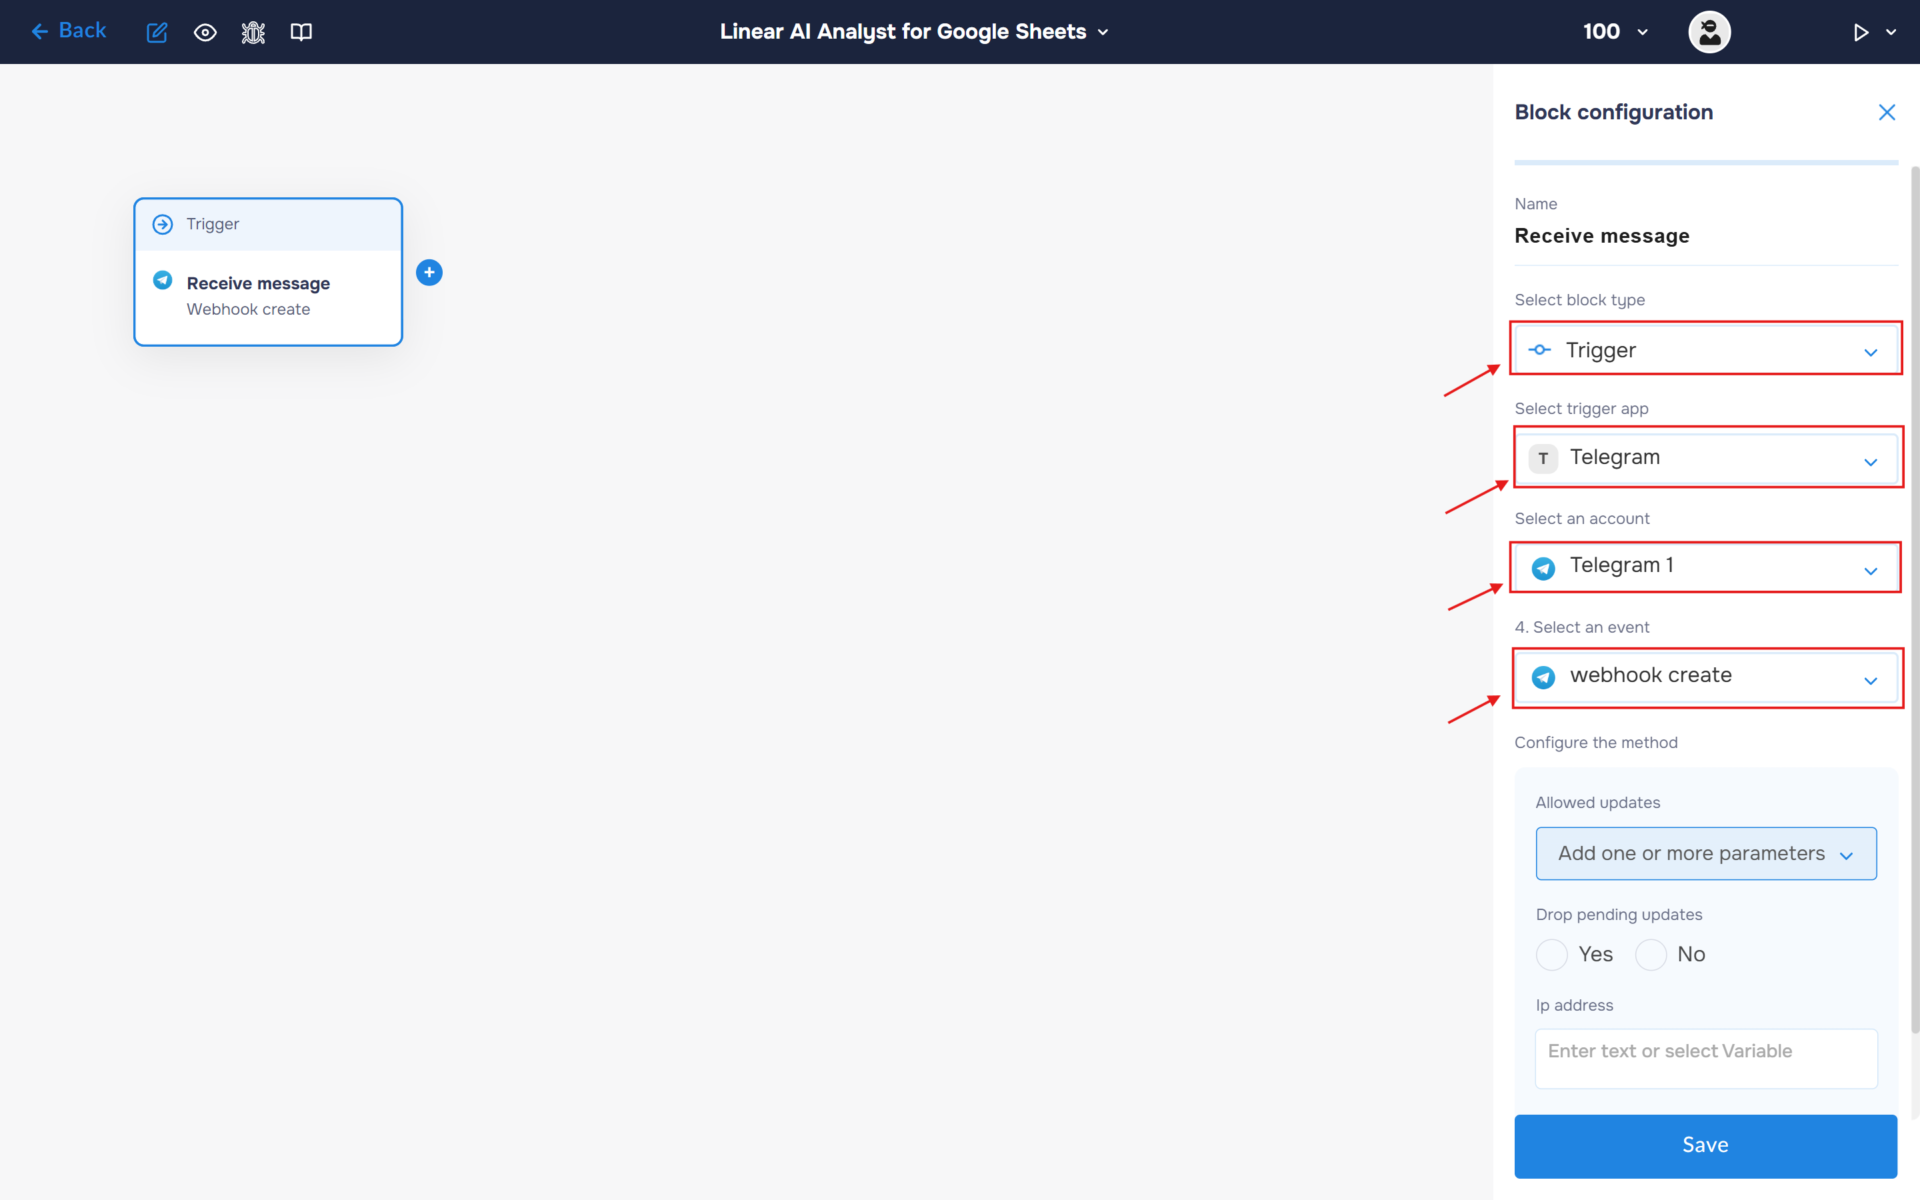
4. Click on the “Name” field and fill in a clear name for what happens in the block, for example, “Receive message”. With this step, you can quickly find out what the block is for.
Step 2: Retrieve conversation memory
1. As soon as the webhook is connected, the first thing we need to do is retrieve the saved conversation context from the technical spreadsheet.
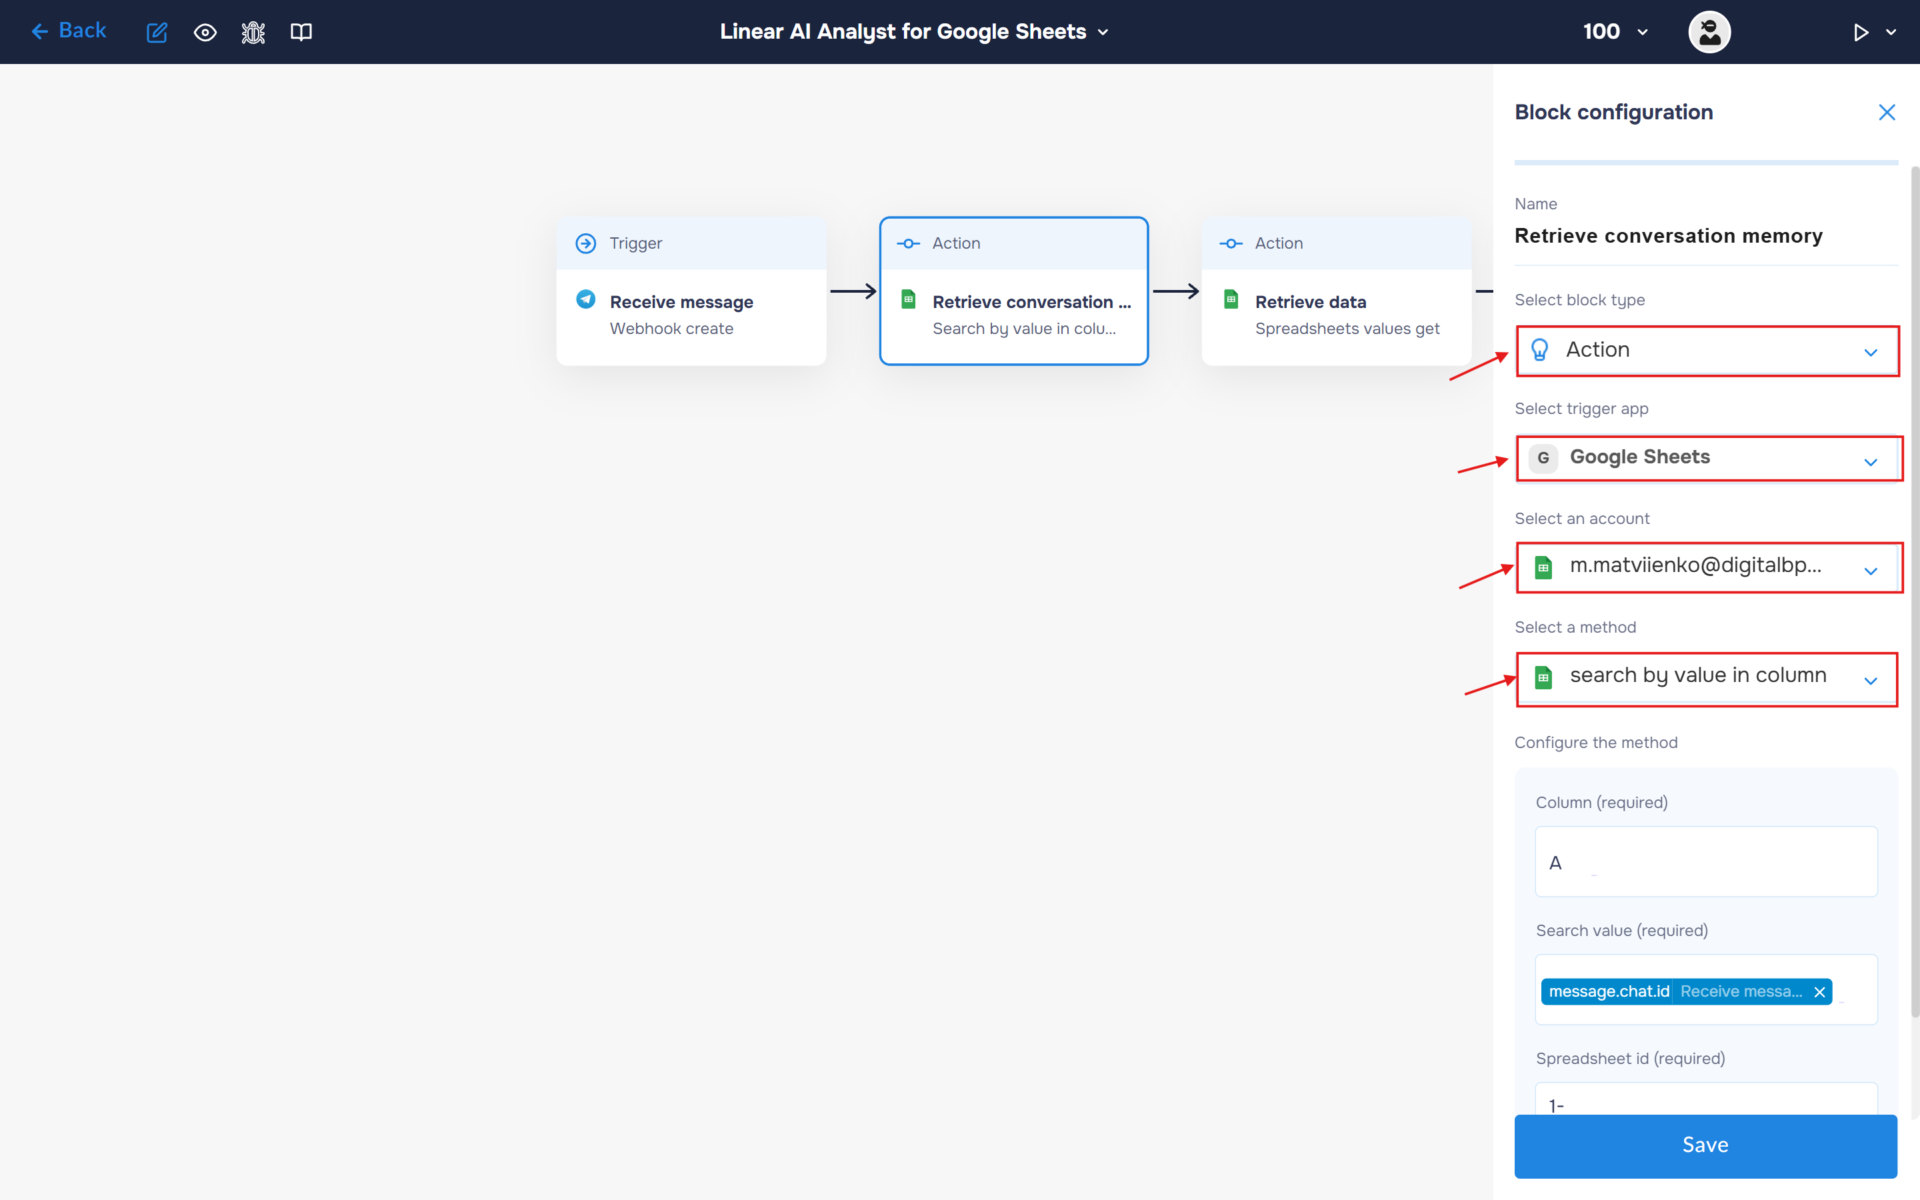
- Add a new block. Select the block type as “Action” and the service as “Google Sheets“. Next, create an authorisation. To do this, click the “Sign in” button.
- Choose an account. Note: choose the account where you created the table at the beginning of the guide.
- After choosing an account, you need to go through all the steps to connect your account to the DigitalBPM service.
- If the authorization is successful, the created authorization will appear in the “Select an account” field. You need to select this authorization to configure the next steps of the block.
- Find and select the “search by value in column” method. Use this method to get value from a defined range.
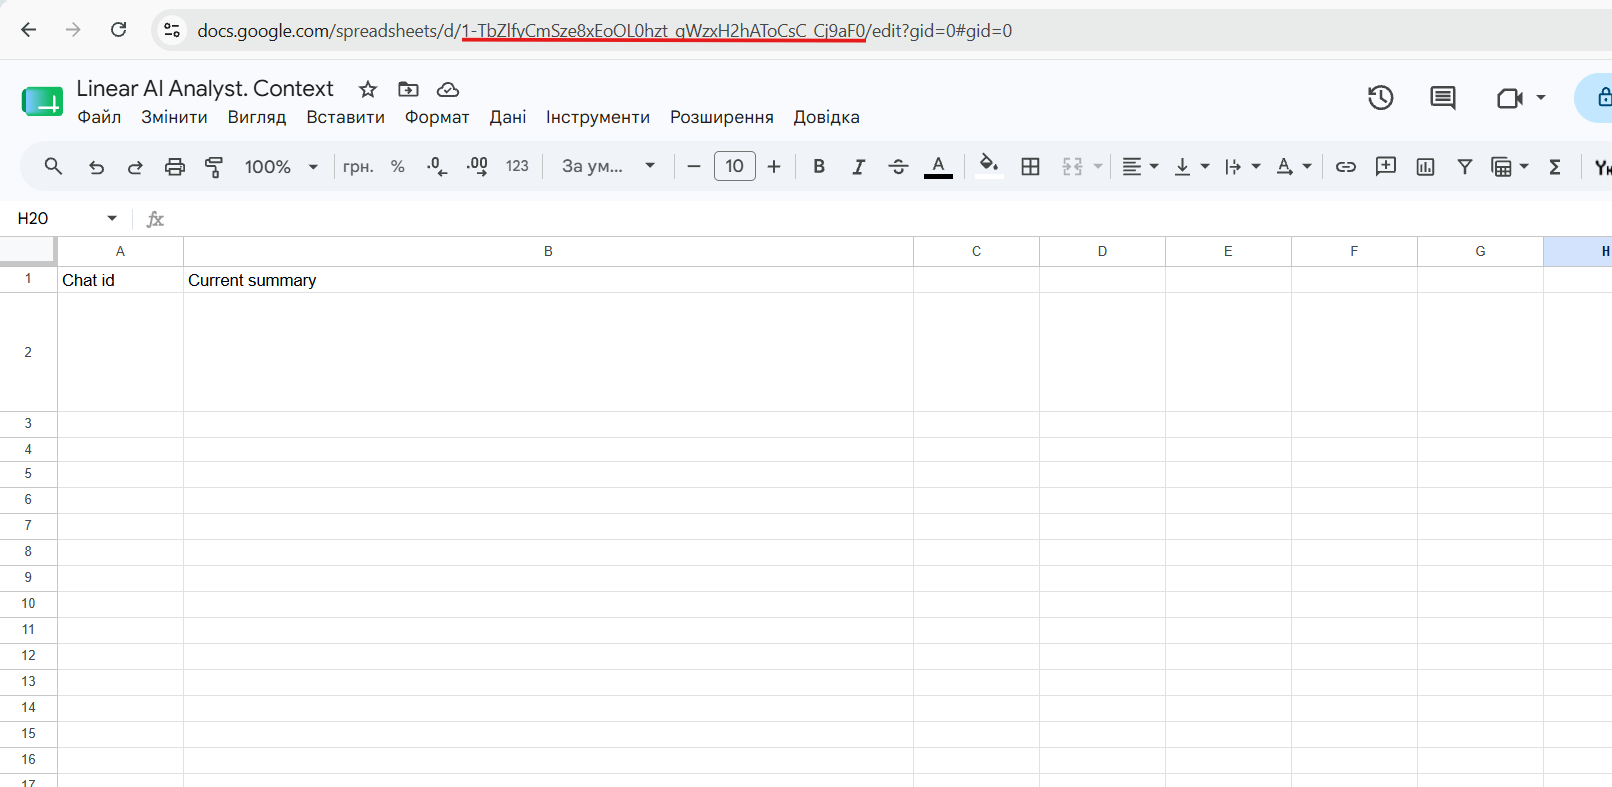
2. Go to the table and copy the table ID located in the link.
3. Fill in the required fields for the selected method. We need to find the saved context using the chat ID received from the webhook response.
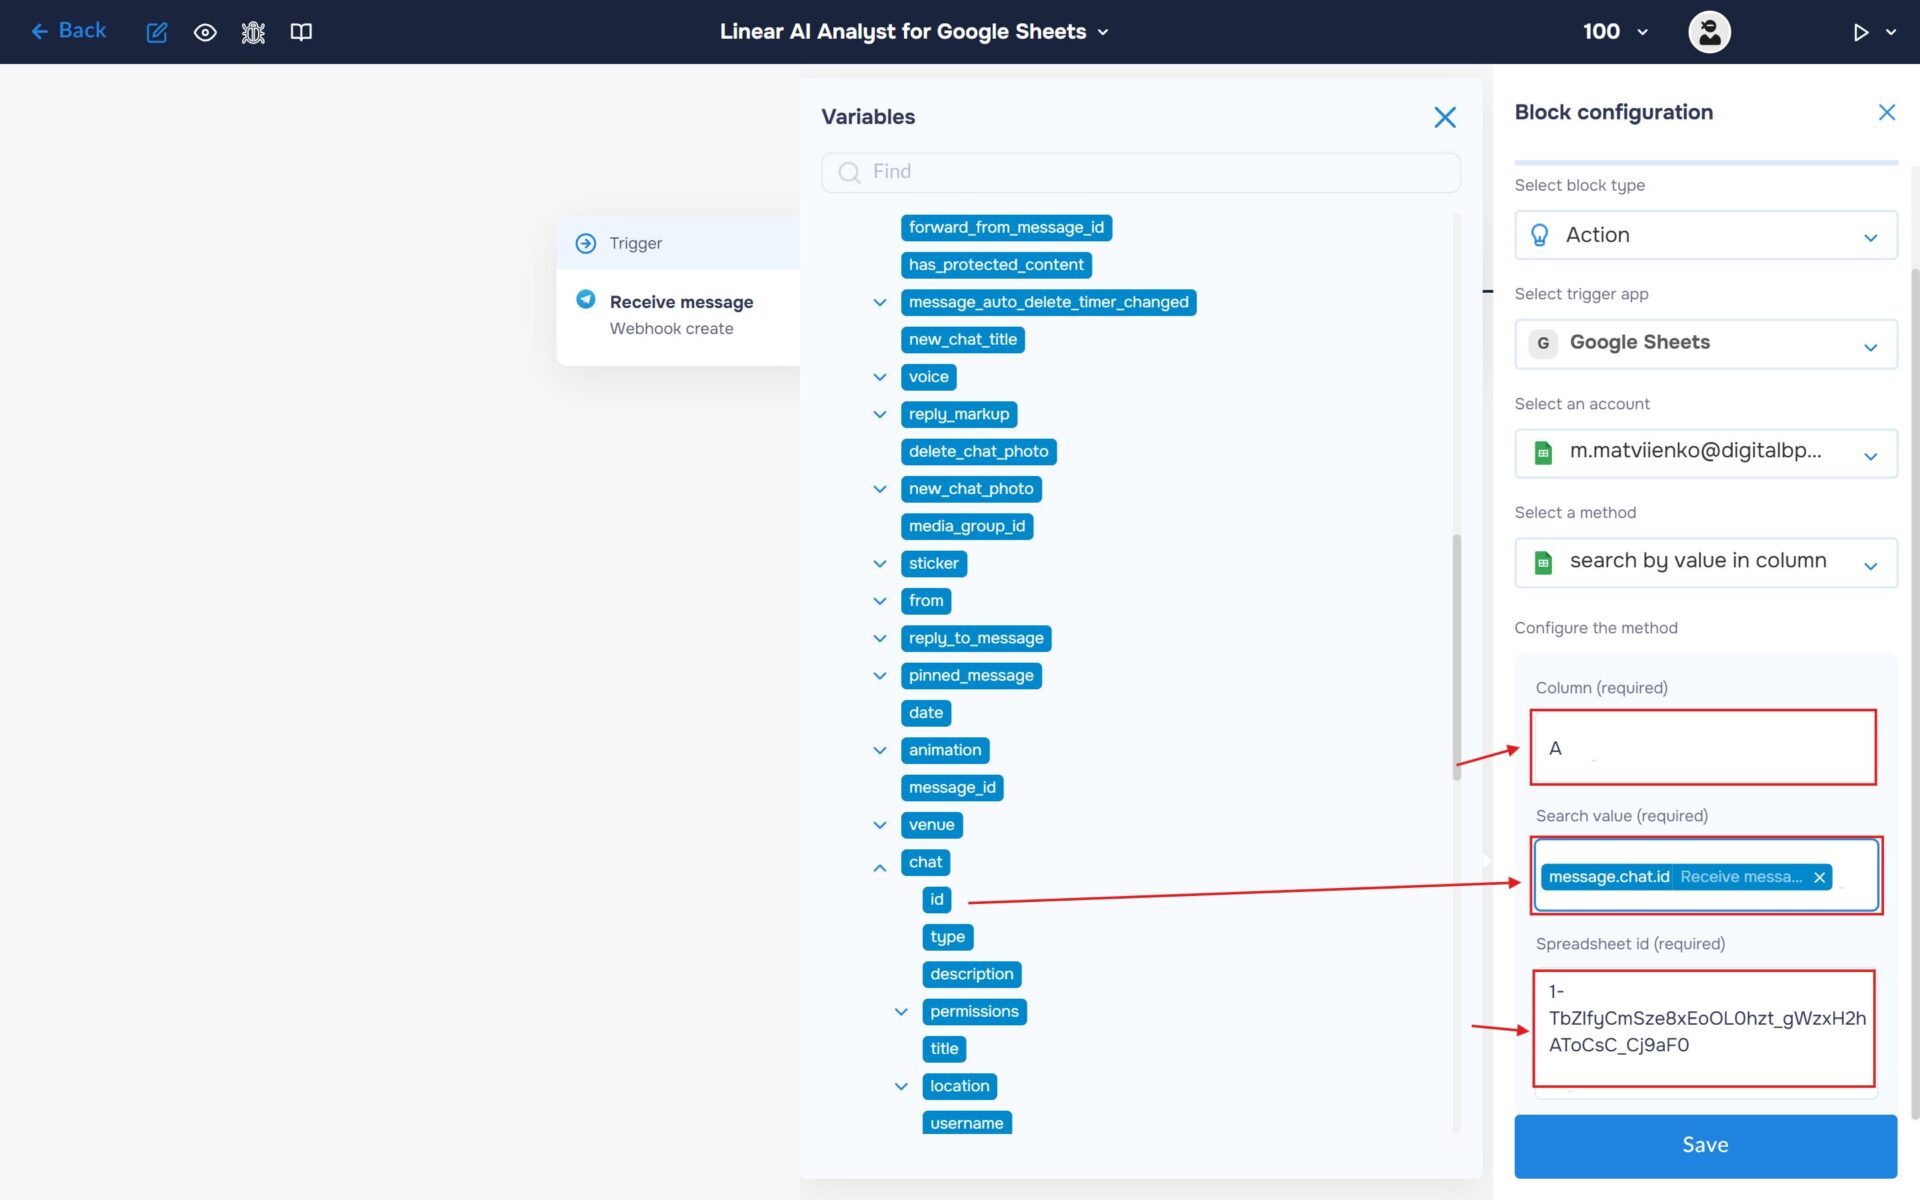
- In the “Column” field, enter “A” or any other column in your spreadsheet that stores chat IDs.
- In the “Search Value” field, enter the Chat ID stored in the “message.chat.id” variable that was obtained during the webhook configuration. This value will be used to locate the corresponding user record in the spreadsheet.
- Enter the spreadsheet identifier in the “Spreadsheet ID” field. Don’t forget to save the block configuration.
Step 3: Retrieve Google Sheets data
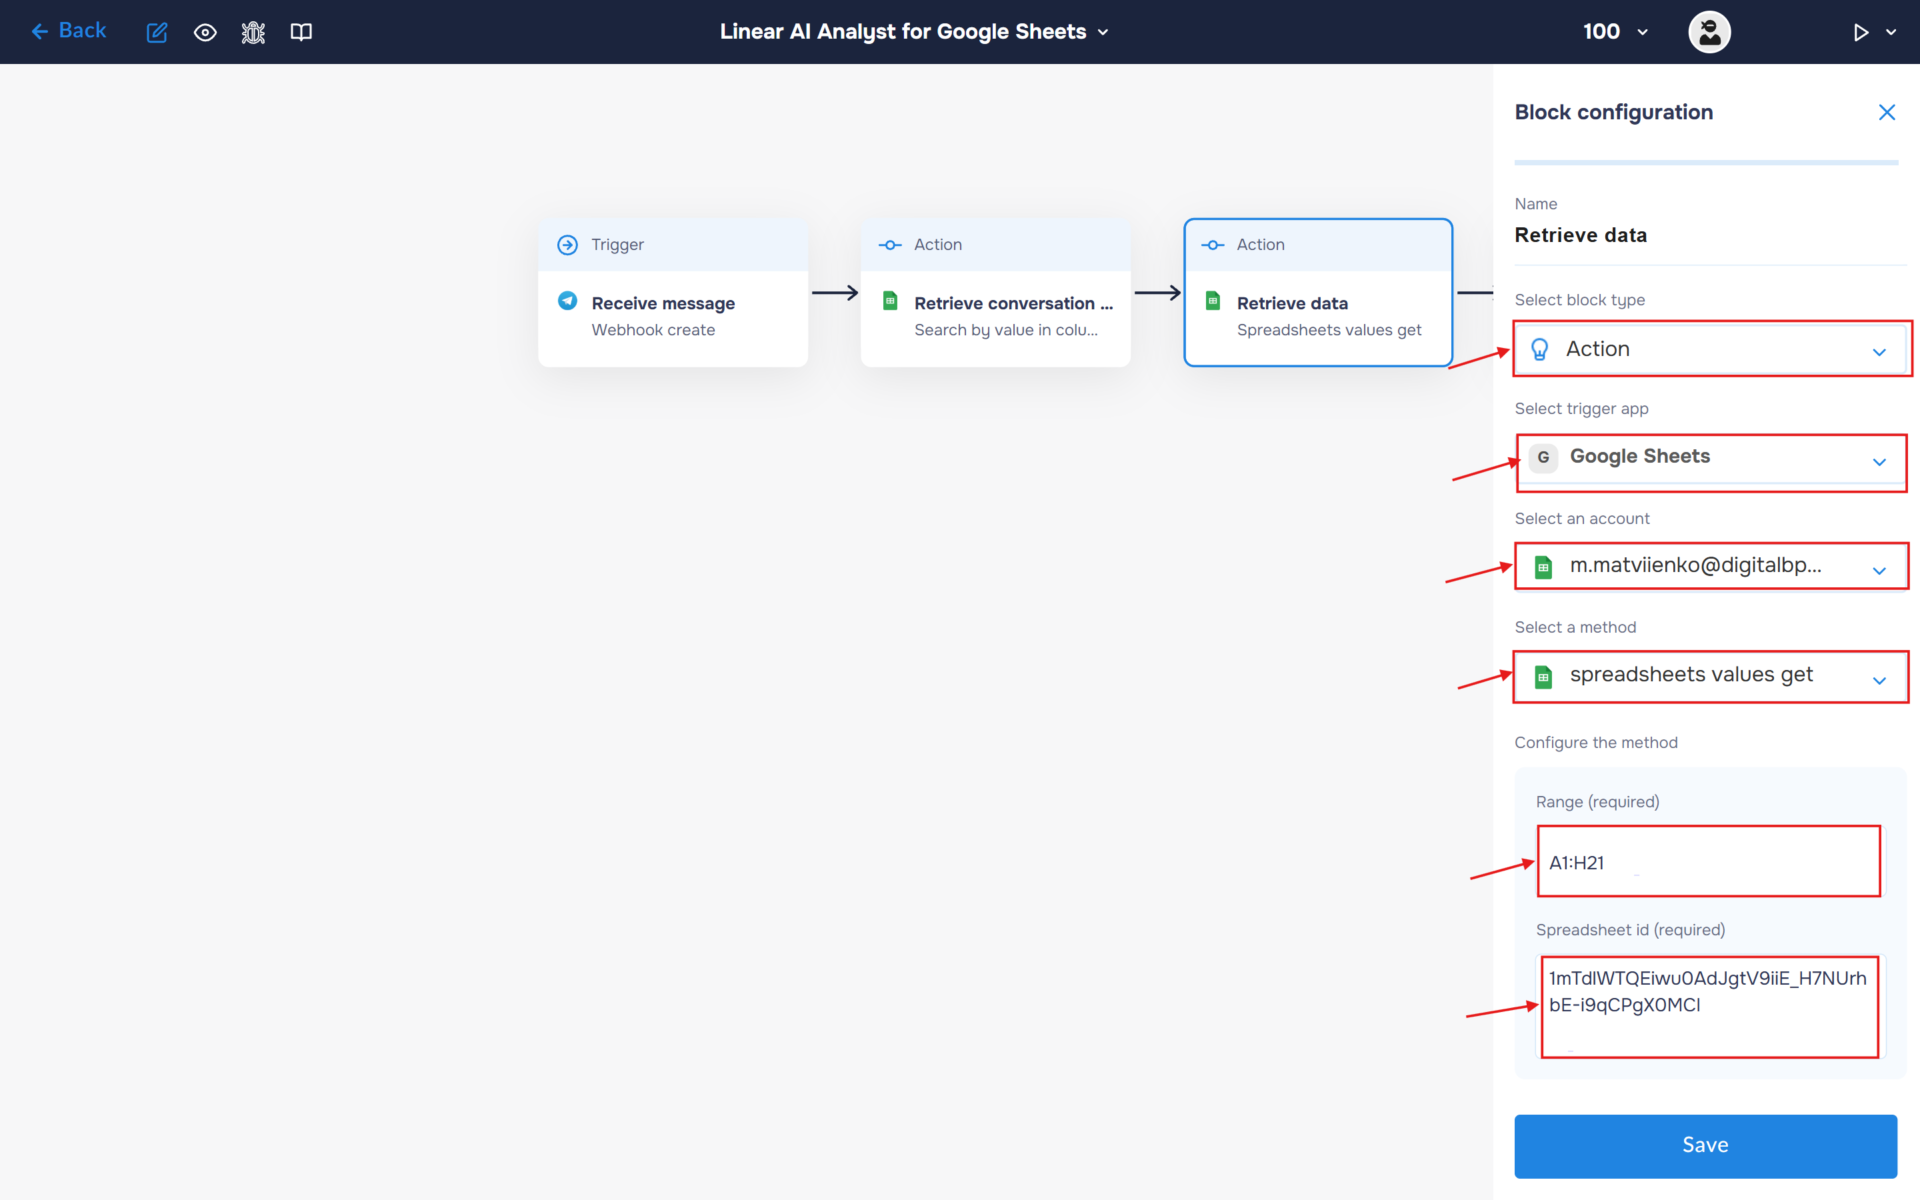
Configure the “Get Sheet” block to retrieve data from the spreadsheet. This data will be used for processing by the AI Analyst in the next steps of the workflow.
- Select the block type as “Action” and the service as “Google Sheets“.
- Choose an account and select it.
- Find and select the “spreadsheet values get” method.
- In the “Range” field, enter the cell range that contains your data in the spreadsheet. For example, if your table starts at cell A1 and ends at H21, enter “A1:H21”. This range should cover all rows and columns that you want the workflow to retrieve and analyze.
- Enter the spreadsheet identifier in the “Spreadsheet ID” field. Note: you need to insert the ID of your main spreadsheet containing your data, not a technical sheet.
Step 4: Integrate Gemini AI for Content Analysis and Copywriting
1. Next, process the data retrieved from Google Sheets using Gemini. The AI Analyst will analyze the structured dataset, combine it with the current conversation summary, and interpret the user’s request to generate a clear, data-driven response.
- In the “Block Configuration“ panel, click on the “Select block type“ field and select the “Action” type.
- Next, you need to add Gemini service by clicking on the field “Select trigger app“; find and select “Gemini“.
- To connect to Gemini, you need to create an authorisation. Click on the “Sign in“ button in the “Select an account“ section.
- After clicking the button, a window for creating a new Gemini authorization will open. Enter a name for the authorization, provide the required credentials, and save the connection.
- If the authorization is successful, the created authorization will appear in the “Select an account” field. You need to select this authorization to configure the next steps of the block.
- The next step is to select a method, so click on the “Select a method“. Find and select the “generating content” method.
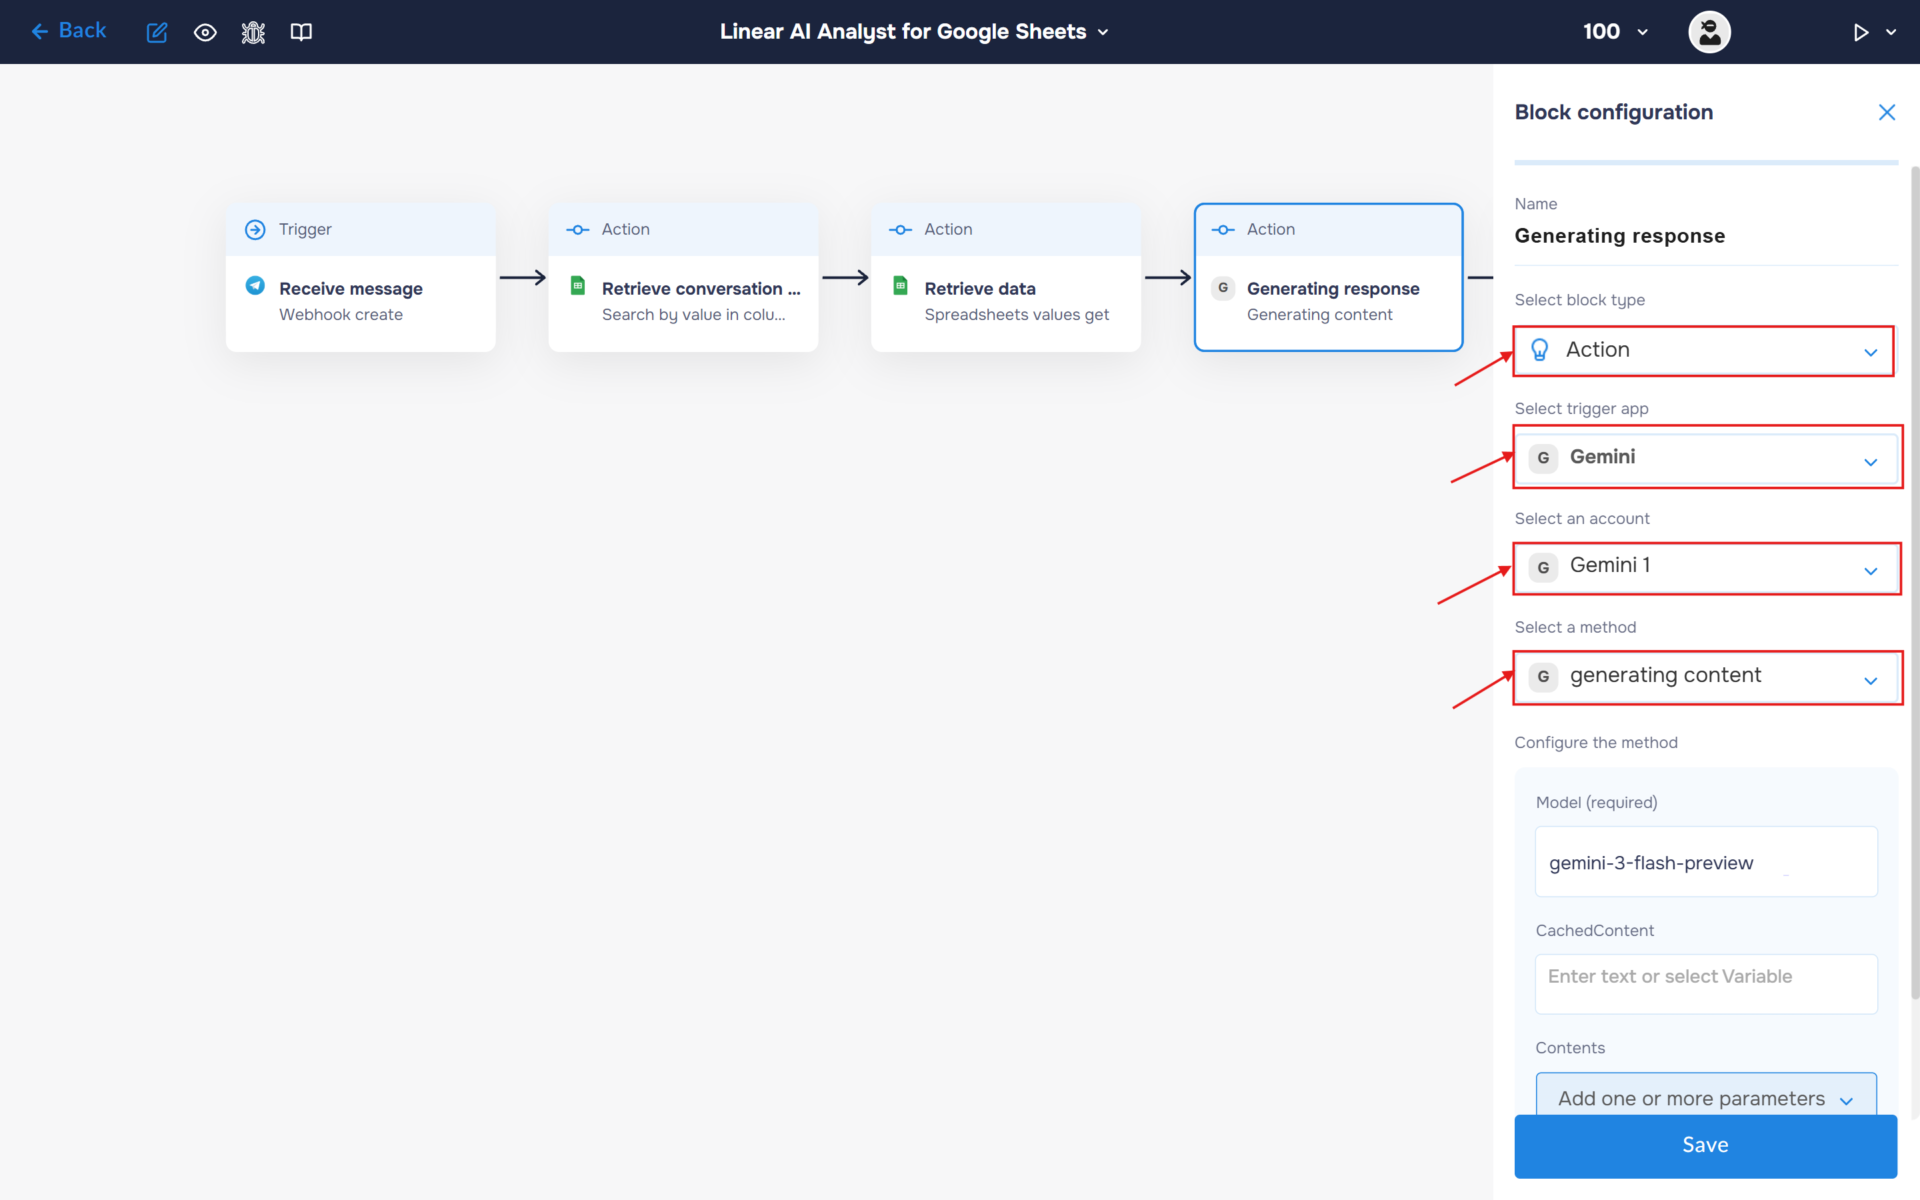
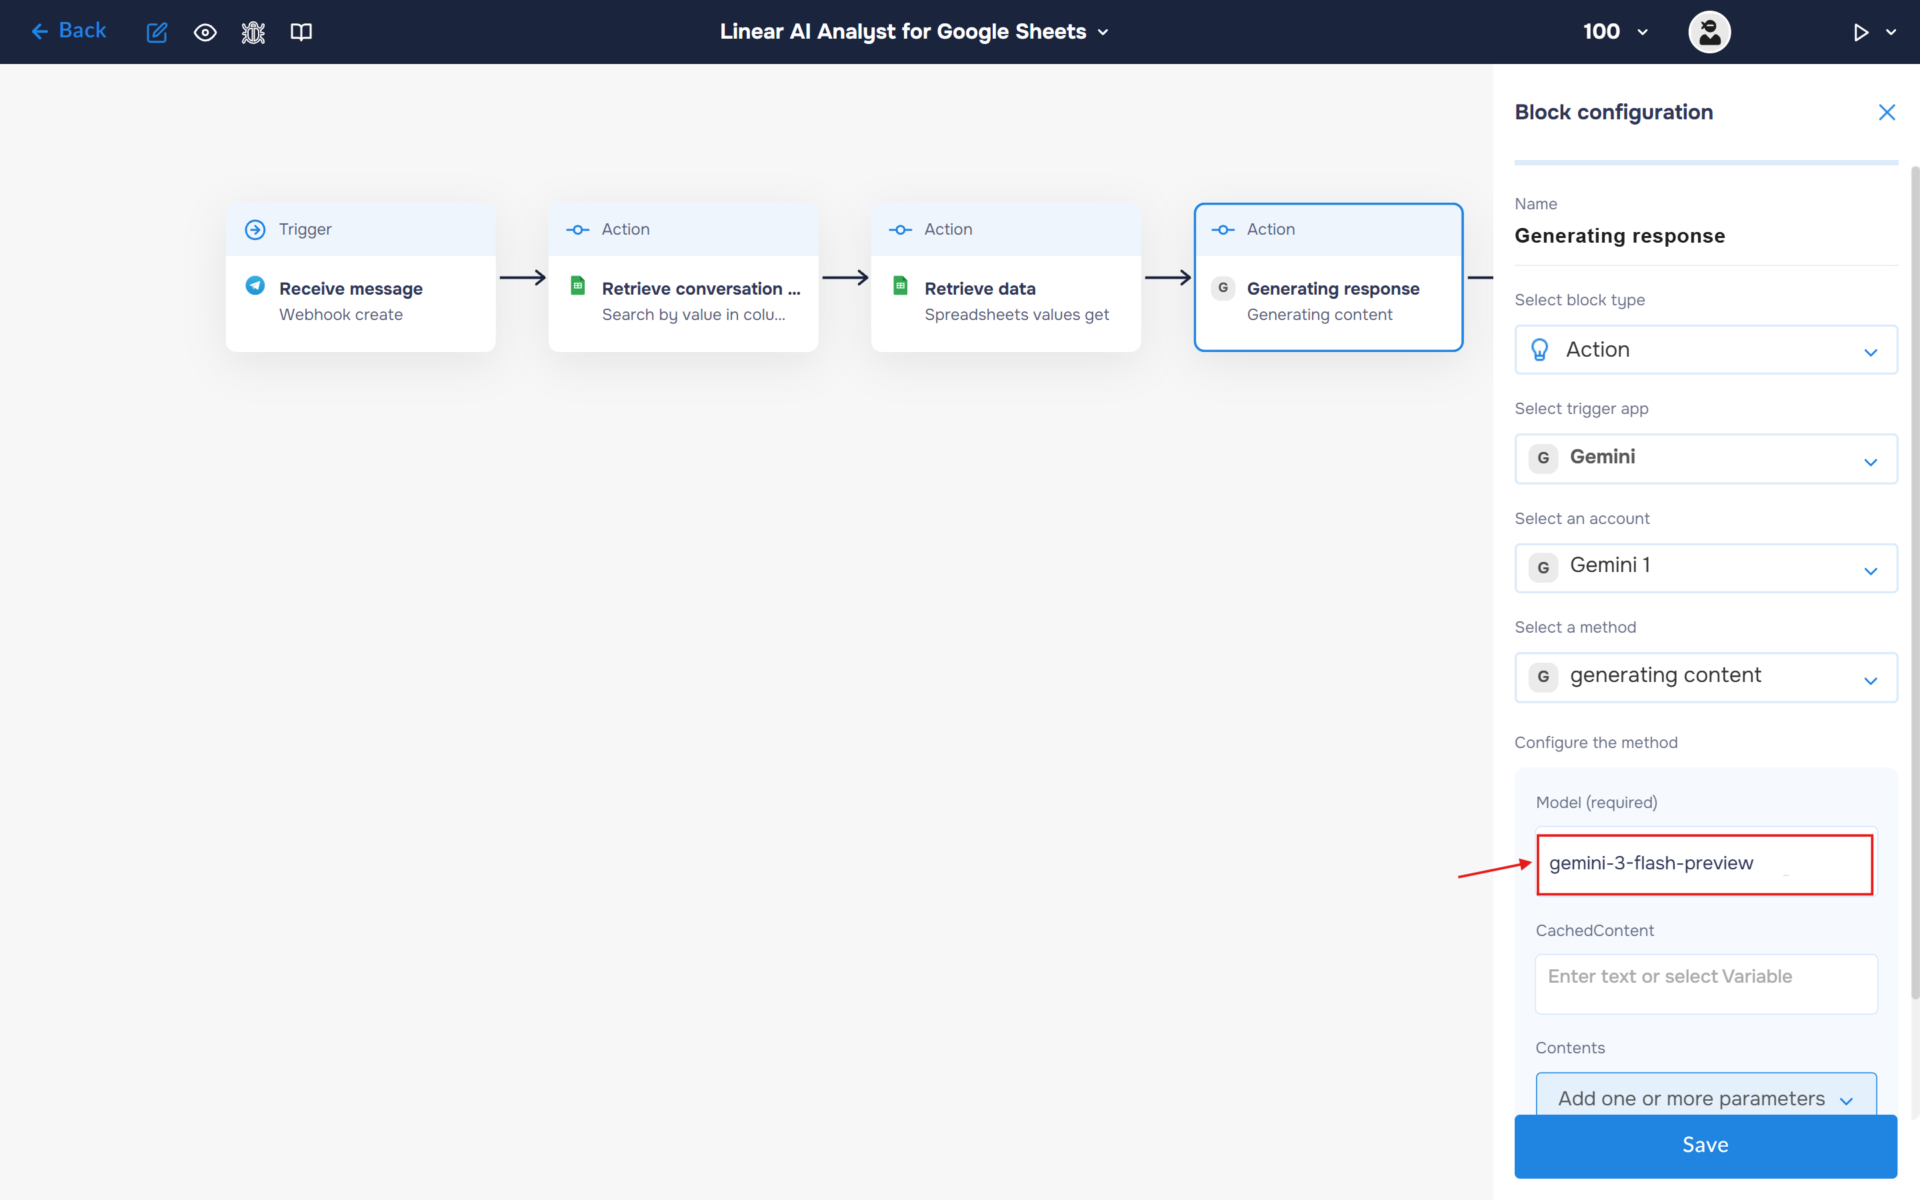
2. Specify the model name in the corresponding field (e.g., gemini-3-flash-preview).
3. In the Content section, select “Add one or more parameters”. Add a Content object and expand it. Then expand Parts and add a Text object. This is where you will enter the prompt that will be sent to the AI model for processing.
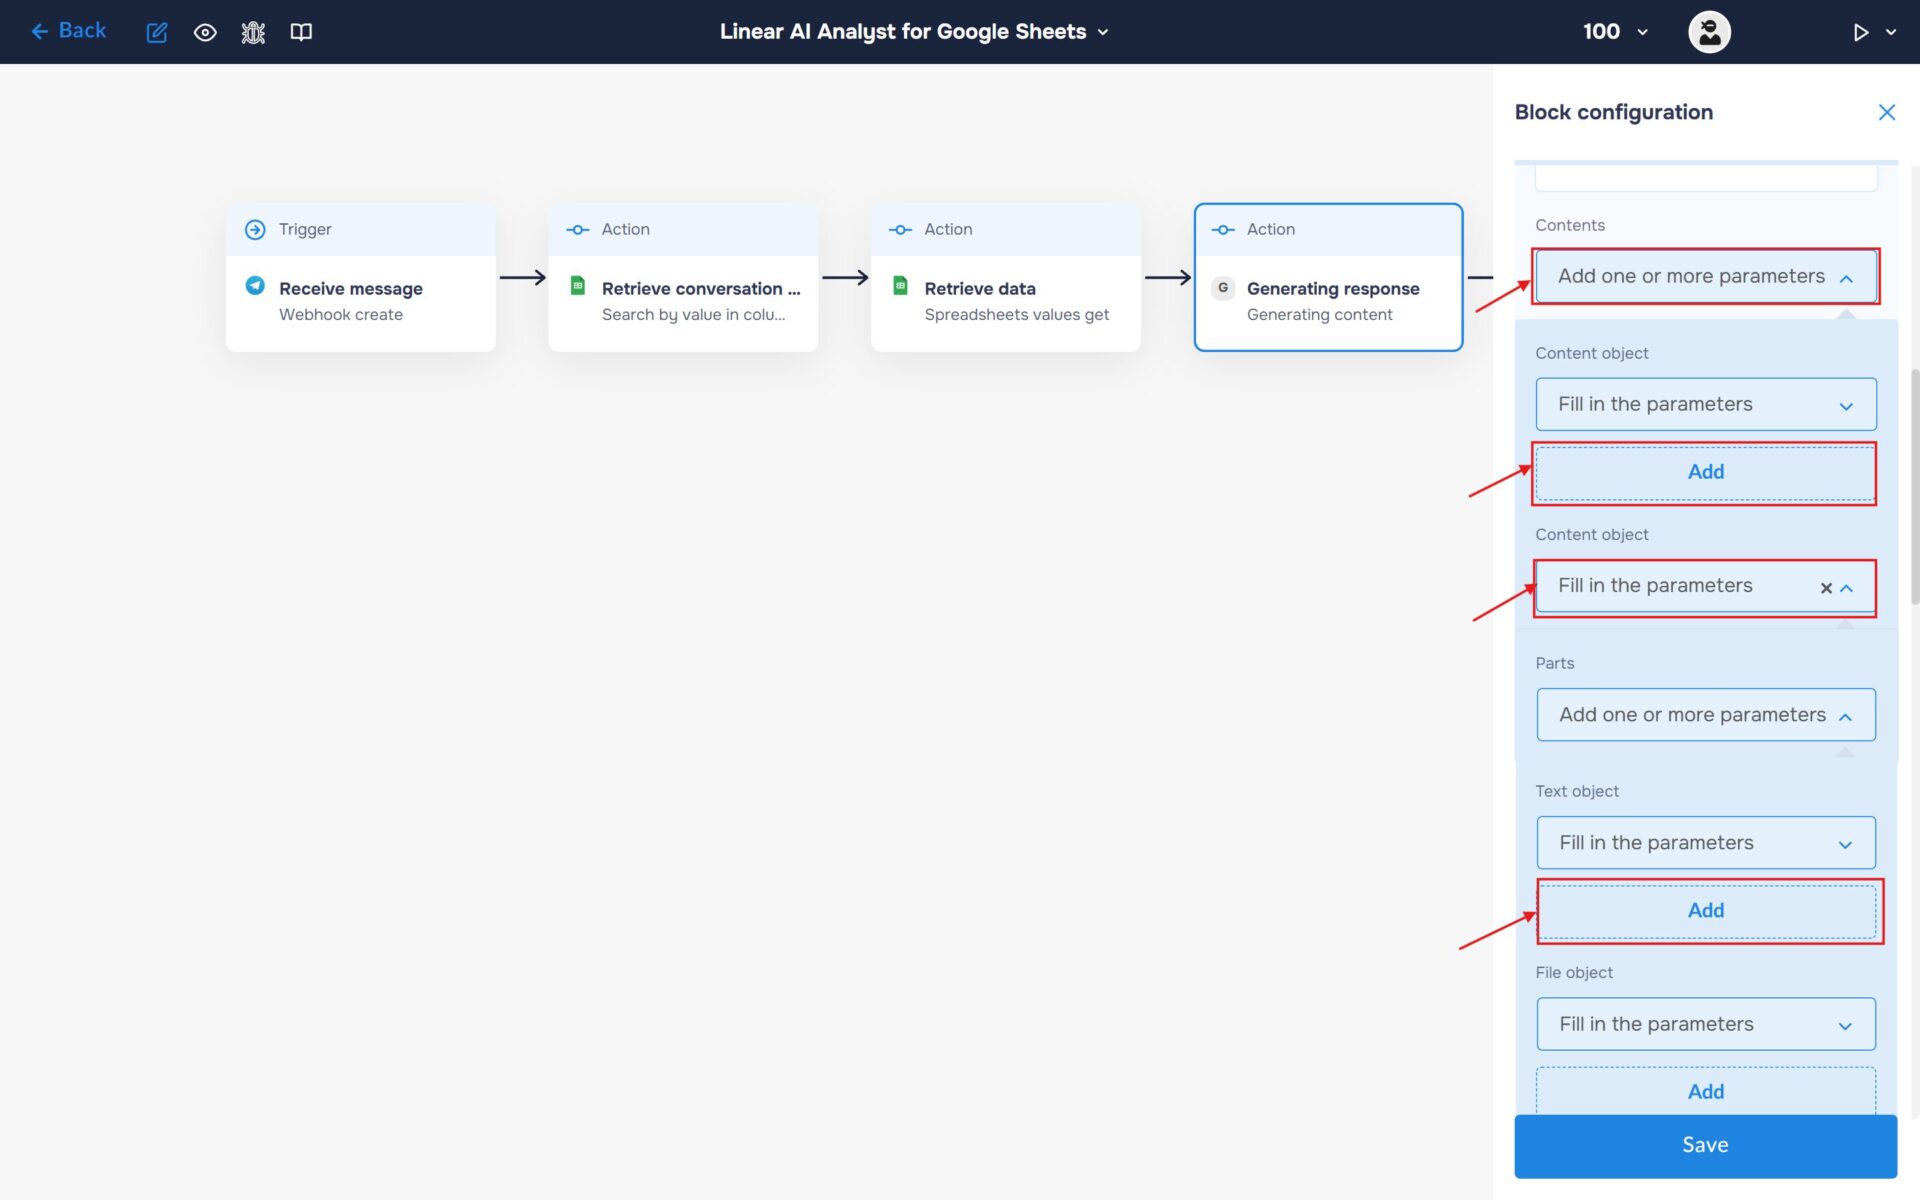
4. Fill the“ Text“ field with your prompt.
🔧 Default Prompt: You are an AI Data Analyst working inside an automated workflow.
You will receive structured data from a Google Sheet, a short summary of the previous conversation, and a user question.
Your task:
Carefully analyze the provided dataset from Google Sheets.
Use the conversation summary to understand context and previously discussed filters or constraints. If the conversation summary is missing or empty, assume this is a first interaction with the user and proceed without any prior context.
Interpret the user’s question and determine what information or calculation is required.
Perform all reasoning and calculations internally based ONLY on the provided data.
Generate a clear, concise, and factual answer.
Rules:
Use ONLY the data provided in the Google Sheet input.
Do NOT invent missing values, assumptions, or external information.
If the dataset does not contain enough information to answer the question, explicitly state that the answer cannot be derived from the available data.
Keep the response short, structured, and easy to understand.
Respond in the same language as the user request.
Output must be plain text only. Absolutely no Markdown, no symbols for formatting, no bullet points, no headings, no bold or italic text, and no special characters used for structuring. Write in simple paragraphs only.
Inputs:
Google Sheet Data: step_3.data
Conversation Summary: step_2.current_summary
User Question: step_1.message
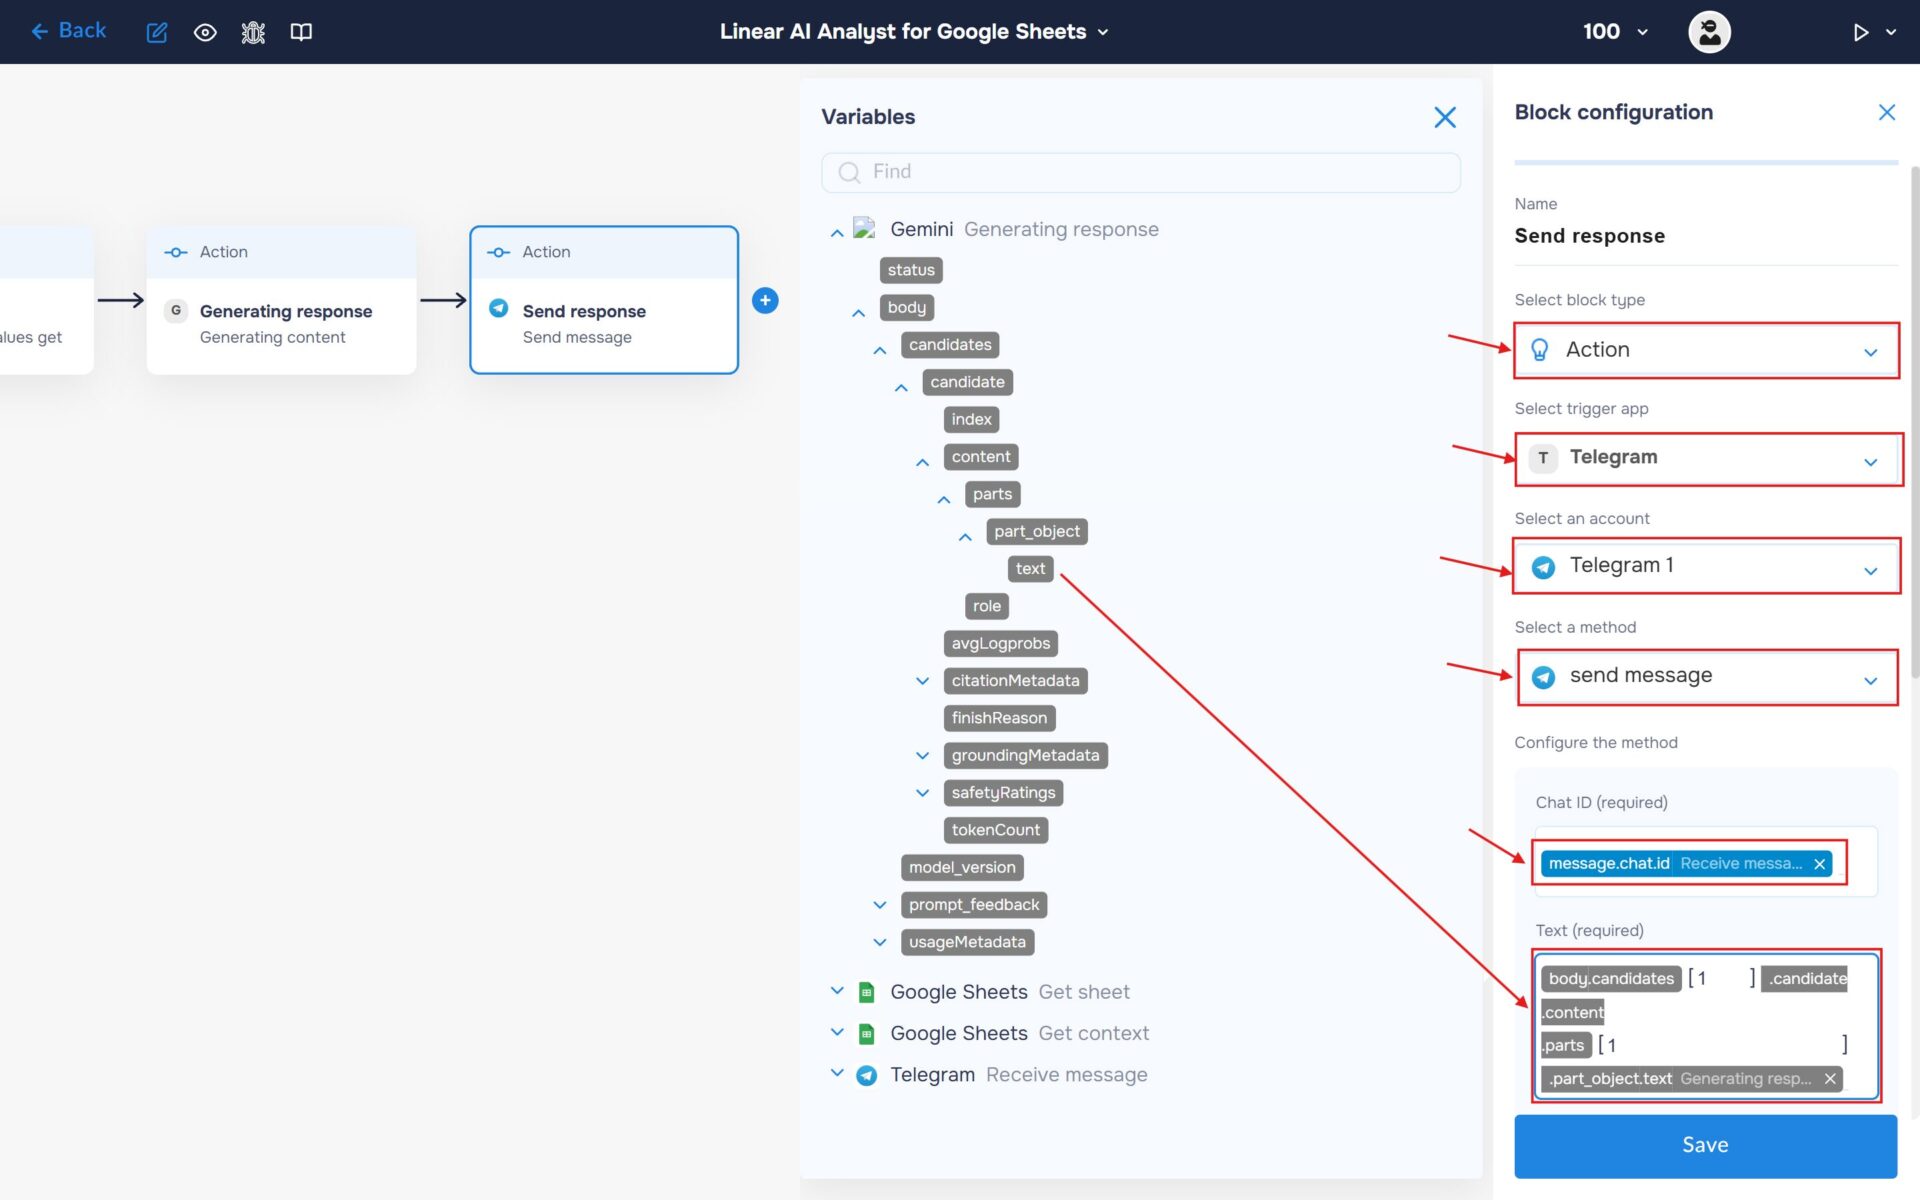
Step 5: Send response to Telegram
Now we can send the AI Analyst’s response back to the user. The user will receive a data-driven answer based on the contents of the spreadsheet and the context of the conversation.
- Select the block type as “Action” and the service as “Telegram“.
- Choose an account and select it.
- Find and select the “send message” method.
- In the “Chat ID” field, enter the Chat ID stored in the “message.chat.id” variable.
- In the “Text field”, insert the response generated by Gemini so that it can be sent to your Telegram chat.
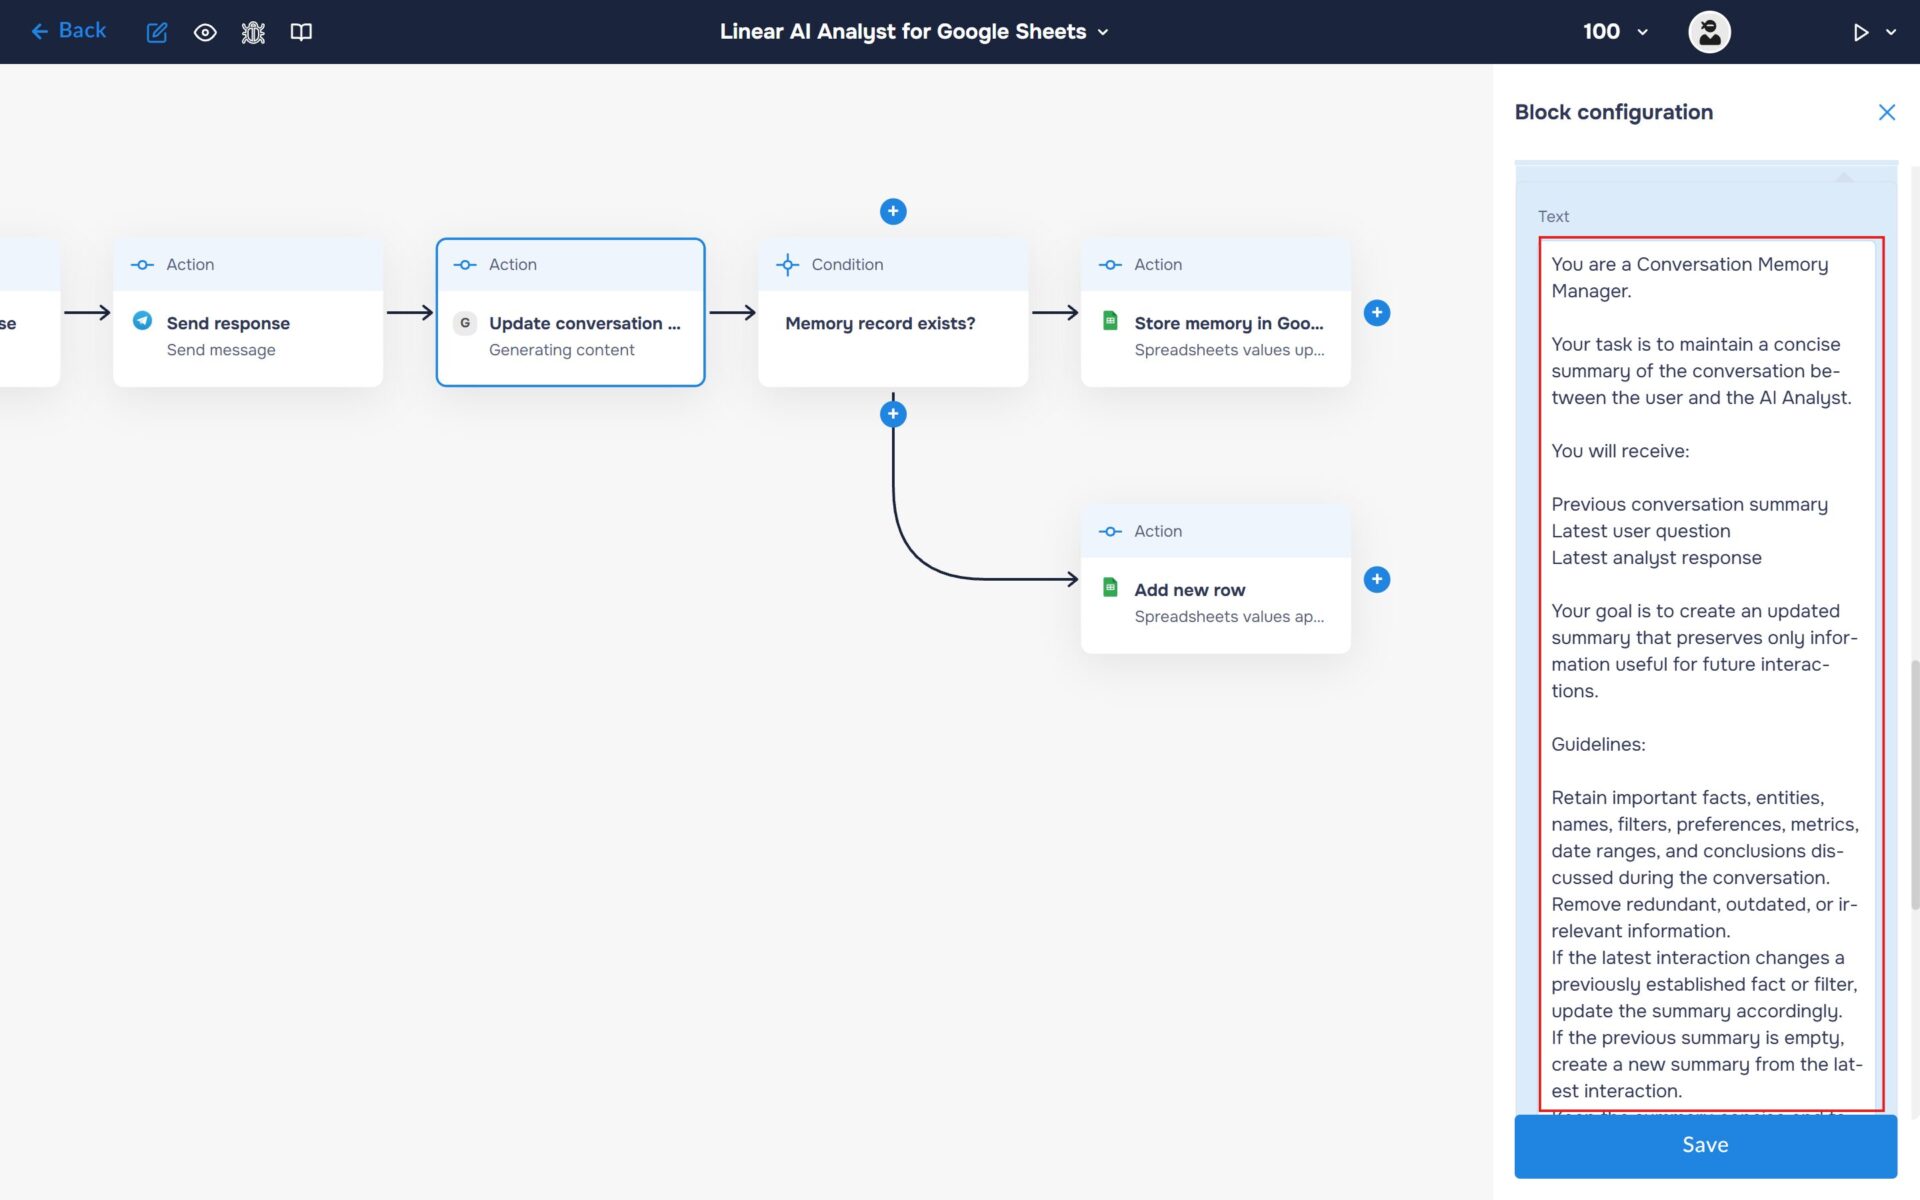
Step 6: Generate an updated conversation summary for memory optimization
Instead of feeding the entire chat history back into the AI (which exponentially increases API costs and risks context overflow), we will use a summarizer prompt. This creates a lightweight, constantly updating single-string memory.
1. To preserve the current conversation context for future interactions, use Gemini AI to generate an updated summary. Configure this block in the same way as described in Step 4. In the “Text” field, enter the summarization prompt.
🔧 Default Prompt: You are a Conversation Memory Manager.
Your task is to maintain a concise summary of the conversation between the user and the AI Analyst.
You will receive:
Previous conversation summary
Latest user question
Latest analyst response
Your goal is to create an updated summary that preserves only information useful for future interactions.
Guidelines:
Retain important facts, entities, names, filters, preferences, metrics, date ranges, and conclusions discussed during the conversation.
Remove redundant, outdated, or irrelevant information.
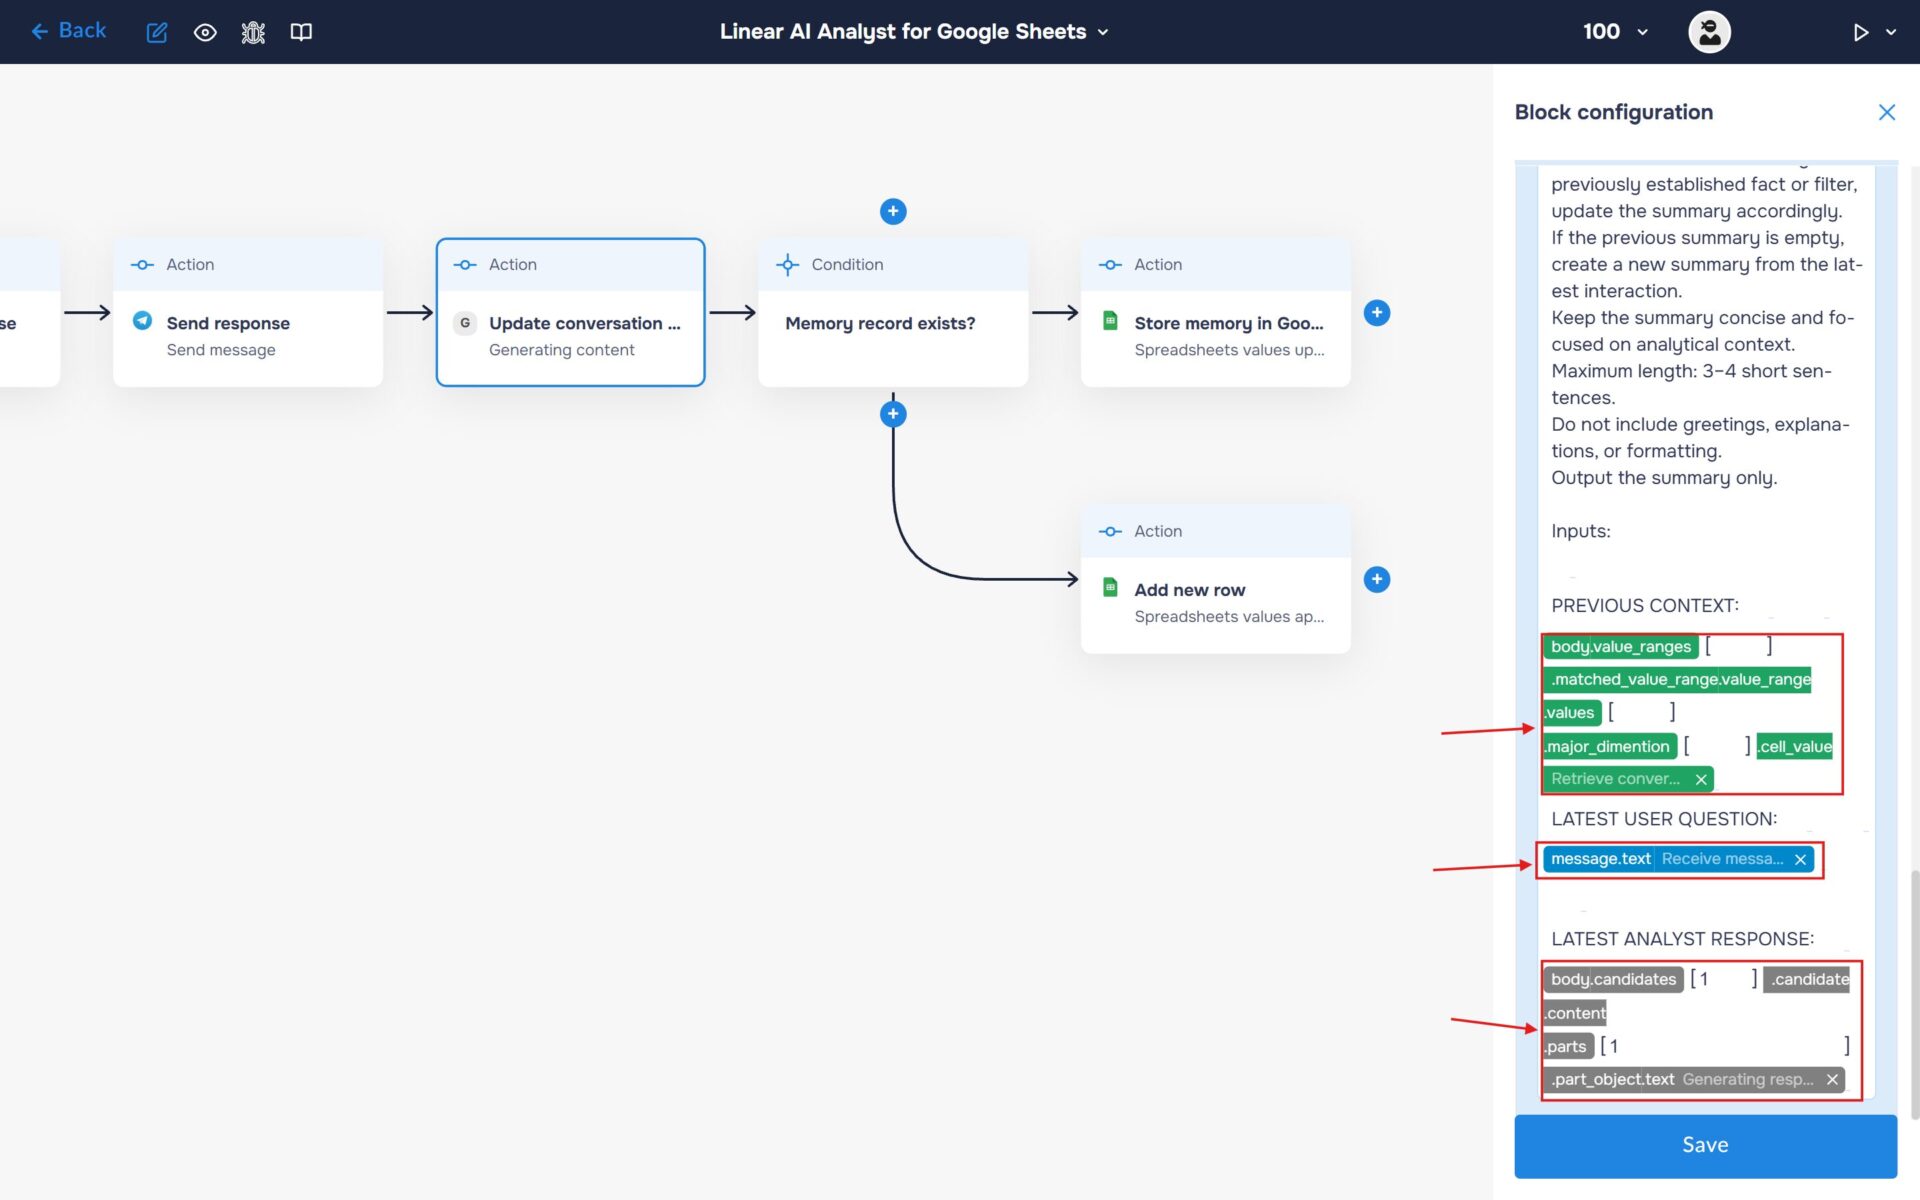
If the latest interaction changes a previously established fact or filter, update the summary accordingly.
If the previous summary is empty, create a new summary from the latest interaction.
Keep the summary concise and focused on analytical context.
Maximum length: 3–4 short sentences.
Do not include greetings, explanations, or formatting.
Output the summary only.
Inputs:
[PREVIOUS CONTEXT]
step_2.current_summary
[LATEST USER QUESTION]
step_1.user_message
[LATEST ANALYST RESPONSE]
step_4.ai_response
2. Add the following variables:
- The previously stored conversation summary
- The latest user request
- The latest response generated by the AI Analyst
Gemini will combine this information into a concise summary that will be saved and used as context for subsequent user requests.
Step 7: Save the updated conversation summary to Google Sheets
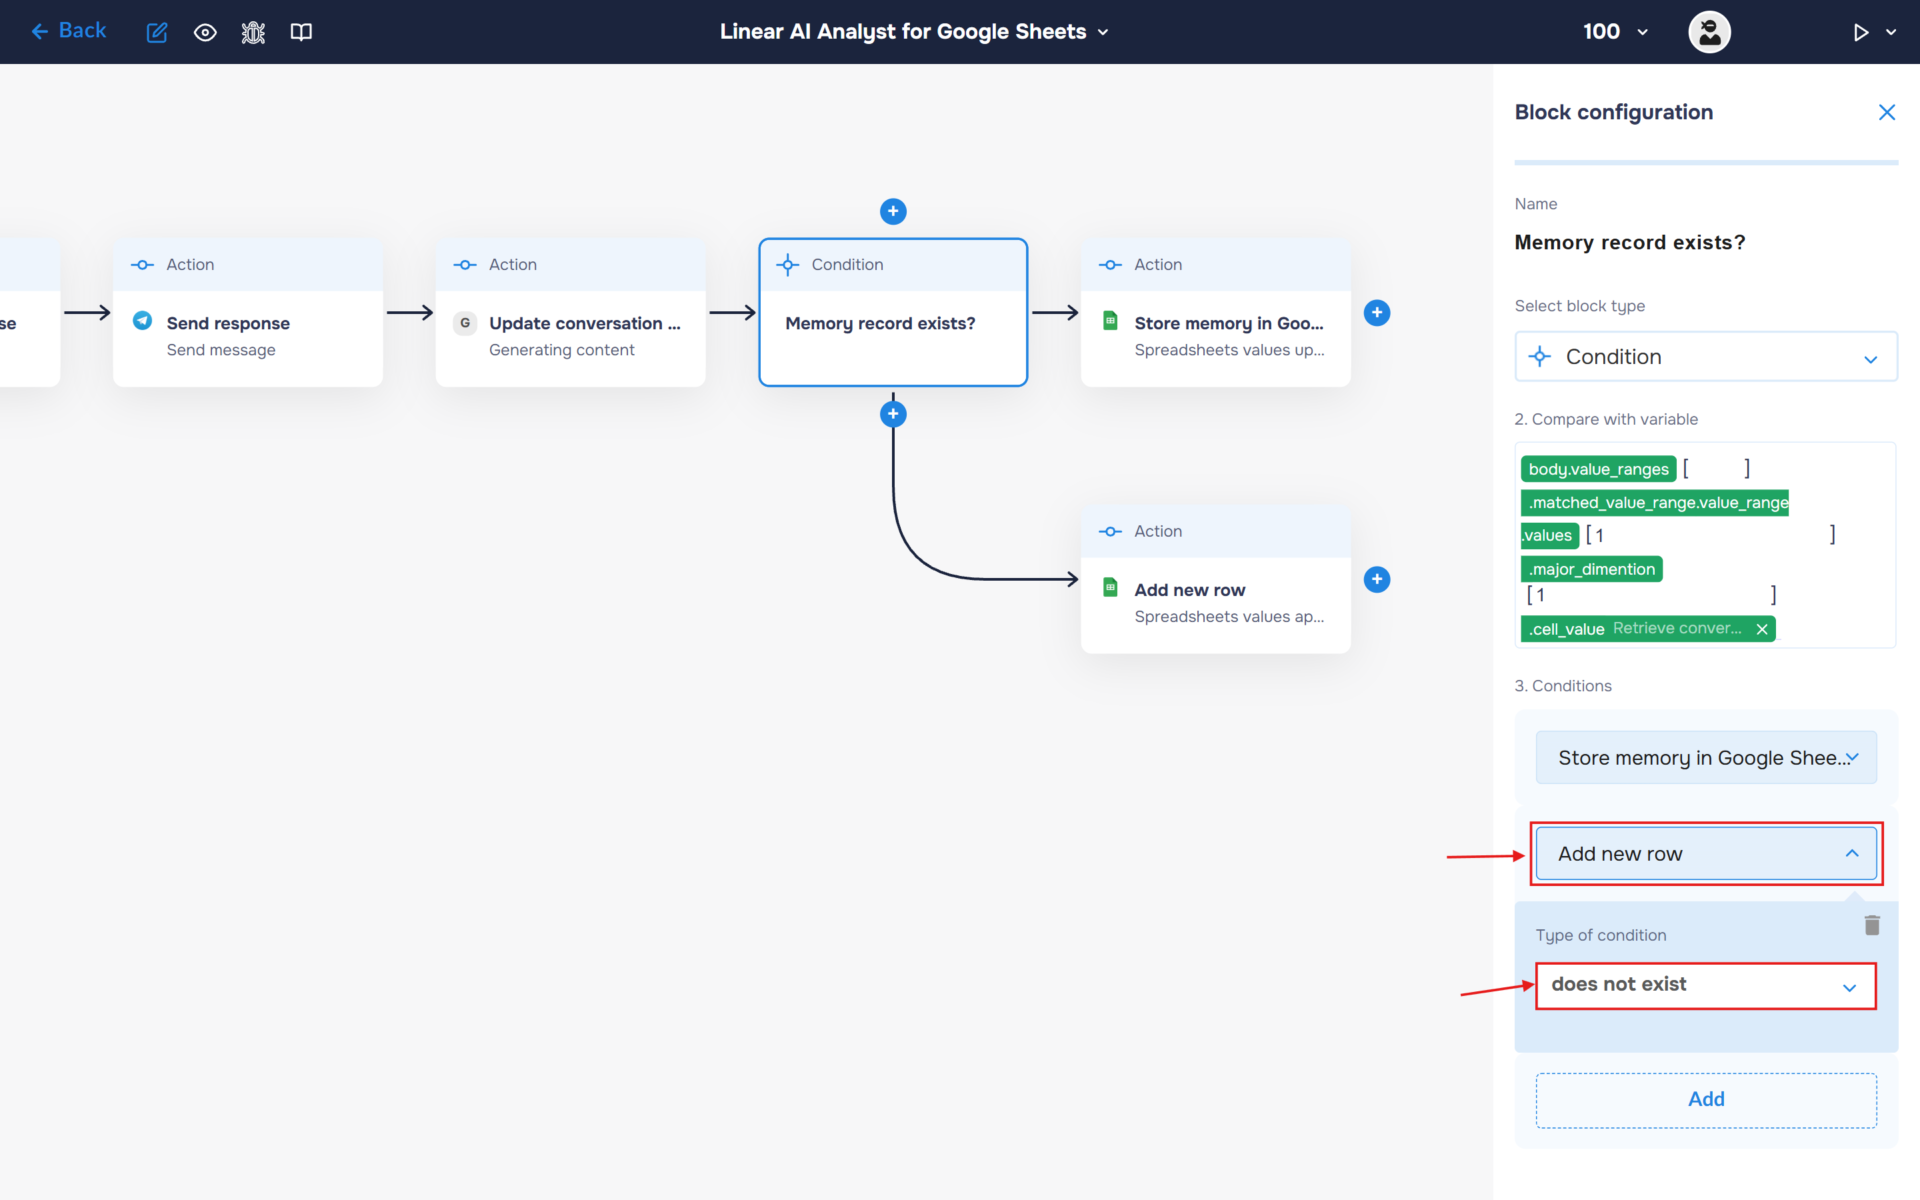
1. If a user is interacting with the AI Analyst for the first time, their Chat ID will not yet exist in the list. To handle this scenario, use the “Condition” block to check whether the Chat ID is present.
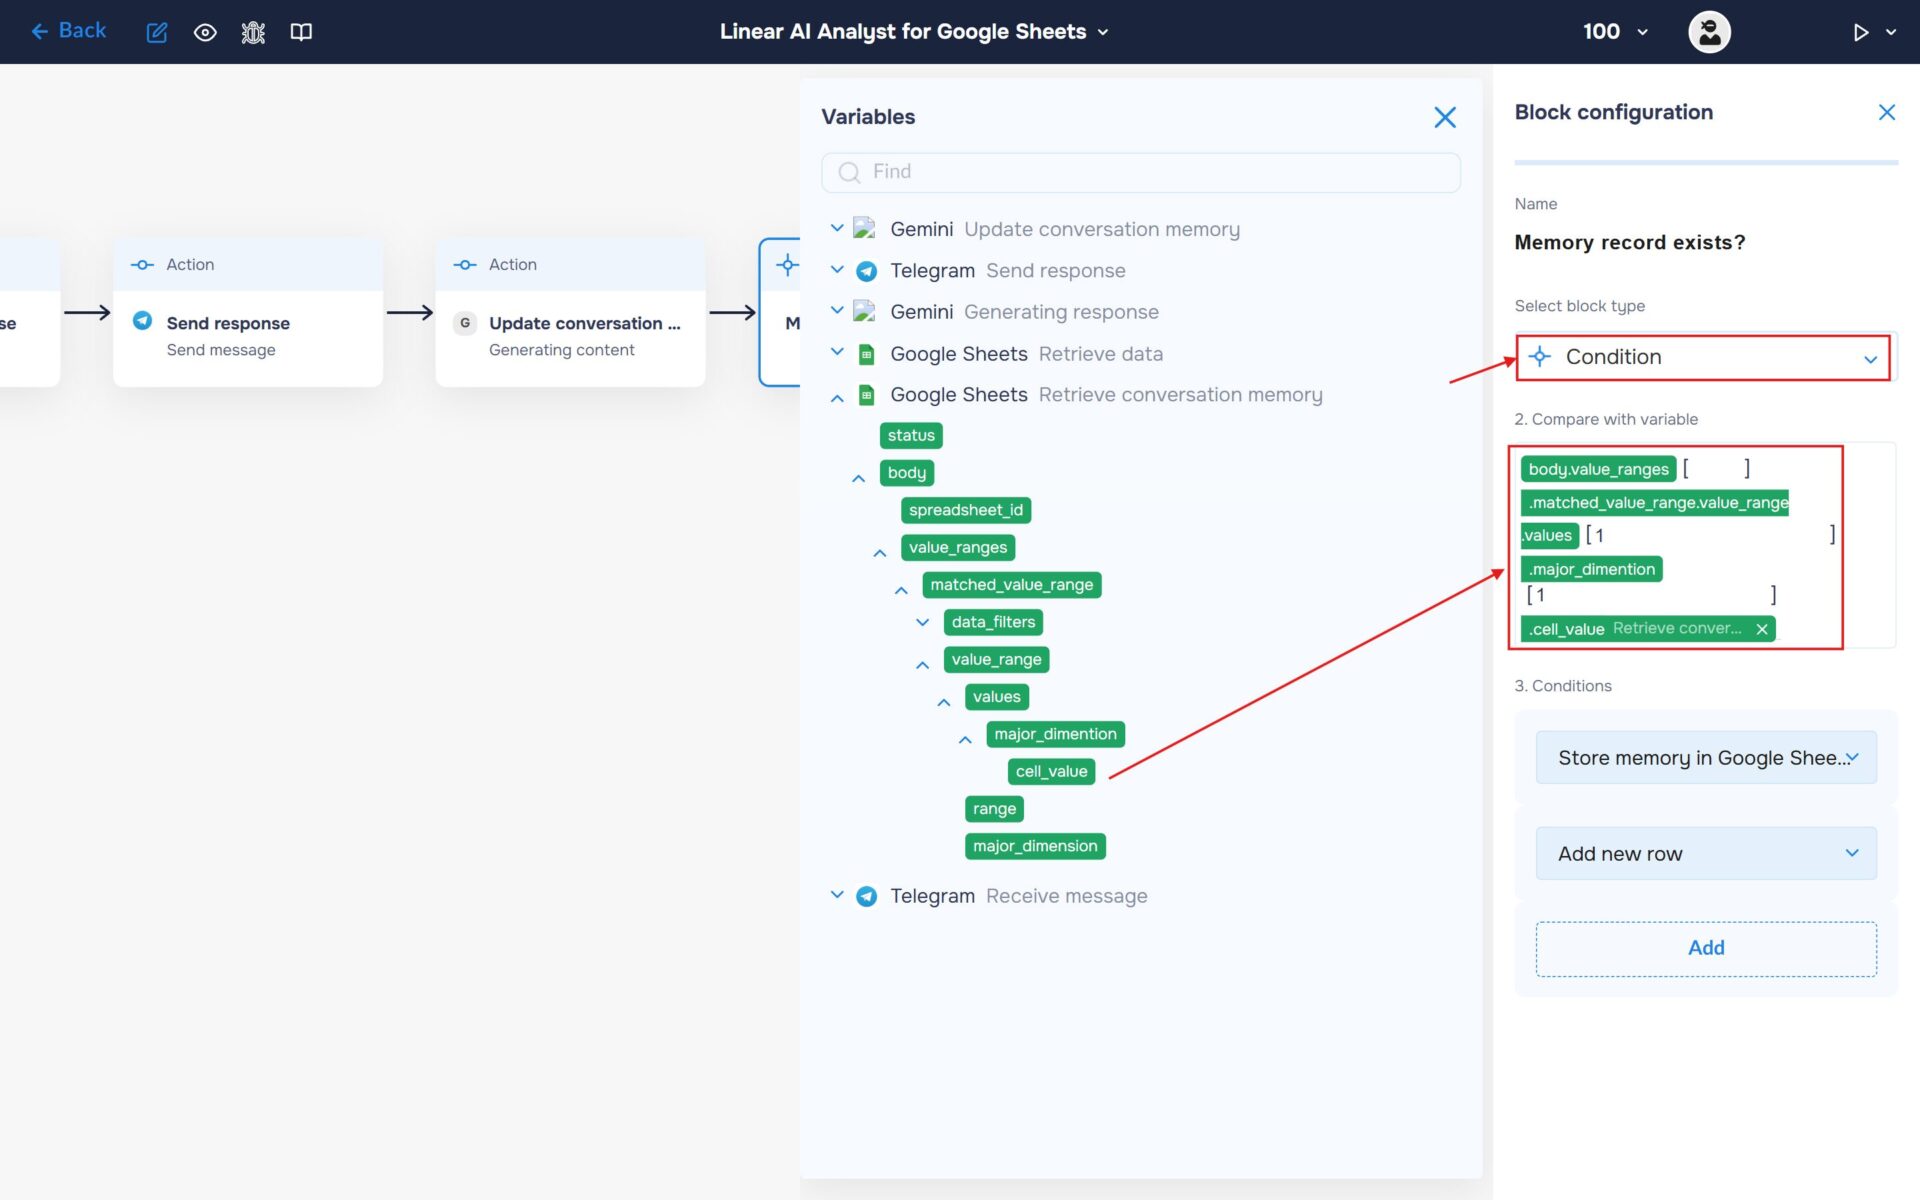
2. Add a new block to handle cases where the Chat ID does not exist. Name this block “Add New Row”. In the “Conditions” section, expand the newly created block and set “Type of Condition” to “Does Not Exist”.
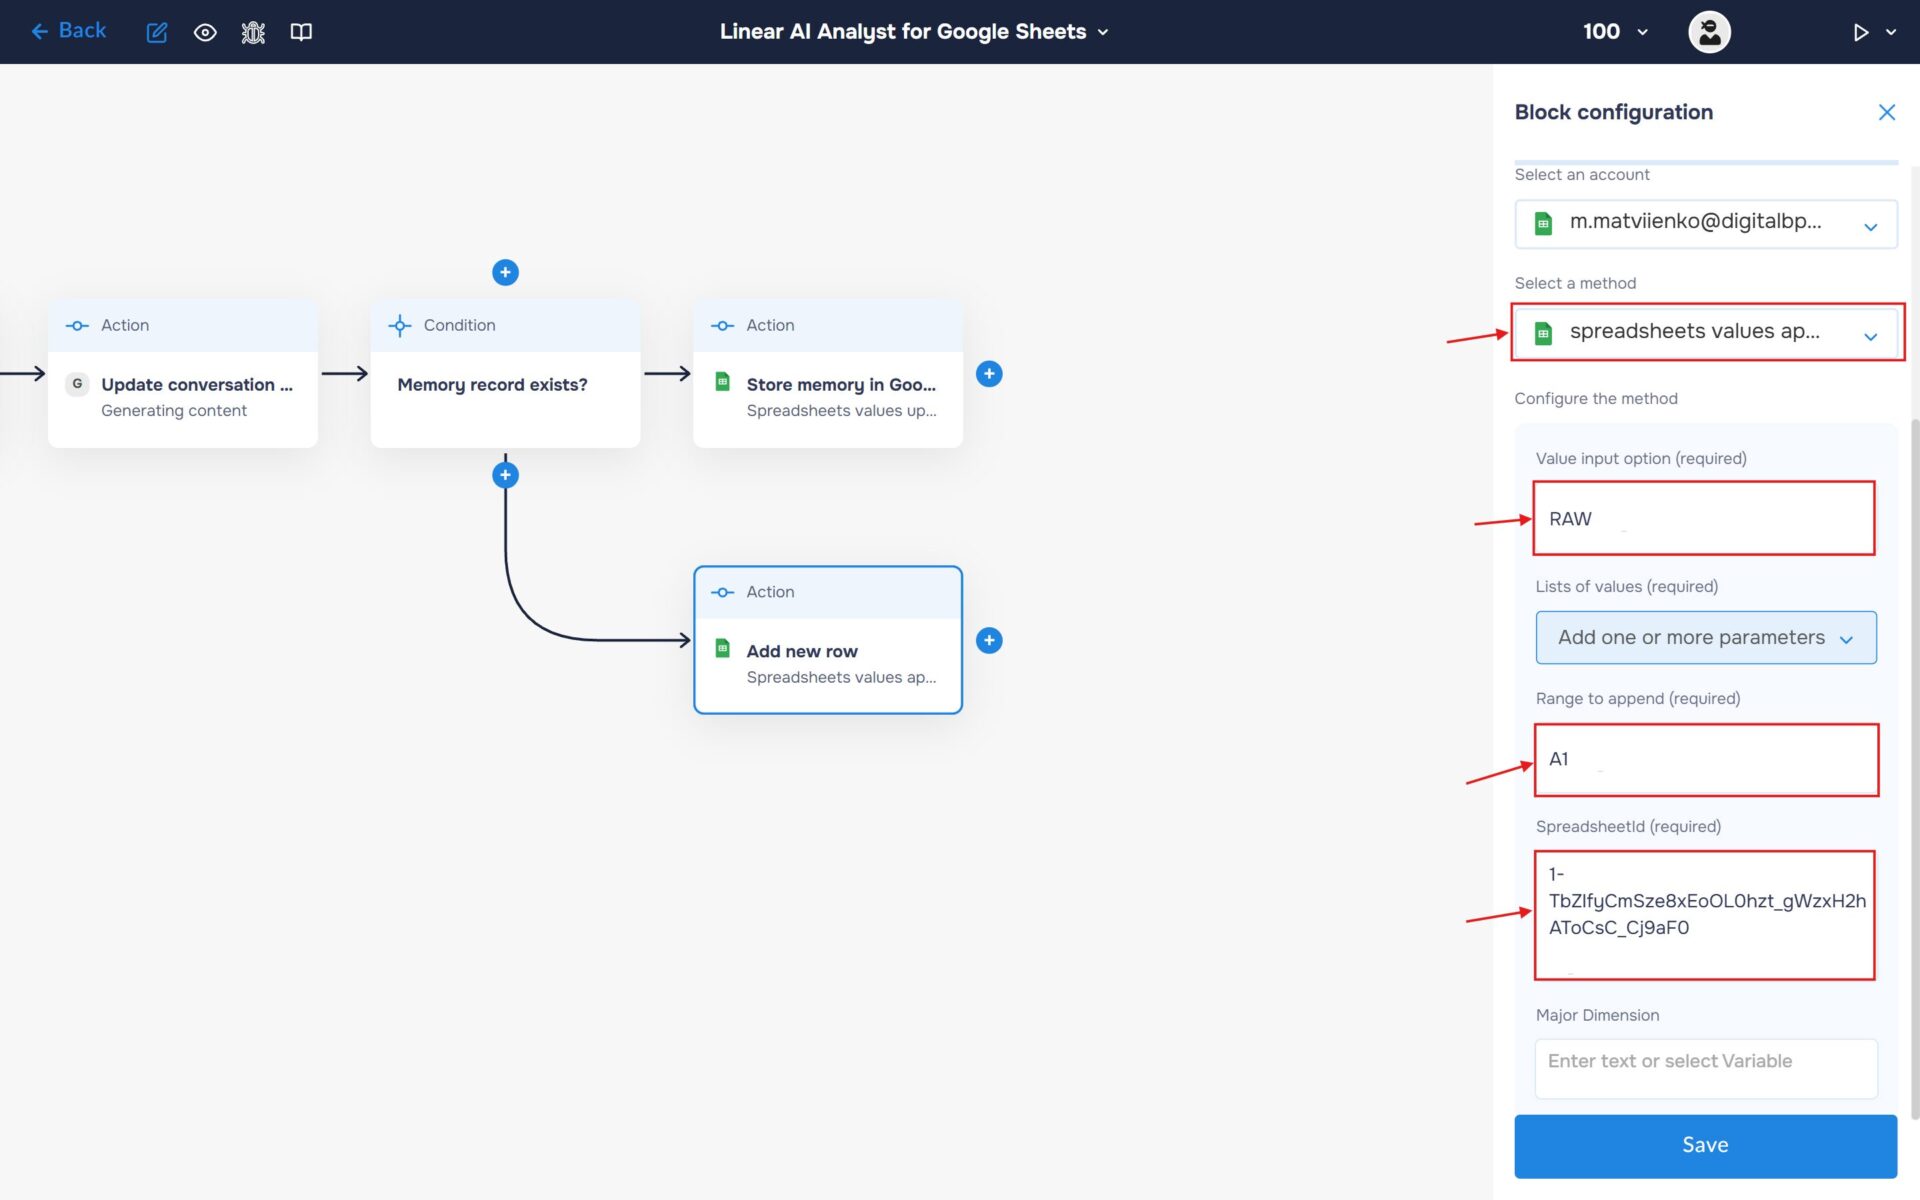
3. Fill in the “Add new row” block to store a new record in the Google Sheet when a new Chat ID appears for the first time.
- Select the block type as “Action” and the service as “Google Sheets“.
- Choose an account and select it. Note: choose the account where you created the table at the beginning of the guide.
- Find and select the “spreadsheet values append” method. Use this method to add new row to the sheet.
- In the “Value input option” field, enter the value “RAW” – Select RAW if you want to write plain data, or USER_ENTERED if you want Google Sheets to parse strings into dates and numbers automatically.
- In the “Range to append” field, enter the range of the table headers or the first row where the first data will be placed.
- Enter the spreadsheet identifier in the “Spreadsheet ID” field.
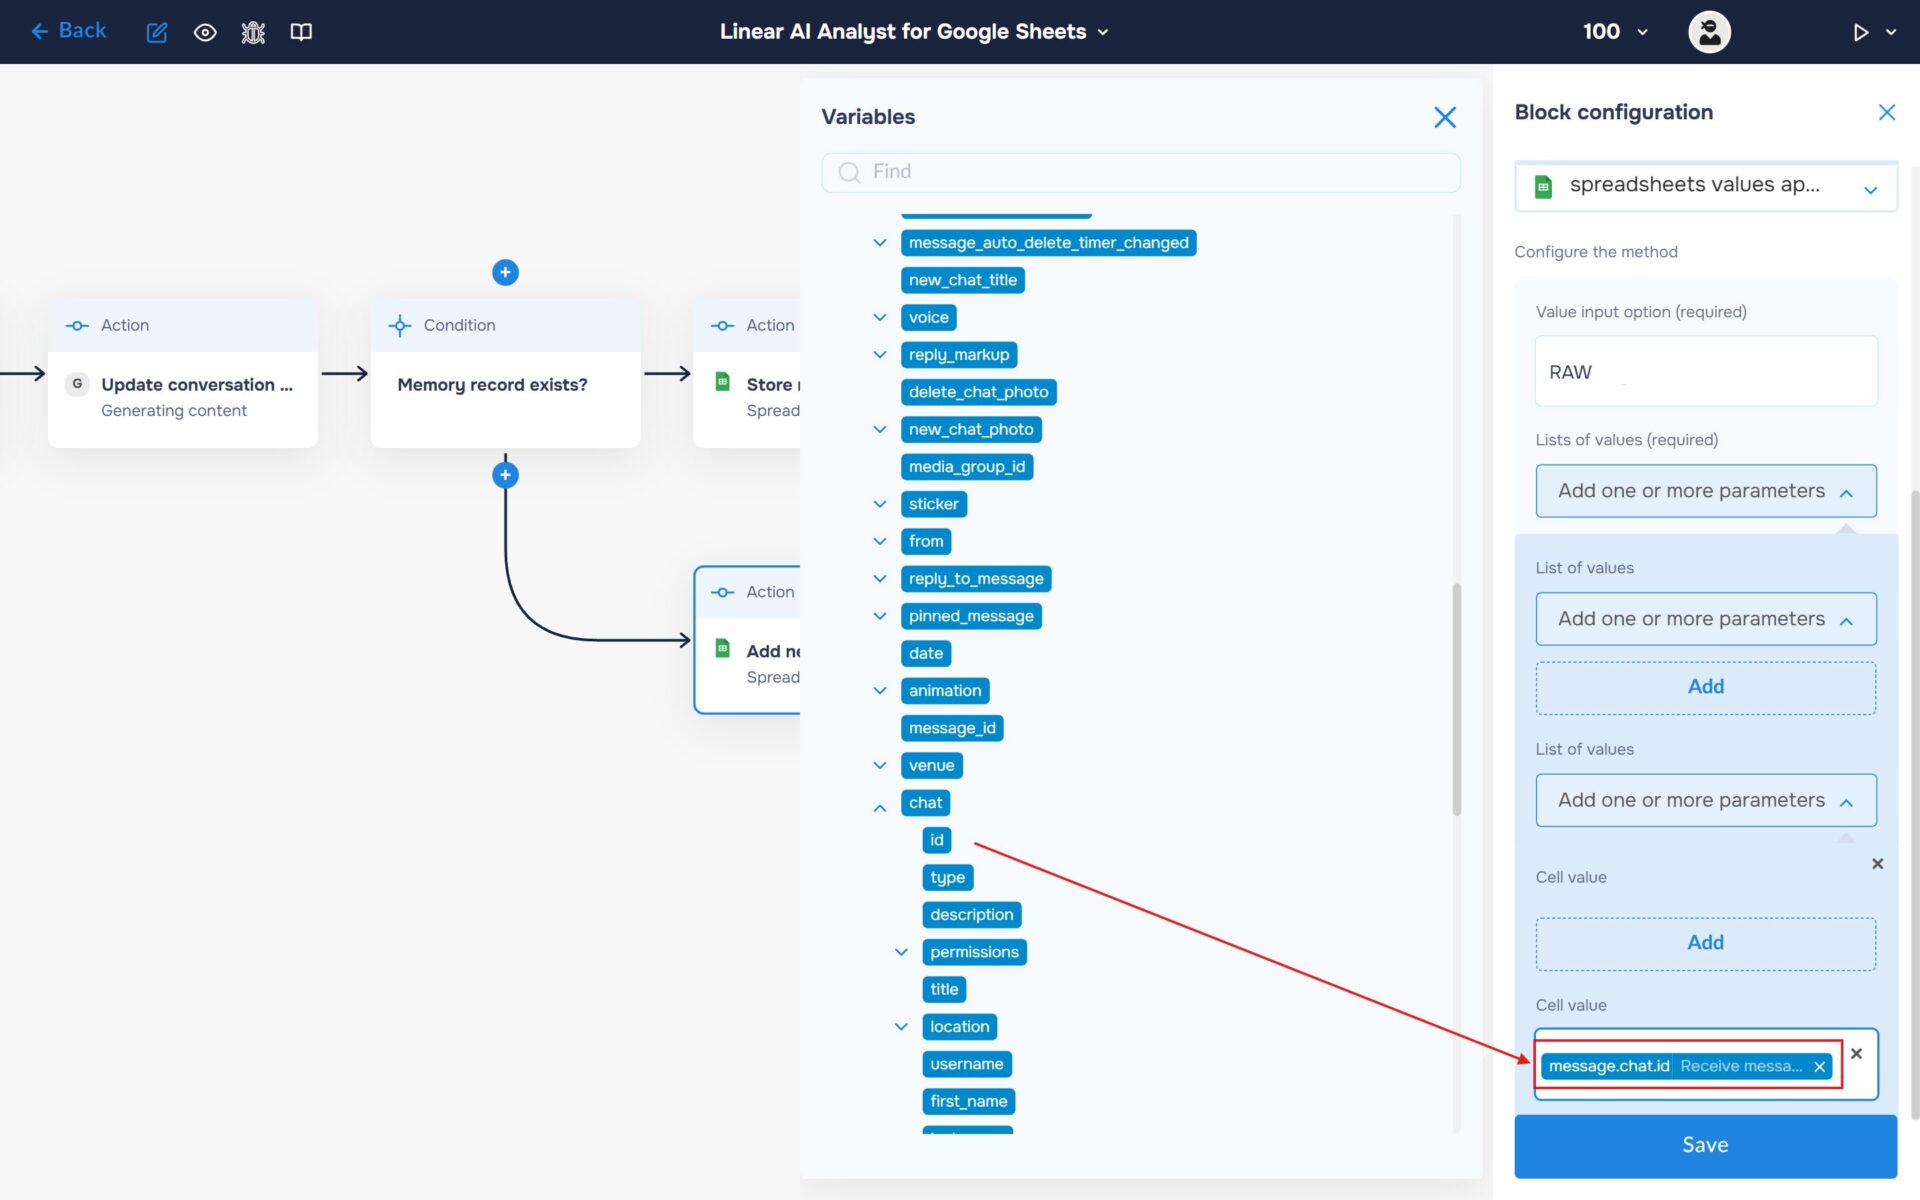
Expand the “List of Values” and create the list of values, which corresponds to the row we will be adding. For the created list, add a cell and fill it with the chat ID.
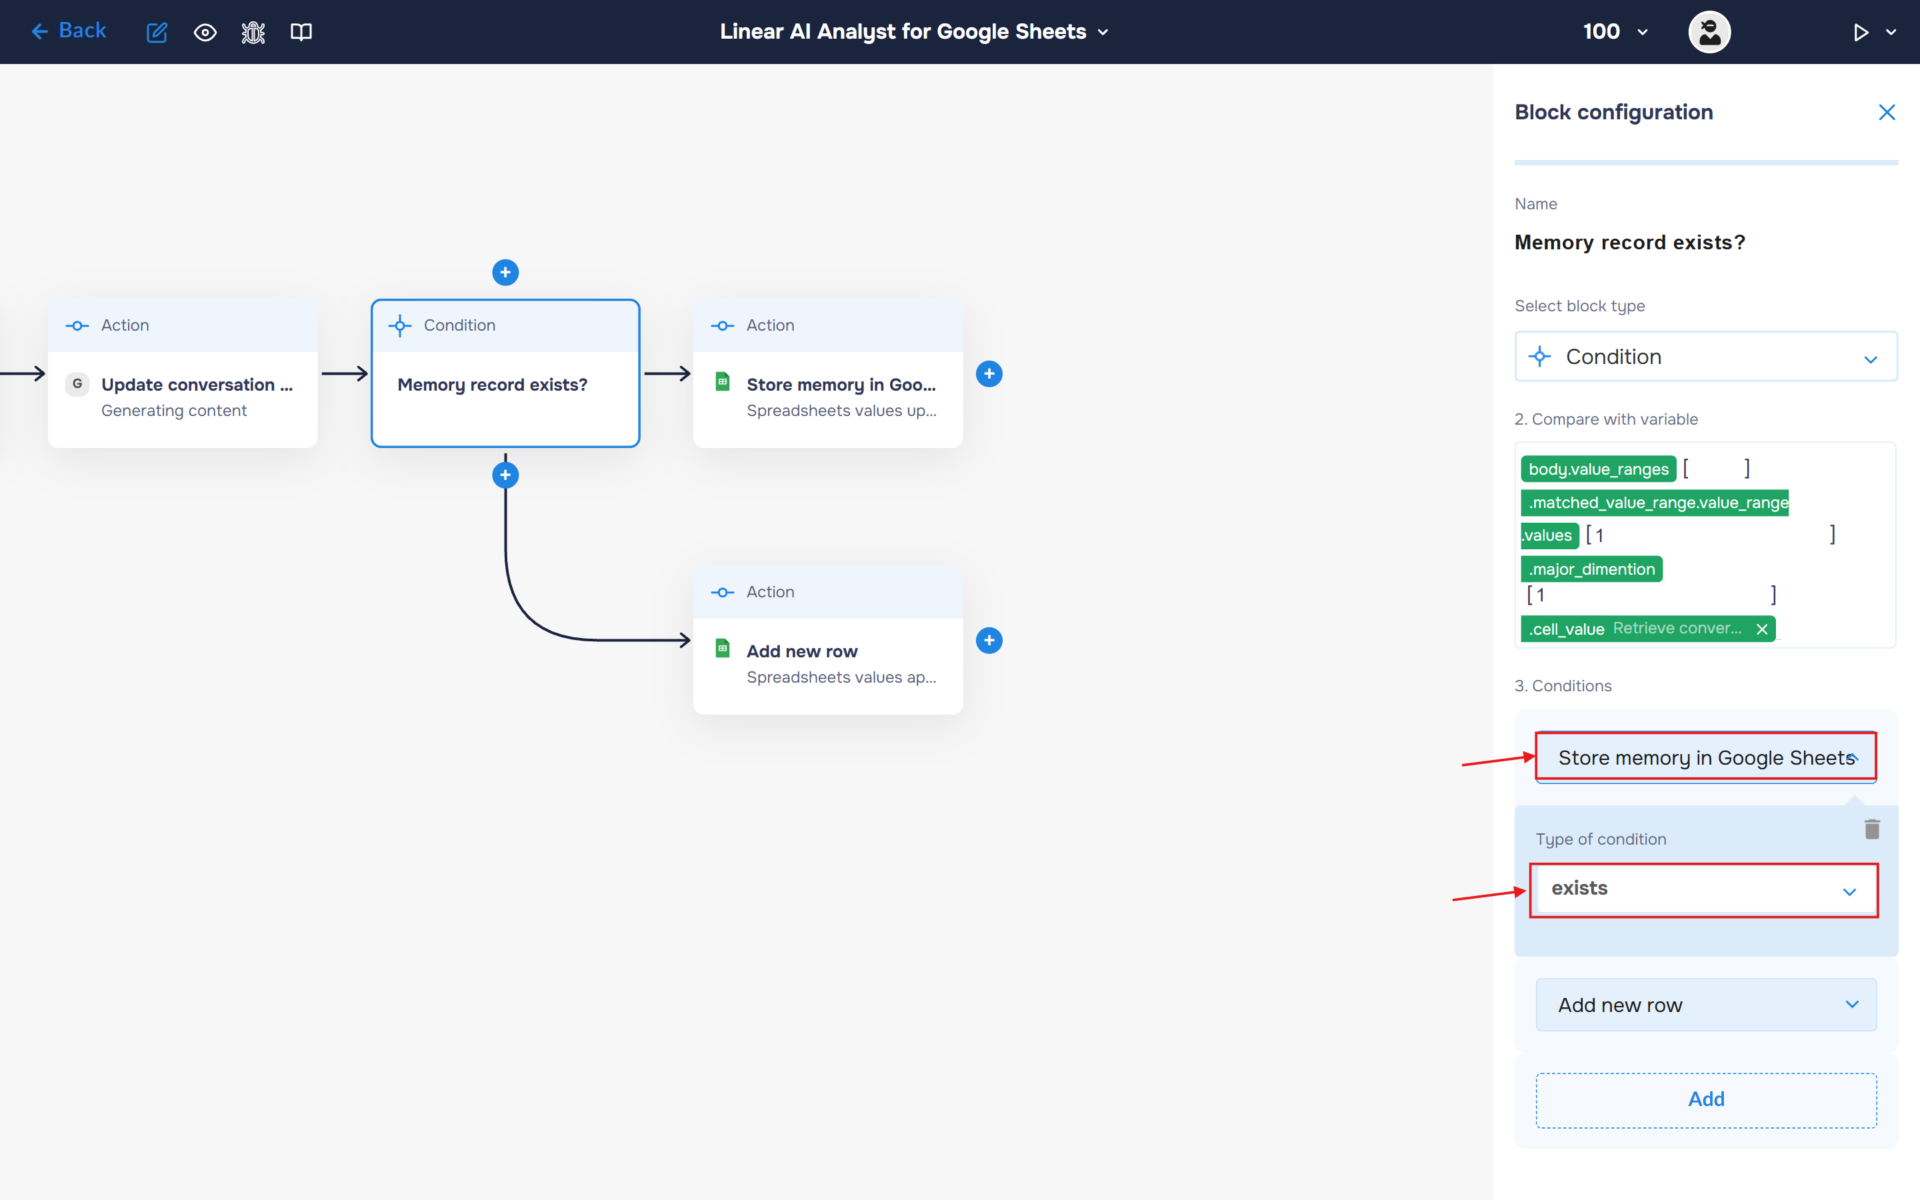
4. Add a new block to handle cases where the Chat ID exist. Name this block “Update context in the sheet”. In the “Conditions” section, expand the newly created block and set “Type of Condition” to “Exists”.
5. Fill in the “Update Context in the Sheet” block to save the updated conversation state back into Google Sheets.
- Select the block type as “Action” and the service as “Google Sheets“.
- Choose an account and select it. Note: choose the account where you created the table at the beginning of the guide.
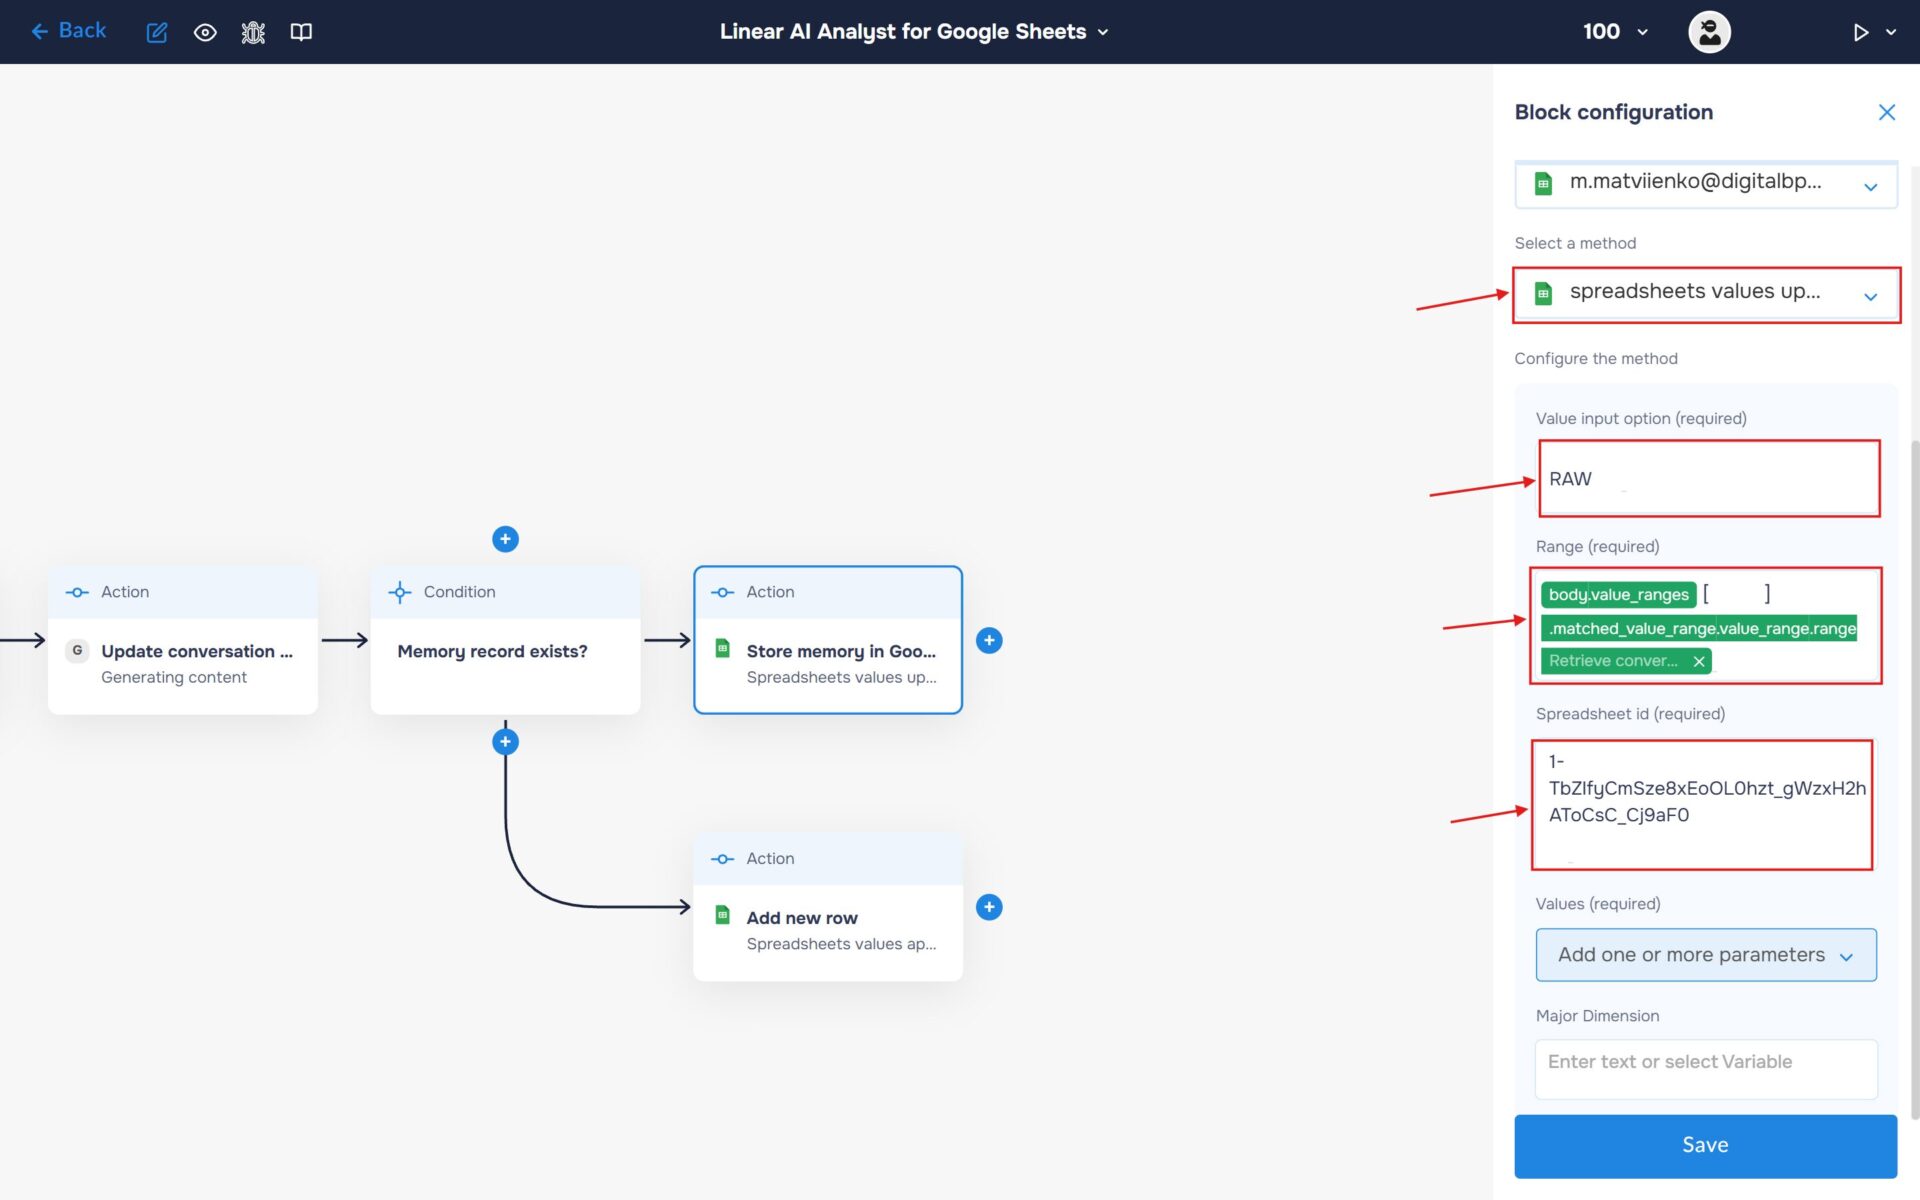
- Find and select the “spreadsheet values update” method. Use this method to add new row to the sheet.
- In the “Value input option” field, enter the value “RAW”.
- In the “Range” field, enter the cell range that was returned as a result of the“Get Context” block execution. This ensures that the system updates the correct row associated with the current Chat ID.
- Enter the spreadsheet identifier in the “Spreadsheet ID” field.
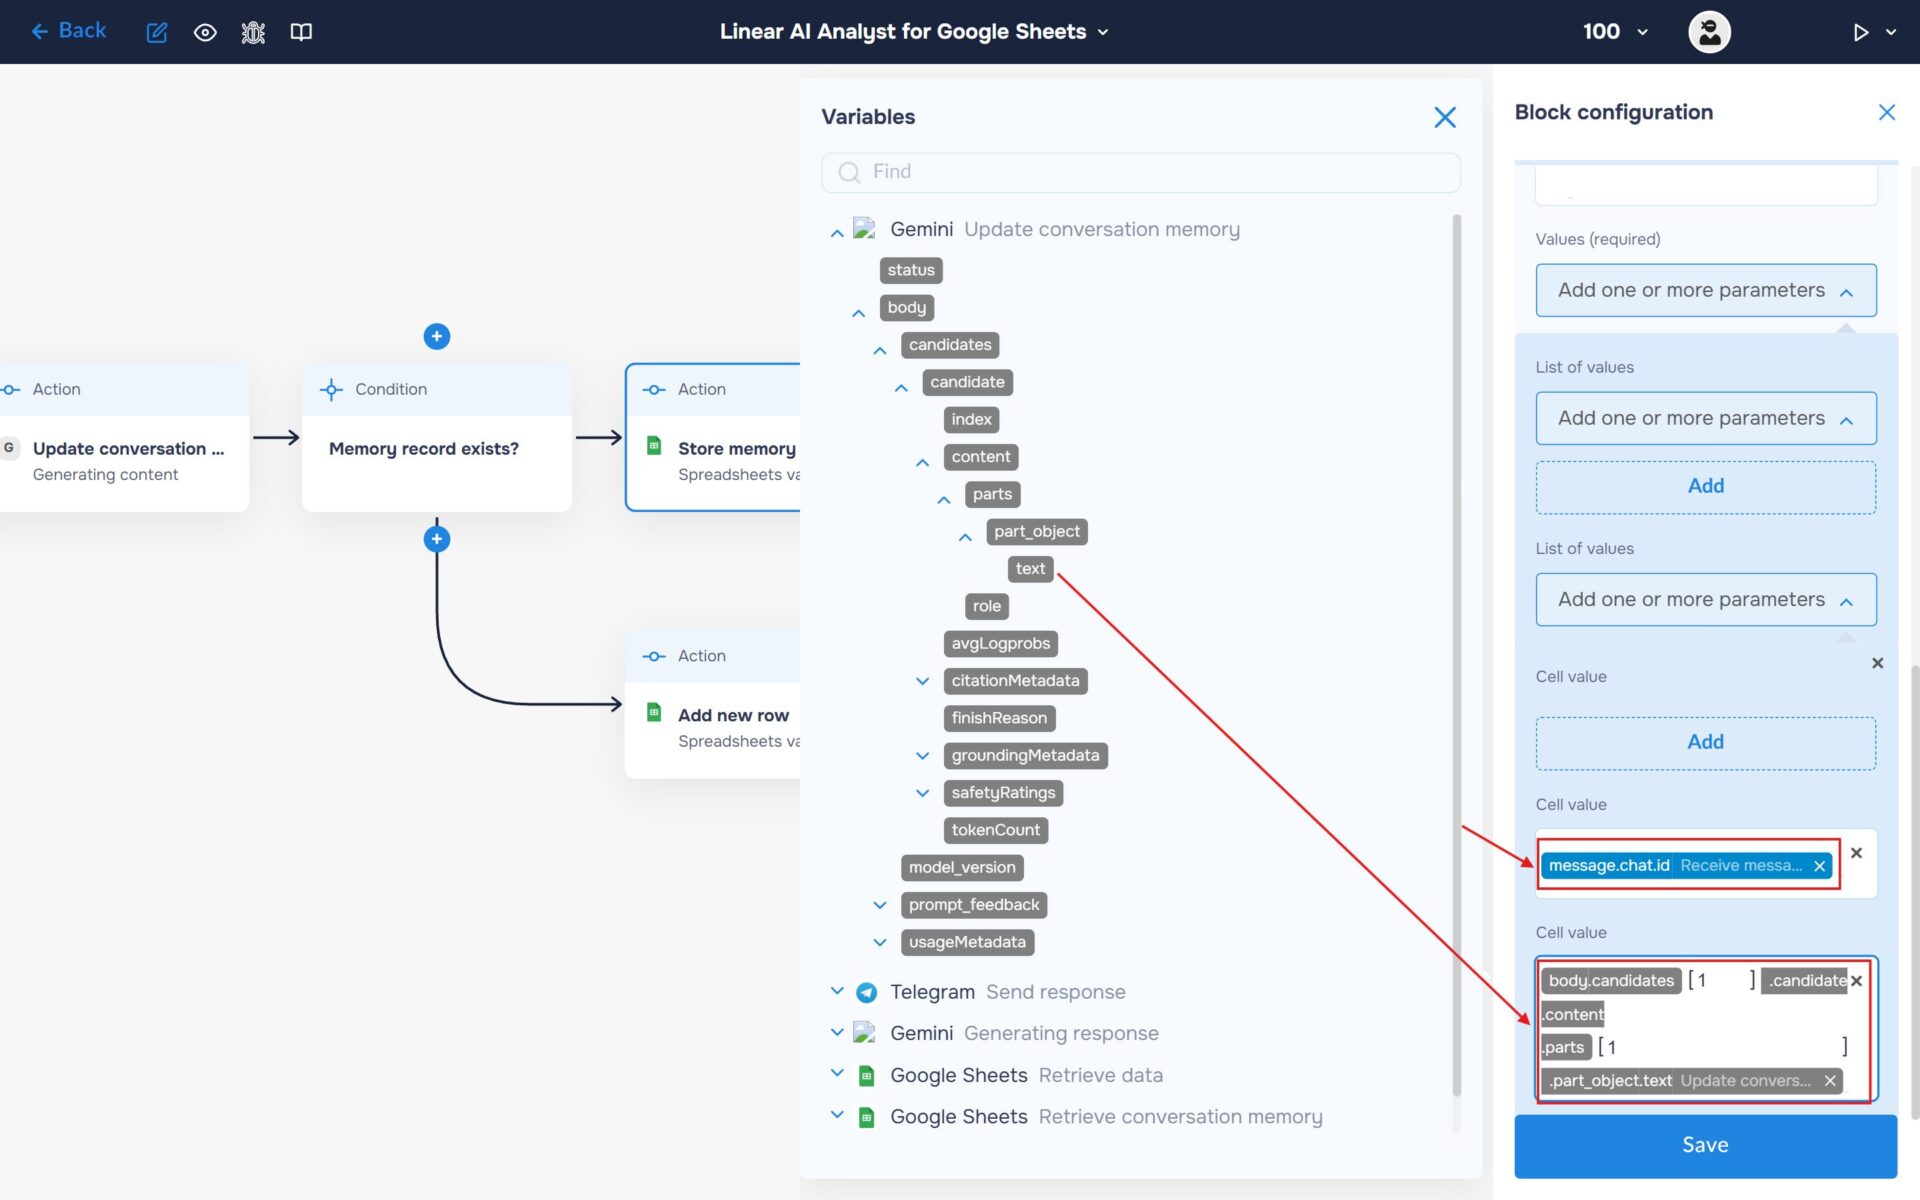
6. Expand the “Add one or more parameters” section and add two “Cell Value” fields:
- In the first Cell Value, insert the Chat ID (used to identify the user record in the spreadsheet).
- In the second Cell Value, insert the generated updated conversation summary from Gemini.
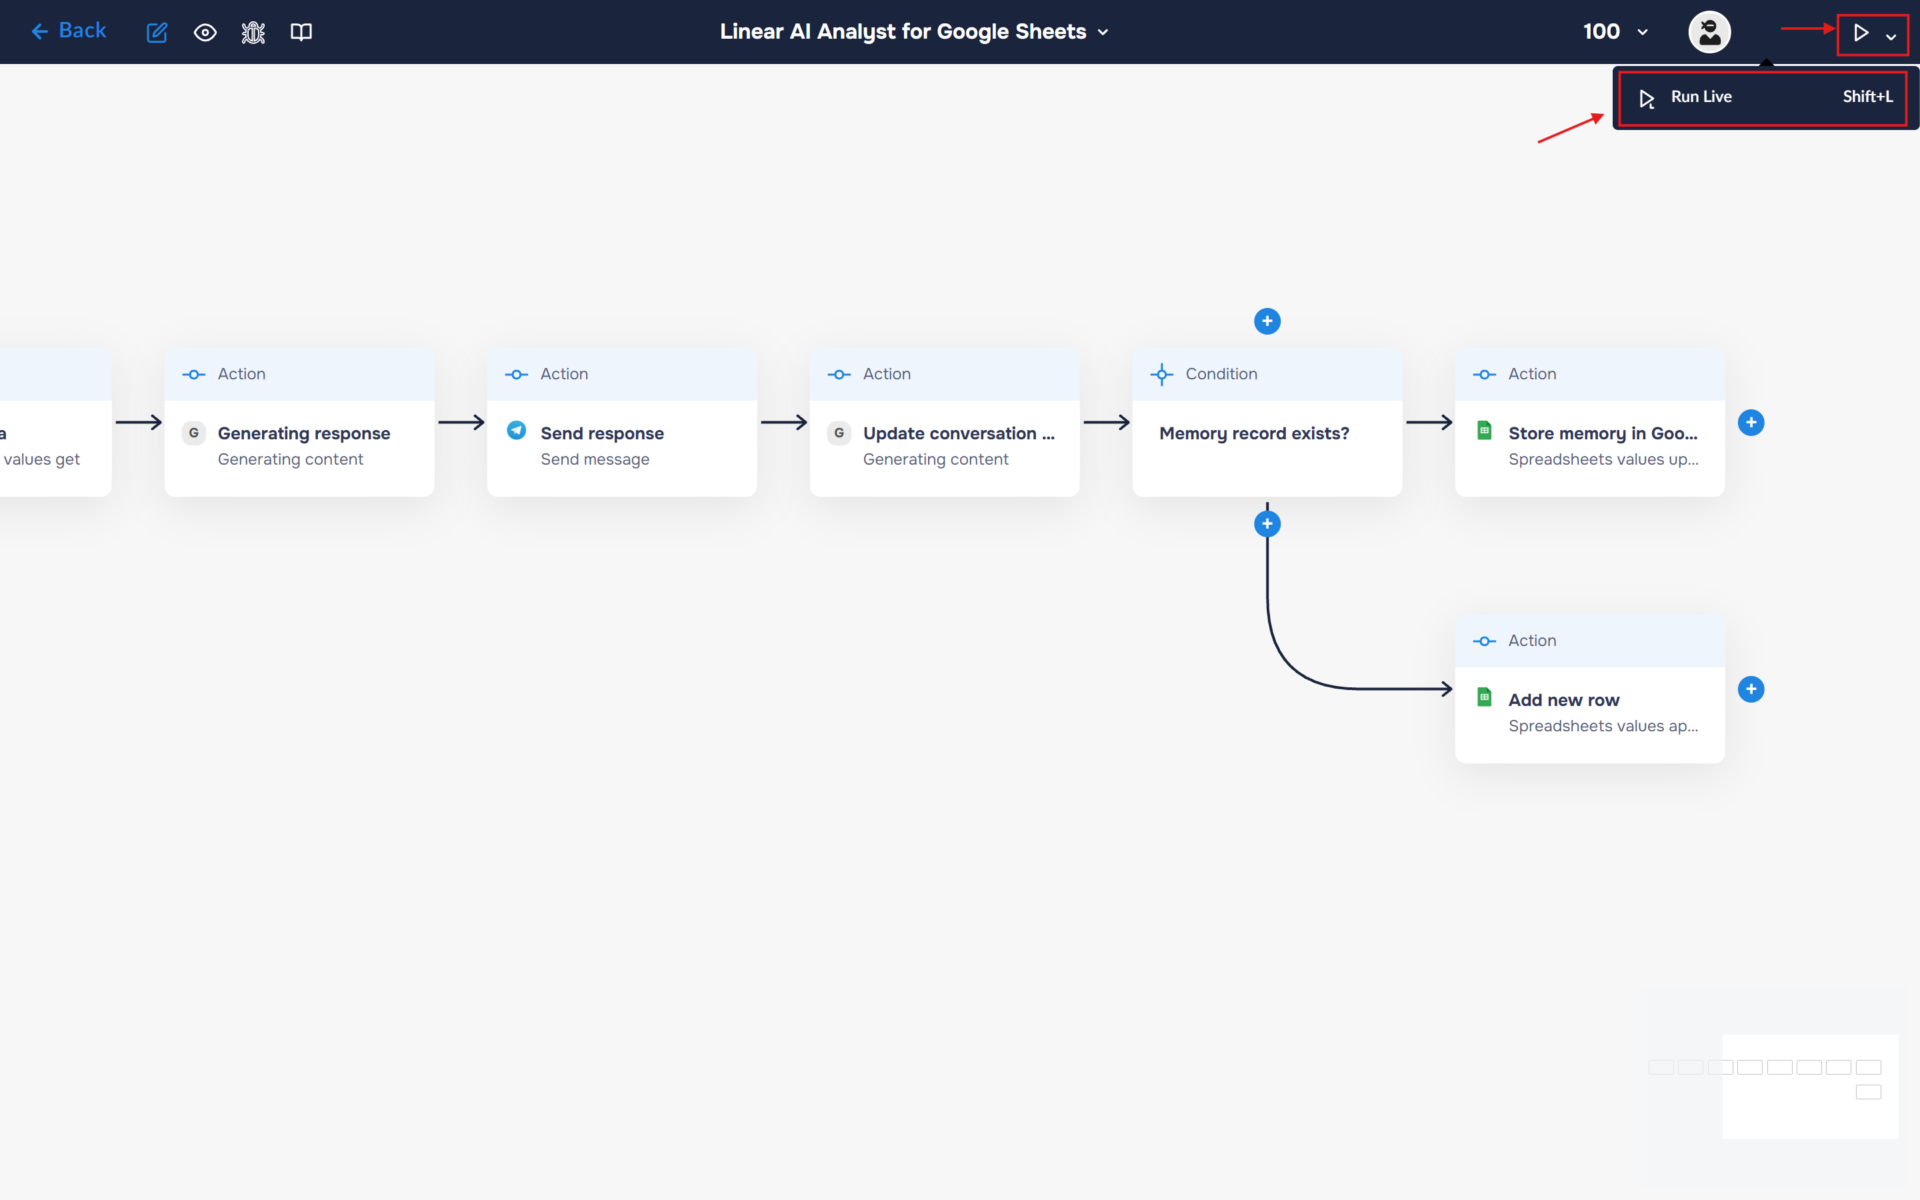
Run to execute a workflow
1. Your workflow is now fully configured. Let’s try running it. To do this, click the “Run” icon in the top-right corner of the workflow builder and select “Run Live”, or use the keyboard shortcut “Shift+L“. If the launch is successful, the icon color will change from white to blue, and an “L” will appear next to it.
2. Congratulations! You have successfully built an autonomous AI-powered data analysis workflow.
The system now automatically retrieves structured data from Google Sheets, processes user questions using an AI Analyst, and generates accurate, data-driven responses using Gemini. In addition, it maintains conversation memory through a lightweight summarization mechanism, allowing the AI to preserve context without storing full chat history.
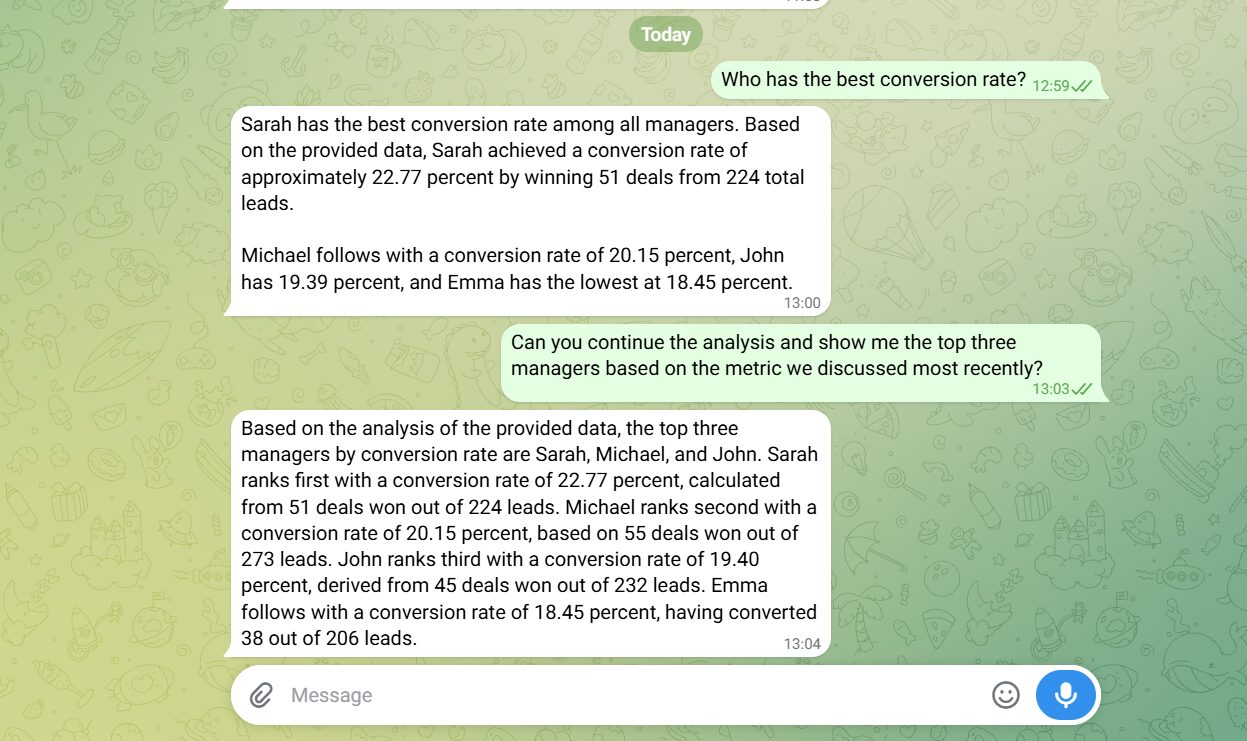
The final response is then delivered directly to the user, while the updated context is saved back into Google Sheets for future interactions on the schedule you configured.