About This Guide
The main goal of this guide is to help you optimize the data collection process for further analysis, reducing manual effort and enabling data storage in the Google Sheets of your account.
This guide is a step-by-step instruction that will allow you to create an automated workflow for collecting statistics for a specified video from the TikTok platform. It explains how to integrate TikTok with Google Sheets to retrieve daily data using the DigitalBPM service.
Who Is This Guide For?
This guide will help both new and old users to create an effective workflow for collecting statistics by the specified parameters.
Marketers and SMM specialists who use TikTok and want to get analytics to analyse the effectiveness of videos as easily as possible.
“Content creators who create videos on their own and want to easily track their performance and popularity statistics. Analysts and business owners who use TikTok as one of their promotion tools and need an automated solution for monitoring and collecting data.”
Viktor Kirianov
Before you start…
Before you start creating a workflow, make sure you have everything you need:
- A DigitalBPM account.
- To analyze the data later, you need a place to store it, and the best option is Google Sheets. Create a spreadsheet on your Google Drive. For reference, you can use the example provided below. Important note: please add a “Date” row with the formula =TODAY().

If you’re ready, let’s get started!
Create a new workflow and first block
1. The first thing you need to do is to sign in to your DigitalBPM account and click on the “+ Workflow” button on the “Automation” page.

2. Next, you need to enter a name for your workflow, for example, “Save Statistics for a Specified TikTok Video in a Spreadsheet” and click “OK“.

3. After confirming the creation of a workflow, its builder opens. To add the first block, click the “+ Add first block” button.

4. Next, you need to configure the first block. This block is responsible for triggering the workflow on a set schedule. To do this, click on the block to open the “Block Configuration” panel, and select the block type “Schedule”.

5. The workflow activation period is set to Daily by default. Set the trigger time to the desired one; for example, we will collect statistics for the table daily at 9:00 AM. Save the settings by clicking the “Save” button.

6. Click on the “Name” field and fill in a clear name for what happens in the block, for example, “Execute a trigger at a set time”. With this step, you can quickly find out what the block is for.

Add integration with the TikTok service
1. Next, you need to add a block with the TikTok service to retrieve information about the specified video by its identifier.
To add a new block, click the “+” button to the right of the existing block.

2. In the “Block Configuration“ panel, click on the “1. Select block type“ field and select the “Execute” type.

3. Next, you need to add the TikTok service by clicking on the field “2. Select trigger app“; find and select the TikTok service.

4. To connect to TikTok, you need to create an authorisation. Click on the “Sign in“ button in the “3. Select an account“ section.

5. After clicking the button, you will be redirected to a tab for TikTok authorization. You need to select an authorization method and complete all the required steps.

6. If the authorization is successful, the created authorization will appear in the “Select an account” field. You need to select this authorization to configure the next steps of the block.
When expanding this field, you have the opportunity to delete created authorisations using the “Edit existed” button or connect new accounts.

7. The next step is to select a method, so click on the “4. Select a method“. Find and select the “query videos” method.
The method is designed to verify that the video belongs to the user, and if so, returns video details. Up to 20 video IDs can be included per request to retrieve information.

8. It is mandatory to fill in the “fields” field – for which we want to retrieve information. Since we are collecting statistics, we want to obtain the following information: the number of likes, the number of comments, the number of views, and the video title. Therefore, this field should include: like_count, comment_count, view_count, title.

9. The next required field is the video identifier for which you need to retrieve information. To do this, go to your TikTok account and select the video you want to get information about. Copy the identifier from the link. For more details, see the image below.

10. Expand the “Filter” field and add a field for entering the video identifier. Paste the copied identifier from the previous step into the newly added field. Save the block configuration.

Add integration with Google Sheets
1. Add a new block. Select the block type as “Execute” and the service as “Google Sheets“. Next, create an authorisation. To do this, click the “Sign in” button.

2. Choose an account. Note: choose the account where you created the table at the beginning of the guide.

3. After choosing an account, you need to go through all the steps to connect your account to the DigitalBPM service.

4. If the authorization is successful, the created authorization will appear in the “Select an account” field. You need to select this authorization to configure the next steps of the block.

5. Find and select the “spreadsheets values get” method. Use this method to get a value for a selected range or cell. You need this method to get the current date from a spreadsheet.

6. Go to the table and copy the table ID located in the link.

7. In the “Range” field, enter the cell that contains the formula for the current date. This cell will update automatically every day. In the “Spreadsheet ID” field, paste the copied identifier from the previous step. Make sure to save the block settings by clicking the “Save” button.

8. The final step is to add a block to insert the data obtained from the TikTok block into the created spreadsheet. To do this, add a new block and select the type as “Execute“. Set the service to “Google Sheets” and choose the authorization from the existing one created in the previous block. To add new data to the end of the spreadsheet, you need to find and select the method “spreadsheets.values.append“.

9. Fill in the required fields for the selected method. In the “Value input option” field, enter the value “RAW” – How the input data should be interpreted. It is either RAW (The values the user has entered will not be parsed and will be stored as-is.) or USER_ENTERED (The values will be parsed as if the user typed them into the UI. Numbers will stay as numbers, but strings may be converted to numbers, dates, etc. following the same rules that are applied when entering text into a cell via the Google Sheets UI).;
in the “Range to append” field, enter the range of the table headers or the first row where the first data will be placed;
and enter the spreadsheet identifier in the “Spreadsheet ID” field. Don’t forget to save the block configuration.

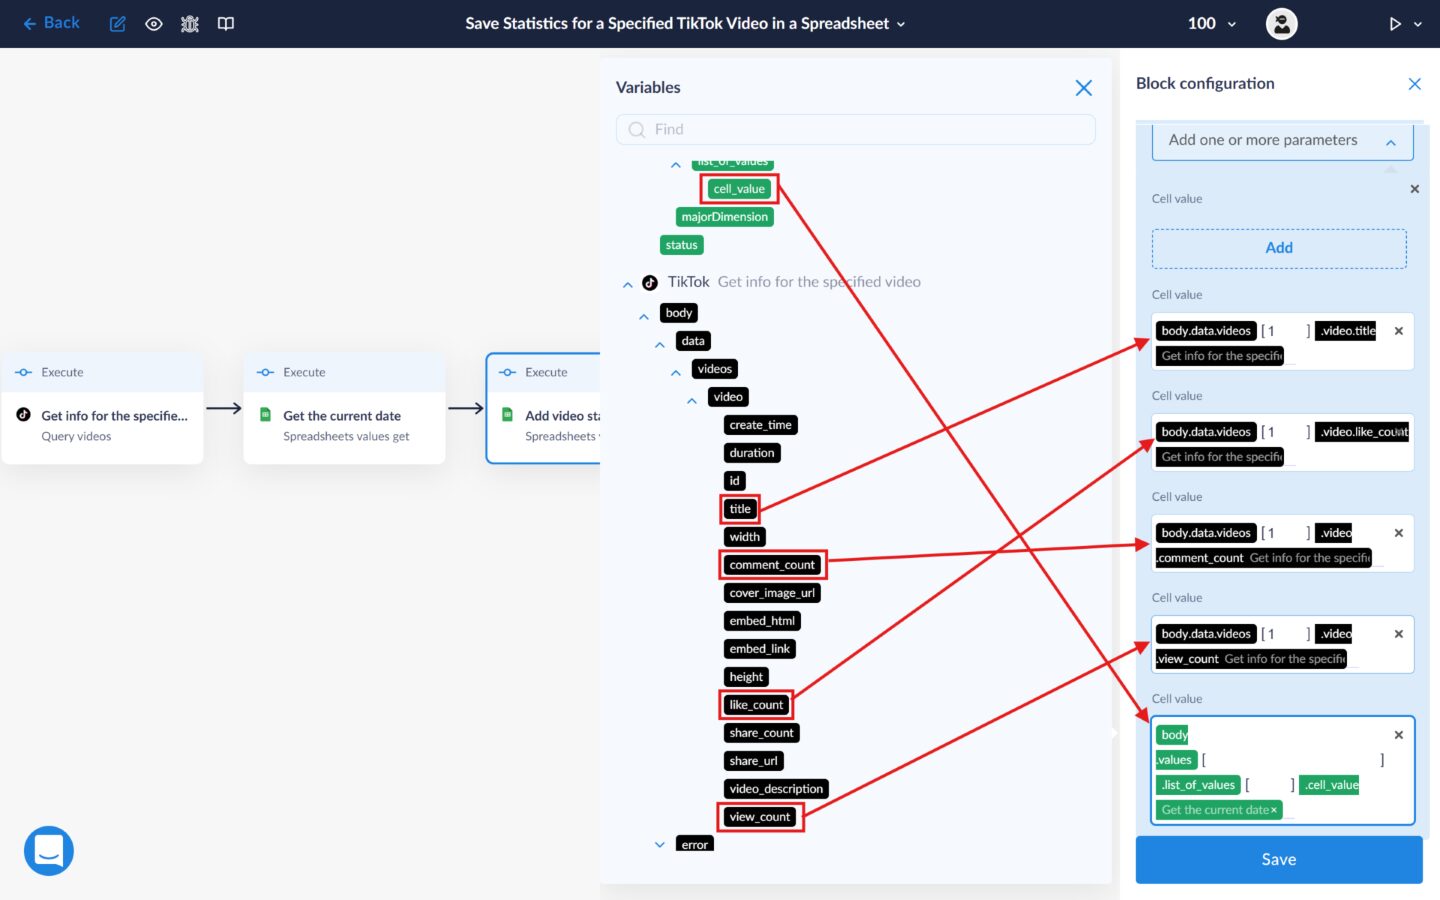
10. Now let’s add the TikTok information to the spreadsheet. Expand the “List of Values” and create the first list, which corresponds to the row we will be adding. For the created list, add the fields that correspond to the cells. We need to fill five cells, so create five fields. In the first field, in the “Variables” panel, find and select the variable that corresponds to the video title (body -> data -> videos -> video -> title); in the second field, enter the number of likes (body -> data -> videos -> video -> like_count); in the third field, add the number of comments (body -> data -> videos -> video -> comment_count); in the fourth field, enter the number of views (body -> data -> videos -> video -> view_count); in the last field, add the current date, which we obtained in block three from Google Sheets. Therefore, we will add the corresponding variable containing this value (body -> values -> list_of_values -> cell_value). Then, save the block settings.
Run to execute a workflow
1. Your workflow is now fully configured. Let’s try running it. To do this, click the “Run” icon in the top-right corner of the workflow builder and select “Run Live”, or use the keyboard shortcut “Shift+L“. If the launch is successful, the icon color will change from white to blue, and an “L” will appear next to it.

2. Let’s rename the blocks to quickly identify their purpose later. To do this, select a block and, in the “Block Configuration” panel, enter a clear name in the “Name” field. For example, name the second block “Get info for the specified video,” the third block “Get the current date,” and the fourth block “Add video statistics.”

3. Congratulations! You can now automatically save video statistics daily and, when needed, easily create charts and graphs for the collected data to perform analysis.